Our newest tech article, check it out if you plan on installing an underdrive crank pulley on your 2010 SS.
http://www.planetlsx.com/tech/How_To..._Camaro_SS/105
Tony
 We show you how to install an underdrive crank pulley in your 5th generation Camaro...
Introduction
There are a slew of modifications for your LS-powered vehicles that physically make more horsepower and torque - such as camshafts, ported heads, and exhaust. While they increase power by increasing airflow and/ or engine efficiency, they are not considered parasitic loss items. Parasitic loss components use up some of the already determined engine-produced power, and these items can include the accessories driven off the front of the crankshaft. When modifying your engine to increase performance by manipulating existing accessories, you can free up power that the engine already makes that is eaten up by the parasitic drag, from rotating accessories like the alternator and power steering. The fix is not removing the belt and forgetting these components exist, rather there is a simple bolt-on item in the form of a undersized crankshaft drive pulley that will change the rotational speed of the accessories, and slow them down to a minimal speed required. The easiest way to think of this modification helping is to think of a 10-speed bicycle. in low gear, you are putting forth minimum effort to maintain speed by utilizing a simple leverage system and higher RPM to maintain that speed. Stay at that same speed, but now change into the highest gear. Now you feel the load incurred by essentially changing the pulley size of the drive gear. It now takes more horsepower and effort to maintain that speed. The crankshaft pulley can be likened to the cranking side of the bikes drive system. Smaller diameter gears or pulleys take less HP to drive, larger requires more, the pulley size directly relating to belt travel per rotation. Simple enough.
The 2010 Camaro is no exception to the underdrive pulley rule. Adding an underdrive pulley to just about any car with belt-driven accessories is bound to free up a little power by reducing drag. With a few specialty tools some common hand tools and about an hour of time, you too can have almost free HP gains with your own 2010 Camaro! The proper removal and installation tools are what determine the hardness level, without the proper tools, you could spend hours attempting this install. Don't try this without access to the proper equipment.
Skill Level
Low-Medium
Estimated Time Required
Approximately 1 hour
Parts List
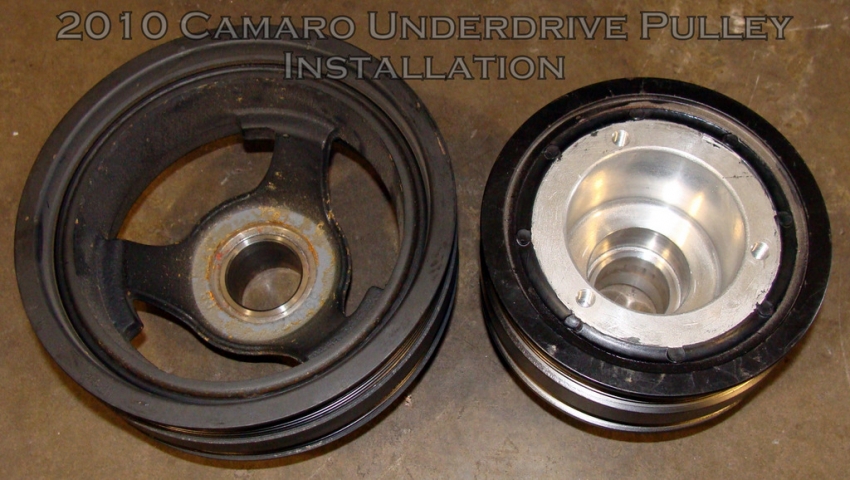
25% Underdrive pulley for 2010 Camaro
Proper main serpentine belt
Proper A/C belt
New GM crankshaft bolt
New GM crankshaft front seal (optional)
Tools Required
Flat-tipped screwdriver
10mm deep socket
15mm wrench
15/16" or 24mm deep socket or shallow with 4" extension (1/2" drive 6-point)
Long 1/2" breaker bar
3-Jaw crankshaft pulley remover (rental is available from "convenience style" auto parts stores)
M16 x 2.0 threaded rod and hardware for re-installation
Torque wrench up to 250 lb ft. or portly friend
Angle torque gage or suitable replacement
Seal remover (if seal replaced)
Scissors or knife to cut old A/C belt
Installation
1. Disconnect Battery, it is located in the trunk where you would assume a spare tire would reside. Instead you will find a small air compressor, some tire sealant and the battery. Disconnect the negative cable with a 10mm deep socket and remove cable from battery.
2. Remove Factory or Aftermarket Air induction for improved access to front of engine. The stock airbox has (2) 10mm sized retention nuts on the inner fenderwell. Remove the Mass Air Flow Connector, and then loosen the screw clamp to the throttle body. Firmly remove the airbox assembly, it take a little tug to remove it from the lower rubber grommeted pin and set aside.
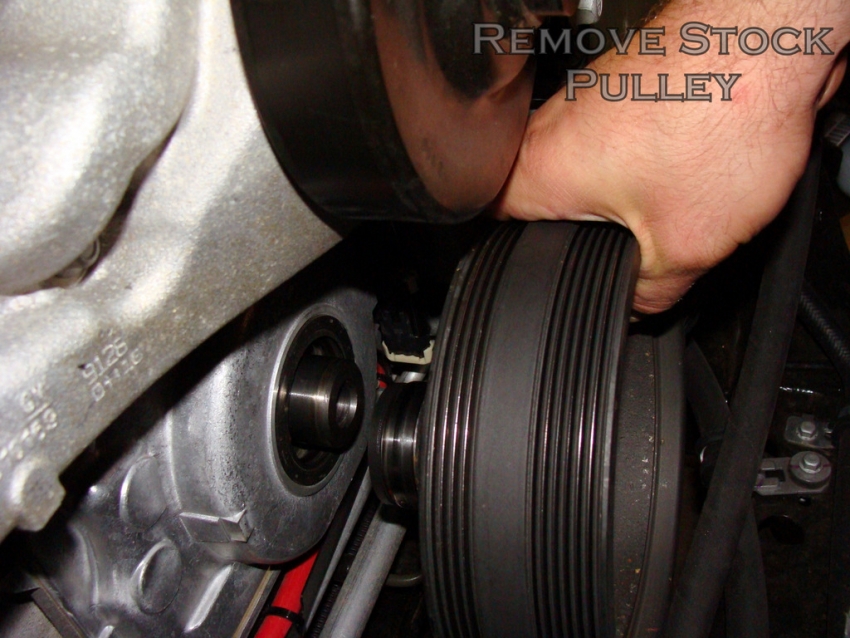
3. Remove the main accessory drive belt, noting its routing, it is similiar to 4th generation F-bodies. Remove tension from the main belt tensioner by using the 15mm wrench on the tensioner and pushing in towards the centerline of the engine. Remove old belt and set aside, it will not be reused with the new pulley.
4. Take a look at the A/C belt, yes there is no tensioner present. GM uses what is called by some as a stretchy belt. Which is a fancy name for a normal belt that is stretched to install. Since no one but the dealership will have the proper removal tool, you can do one of two things here: Quickest and easiest is to cut the belt off, which is not reused anyway, or you can leverage the belt out of place and attempt to jump the belt off by rotating the crankshaft pulley by hand while holding the belt mis-aligned. When that fails break out your knife and just cut it off.
5. If you have a 6-Speed Manual car, this next step is easy. Put the car in 4th gear, and set the parking brake. You may also want to chock the tires from moving if your parking brake is not holding. Now take the breaker bar with the 15/16" or 24mm socket and loosen the crankshaft center bolt. It will take some effort. Set the old bolt aside once removed. If you have a 6-Speed Auto Camaro, you will need to either use a big impact gun on the crank bolt, or find a way to lock down the crankshaft from turning. Many people report good results by using a long screwdriver or prybar holding the flexplate from turning. You would likely need a 2nd set of hands if so.
6. Using the 3-jawed puller and proper spacers/pushrod for removal affix the pulley puller to the stock crankshaft pulley with the 3-jaws all located on a flat or notched surface. The initial removal might take some extra effort for the first budge of the pulley, but after that it should be removed easily. When removed, set the pulley aside. The pulley is obviously not reused.
7. If you choose to replace the crankshaft front cover seal, use a long screwdriver or seal remover to dislodge the crank seal. Use a small hammer and a socket or spacer to reinstall the new seal, it is quite easy to pop into place, sometimes as easily as by hand.
8. Place your new crankshaft pulley into place on the end of the crankshaft, it should stay in place by itself, but if not hold it while installing the long M16 x 2.0 threaded rod. Some forum members sell this installation tool, but for about $10 you can make your own with a length of threaded rod cut to size a few M16 x 2.0 nuts and a stack of washers that will push against the inside of the new crankshaft pulley.
9. Thread the pulley installation tool into the crankshaft and once threaded in sufficiently, you may start the press-on procedure. Thread the installation press nut in until the crankshaft pulley seats all the way against the lower timing gear. You will know when it bottoms out. While pressing the pulley on, make sure the pulley is squarely installing over the crankshaft stub and not going on crooked.
10. Once the new crankshaft hub is installed, you can now seat the pulley using the old crankshaft pulley bolt. Torque the bolt to 250lb ft, or as close to it as possible. For reference a 1 ft breaker bar is at 250lbs setting with a 250lb weight applied to the 1 ft mark; with a 2 ft breaker bar, it is at 250lb ft on the bolt with 175lbs of weight applied to the end of the breaker bar; with a 3 ft breaker bar, this is now 83.3lbs of weight. So the longer the breaker bar or torque wrench, the easier the leverage becomes as you tighten bolts to ungodly torque settings.
11. Remove the old crankshaft bolt and discard. Now you can tighten the new crankshaft bolt to specification. I like to use a smidge of loctite on the new bolt threads as cheap insurance. I always hear of crankshaft bolts loosening up, if loctite helps prevent it, that is what I want to use.
12. Torque the new crank bolt to 37 lb ft., mark the bolt and then turn the bolt an additional 140 degrees of rotation using the torque angle gage.
13. Now that the pulley is installed, assembly for the most part is backwards from disassembly.
14. Install the new A/C belt by first looping it behind the crankshaft pulley, then routing it over the A/C compressor pulley grooves in its correct location. Now depending on which way you rotate the crankshaft in the next step determines where to start "wrapping" the belt over the crankshaft pulley. I rotate clockwise, so I would start the belt at the top of the crankshaft pulley and as I rotate the crankshaft I hold the belt in place. Once stretched over the crankshaft pulley, you keep rotating the crankshaft and the belt will continue to center itself until it finally will snap into place. A few more turns insures the belt is locked into its groove.
15. Install the main drive belt by following the belt routing schematic or by just routing it as so: First route the belt over the grooved tensioner, then follow the belt down and install it over the crankshaft pulley, from the crankshaft pulley, the belt is routed up to the smooth idler pulley, then back down to the alternator pulley, after the alternator, it is routed around the power steering and then is laid in front of the water pump.
16. Release the tensioner by levering it over towards the centerline of the engine and slide the belt into place under the water pump pulley.
17. Verify belts are in correct orientation, and reinstall your air induction using the supplied hardware, either OEM or Aftermarket
18. Reinstall battery ground cable and start the car up. You should notice no warning lights on the dash, shut off the car and do a final inspection of the belts for proper routing once again as sometimes they are not fully seated when initially installed.
19. Shut hood, taking care not to leave any tools in the engine bay.
20. Give yourself a high-five, you just installed one of the many easy bolt-on modifications for your 2010 Camaro SS!
Conclusion
As is the case with most bolt-on componentry, the pulley change usually requires no additional tuning. It is one of the modifications that you can bolt-on and go without changing your driving technique; and does not substantially affect cooling, power steering effort or alternator charging. The only time you may see a detrimental effect from a pulley swap is when your vehicle is equipped with a larger stereo system, due to the increased load placed on the vehicles electrical system. If that is the case, you may be able to employ a smaller alternator pulley to speed up the charging system to the same speed as before the pulley, but most people would not require the overdrive alternator pulley.

On to the dyno results from the 2010 Camaro pulley swap; the LS3 picked up right at
9.5 hp and 8 lb-ft of torque to the rear wheels. Notice from the graph that this is not a gain at only high or low engine RPM, it is a gain that is highlighted through the entire RPM range. The addition of a pulley to your 2010 Camaro will increase approximately the same amount, whether you are a stock engine, or have a larger cubic inch engine. Many aftermarket pulleys are also keyed, so that if you utilize an aftermarket crankshaft with a keyway, or use a crankshaft "vertical" style pin kit from ATI Performance, the new pulley will be locked into place no matter what level of RPM abuse you put it through. The use of any type of pinning kit is recommended anytime power adders are implemented to your LS-equipped vehicle.
Extra Note on Specialty-Type Tools
The OEM crankshaft balancer pulley can be removed with any large 3-jawed puller and any solid object set against the crank to pull against. The pulley puller I use is specific to the LS-Engine and a few Mopar styles of balancers. It uses a "pushrod" to push against the crankshaft near where the end of the inner crankshaft threads are. I believe Autozone loans these types of pulley pullers out for a deposit, but you may need a longer "pushrod" than what theirs are equipped with, the length required is about 7.2" and just so happens to be in the 5/16" diameter, so if you have some old LT1 hardened pushrods, here is your chance to use them to gain power for once.

The threaded rod used in the photographs is cut from about a 4 foot length of hardened all-thread purchased from a bolt supply store (M16 X 2.0), you will need a stack of washers or spacers, about 8-10 inches of threaded rod, and the properly threaded nut to press the new balancer on. This is the recommended method due to full thread engagement being used against the stock crankshaft threads to pull the balancer into place. When you use just a longer bolt, you are inducing friction on the threads, and also not fully engaging all of the threads in the crankshaft. When using a threaded installation rod, you are still applying the same force, but the load is spread out further than the just 1-5 threads a longer bolt would grab. I have used both methods in the past, but after stripping out a crankshaft and overnighting in a M16 tap, I will not go back to the "long bolt" method...ever.