Alright, I'm finally getting around to putting together this thread on the installation of my Noweeds exhaust diverter system. Sorry it took so long for me to get around to this - been busy.
First a bit of background. Noweeds stands for No Weld Electronic Exhaust Diverter System. By no weld they mean bold on. You have to cut your stock system however it really is BOLT-ON. And the best part, if you ever want/need to return the car to stock, you just undo the clamps, swap-out the valve assemblies for the stock pipes you cut out, tighten up the clamps and you’re back to stock. I know some were worried about emissions testing down the road. This is your solution. It’s also important to point out that these are exhaust DIVERTERS not cut-outs. While the theory is the same (allow for wide-open exhaust right after the Cats) only a diverter system CLOSES the stock exhaust while it opens the cut-outs. Of course if you cut a big hole in the side of your exhaust system behind the Cats most of the exhaust will escape through this “path of least resistance”. However some will still inevitably go down the stock pipes. Diverters prevent this. And for those that say the Noweeds system puts a sharp 90 degree turn in the stock exhause routing that wasn’t there before (see below pics) I beg to differ. If you look inside the pipes you’ll see that the Y-pipe they have used (the part that looks like a lowercase “h” is actually wide-open inside. So the air flow s/b just as free as stock IMHO.
The instructions provided are excellent so you don’t really need this thread. However I have provided below a supplement to the instructions provided in the kit. This thread is in NO WAY a replacement to the instructions provided by Noweeds or a replacement for common sense. Read and follow the instructions carefully, particularly the safety precautions! I’ve simply provided an overview of the major steps below, added a few tips I thought were useful and some additional photos not in the instructions (yes the instructions have full colour photos) and I’m doing this to show just how easy this install really was. I should also mention that I am in no way affiliated with or paid by Noweeds to market their product. I am doing this write-up b/c I love working on my car and I think this product rocks. I will also add that my interactions with Steve the owner of Noweeds was excellent and their customer service is second to none. Steve has a thread on these boards (
http://www.camaro5.com/forums/showthread.php?t=7027) and some videos etc. on their site (
www.noweeds.net).
Enough talk, let’s get started.
First, be prepared. Get your tools ready after reading the instructions. I recommend a buddy help with this install. Not required but the extra set of hands is useful even if only to fetch more beer. In this case my buddy took most of the photos. This also meant that there were a few photos I wish we had taken along the way. Oh well.

Here’s the kit provided by Noweeds. Everything you can think of has been provided. Even the masking tape to mark for your cuts. I think they look damn good. Almost too good as they look even better than the stock pipes. I don’t know why, but to me this system looks professional, not ghetto.

In the above picture I have already mounted the switch to the provided switch plate. This allows for mounting the switch under the front edge of the driver’s seat as suggested in the instructions. The switch and switch plate are upside-down above (the thing with the grey wire running into it). I had a little trouble with the retainer brackets on the switch. When you tighten them down they want to kick-out. So I came up with a little fix for this to keep them in tight to the switch body simply by putting a zip-tie around the whole thing before tightening the nuts. Forgot to take a picture of that until after it was in the car

.

OK, onto the heavy lifting. If working without a lift this is probably the most difficult part of the whole thing. Also dangerous. Work slowly and use common sense. If you have a lift, lucky you. Stop laughing at the rest of us and move on. To start I ran the front of the car up on my homemade ramps (can be seen in a later pic) to get enough clearance for my jack to go right under the centre cross member. Just to be safe, block the rear wheels (+ parking brake on of course). Also to be safe I put a 2’ 2x6” between the jack and the cross member so I’m spreading the load some. If working without a lift you’ll want to get it as high as possible. This may require raising each end a bit at a time. Once the front was up I moved to the rear. I hate corner jacking unless it’s an emergency. So I cut a piece of 2x4 the right size to allow me to centre jack the rear as well. There’s a good spot directly under the rear diff. where you’re actually lifting on the rear cradle, not the diff itself. (Sorry no pic.) Use jack stands! Can’t stress this enough. Jacks are for lifting, not holding a car.
Here she is airborne!

Now it’s time to remove the driver’s seat. “Say what! Remove the drivers seat!?! Are you for real!?” Actually, yes. The wiring is near impossible without doing this and it’s super easy to do. 2 T-40 Torx bolts at the rear, slide the seat back to unclip the front, unplug the wire harness and (carefully) lift out (it’s heavy). That’s it! Goes back in easy too. Here’s the seat after removal.

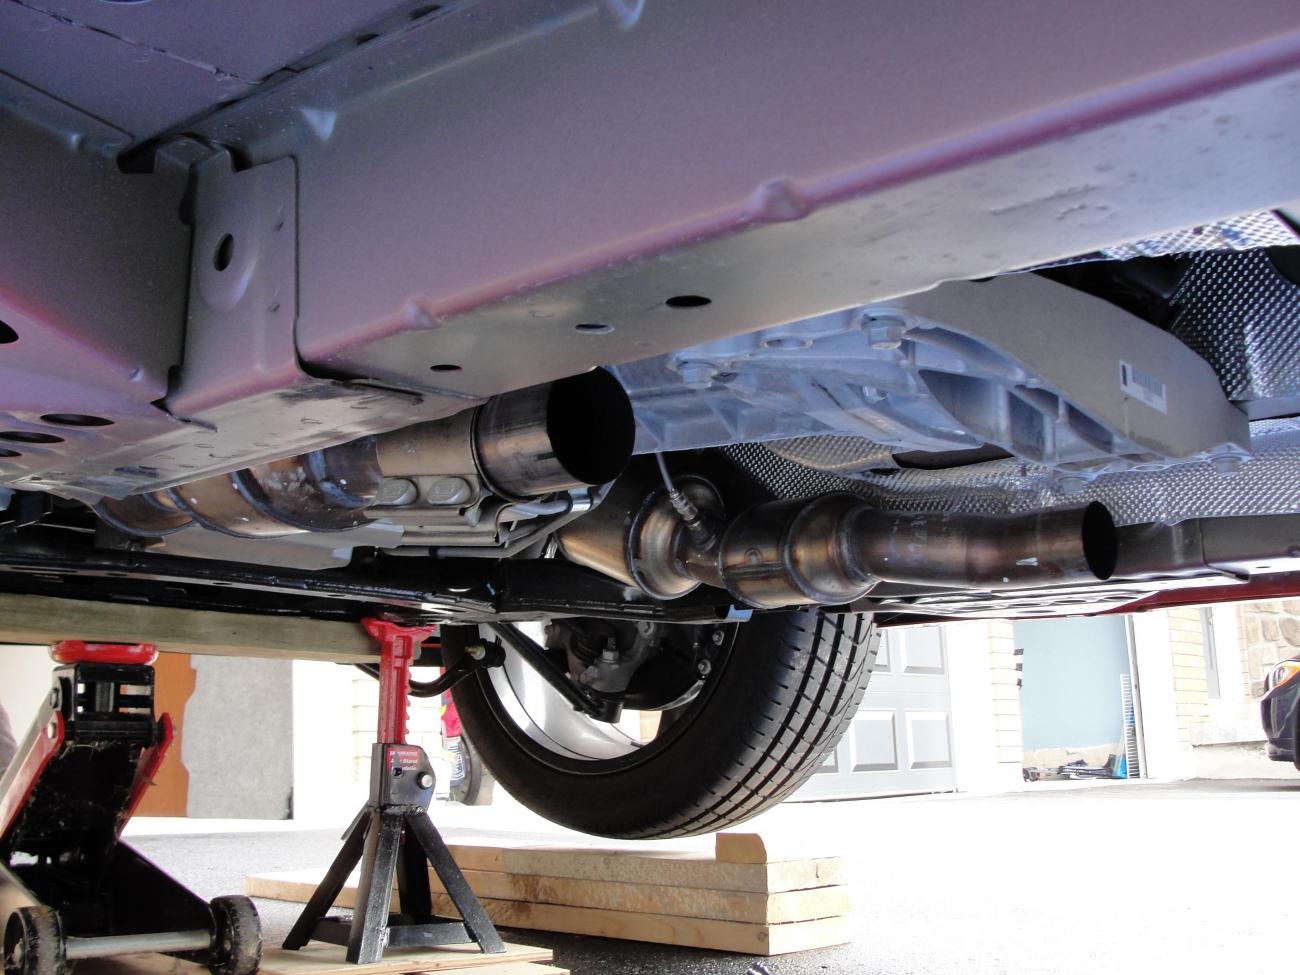
Under the car now. For those who don’t know, the Noweeds valve assemblies replace the “S” bend in the stock pipes between the Cats and the H pipe (or that big resignator thingy for the L99s). This means that the existing stock clamps are utilized and the stock pipes must be cut just in front of the H pipe. Working without a lift I found it easier to make my cuts by getting the stock pipes as low as possible. This is where I departed from the instructions slightly. I loosed the stock band clamps and slid them out of the way. To do this you need to first take a screwdriver and pry up the retaining clip on the stock clamp (catches a little knob on the stock pipes) and you may need to tap the clamp with a hammer and punch to slide. Note the passenger side stock clamp must be slid back, not forward. The rear section of the exhaust will now drop down and rest on the black cross member behind the H pipe. To get them even lower, I then removed that cross member. Have something ready to support the pipes. I found they came down a good 10” before the rubber hangers stopped them. The tips did not touch the rear facia. I used a milk crate to rest the pipes on to they weren’t prying on any hangers. Also gave a good firm bracing point for your buddy to hold the pipes during cutting. If you don’t have helping hands I’d suggest finding a way to secure them before cutting.
OK here I am cutting the second pipe. As you can see, don’t forget your safety glasses. Safety first (no this is not the Mole).

Here’s the finished cuts. I like to clean-up the cuts with a file. Not that I’m picky or anything.

And here’s the front end where the existing joint in the stock system is. Note the homemade car ramps (turned around just to get them out of the way). I should also note the jack is not supporting any weight in this picture.
Another small diversion from the instructions. I cut both sides at this time. Instructions = cut and install the driver’s side, then drill, then cut/install passenger side. Don’t think order makes any difference. The only thing I’ll add is it’s easier to drill the hole in the recommended location with both sides cut, but neither diverter installed. I also found it tricky to drill in the recommended location (can’t get drill in beside drive shaft). Later you’ll see where the hole is on the inside. An alternative location is possible but sticking with the recommended location I used a drill bit extension to get the right angle to drill easily. The good news is this location means less exposed wires on the outside and it’s nice and close to the desired location inside. Another tip. Anytime you make a hole into the passenger compartment of your vehicle that wasn’t there before, use some silicone. A bead around the grommet before installing and a shot in the grommet centre after the wires are in place will ensure no fumes or moisture can get in.
At this stage you’ll understand (and appreciate) why Noweeds left the assembly of the connectors on the ends of the wires going into the car for you to do. The small individual pins push through a small grommet with ease, reducing the size of the hole required. Good job guys! Grommet installed.

After pulling the wires, it’s time to hang the jewellery… errr I mean install the diverters. The instructions mention getting tight clearance (circled) to the cross member under the trans. So I got them real close. Later I realized that as the linear actuators move, they pivot up slightly. If too close to this cross member they touch it a bit. This shouldn’t be a problem since the system is over built. But to avoid the motors from rapping the cross member when open 50% and hitting bumps, I loosened the clamps and rotated them down to about a 1/4” gap.
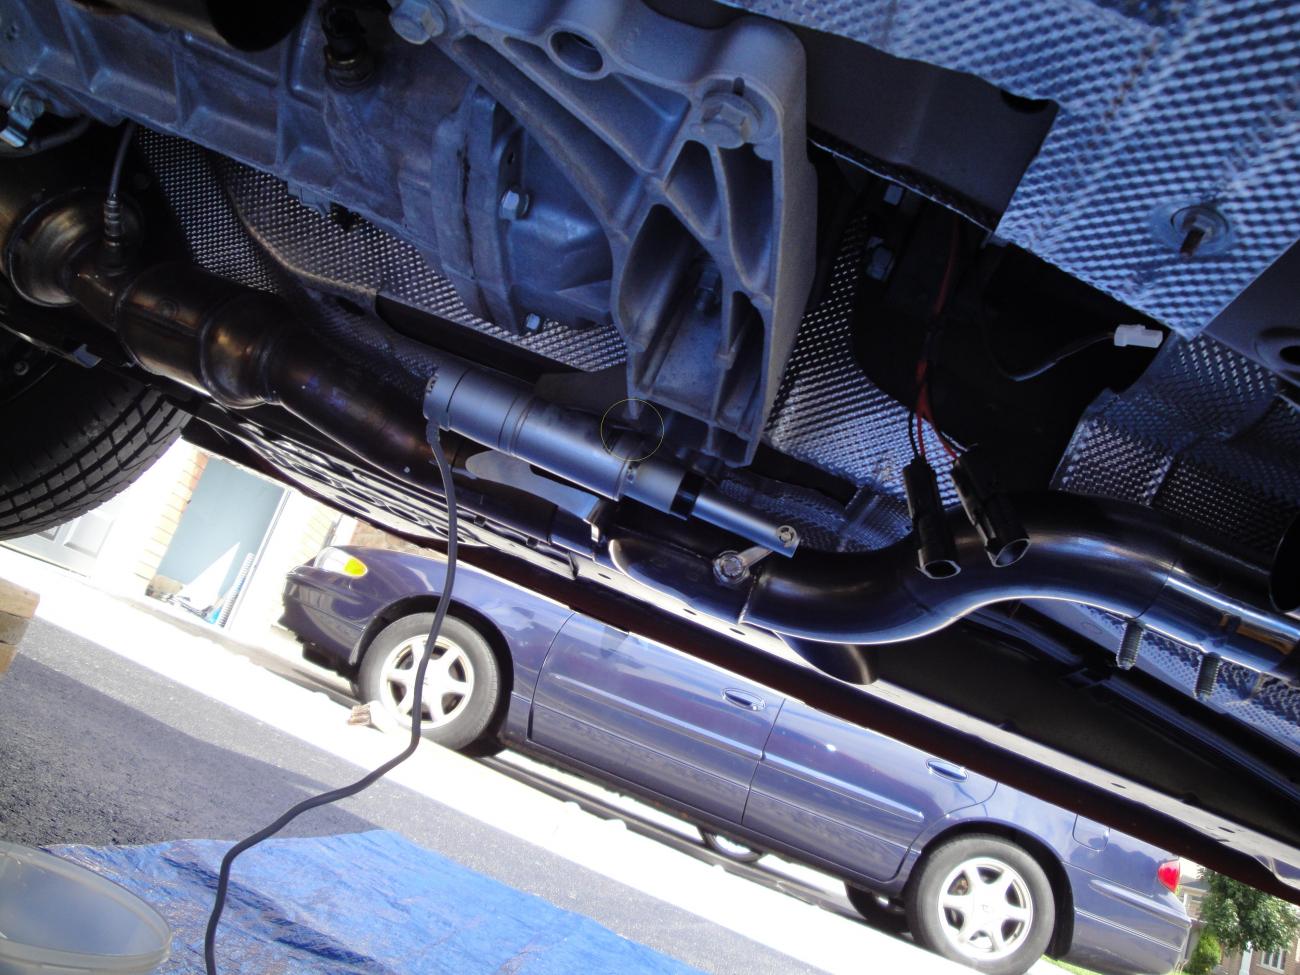
Second diverter installed. Tighten down your clamps slowly and evenly on both sides. Once everything is tightened down clean up your wires underneath. I found I was able to tie them up neatly on the trans cross member with some long zip ties. I also wrapped the bundle of plugs in wide electrical tape to protect it (not that it really needs it).

Welcome to the inside. Below marks the approximate location the wires come thru under the carpet. No cutting of carpet is necessary. The stock cuts for the wiring harness allow enough room to get your big ugly paw under the carpet and pull the wires under the seat.
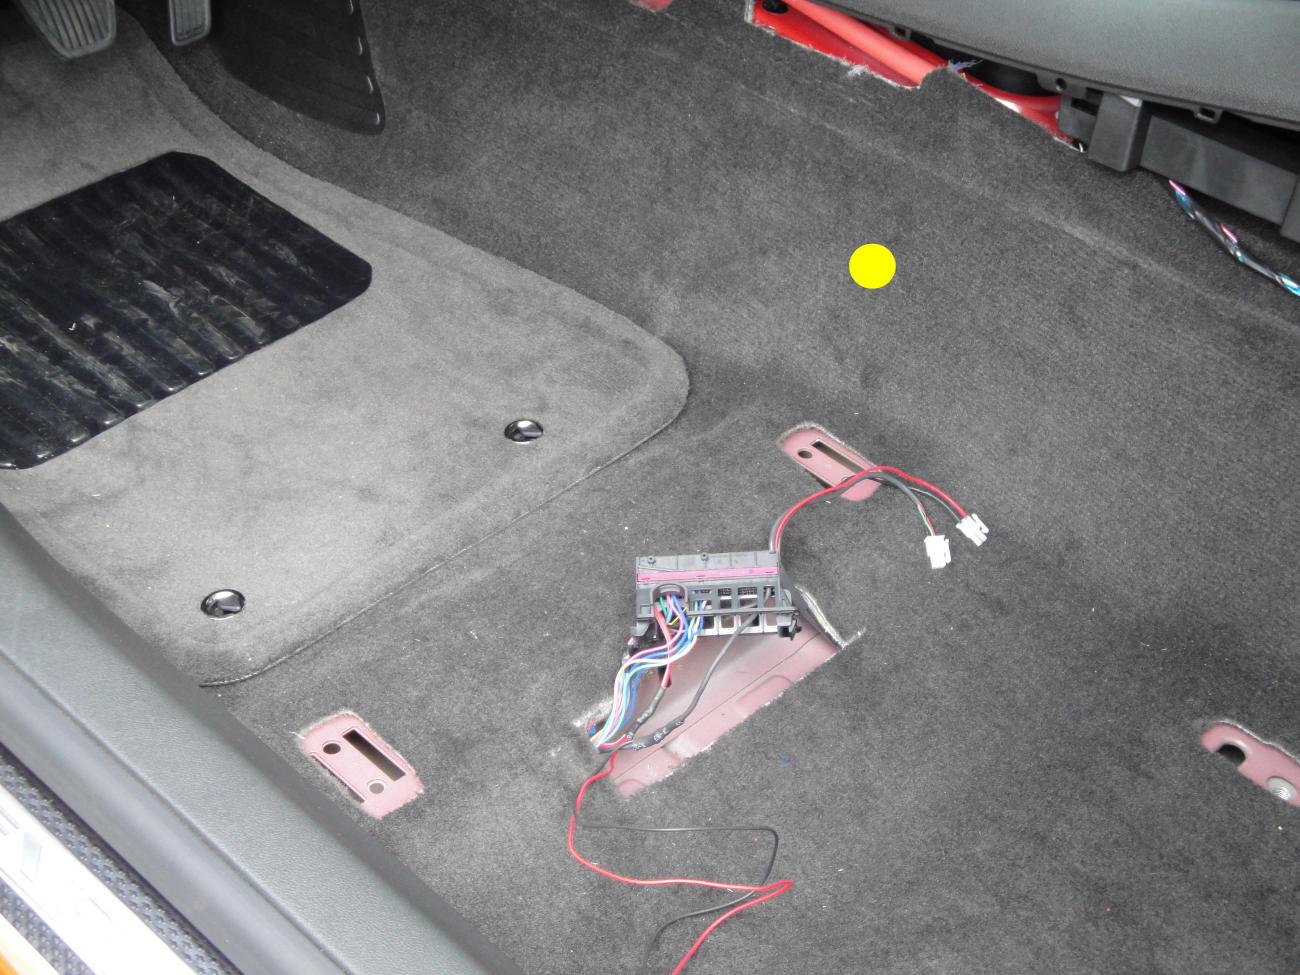
Another tip, I unclipped the seat harness connection block from the floor pan (pops right out) to make the wiring easy. Those who have never done any soldering may want to use splicing connectors for this. But I prefer the failsafe method of cut, splice, solder and heat shrink.
Here’s another tip – or rather confession. The instructions tell you which fuse to pull. I did that. Always still test for power! I found the wires per the instructions, tested, still had power. WTH! Went back to the fuse panel, couldn’t find any other fuse that made sense to pull. After disregarding my buddy’s suggestion to pull every fuse (
) I proceeded to complete my work one wire at a time to avoid arcing. HOWEVER, I later realized that there is 2 sets of wires leading into this connection block that are the same colour as those described in the instructions! One set come in the top and are about 14g wire. Another set come in the bottom and are 10 or 12g. I realized this after soldering (
). Tested, sure enough. No power on the top lighter wires (with fuse pulled), power on the bottom set. Repalced fuse and checked with the multimetre, exact same voltage on both sets regardless of ignition position. So I just left them.
Finished product.

Now’s it’s time to mount the switch. As already mentioned Noweeds has come up with a clever spot just under the edge of the driver’s seat that requires no cutting or drilling for install. Here’s the installed switch after the seat is reinstalled. Pay attention to the part of the instructions about checking for clearances under the seat and remember your seat goes up and down. It’s already a jungle under there and even though I had no problems I could easily see a wire getting stretched or the controller box getting crunched. I used some black wire loom to contain the wires b/c I wanted it to look pretty – even under the seat. Oh, and don’t forget to reinstalled the side cover for the centre consol BEFORE the seat goes back in

Before the kit came I didn’t think I’d like the switch being under the seat. I thought about installing it inside the centre console. But it’s already tight in there as is and then it’s not easily accessible (trust me, you’ll be playing with the switch all the time

). I did think of another really cool spot to mount the switch. This spot is wide open and just beggin’ for something cool to be popped in there. But this involves cutting a rather large hole which I wasn’t prepared to do – yet.

Reinstall the seat. Goes in as easy as it came out. I liked the idea of putting some thread locker on the T-40 bolts in the seat. Don’t think there was any on there when they came out but it can’t hurt. Replace the fuse removed previously, drop the car down and you’re ready to piss-off the neighbours.
Gratuitous butt shot.

Operation couldn’t be simpler. Outside buttons (which are also LEDs) fully open and close the valves. Pressing any button while valves are in motion stops them. Hold the middle button for 4 seconds and save the current position for easy return (like a radio preset).
How loud is it? Well, sound is a personal thing. I love the sound. I love the loud. But too much loud for too long get's problematic - both for your ears and for the local law enforcement people. So that's the beauty of the diverter system with position memory. You can change the sound/volume as much as you like or go back to stock all within 5 seconds.
Thanks again to Steve and the crew at Noweeds for making such a killer product.
VIDEOS:
Theres a couple videos out there already. Running on the dyno, interior sound etc. But no one has done any like these that I've seen. (Can someone please embed? Thanks)