Getting a bunch of requests for "How do you take your Speedo cluster out" and "How hard is it to change those new Gauge Faces out" so here we go!
**Disclaimer-As with any DIY, if you break something on your own or your car bursts into flames spontaneously, I nor
Southwest Speed LLC takes any responsibility. Enjoy!

**
Tool List: - T15 Torx Driver
- Flathead Screwdriver
- Lint Free Cloth or Cheesecloth
GTAHVIT's Video on how to remove it also helps: (Thank you Doug!)
1.) First thing you wanna do is get all your tools ready and get the car in a safe place to work. Pull the Ebrake and all that good stuff and adjust the steering column all the way down and all the way out so that you can easily remove the cluster.
2.) Next go ahead and remove the rubber shroud attaching the bottom of the cluster to the steering column. It just comes out with a little pull. Some have nipple style plugs while others are blade style plugs.

3.) Firmly grab the outter silver trim piece and pull straight out....unsnapping the clips that hold it in the dashboard. It might seem to take a little bit of force, but it comes right out. There are two clips on top and side and then two on bottom. Once all clips are detached, the entire silver surround with rubber lower shroud comes right out. Take care in removing the trim as the clips are harder plastic and can scratch your clear speedo plastic.

4.)Locate the (4) T15 screws holding the Cluster in. Two on top, two on bottom. Remove them all. You might lose one or 4 of em in the lower dash when removing. No problem. Just lightly bump the lower dash and they come right out on the floor.
5.) Once the T15 screws are removed, gently remove the Cluster by taking it straight out from the dash. Once you get it about 5/6" away, you can unplug the Cluster connector that gives signal and power to the Cluster. Take the Cluster all the way out and set it to the side.
6.) Taking the cluster out of the car allows you to separate the front clear plastic from the rear of the Cluster. It also make it much easier to handle and work on now that you can put it in light and have it sitting firmly on a flat surface.
7.) I usually like to take the Lint Free Cloth or a Towel, and use that to place the Cluster on face down. At this point you can work the black and white clips apart that keeps the two pieces together. Dont try to separate the cluster without going around the entire perimeter of the Cluster. There are clips that will break if you try to pry it apart or force it once you get close.
Just a note...this is really an easy mod, but as you can prolly already tell, patience will result in not only a more complete DIY, but a better finished product for you to enjoy for years.
8.) Once you have the clear piece separated from the Cluster housing, set it off to the side on another piece of the Towel or cloth as not to scratch or dirty the plastic.
9.) Now that the clear plastic is off, we can get to work removing the needles from the Speedo and Tach. They are magnetically controlled so they aren't indexed. However, when they are removed and then put back on, you should really try to put them on at the "0" Position. You can always go back and "fix" it but if they're not right, they'll be off a little. You'll be able to tell from the Digital Speedo Readout.

Using a table fork is pretty easy to do if you don't have a "speedo needle removal tool" and works much faster. Take time in centering the tines of the fork under the needle and slowly pry it up. I'd totally reccommend covering the needle with your other hand as it will most likely fly quite far if not retained.

Repeat step for the other needle as well.

10.) Once the needles from both the Speedo and Tach are removed, confirm that your surfaces of both are lint free and clean in preparation for the new Faces to attach to.

11.) Stage your new Speedo gauge face and remove the adhesive backing from the new Face. Square it off using the two bottom corners and center whole and attach the face from one side to the next, evenly applying it down. Use your index finger or thumb to confirm final placement of the face.


12.) Repeat step for the Tach face.
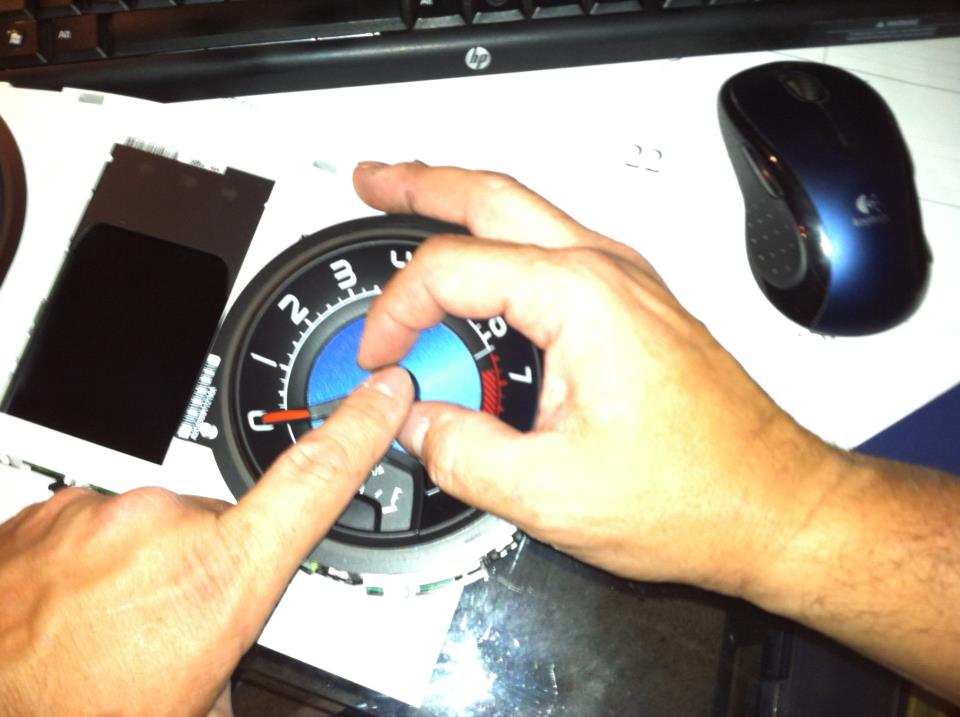
13.) Using your index and thumb fingers to hold the needle, line it up on the post of the bottom cluster piece, line up the pointer to the "0" position the best you can and push it down gently with your other index finger. Take a look at it and if its not right, do it again. It'll save you time now if it's wrong.
14.) Once the needles are correctly mounted, take a minute to make sure that your faces look great, the cluster is clean and free of fingerprints and dust. Once you'rehappy with it, simply take your clear plastic front and slowly push it straight down and back onto your lower cluster housing.
15.) Install your Cluster using the (4) T15 screws you removed earlier....wait. Did you connect the electrical harness?

Good job. Get the connector reinstalled, screw in the (4) Torx screws and reinstall your Cluster surround. Line up the Cluster surround, and slowly push it in. You'll need to use some force to click it in fully but make sure it's lined up before you go Hulk status on it.
16.) Once your surround is in, you're prolly having a tough time reinstalling those rubber nipples and blade plugs. This is where patience and a small flat screwdriver can really help you. Get em partially in there, then wobble em back and forth till they are fully seated and flush with the top plastic of the steering column.
17.) Once you've gotten the shroud pieces in, realign your steering wheel back to a safe and comfortable postion as you are certainly going to wait to take your Camaro for a ride and enjoy your new Faces.
Questions and comments welcome and thanks for reading!
Ivan @ Southwest Speed
