You are browsing camaro5 

|
 02-19-2016, 07:46 PM
|
#575 |
|
'It's an experiment'

Drives: [COTW 2/09/15] '11 GPI LSA SC Z/LE Join Date: May 2014
Location: Dallas TX
Posts: 8,709
|
Finally got this to go with my Calibrated Success DVD from Greg Banish:
 Want to understand more of what's going on ;o)... -Don
__________________
747 RWHP 794 RWTQ
"Horsepower sells cars, torque wins races." - Enzo Ferrari See My Build: http://www.camaro5.com/forums/showthread.php?t=385577 Last edited by hammdo; 08-14-2017 at 09:02 PM. |

|

|
|
02-20-2016, 10:20 PM
|
#576 |
|
'It's an experiment'
Drives: [COTW 2/09/15] '11 GPI LSA SC Z/LE Join Date: May 2014
Location: Dallas TX
Posts: 8,709
|
So, while I'm looking for the ZL1 IAT2 scalings, I ordered this so I can add an analog IAT 1 to the AeroForce:
 This, along with the breakout cable, will allow me to have the ECM use the LSA IAT2 for 'IAT' (ECM 38 only has IAT1), while the Analog sensor will give me the CAI IAT temps -- then I can see what the HX, Intercooler, Reservoir, and the new Varimax pump does for IAT2 temps! -Don
__________________
747 RWHP 794 RWTQ
"Horsepower sells cars, torque wins races." - Enzo Ferrari See My Build: http://www.camaro5.com/forums/showthread.php?t=385577 Last edited by hammdo; 02-21-2016 at 02:13 AM. |
|
|
|
|
02-21-2016, 05:13 PM
|
#577 |
|
'It's an experiment'
Drives: [COTW 2/09/15] '11 GPI LSA SC Z/LE Join Date: May 2014
Location: Dallas TX
Posts: 8,709
|
So, here is the Casper Electronics breakout harness (http://www.casperselectronics.com/ca...product_id=387 108136):
.jpg) The colors are 'not exactly' light blue and tan, but they are broken out correctly to allow the IAT2 sensor to be read. What I'll do is open up the CAI, move the factory harness outside and plug in the breakout harness into the factory harness, then route it back inside the CAI. Then, just plug in the IAT2. Very simple -- once that is done, I'll get my corrections in. The Analog IAT sensor will be put into the CAI (I'll drill a small hole and use the 'threaded' sensor with a nut and loctite). Then, run the Analog wire to the Interceptor and set the IAT2 to read from the Analog (Yes, I know its IAT1, but I don't believe I can change that in the interceptor, as IAT1 for my ECM will be IAT1 selectable from the OBDII port, even though its an IAT2 sensor ;o). -Don
__________________
747 RWHP 794 RWTQ
"Horsepower sells cars, torque wins races." - Enzo Ferrari See My Build: http://www.camaro5.com/forums/showthread.php?t=385577 Last edited by hammdo; 12-11-2016 at 10:46 PM. |
|
|
|
|
02-22-2016, 08:07 PM
|
#578 |
|
'It's an experiment'
Drives: [COTW 2/09/15] '11 GPI LSA SC Z/LE Join Date: May 2014
Location: Dallas TX
Posts: 8,709
|
So, I spent some time looking @ my tune and a tune done in HP Tuner (TTShovel's).
In HP Tuner advanced mode, you can find the IAT and IAT2 scaling here: 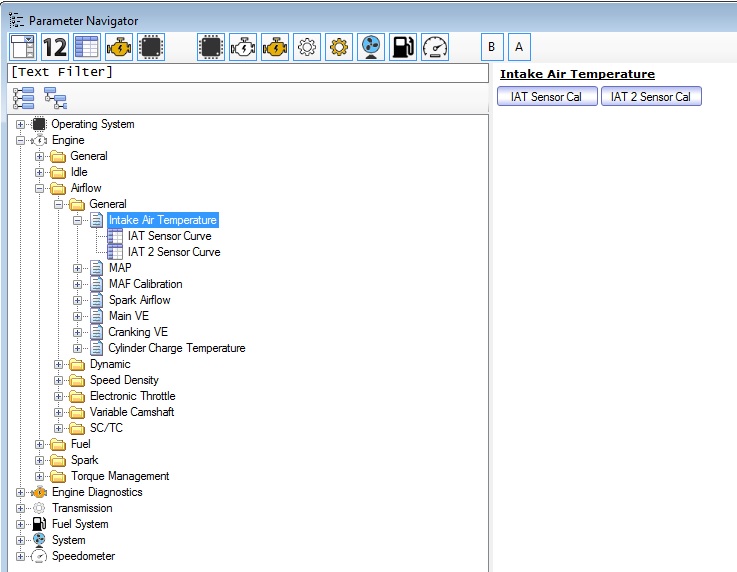 IAT: 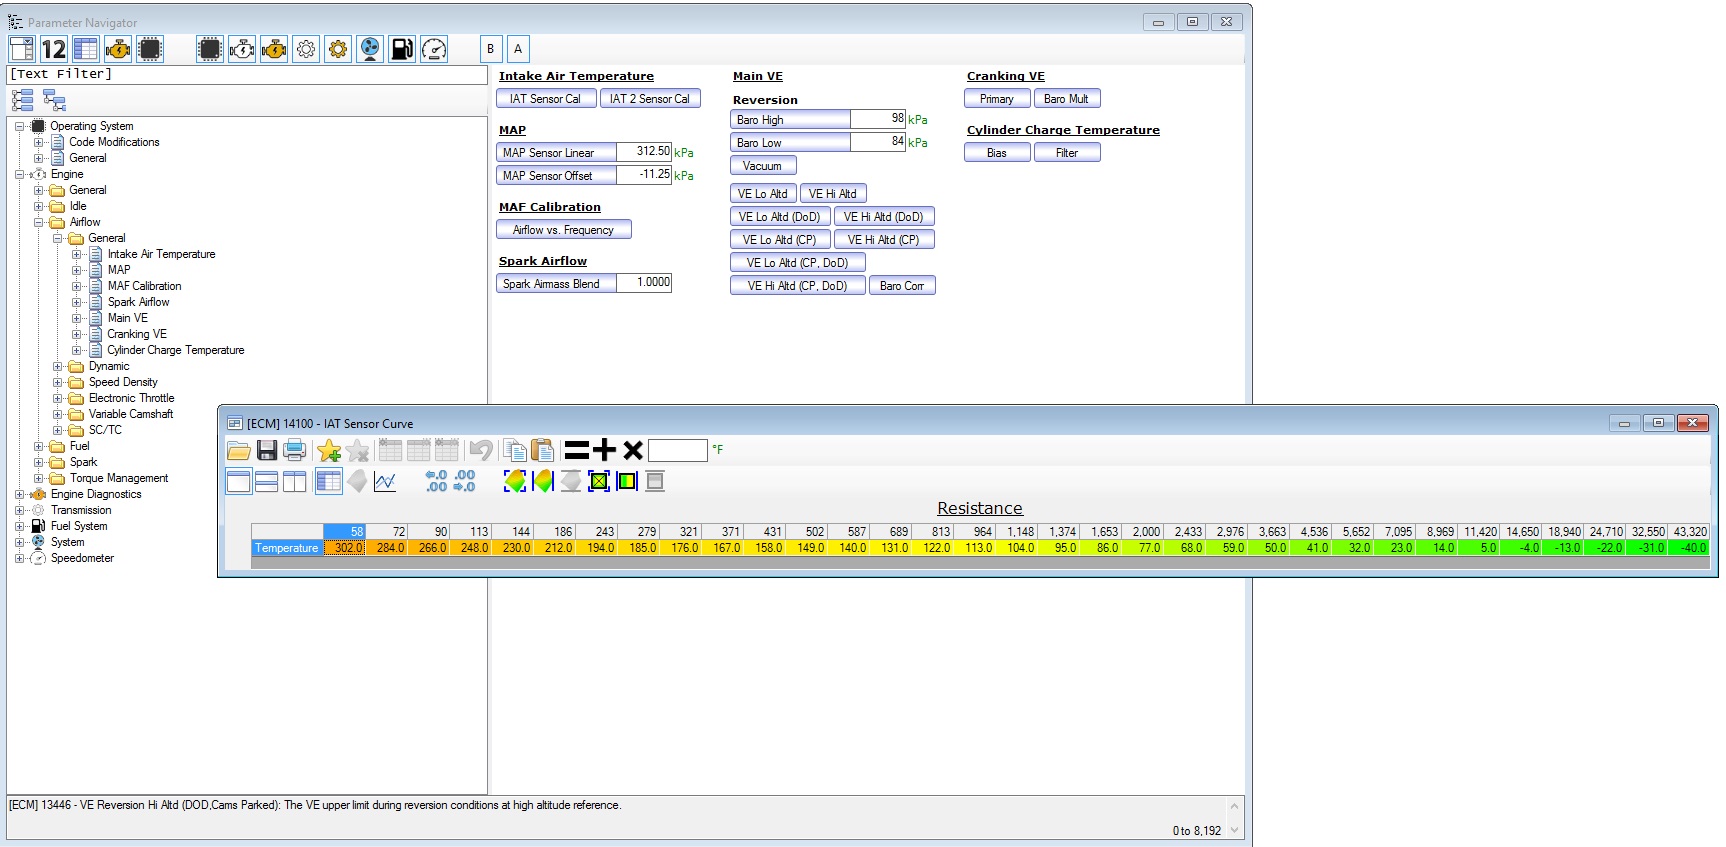 IAT 2:  And in EFI Live here: 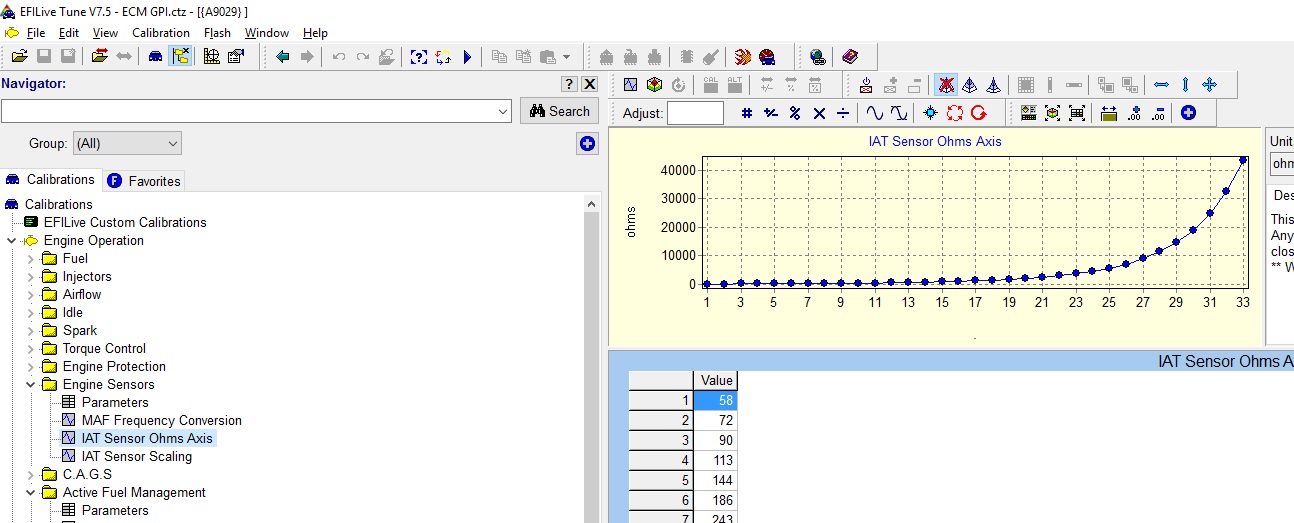 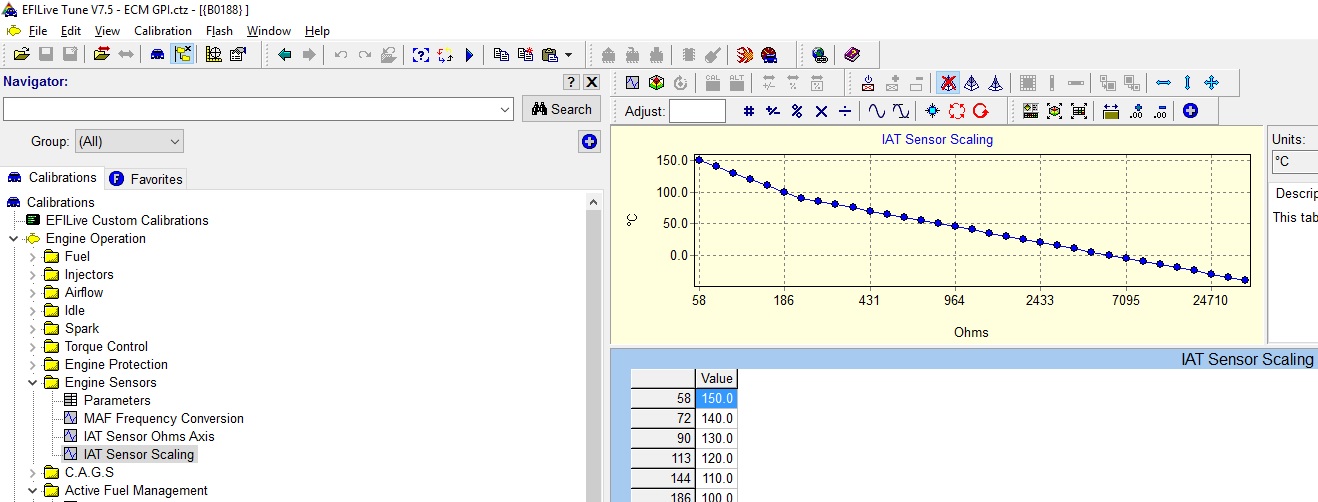 Now, using TTShovel's tune, I looked @ the HP Tuner IAT Sensor CAL, and IAT2 Sensor CAL, then Compared it to mine in EFI Live (both scales set to metric). The IAT Sensor CAL and my EFI Live IAT Sensor settings were the same. So, I created a spreadsheet and this is the scaling differences I found: 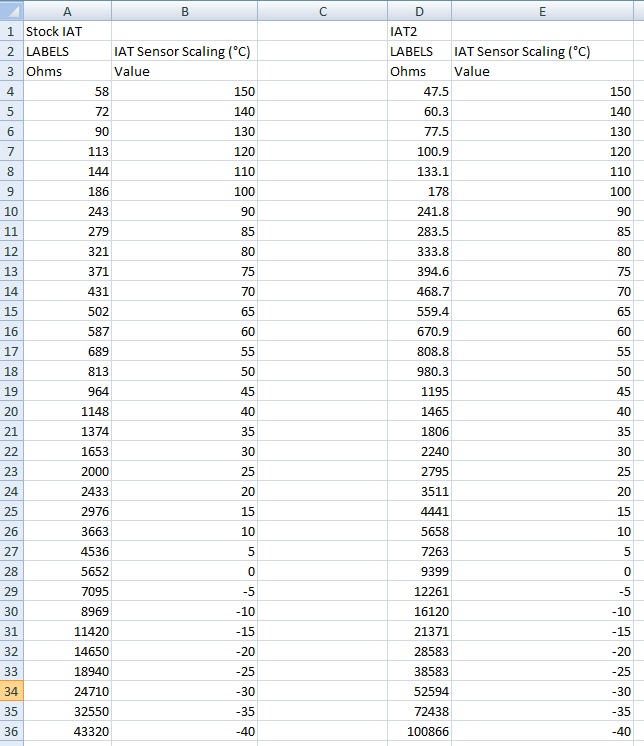 With that said, once I confirm these are 'indeed' the correct scaling, then, in EFI Live, I should be able to set the IAT Sensor Ohms Axis to the Ohms in the IAT2 settings. The IAT Sensor Scaling should then be correctly set. Will wait to see what Ryan sets up for me, but that is what I've figured out so far. Will let you all know... -Don
__________________
747 RWHP 794 RWTQ
"Horsepower sells cars, torque wins races." - Enzo Ferrari See My Build: http://www.camaro5.com/forums/showthread.php?t=385577 Last edited by hammdo; 02-22-2016 at 08:18 PM. |
|
|
|
|
02-22-2016, 11:56 PM
|
#579 |
|
'It's an experiment'
Drives: [COTW 2/09/15] '11 GPI LSA SC Z/LE Join Date: May 2014
Location: Dallas TX
Posts: 8,709
|
Found a stock ZL1 tune (auto! EFI Live) that has the actual IAT2 settings, added that to the spreadsheet -- a bit different!
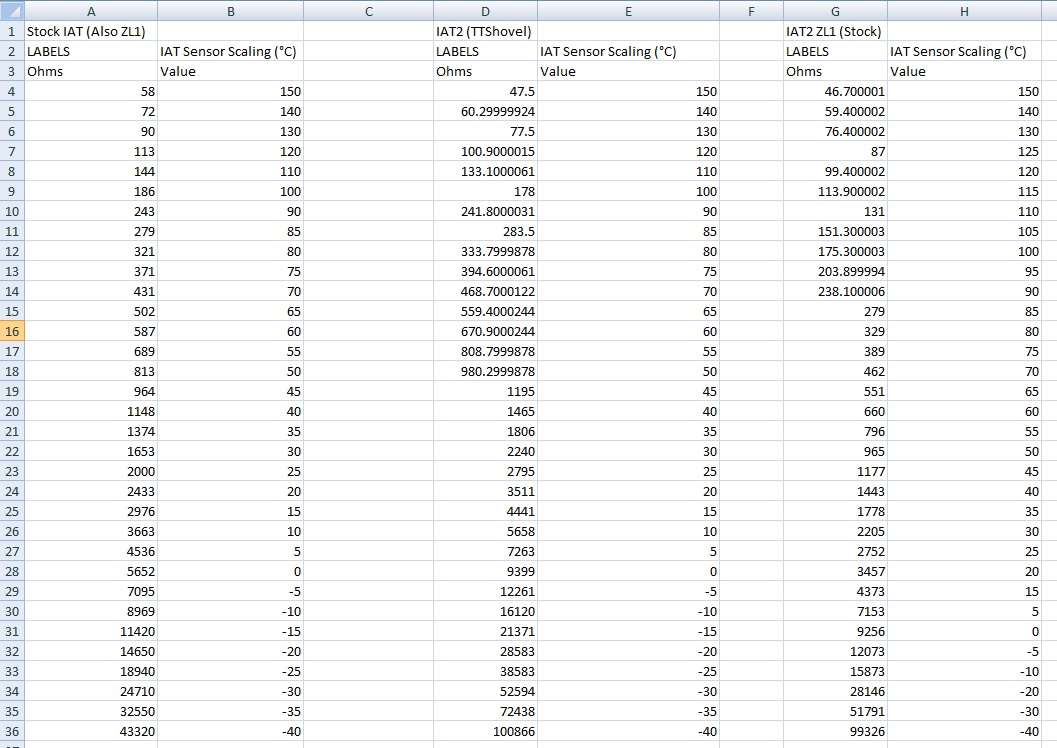 And added my estimates for some of the missing increments (note the Stock IAT2 is missing some of the - 5 increments -- looks to be about 98.5 % of what TTShovel has):  Very interesting... -Don
__________________
747 RWHP 794 RWTQ
"Horsepower sells cars, torque wins races." - Enzo Ferrari See My Build: http://www.camaro5.com/forums/showthread.php?t=385577 Last edited by hammdo; 04-22-2016 at 09:10 PM. |
|
|
|
|
02-24-2016, 01:36 PM
|
#580 |
|
'It's an experiment'
Drives: [COTW 2/09/15] '11 GPI LSA SC Z/LE Join Date: May 2014
Location: Dallas TX
Posts: 8,709
|
LSA Supercharger IAT2 upgrade
So, its a go with GPI, I've added the wiring harness -- really simple too:
Hooked up to the MAF: .jpg) Connector's: .jpg) IAT2: .jpg) Plug and Play! Just checked the IAT from the AeroForce. IAT is 42* (reading from the SC IAT2 sensor), Ambient is 61* so its 19* off -- once I get the scale changes from Ryan, I'll add those to the spreadsheet to compare and upload that to the PCM. -Don
__________________
747 RWHP 794 RWTQ
"Horsepower sells cars, torque wins races." - Enzo Ferrari See My Build: http://www.camaro5.com/forums/showthread.php?t=385577 Last edited by hammdo; 04-12-2016 at 11:58 PM. |
|
|
|
|
02-25-2016, 12:38 AM
|
#581 |
|
'It's an experiment'
Drives: [COTW 2/09/15] '11 GPI LSA SC Z/LE Join Date: May 2014
Location: Dallas TX
Posts: 8,709
|
Took the car out just to see what the difference is before we update the tune. I found that while the Ambient was around 51*, the IAT2 was reading about 46* (driving @ 75 mph) -- so, not a huge difference right now -- I did do a WOT and it got up to 56* while temps were 46* -- so, taking the fact the current tune is reading/expecting IAT temps (CAI) and the CAI temps were 1* to 2*'s higher than ambient, it appears when temps are cool like this, its not a big difference -- I'm sure when it get's 'hot', there would be reason for concern. Will be glad to get this adjusted and tuned to see where I finally end up...
-Don
__________________
747 RWHP 794 RWTQ
"Horsepower sells cars, torque wins races." - Enzo Ferrari See My Build: http://www.camaro5.com/forums/showthread.php?t=385577 |
|
|
|
|
02-25-2016, 06:35 PM
|
#582 |
|
'It's an experiment'
Drives: [COTW 2/09/15] '11 GPI LSA SC Z/LE Join Date: May 2014
Location: Dallas TX
Posts: 8,709
|
Dropped her off to Ryan. Car drove amazing. We're going to do a sensor scale update then take the baseline dyno. This will serve as my base tune when I'm not on Torco. Then, the Torco tune.. Looking forward to that...
-Don
__________________
747 RWHP 794 RWTQ
"Horsepower sells cars, torque wins races." - Enzo Ferrari See My Build: http://www.camaro5.com/forums/showthread.php?t=385577 |
|
|
|
|
02-26-2016, 08:09 PM
|
#583 |
|
'It's an experiment'
Drives: [COTW 2/09/15] '11 GPI LSA SC Z/LE Join Date: May 2014
Location: Dallas TX
Posts: 8,709
|
Well, just got back. GPI and Ryan were awesome!
So, Ryan made the scaling adjustments to the stock ZL1 IAT2 settings. Car ran fantastic! We tested the current tune with my new updates. Driveshaft was smooth on the Dyno. Now, I did not expect to see any increase in RWHP from the Driveshaft and Turn One power steering upgrade, and I didn't. RWHP was exactly the same, but the delivery was smooth. Ryan noticed how little to no vibration he felt doing the pulls. Car sounded strong! So all set on the IAT2 updates. Torco was a non starter. The engine did not want it and we could not adjust the timing enough to make a difference. I did mix it, so it could have been that but I'm not going to push it. The engine is happy where it's at. Nice drive there and back. Awesome service from Ryan, James, and GPI . So, that is about it for this setup. It's running so good, I'm not going to change much. I do have the analog IAT for the Aero Force so that is next... Anyone need 5 gallons of Torco ;o)? -Don
__________________
747 RWHP 794 RWTQ
"Horsepower sells cars, torque wins races." - Enzo Ferrari See My Build: http://www.camaro5.com/forums/showthread.php?t=385577 Last edited by hammdo; 02-28-2016 at 05:43 PM. |
|
|
|
|
02-26-2016, 11:19 PM
|
#584 |
|
'It's an experiment'
Drives: [COTW 2/09/15] '11 GPI LSA SC Z/LE Join Date: May 2014
Location: Dallas TX
Posts: 8,709
|
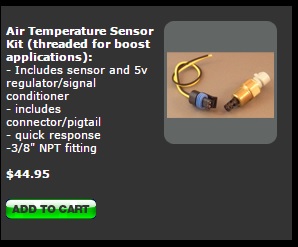
So, I'm starting on the CAI IAT analog sensor. I have the AeroForce sensor kit (with the 5V regulator) and the connector from the AeroForce gauges:
.jpg) I have a 3/8 NPT nut to install it into the CAI. I'll need to get a couple of nylon washers just to be sure it takes up any space. I also have an Add-A-Circuit and fuses. I'll need to get red, green, white, and black wire so I can wire up per instructions. I'll show those as I go along. What is nice about the AeroForce interceptor is I don't need to add the Slope and Offset/multiplier to get the temps to read, I can just select it from the Analog menu of the gauge -- very nice! When I go though that, I'll take a video... -Don
__________________
747 RWHP 794 RWTQ
"Horsepower sells cars, torque wins races." - Enzo Ferrari See My Build: http://www.camaro5.com/forums/showthread.php?t=385577 |
|
|
|
|
02-26-2016, 11:43 PM
|
#585 |
|
WILD CANADIAN HEARTBEAT

Drives: 2014 2SS 1LE RS, 2014 ZL1& 2024 ZL1 Join Date: Sep 2014
Location: Camrose, Alberta
Posts: 477
|
So do you figure the new drive shaft is worth the investment, I am also thinking of replacing mine in the future? Enjoy your building process of your car.
__________________
700/633 91Octane Street Tune=750/670 VP109 Race Tune TVS2300 Heartbeat SC,ADM Dual Fuel Pumps/ Module, BRM lowered 1", performance rotors, hawks pads, SS Braided lines, GT-14cam, 78mm pulley, AR LT Headers, Cat Deletes, Borla S catback, tinted, 1/LE emblems, 65lb Injectors, Elite catch can,dual valve springs, titanium retainers, super conductor wires and insulators, Robo Fab CAI, Oversize intercooler reservoir, Oracle ghost side markers, Black out Bowties & SS,ZL1 splash guards, Michelin PSS. Built and tuned by Davenport Motorsports (WILD1LE)
 |
|
|
|
|
02-27-2016, 12:10 AM
|
#586 |
|
'It's an experiment'
Drives: [COTW 2/09/15] '11 GPI LSA SC Z/LE Join Date: May 2014
Location: Dallas TX
Posts: 8,709
|
For me, I'd do it again. The driveline is so much smoother, it was surprising. Even Ryan noticed it on the dyno. Now , I have the Carbon fiber shaft and really like it. Others do the aluminum. Either way, I personally like the single shaft. For a stick, I can see it being a benefit, along with the trans support bearing and half shafts if you're drag racing and launching hard.
It's a chunk of change for the carbon fiber, but the aluminum shaft may make sense. Now, there are quite a few folks who've never had an issue with stock. I just like how everything works smoothly now... Ask Ryan (rhino79). -Don
__________________
747 RWHP 794 RWTQ
"Horsepower sells cars, torque wins races." - Enzo Ferrari See My Build: http://www.camaro5.com/forums/showthread.php?t=385577 |
|
|
|
|
02-27-2016, 12:35 AM
|
#587 |
|
'It's an experiment'
Drives: [COTW 2/09/15] '11 GPI LSA SC Z/LE Join Date: May 2014
Location: Dallas TX
Posts: 8,709
|
I guess I should note the IAT2 temps. Today, driving highway speeds, ambient was 56* to 62*, IAT2 was 66* to 78*. At idle, stuck in an hour traffic delay (ugh) today, up to 98* while ambient was 62*.
Ran excellent... -Don
__________________
747 RWHP 794 RWTQ
"Horsepower sells cars, torque wins races." - Enzo Ferrari See My Build: http://www.camaro5.com/forums/showthread.php?t=385577 |
|
|
|
|
02-27-2016, 08:08 PM
|
#588 |
|
'It's an experiment'
Drives: [COTW 2/09/15] '11 GPI LSA SC Z/LE Join Date: May 2014
Location: Dallas TX
Posts: 8,709
|
Started the CAI IAT sensor from AeroForce today. Had to run the wire to the inside. Finding the right spot was kinda easy, but hard to get it though. The area had a lot of tape on it and I was lucky to use a 'skewer' to ease it into the car.
First, the location (right above the steering input): .jpg) Routed over the master cylinder (once confirmed, I ty-rapped it down): .jpg) Next, following the diagram, created a black, green, and white run and place it into the shielding -- then prepped it for soldering: Schematic: .jpg) Wire setup and soldering: .jpg) .jpg) Connector ready to go! .jpg) Next, I needed to mount the sensor inside the CAI. To do this I used a 90* plastic piece from one of the air dams I had (when I did the heat exchanger) and opened the hole just enough to screw in the sensor. I then used a 3/8 NPT nut on the other side to lock it down: .jpg) .jpg) .jpg) .jpg) Then, drilling a small hole in the CAI, I bolted it down using loctite and clear nail polish (to hold it there in place): .jpg) little silicone (dries clear) to help hold it: .jpg) .jpg) Connected! .jpg) Put the CAI lid back on and installed the inlet hose to the TB. Double checked everything to make sure its all tight. Tomorrow, hooking it up to the AeroForce. Still need to do the wiring inside, but the hard part is done! More to come... -Don
__________________
747 RWHP 794 RWTQ
"Horsepower sells cars, torque wins races." - Enzo Ferrari See My Build: http://www.camaro5.com/forums/showthread.php?t=385577 |
|
|
|
|
|
|
|
 |
|
|


