You are browsing camaro5 

|
 03-06-2011, 11:33 AM
|
#71 | |
|
Booooosted.

|
Quote:
 Right. NO hoses, so spinning wheels. I should be ok. lol Right. NO hoses, so spinning wheels. I should be ok. lolI wonder if I have to replace the oil valley cover? To the LS3 one. I know the LS3 cover can't be used for an L99, but I wonder the opposite.
__________________
 |
|

|

|
|
03-06-2011, 11:35 AM
|
#72 | |
|
Booooosted.
|
Quote:
__________________
|
|
|
|
|
|
03-06-2011, 12:34 PM
|
#73 | ||||||
|
Truth Enforcer

Drives: anything I can get my hands on Join Date: Sep 2006
Location: anywhere and everywhere
Posts: 22,797
 |
Quote:
Quote:

__________________
Never race anything you can't afford to light on fire and push off a cliff
A group as a whole tends to be smarter than the smartest person in that group until one jackass convinces everyone otherwise. Quote:
 Quote:
Quote:
|
||||||
|
|
|
|
03-06-2011, 01:12 PM
|
#74 | |
  
Drives: 2012 Challenger SRT8 Auto Join Date: Sep 2009
Location: Central New Jersey
Posts: 839
|
Quote:
 ). ).By the way, you should change where you are sitting in your signature image every day or so 
__________________
"When the people find they can vote themselves money, that will herald the end of the republic." - Benjamin Franklin  LS3 Camshaft Swap Do-It-Yourself Instructions - 2010 LS3 gone but not forgotten!!! |
|
|
|
|
|
03-08-2011, 01:09 PM
|
#75 | |
      
Drives: 2SS/RS - Black - GFX Join Date: Nov 2008
Location: B'ham, Alabama
Posts: 2,458
|
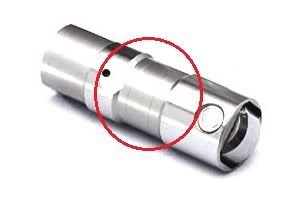
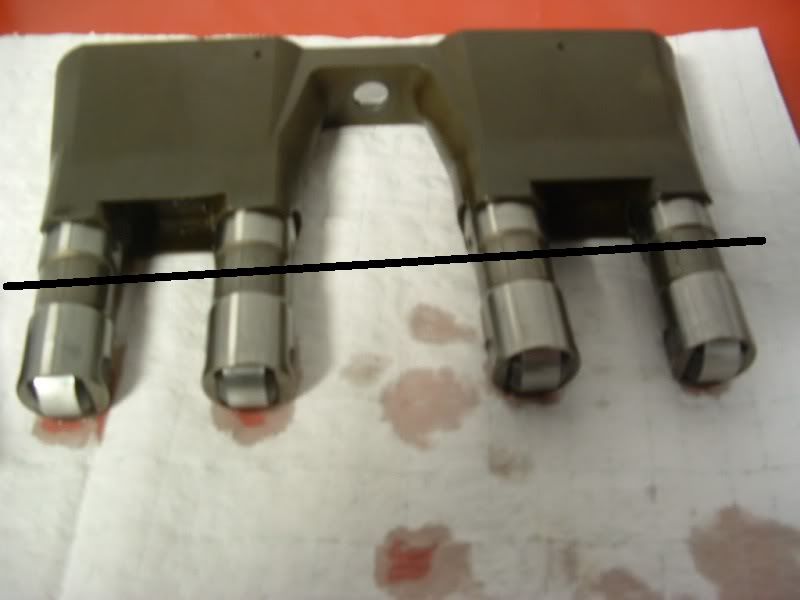
Could you furter explain step 42:
Quote:
Do the lifters just kind of stick in the top position when you rotate the cam because the rockers are disconnected and there is no downforce and the fit is tight enough to keep them up? Does the dowel push each lifter up even further as it slides through the oil hole? It seems that the lobes on the cam would push the lifters up to a point, but not high enough to get a dowel between the cam and the lifter since the lobes on the cam are smaller than the cam housing circle. EDIT: few more questions: why do you need a new crank bolt? is there a part #? ... I am starting to order parts. Do you have any guess on the size of the crank bolt needed to push the balancer back in? M16 pitch (1.5 or 2mm) and 3-4 inches? http://www.mcmaster.com/#metric-threaded-rods/=bcjhie or http://www.mcmaster.com/#cap-screws/=bcjrtf why do you need new pushrods? Is it safe to run stock pushrods? you mention that they need to be measured. do you add the difference in camshaft lift to the length of the stock pushrods?
__________________
Ordered: 10-13-08
Built: 3-30-09 (#1691) Recieved: 6-12-09 Blacked out, Cammed (Lunati Voodoo 233/245, .578/.598 @114°, +4°), ARH LTs, VR OTR CAI, Cutouts, and lots of other fun mods. Last edited by Bell040; 03-08-2011 at 03:45 PM. |
|
|
|
|
|
03-09-2011, 04:26 PM
|
#76 | ||||
|
Drives: 2012 Challenger SRT8 Auto Join Date: Sep 2009
Location: Central New Jersey
Posts: 839
|
Quote:
Quote:
The crank bolt is a one-time use bolt. When it gets cranked down it gets torqued to a particular foot pount and then an additional number of degrees to "stretch" the bolt. Can you use it again? Sure. Would you want to, not at the risk of screwing up the threads in the crank snout or the bolt coming loose. Quote:
Quote:
__________________
"When the people find they can vote themselves money, that will herald the end of the republic." - Benjamin Franklin LS3 Camshaft Swap Do-It-Yourself Instructions - 2010 LS3 gone but not forgotten!!! |
||||
|
|
|
|
03-09-2011, 04:40 PM
|
#77 | ||
|
Drives: 2SS/RS - Black - GFX Join Date: Nov 2008
Location: B'ham, Alabama
Posts: 2,458
|
Thanks Robert... your DIY is awesome!
... maybe someone else can chime in on the dowels holding up the lifters. EDIT:  Quote:
from http://www.ls1tech.com/forums/genera...estions-2.html Quote:
__________________
Ordered: 10-13-08
Built: 3-30-09 (#1691) Recieved: 6-12-09 Blacked out, Cammed (Lunati Voodoo 233/245, .578/.598 @114°, +4°), ARH LTs, VR OTR CAI, Cutouts, and lots of other fun mods. Last edited by Bell040; 03-24-2011 at 05:54 PM. |
||
|
|
|
|
03-09-2011, 04:58 PM
|
#78 |
   
|
thinking I should've bought an 8, jus so I can DIY...
:..very nice
|
|
|
|
|
03-09-2011, 05:05 PM
|
#79 | |
|
Booooosted.
|
Quote:
I just went to the dealer. LS3s have been around for a while, L99 is the same as far as this goes so they usually will have them in stock.
__________________
|
|
|
|
|
|
03-10-2011, 07:44 PM
|
#80 | |
|
Drives: 2SS/RS - Black - GFX Join Date: Nov 2008
Location: B'ham, Alabama
Posts: 2,458
|
Quote:
Highly Recommended: Longer crankshaft pulley bolt, M16 x 2.0 pitch x 120mm long
__________________
Ordered: 10-13-08
Built: 3-30-09 (#1691) Recieved: 6-12-09 Blacked out, Cammed (Lunati Voodoo 233/245, .578/.598 @114°, +4°), ARH LTs, VR OTR CAI, Cutouts, and lots of other fun mods. |
|
|
|
|
|
03-21-2011, 03:04 PM
|
#81 |
|
Drives: 8 second C5 Drag Car, C6 Road racer Join Date: Sep 2009
Location: Cream Ridge, NJ 609-752-0321
Posts: 778
|
Great thread Robert!
Just to stir the pot a little.. the last two Camaro's with our cam, Paxton 1500 kit and meth injection left here with over 800rwhp! 
|
|
|
|
|
03-21-2011, 04:04 PM
|
#82 | |
|
Drives: 2012 Challenger SRT8 Auto Join Date: Sep 2009
Location: Central New Jersey
Posts: 839
|
Quote:
__________________
"When the people find they can vote themselves money, that will herald the end of the republic." - Benjamin Franklin LS3 Camshaft Swap Do-It-Yourself Instructions - 2010 LS3 gone but not forgotten!!! |
|
|
|
|
|
03-22-2011, 10:33 PM
|
#83 |
|
Drives: 2SS/RS - Black - GFX Join Date: Nov 2008
Location: B'ham, Alabama
Posts: 2,458
|
Has anyone used this tool? know where to get it? Any reason it would be better or worse than the OP's? ... looks easier.
 also, which Manley springs did you go with Rob?
__________________
Ordered: 10-13-08
Built: 3-30-09 (#1691) Recieved: 6-12-09 Blacked out, Cammed (Lunati Voodoo 233/245, .578/.598 @114°, +4°), ARH LTs, VR OTR CAI, Cutouts, and lots of other fun mods. |
|
|
|
|
03-23-2011, 05:38 AM
|
#84 | |
|
Drives: 2012 Challenger SRT8 Auto Join Date: Sep 2009
Location: Central New Jersey
Posts: 839
|
Quote:
The Manley part# is 221436-16 and the rest of the Manley part#'s are in the picture; [IMG]
__________________
"When the people find they can vote themselves money, that will herald the end of the republic." - Benjamin Franklin LS3 Camshaft Swap Do-It-Yourself Instructions - 2010 LS3 gone but not forgotten!!! |
|
|
|
|
|
|
|
|
 |
|
|
 Similar Threads
|
||||
| Thread | Thread Starter | Forum | Replies | Last Post |
| DIY: Vararam CAI Install with Color Photos | Jeanius | Camaro DIY & HOW-TO instructions & discussions | 22 | 05-26-2015 02:48 PM |
| DIY Hurst Short Throw Shifter Install - Pix and Video | TAG UR IT | Camaro DIY & HOW-TO instructions & discussions | 121 | 02-26-2015 10:08 AM |
| Camaro Heritage Grill DIY install (now with official GM install instructions). | vuduman67 | Camaro DIY & HOW-TO instructions & discussions | 216 | 12-03-2014 05:18 PM |
| DIY : Install underdrive pulley on 2010 Camaro SS | Nine Ball | Camaro DIY & HOW-TO instructions & discussions | 34 | 09-30-2013 08:25 PM |