You are browsing camaro5 

|
 02-19-2013, 12:22 PM
|
#15 |
|
HT5 COTW 1/21/13

Drives: 2010 Camaro Inferno 2SS RS 6M Join Date: Apr 2011
Location: Pleasant Hill, Or
Posts: 2,486
|

__________________
 |

|

|
|
02-19-2013, 03:01 PM
|
#16 |
 
Drives: 2010 2ss red LS3 Join Date: Aug 2011
Location: perkasie pa
Posts: 533
|
Anthony@LG Motorsports says they are working on a kit,says it should be ready in a few weeks!
|
|
|
|
|
03-01-2013, 08:19 AM
|
#17 | |
 
Drives: RY 2011 2SS A6 Join Date: Jul 2010
Location: Virginia
Posts: 997
|
Quote:
__________________
 Dry sump LS7, cage, JPSS suspension, Wilwood brakes, fire suppression, ARH 3" headers/exhaust, Z/28 DSSV coilovers, Kirkey seats, TeamTech 6-point harnesses, 19" Forgeline GA3R, 325/30R19 Re11 tires, oil cooler, monster JPSS splitter/wickerbill, CAI, brake ducts. |
|
|
|
|
|
03-01-2013, 09:39 AM
|
#18 |
|
instigator

Drives: 2020 6.2 Trail Boss, 2022 XC90 Join Date: Jan 2010
Location: 72034
Posts: 3,979
|
that looked like an older gt500 duct kit
__________________
-John S.
|
|
|
|
|
03-01-2013, 12:12 PM
|
#19 | |

|
Quote:
 Just kidding LG... But seriously hurry up |
|
|
|
|
|
03-01-2013, 04:54 PM
|
#20 |
|
Account Suspended
Drives: 2011 2SS Join Date: Sep 2011
Location: CA.
Posts: 309
|
I'm going to be doing mine this weekend. I removed the fog lights and will be pulling air in from there. I plan on modifying the backing plate at the other end. I'll post some pics when I get it done...
|
|
|
|
|
03-02-2013, 12:05 PM
|
#21 |
|
Drives: 2010 2ss red LS3 Join Date: Aug 2011
Location: perkasie pa
Posts: 533
|
I hope the kit from LG Motorsports uses the lower grill area,I use my fog lights!
|
|
|
|
|
03-02-2013, 12:22 PM
|
#22 | |
        
Drives: One of the baddest handling Gen 5s Join Date: Feb 2011
Location: Masachusetts
Posts: 4,177
|
[QUOTE=bannonm;5692756]
Quote:
|
|
|
|
|
|
03-02-2013, 12:46 PM
|
#23 | |

Drives: 2011 2SS/RS M6 VR Join Date: Aug 2011
Location: Chicagoland
Posts: 1,536
|
Quote:
I'm 99% sure you won't be able to run a 3 inch pipe through the engine bay without smashing it up. I have test run a 2-1/2 duct and was able to get that in without a lot of problems. So to reiterate, I'm going with the headlight duct adapters and mounting those to the left and right of the air damn in the lower grille. This means cutting out the plastic and riveting or bolting in the adapters to the air damn. I'll need a 3" to 2.5" adapter to run the smaller duct back to the brakes. Since the dust shield is steel, I'll cut holes where I want the duct to be attached and weld the muffler adapters I found at autozone for 2.5 exhaust pipe. Using the DRL lights is another way to get air, but I prefer to leave mine intact. The plastic air damn is inexpensive enough that if I remove the ducts for some reason, I can get it replaced.
__________________
 |
|
|
|
|
|
03-02-2013, 12:54 PM
|
#24 | |
|
Drives: 2011 2SS/RS M6 VR Join Date: Aug 2011
Location: Chicagoland
Posts: 1,536
|
[QUOTE=L99CAMA2011;6236297]
Quote:
__________________
|
|
|
|
|
|
03-02-2013, 11:44 PM
|
#25 | |
|
Drives: One of the baddest handling Gen 5s Join Date: Feb 2011
Location: Masachusetts
Posts: 4,177
|
[QUOTE=bannonm;6236395]
Quote:
|
|
|
|
|
|
03-03-2013, 09:30 PM
|
#26 |
|
Tampa Gulf Coast Family

Drives: 1977 Z28, 2SSRS 2010 M6 Join Date: Sep 2009
Location: Dunedin FL
Posts: 810
|
Here's some pics from my ducts. I used the idea from JohnM. It came out well. He posted pics on here and I just used those. the only thing was the pics still left a lot for me to figure out. like there is two little plastic pieces that I had to cut in the front air dam to run the hoses through. The NACA ducts come pretty big and have to be cut or sanded down a lot to fit against the lower grill. The lower grill does come out with some persuasion without taking the front bumper off. The NACA ducts are zip tied to the lower grill and held strong last December at Daytona even hitting a top speed of 158 mph. Routing the ducting was the easy part. The backing plates pop off with 3 bolts, drill a 2" inch hole where the air can get to the inner rotor vanes and weld that sucker on. Also the NACA duct comes in 3" and you need a reducer that doesnt have the greatest fit so I epoxied that after sticking a couple screw in for good measure. They really can't even be seen unless they are pointed out.
Part #s 2 SPA-D103B 3"- 2 1/2" NACA duct adapter $13.99 ea 1 THE-SS200 2" silicone ducting 11' section $52.99 2 SPA-D100 single small bumper, black NACA duct $15.99 ea 2 2" O.D. exhaust tube, 4 worm clamps, zip ties
__________________
 |
|
|
|
|
03-03-2013, 09:35 PM
|
#27 |
|
Drives: pleather and Chiclets Join Date: Mar 2012
Location: a line somwhere
Posts: 4,206
|
anyone try the zl1 brake ducts and then add a hose to position the air directly between rotor and the guard?
__________________
|
|
|
|
|
03-18-2013, 03:01 PM
|
#28 |
|
Drives: 2011 2SS/RS M6 VR Join Date: Aug 2011
Location: Chicagoland
Posts: 1,536
|
My brake duct attempt
Took some time Sunday to start the brake duct project. Very similar to what 1977and2010 and many other have done. I am using a 2-1/2 hose instead though. While a 2 inch hose would definitely be easier to route, I want the larger diameter because eventually I'll make some parts from fiberglass to replace what is routed along the frame. I'll only need a short section of duct tubing from the frame to the dust shield, and from the front NACA ducts to the fiberglass ducting. Right now I need something for a big track outing in May and need this working.
So here what I used from Racer Parts Wholesale. I like their ducts because of the plastic they use can be formed by heating it up. You'll see what I mean in a few pictures what I did with the bumper duct. 2 - SPA-D103A 3" to 2-1/2" NACA Duct Adapter 2 - SPA-D107 Small, Black Air Duct for Bumper, Spoiler or Small Area 1 - THE-SS250 2-1/2" Silicone Ducting- 11' Section 2 - The short steel pipe used to connect to silicone ducting to the dust shield is just a 2-1/2" muffler connector bought at Autozone. This is the bumper duct cut and bent to fit in the lower air dam. 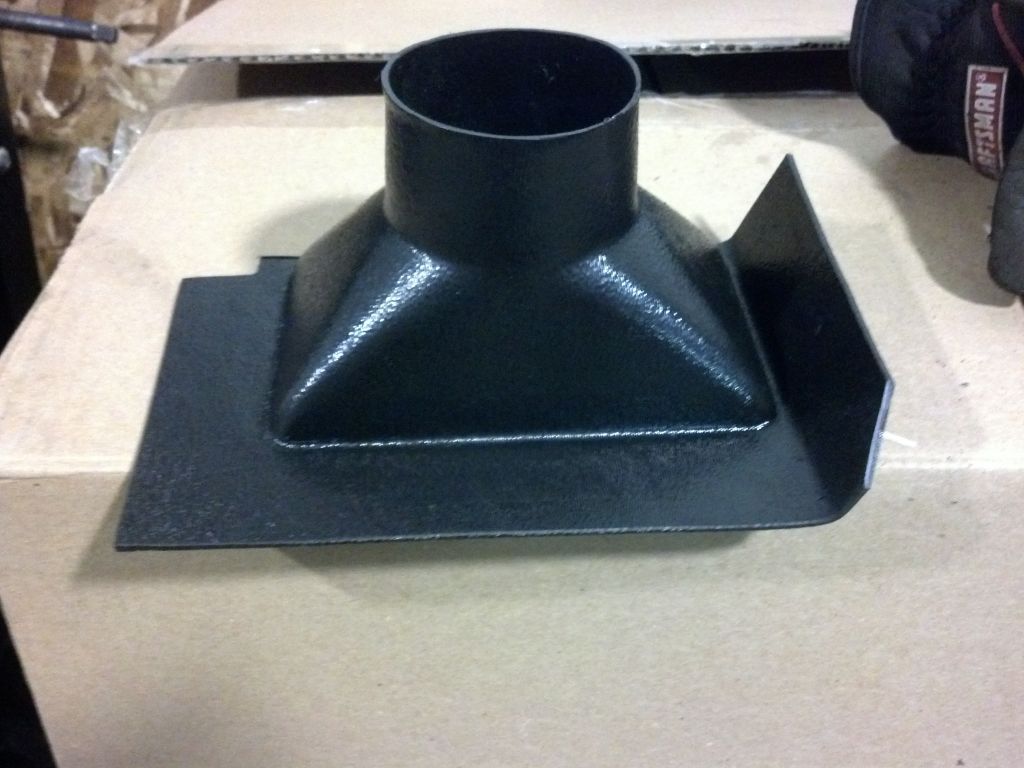 Using a heat gun, a couple of pieces of aluminum and vise grips I carefully bent the duct. This was done to fit the angle in the lower air dam to give it a finish look.  Here's the backside of the air dam marked off for where I will make the cutout to fit the bumper duct. 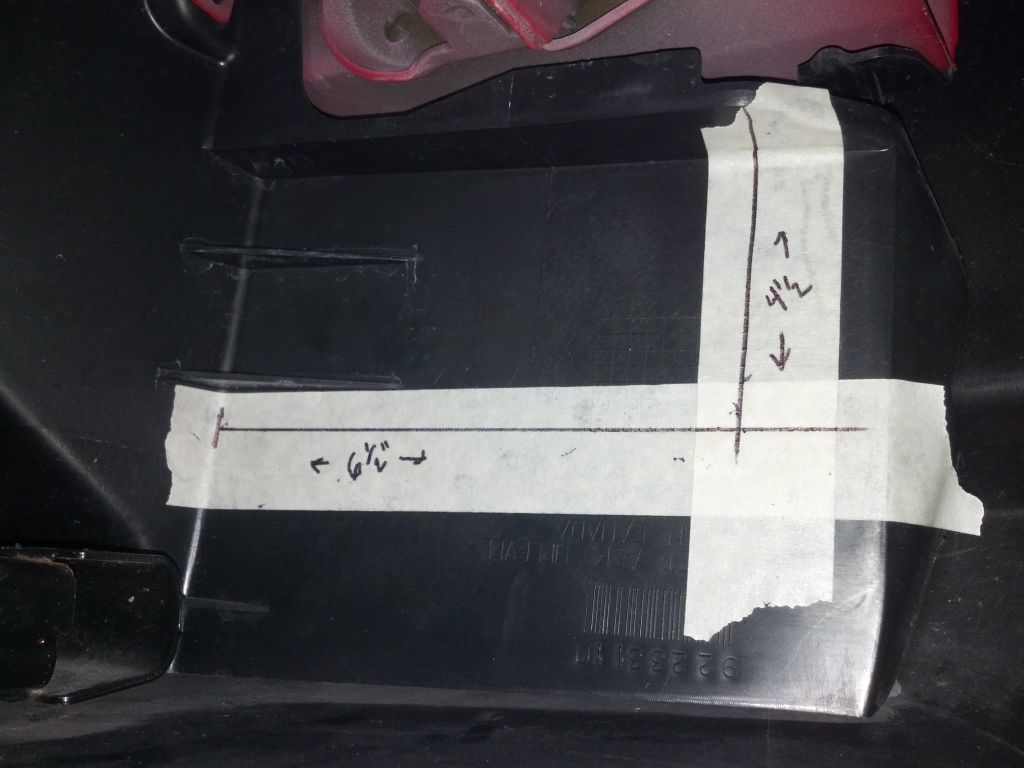 Backside of air dam after cutting. Used a dremel with a cutting bit which made it quick and easy. 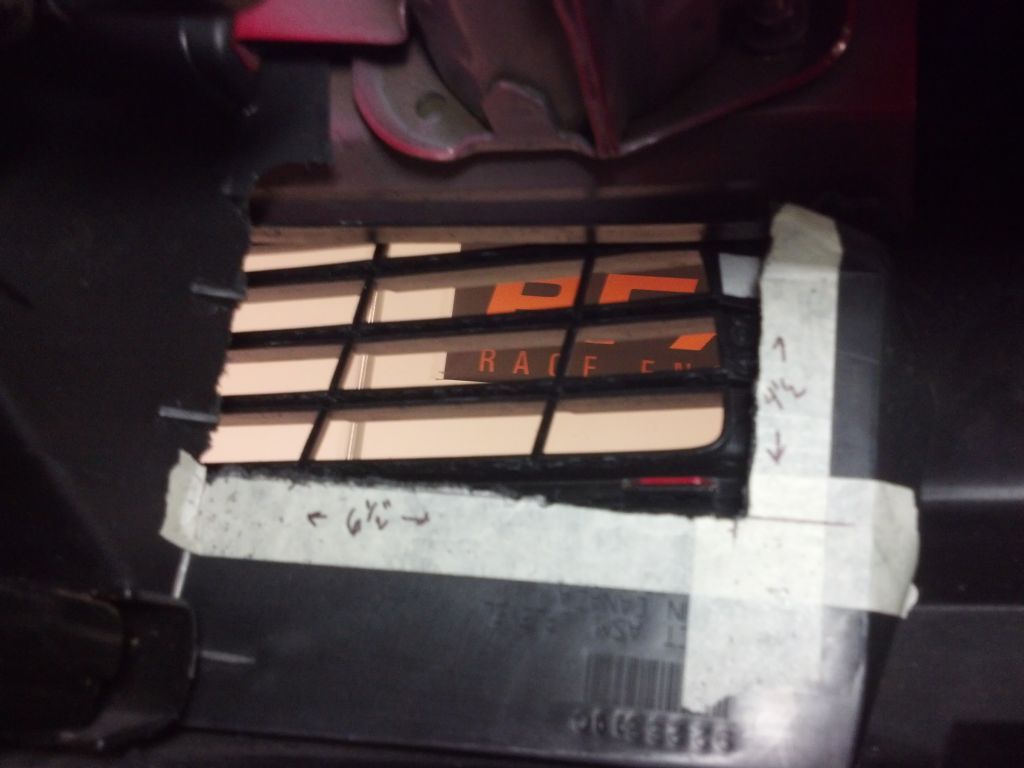 This is the bumper duct mounted to the air dam. 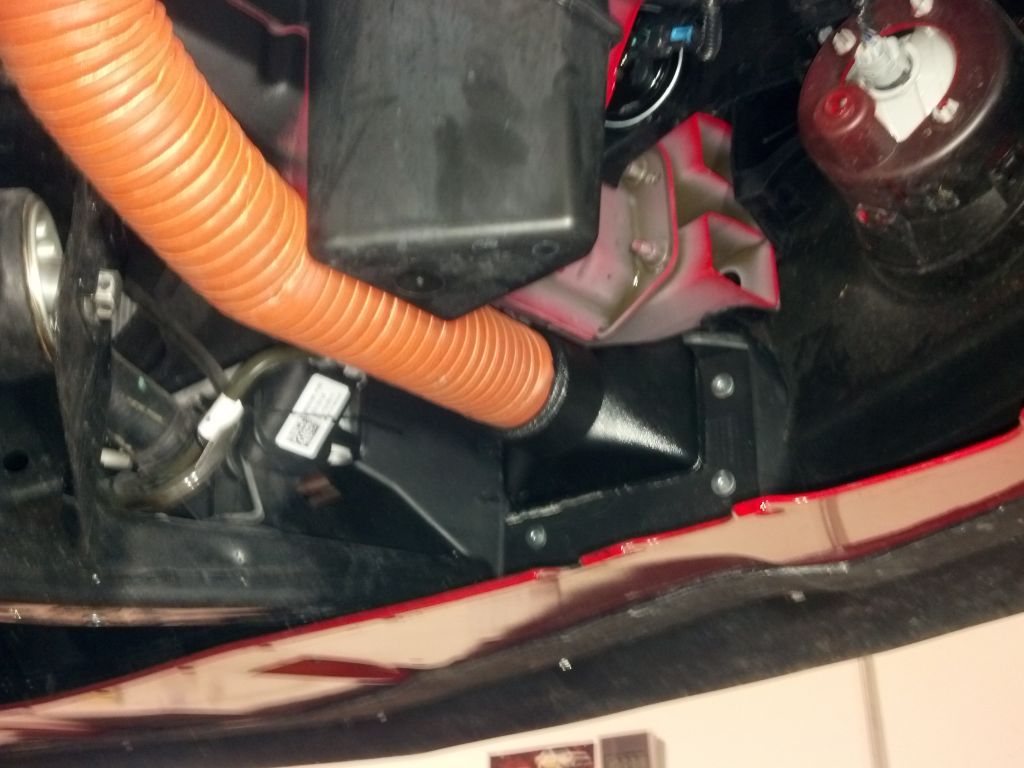 This is what it looks like from the front. You can see on the right side where the bumper duct that was bent fits over the angled part of the air dam. This helps support it as well. 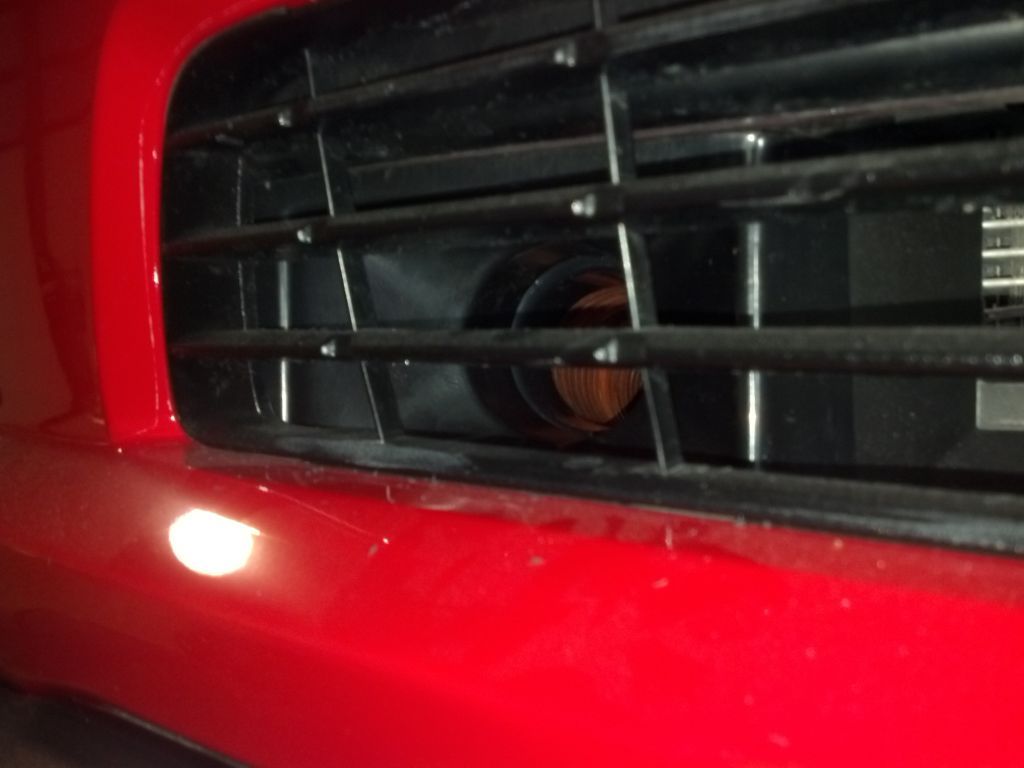 Here's how the duct attaches to the dust shield. I'll mark the shield up, cut the hole and weld the round tube to it. I'll be taking the shields off because I need to replace the dust shields on my calipers anyway. I can then trim off some extra metal and paint them up nice. 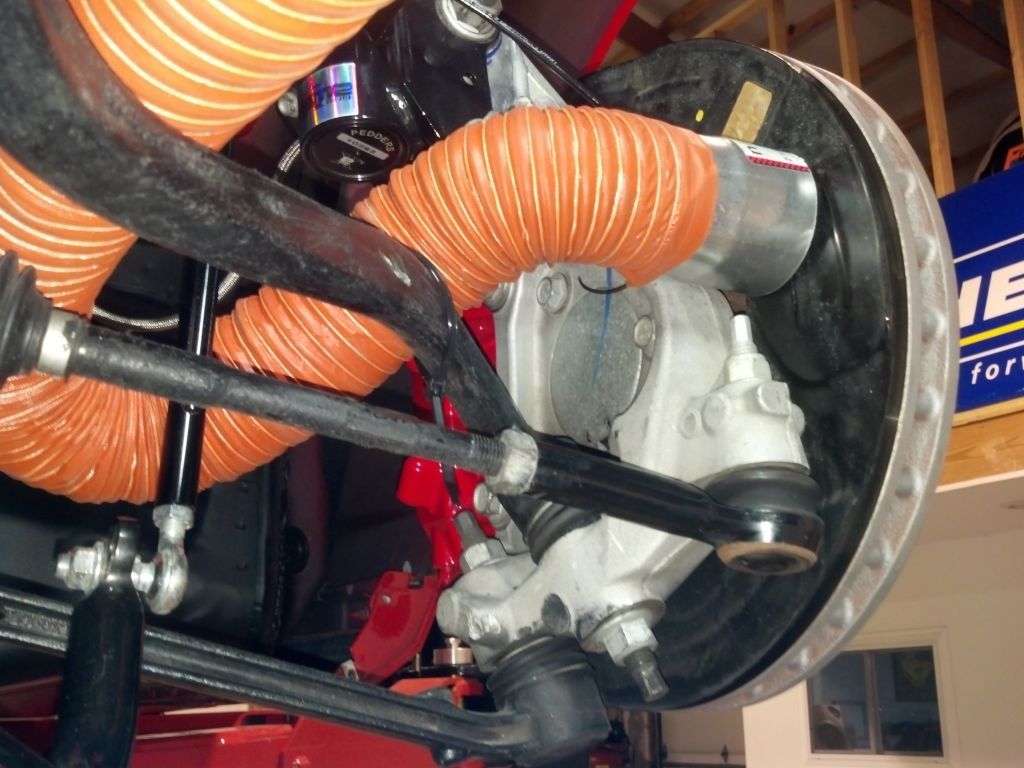 So I'll need to run the duct below the control arm instead of going over it. The 2-1/2 hose will get crushed with the suspension compressed; a 2 in hose might make it through there but my feeling it is will rub also. 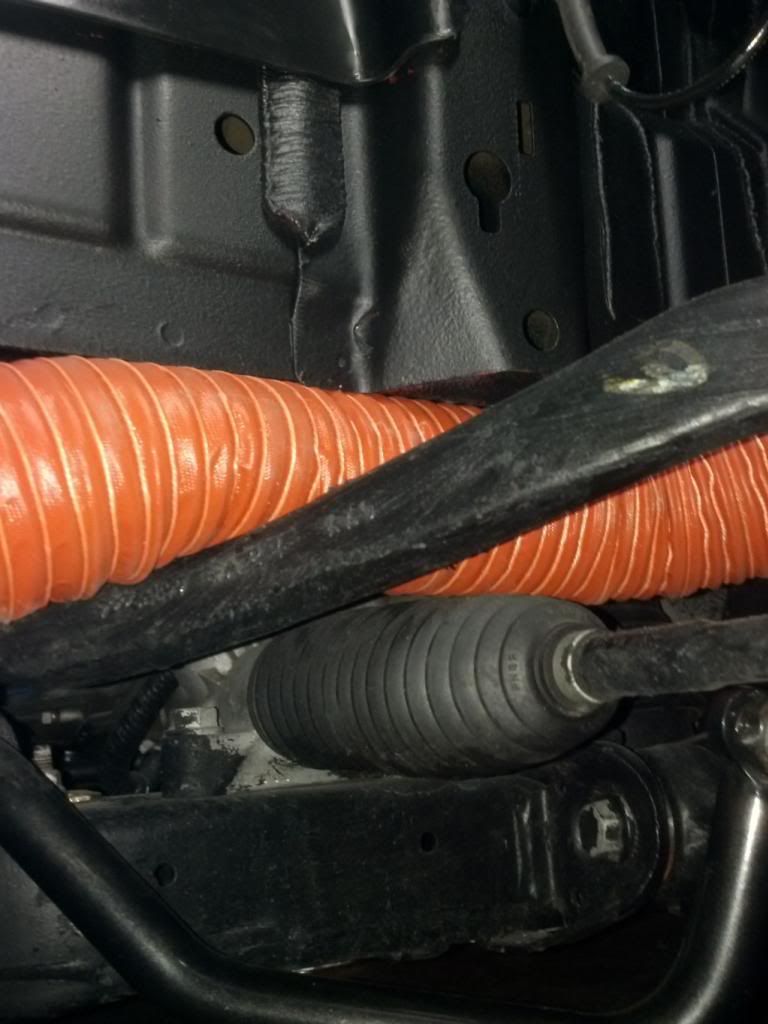 I took a bunch more pictures, but this should give you guys some more food for thought. Most of these implementations have been similar, so nothing earth shattering with mine. The only thing I will do differently in the future is to design a duct system made of fiber glass to run along the frame and avoid the issues with the control arms. For now this will have to wait, time to get on the track.
__________________
|
|
|
|
|
|
|
|
 |
| Tags |
| brake, ducts |
| Thread Tools | |
|
|


