You are browsing camaro5 

|
 07-04-2013, 07:04 PM
|
#15 |
        
|
Very nice i wish i would have known about this i would have definitely been there. I dont get emails from the club anymore

__________________
|

|

|
|
07-04-2013, 07:40 PM
|
#16 |
 
|
you should be getting your emails now. the mailingist was goofy.
nice pics Cliff! Congrats on the trophy! g
__________________
 XSPower Longtube + Catback "Engine to Tip" polished steel VMAX ported Throttle Body 160 degree thermostat Street Tune East Coast Supercharging Cold Air Inductions TRex Phantom Black Billet Grill. Upper and lower Custom Badging Lloyd Floors mats splash guards Underhood Engine bay done AAC LED mailslot strip lights Flowing Cheese Fondue waterfall in console Various food items to dip into warm cheese  |
|
|
|
|
07-04-2013, 08:44 PM
|
#17 | |
|
|
Quote:
__________________
|
|
|
|
|
|
07-05-2013, 12:00 AM
|
#18 |

Drives: 2013 silver ice metallic ZL1 Join Date: Jan 2013
Location: Camden County, NJ
Posts: 730
|
Your wheels look great; I should have went to the silver diner this morning I just had too much going on at my house. I may consider contacting that guy to fix my wheel damage and powdercoat mine as well! Thanks for the detailed posts, and great pics.
|
|
|
|
|
07-05-2013, 06:28 AM
|
#19 | |||
|
Quote:
 Quote:
 Quote:

__________________
 |
|||
|
|
|
|
07-05-2013, 08:26 AM
|
#20 | |
|
|
Quote:

__________________
|
|
|
|
|
|
07-08-2013, 08:26 AM
|
#21 |
 
Drives: 2013 2SS Join Date: Jun 2013
Location: NJ
Posts: 4
|
Looking good, Cliff. Even though I already told you this :P figured I would comment.
|
|
|
|
|
07-08-2013, 08:42 AM
|
#22 |
|
Jackson's COTW

Drives: 1968 Camaro & 2010 Camaro 2SS Join Date: Jul 2009
Location: Chalmers, Indiana
Posts: 1,740
|
Cliff,
Nice Build....love the subtleness of your mods.... Documentation is awesome.... Keep up the good work and great things will follow...  Kurt ABL99... 
__________________
|
|
|
|
|
07-08-2013, 11:26 AM
|
#23 | ||
|
|
Quote:
Quote:

__________________
|
||
|
|
|
|
07-08-2013, 12:02 PM
|
#24 |
|
Drives: 2013 2SS Join Date: Jun 2013
Location: NJ
Posts: 4
|
[QUOTE=cliffdog89;6762749]lol thanks Sam! Need to get some pics of your car up soon
Your thread has inspired me, Cliff. I just may do my own. Haven't really done any mods yet, though.. other than.. well, you know haha 
|
|
|
|
|
07-11-2013, 06:30 AM
|
#25 |
|
|
Mod 8: Trunk Blackout
Purchased: http://www.ridergraphix.com/
Contact: sales@ridergraphix.com Flat Black Trunk Blackout $45.95 I am a little late putting this mod up but better late then never! I installed this decal at the same time as my hood spears but I feel it deserved a separate write up. During the installation I definitely felt that the quality of the decal was not quite the same as the hood and side spears I received from Big Worm Graphix. The trunk decal material felt much lighter than the hood and side spears. With that said, the decal has held up fine for the three to four weeks it has been installed with no evidence of peeling. I went with Rider Graphix because Big Worm did not have a trunk blackout decal when I ordered the decals but they have since added a kit to their site. I have no complaints now that the decal is installed so it is a matter of preference. Installation There are two options for blacking out the trunk: The first mounts without bowtie removal, the second (the option I went with) requires the bowtie to be removed. I stayed away from the first option because a thin line of orange would have been showing around the bowtie. NOTE: BEFORE removing the bowtie, get a measurement of the bowtie's location in the center of the trunk so you can quickly remount it. I forgot to save the measurements or I would have recorded them here but the areas I measured were: 1. From the bottom of the trunk to the bottom of the bowtie 2. From the outside top edge corner of the trunk to the top center of the bowtie on both sides. To remove the bowtie I taped around the bowtie with masking tape and then worked it off with dental floss. The dental floss shredded easily and I had to go through quite a bit before the bowtie came off. I do not fish but if you have fishing line this would probably work with a lot less frustration involved. I then used paint thinner and a microfiber towel to remove the automotive tape that was still on the vehicle. I then thoroughly cleaned the area with rubbing alcohol to remove any wax.   The decal required a mixture of soap and water during the application (rather than just the water mixture of Big Worm Graphix). It was difficult to get all of the soap and water from behind the decal and it required a lot of squeegeeing. Even after I thought I had removed all of the water, more came out when I went over it again. There is about one inch of material that folds under the lip of the trunk. Due to the slight point that the trunk comes to in the middle, it was necessary to slice this part that folded under in the middle. This cut allowed the decal to fold under the trunk without bowing out the middle of the decal on the outside of the trunk. Before bending the bottom of the decal under the trunk I let it set for a few minutes and hit it briefly with a blow dryer. However, even after waiting, bending the decal underneath the trunk, using a blow dryer to warm up the area, the decal on the outside of the trunk lifted some and I had to re-squeegee the outside area. I then waited about one hour before remounting the bowtie. While I was working on other portions of the car, my grandfather thoroughly cleaned and custom fitted 3M automtive tape the back of the bowtie. Using the measurements I had recorded earlier, I remounted the bowtie.  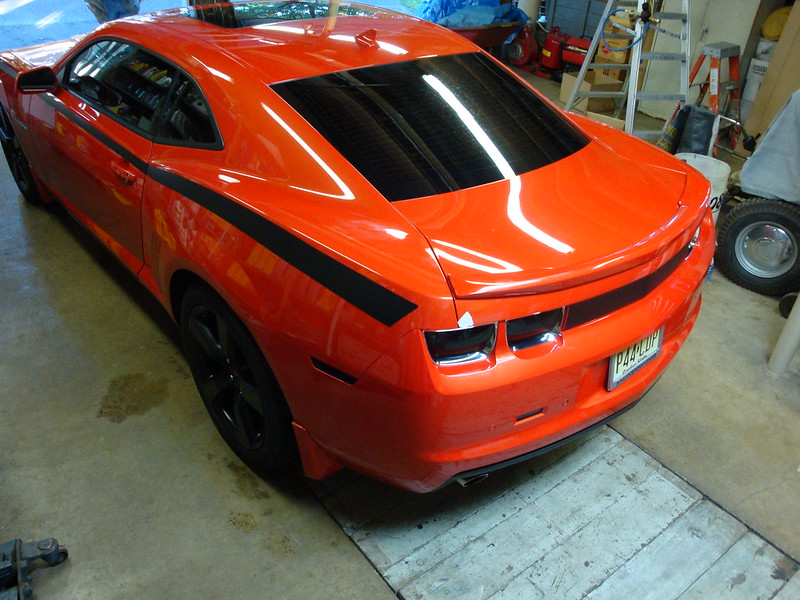 
__________________
|
|
|
|
|
08-12-2013, 07:05 PM
|
#26 |
|
|
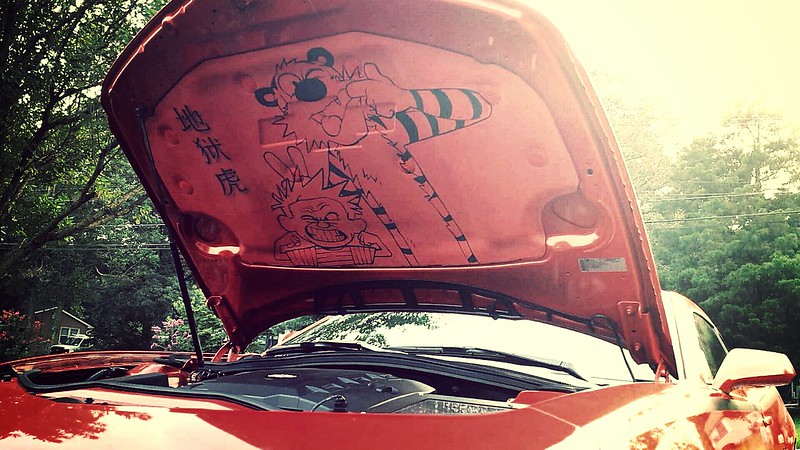
Mod 9: Air Brushed Hoodliner
Purchased: www.corradomurals.com
Contact: corrado@corradomurals.com Artwork: $650 Hoodliner & Pins: $60 Shipping: $65 If you are considering having your hoodliner airbrushed I would highly recommend Corrado. His work is of the highest quality and he has lot of experience with camaro hoodliners. You can browse a lot of his past work on his website to get a taste for what other camaro owners have done. I wanted to be unique with mine and my brother and I came up with the design. We both read all of the Calvin and Hobbs comics growing up and it felt fitting for the car. A lot of friends busted my chops for putting Chinese characters on an american car but to each their own. It translates "Tiger in Hell" - or more loosely "Inferno Tiger" which is what I was going for in keeping with my tiger theme. Corrado made sure he fully understood the nuances of the design before starting and offered suggestions like giving a slight backdrop to the Chinese characters. He emailed me in progress photos throughout the process. I was initially worried about how it would hold up under daily use, so far it has held up very well through a harsh winter. Corrado assured me that it will hold up as he uses automative paints and the heat from the engine should have no affect whatsoever. One word of warning - I would not recommend removing and re-installing the airbrushed hood-liner often. Although very secure once in place under the hood - it definitely feels much flimsier than the original hood-liner. I am not sure if this is due to the painting process or because it is just a made from flimsier material. I know some camaro5 members have Corrado hood-liners that they take in and out for car shows. If you plan on removing it often, I would only suggest that you do so very carefully. 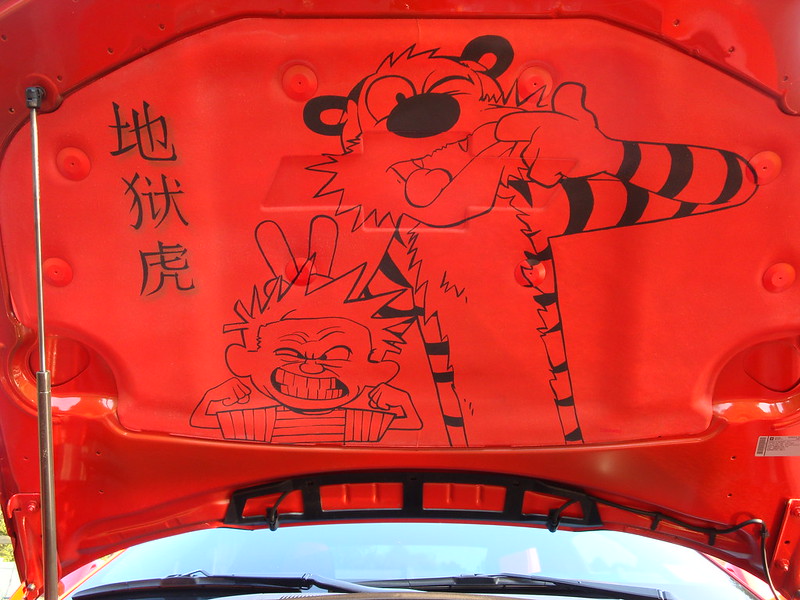 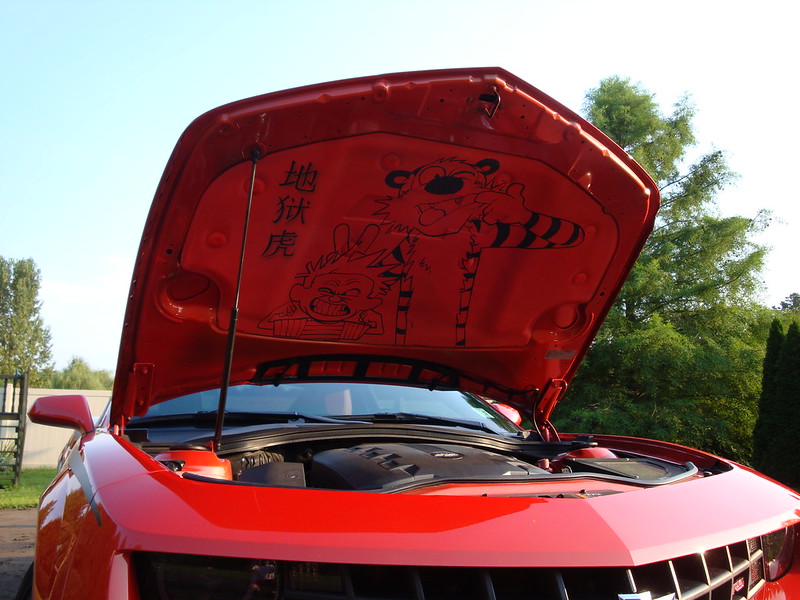 
__________________
Last edited by cliffdog89; 02-12-2014 at 11:26 AM. |
|
|
|
|
08-14-2013, 04:34 PM
|
#27 | |
|
SoCal HT5 COTW 4/21/13

Drives: 2011 SS/RS Blown & Cammed LS3 Join Date: Sep 2011
Location: Sandy Eggo
Posts: 3,047
|
Quote:
__________________
 |
|
|
|
|
|
08-23-2013, 08:52 PM
|
#28 |
|
|
Two of my in progress mods. The engine cover has a long way to go but it is started
 I will post a detailed guide for both the rim pinstripe and painted engine cover once both are complete. I will post a detailed guide for both the rim pinstripe and painted engine cover once both are complete.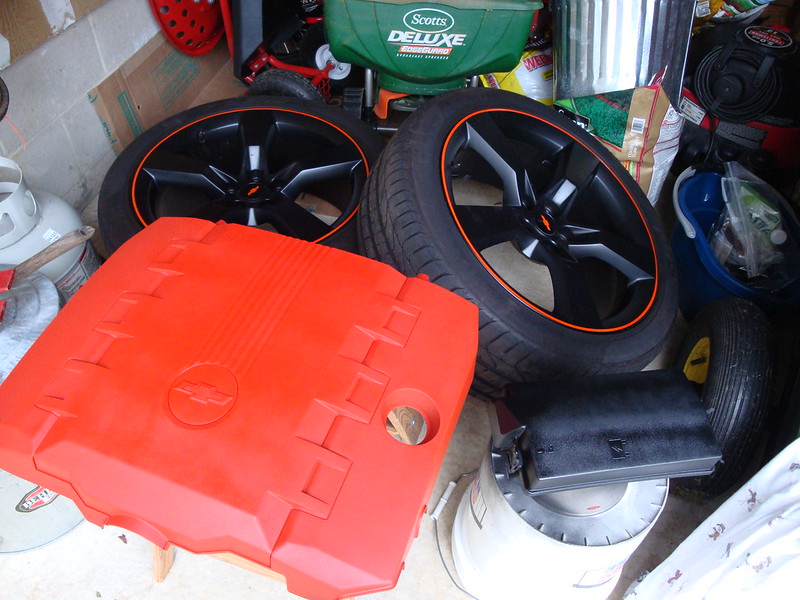
__________________
|
|
|
|
|
|
|
|
 |
|
|