You are browsing camaro5 

|
 04-20-2012, 09:13 PM
|
#1 |
|
[COTW 5/12/14]

Drives: 2012 CRT NF Cammed 2SS/RS For Sale Join Date: Oct 2011
Location: NOLA
Posts: 6,115
|
Sorry I couldnt really upload the pictures in the right order, or put the text with the pics, but hopefully this helps some people who may want to attempt this themselves.
I chose to do the rear bowtie on the car, you can take it off using adhesive remover, a blowdryer, and fishing line or dental floss. 1. Remove front bowtie 2. Scuff or sand lightly 3. Prime the entire bowtie 4. Mask off the inside applying painters tape over the entire bowtie, and run a fingernail along the edge to get an outline of where the razor blade needs to go, then cut along the edge with a razor or xacto knife. Then peel off the excess 5. Paint the outer part of the bowtie 6. Following directions on cans for drying times and coats, let the outer coat dry. 7. Mask off the outside using the same instructions as number 4, except removing the inner tape. 8. Paint the inside with a few light coats. 9. Following the directions on the can, spray a few coats of clear to protect the base coat and make it more durable. 10. Allow to dry for a while before trying to push it back on or you may leave finger print impressions, in the clear. Some masking tips for doing it on the car - I used trashbags to cover the area - Cover any horizontal surface, since this is where overspray will settle for the most part - When doing the immediate area of the bowtie, I used a flathead eyeglass screwdriver to help push the blue painters tape behind the bowtie. Removing the front bowtie is tough, reach behind and pull the big horizontal tabs down a little, and pull one side at a time, working it back and forth, you will have to pull harder than you think. Helpful tip I can give you is to go slow and follow the directions, the more careful you are, the less chances you have of runs, or messing up the finish with the razor blade. Excuse the dirty car and bugs, Im cleaning it tomorrow
__________________
 Last edited by vroomapunk; 05-16-2012 at 02:07 PM. |

|

|
|
04-20-2012, 09:21 PM
|
#2 | |
        
Drives: 2010 SS/RS M6/2500HD Lmm LTZ Join Date: Apr 2012
Location: South Georgia
Posts: 2,543
|
Nice!!!!!
__________________
FASTER than my SS....for now
  2500HD (with a couple parts 2500HD (with a couple parts ) )Quote:
|
|
|
|
|
|
04-21-2012, 03:32 AM
|
#3 |
 
Drives: 2018 Hot Red ZL1 Join Date: Nov 2010
Location: Los Angeles, CA
Posts: 3,599
|
what type of primer did you use??? I am going to do this.. I was thinking adhesion promoter. This can be done to the tail light bezels right?? I want flat black so just flat black with no clear coat tight??
__________________
 |
|
|
|
|
04-21-2012, 05:49 AM
|
#4 |
 Drives: 2011 camaro ls Join Date: Jul 2010
Location: lafayette, la
Posts: 219
|
Looks mean.
|
|
|
|
|
04-21-2012, 09:09 AM
|
#5 | ||
|
[COTW 5/12/14]
Drives: 2012 CRT NF Cammed 2SS/RS For Sale Join Date: Oct 2011
Location: NOLA
Posts: 6,115
|
Quote:
If you want flat black, you will still want to do a clear, just a matte or satin clear. I think its Gloss, Semi-Gloss, then Satin. The point of the clear is to protect it, if you just put flat black enamel, after it dried, you could still just pick it off with your fingernail, no matter how well you prepped it. A few coats of clear will protect it like the rest of your car, where you can wash it, wipe it, pick bugs off it, etc without worrying. Alot of people use Plasti-Dip, to get a flat black look, although it is single stage, plasti dip is more resilient than normal spray paint, but not as tough as a black coat with a couple clear coats over it. But satin clear is what you need, I think it looks almost the same as flat, if not just a tad bit shiny, but you could buy it, and spray a piece of wood or a bucket or something to test and make sure it gets the finish you want. And yes, the bezels are even easier because you can take them all off the car, and they are one color, so you really dont need to mask anything off if you dont want. Just be sure to follow the can directions, dont douse it with paint and clear, keep the can moving and do light coats. Quote:
__________________
|
||
|
|
|
|
04-21-2012, 11:26 PM
|
#6 |
|
[COTW 5/12/14]
Drives: 2012 CRT NF Cammed 2SS/RS For Sale Join Date: Oct 2011
Location: NOLA
Posts: 6,115
|
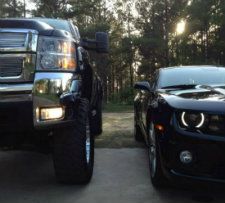
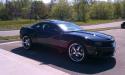
Couple more pics
__________________
|
|
|
|
|
04-22-2012, 01:54 AM
|
#7 |
|
Drives: 2018 Hot Red ZL1 Join Date: Nov 2010
Location: Los Angeles, CA
Posts: 3,599
|
cool.. I will look into the primer.. so you recommend to use adhesion promoter then gray primer then paint and then clear, right??
what did you scuff and sand with?? will the primer fill up any scratches??? Sorry if all this questions are stupid but i dont know much about painting
__________________
|
|
|
|
|
04-22-2012, 02:40 AM
|
#8 |
Drives: 2010 Camaro 2SS/RS L99 Black Join Date: May 2009
Location: West Bloomfield, Mi
Posts: 127
|

__________________
2010 Camaro SS/RS Black on Black
American Thunder Flowmaster 817481 K&N CAI |
|
|
|
|
04-22-2012, 04:30 AM
|
#9 |
Drives: 2010 Camaro IOM 1SS M6 Join Date: Aug 2010
Location: Michigan
Posts: 889
|
Great job! Nothing like doing it yourself and thanks for the instructions on this i may do this myself
|
|
|
|
|
04-26-2012, 10:49 AM
|
#10 | |
|
[COTW 5/12/14]
Drives: 2012 CRT NF Cammed 2SS/RS For Sale Join Date: Oct 2011
Location: NOLA
Posts: 6,115
|
Quote:
I say yes to the adhesion promoter, then gray primer, paint, then clear. But be sure to clean the surface with alcohol, and try testing that combination on a piece of plastic, because sometimes using different brands can make the different stages react differently.
__________________
|
|
|
|
|
|
04-26-2012, 12:05 PM
|
#11 |
|
It's a Three Six, Vee Six

Drives: '12 AGM 2LT/RS & '14 Silverado LTZ Join Date: Feb 2011
Location: Fort Leonard Wood, MO
Posts: 981
|
Nice DIY.
 This has been one of the projects I have had in my mind for a while now. This has been one of the projects I have had in my mind for a while now.
__________________
 |
|
|
|
|
04-28-2012, 06:56 PM
|
#12 |

Drives: 2012 Summit White Camaro 2LT Join Date: Apr 2012
Location: Savannah, GA
Posts: 1,179
|
Very nice! How did you know I am about to do this? Thanks for the tips, I have been wondering about painting the chrome. I bought some self etching primer...do you think that would be fine? i am testing right now on some electrical conduit to see how it all works. I like doing things myself...I get to learn, it's fun and less expensive! Great job.
__________________
Cars Owned:
2010 BMW 328xi LeMans Blue 2012 Camaro 2LT Convertible Summit White M6 2003 Audi A4 Convertible Silver Auto (sold) 1999 Ford F150 (sold) 2008 Porsche 911 Convertible Atlas Gray M6 (sold) 2007 Corvette Lemans Blue M6 (sold) 2004 BMW 645 ci Convertible Black Metallic (sold) 2000 Dodge Dakota sport Navy (sold) 1999 Porsche Boxster Black Metallic M5 (sold) 1999 Ferrari 360 Modena Titanium F1 (sold) 1992 BMW 325i 2 door Alpine white (sold) 1990 Nissan 240SX Burgundy M6 (sold) 1979 Celica Blue M5 (sold) 1974 Mustang II Ghia Green (sold) |
|
|
|
|
04-28-2012, 07:26 PM
|
#13 |
 
Drives: 2010 Camaro 1LT/RS M6 Join Date: Nov 2007
Location: Fairhaven, MA
Posts: 5,885
|
Just an FYI... the center of the bowtie is removable. Be careful that you dont break it when you remove it, but if you do, you don't even have to tape it off, just spray it and put it back together with some more 3M tape.
__________________
Trifecta tune, Vararam Intake, VMAX throttle body and manifold insulator, RxPerformance Catch Can, , MRT v1.0 and Louvers, Barton shifter, BMR strut tower brace, RED dome light and Plasma LED DRL's, fieldgoal00's Halo 1 harness, hood spears/side stripes, rain guards, custom bowtie, Team LLT badges, headlight and foglight covers, taillight and side marker covers, backup light covers, WeatherTech floormats
 |
|
|
|
|
05-01-2012, 02:48 PM
|
#14 | ||
|
[COTW 5/12/14]
Drives: 2012 CRT NF Cammed 2SS/RS For Sale Join Date: Oct 2011
Location: NOLA
Posts: 6,115
|
Quote:
Quote:
Good tip for people removing both bowties!
__________________
|
||
|
|
|
|
|
|
|
 |
| Tags |
| black, bowtie, front, paint, red |
|
|


