You are browsing camaro5 

 |
|
|
#43 |
 |
Nice. I'm getting everything together to tackle my build. Starting with a big order from SDS and I may break out the fiberglass and fill all those big holes in the door.
Looking forward to the pictures! |
|
|

|
|
|
#44 |
 Drives: 2013 2SS 1LE Join Date: Mar 2013
Location: United States
Posts: 134
|
alright... i'm soo happy today...
with the amount of progress I made today... I surely didn't think all this was going to be possible... so, with the front midranges installed and ready to go, I turned my attention to the mounting of the horns... and i hate installing horns. i mentioned earlier that there are two things I absolutely detest in this hobby, and that's deadening cars, and hanging horns. so, with the dread of today in front of me, i went to work patiently, and thoughtfully, looking for the best solution. first off, a thing about the horns. there are a lot of horn bodies out there, and out of the ones that I've used, I prefer to use the minihorns from Eric Stevens, as they are what I consider the most "install friendly" horns I've seen. they are small, the angle of the neck allows them to get fairly wide without any modifications, you can push them back pretty far out of the way. so, first thing is making sure i have horns that are easy to install. second is weight. heavy horns are a bear to hang... which is one of the reasons why i went with the bms 4552nd Neo compression drivers... they are small in size, and they don't weigh very much. third thing is magnet pains. if you've hung horns, then you know every time the compression driver comes into contact with sheet metal, you're in for a wicked fight to get them loose. so, this is why I came up with these. i'm sick and tired of scratching the horns, and them pulling towards every metal piece in the car. simple diy fix for this is to use some scrap ccf, and a zip tie... and voila... you have a protective sock for the driver. 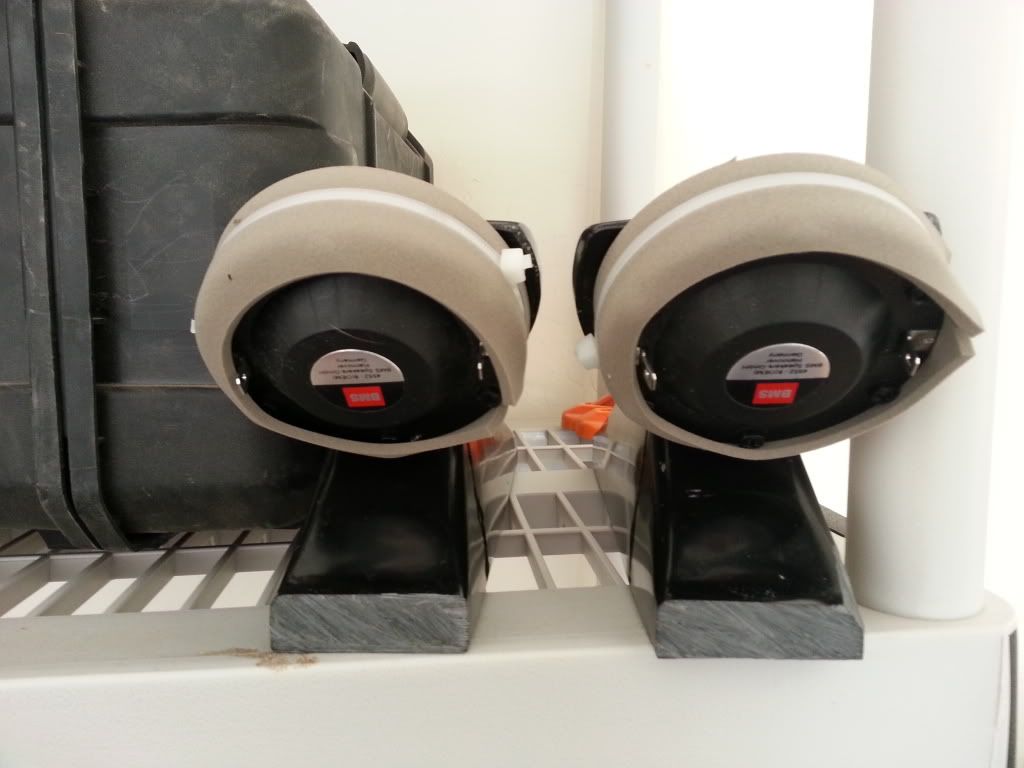 after looking around for quite some time at possible mounting locations and hanging solutions I settled on one that would be the easiest, and the most effective. most people will use backstrap, and hang it from a post within the dash... and then attach it to the front of the dash with more strap... it all leads to a pretty flimsy solution. now, in my location hunting, I found out that i could get the side horn mouth within 3/8" of the body metal. the little indent in the kick panels allowed me the extra room. so i trimmed to bodies way down... but i made sure i did so with a strong 90 degree angle. (again, trimming the bodies, getting rid of the unnecessary fat, allows me to have have extra feet room as well... which is important when i'm driving.) so, I decided to fab up some brackets that will allow me to attach the horn at the mouth.. and because of the way that the horn is designed, almost all of the weight is placed on this bracket as well... eliminating my need to use any other install points. here I'm drilling three holes per horn: 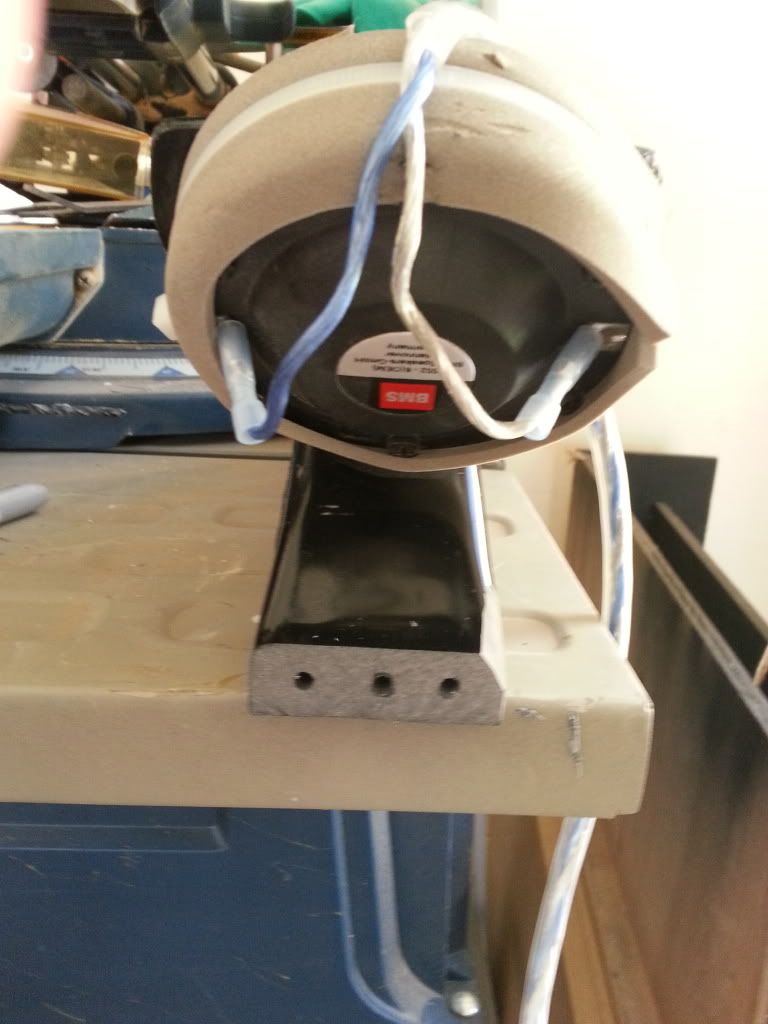 and i'm countersinking the inside so i don't have bolt heads sticking out: 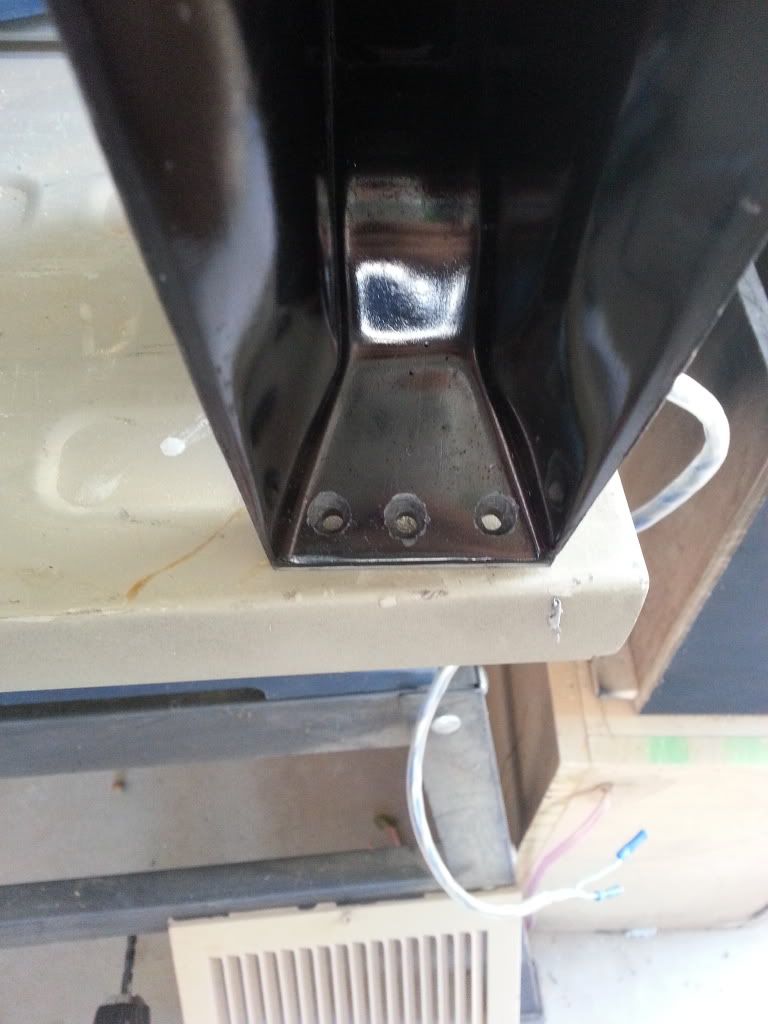 i used two pieces of aluminum in this install. one that attaches to the horns and the bracket, and the bracket that attaches to the body of the car. i drilled three holes to coincide with the horn mount as well as the body mount. 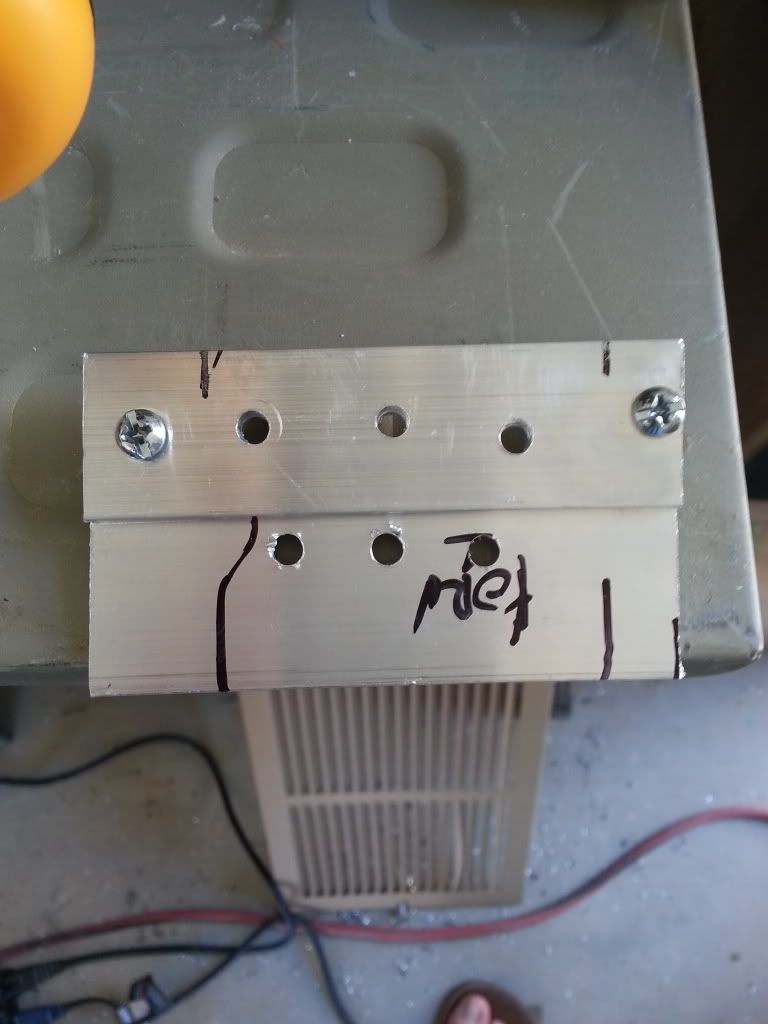 then I attached the horn bracket. now, with horns, you want the inside to be as smooth as possible. countersinking my bolts caused a bit of a problem with that, but not one that i hadn't anticipated. with my new found love of CA glue, i angled the horn in a way that the countersunk holes were horizontal .. and then filled each to the top with ca glue and used the accelerator to cure it. now, it's like i didn't even cut into the horn  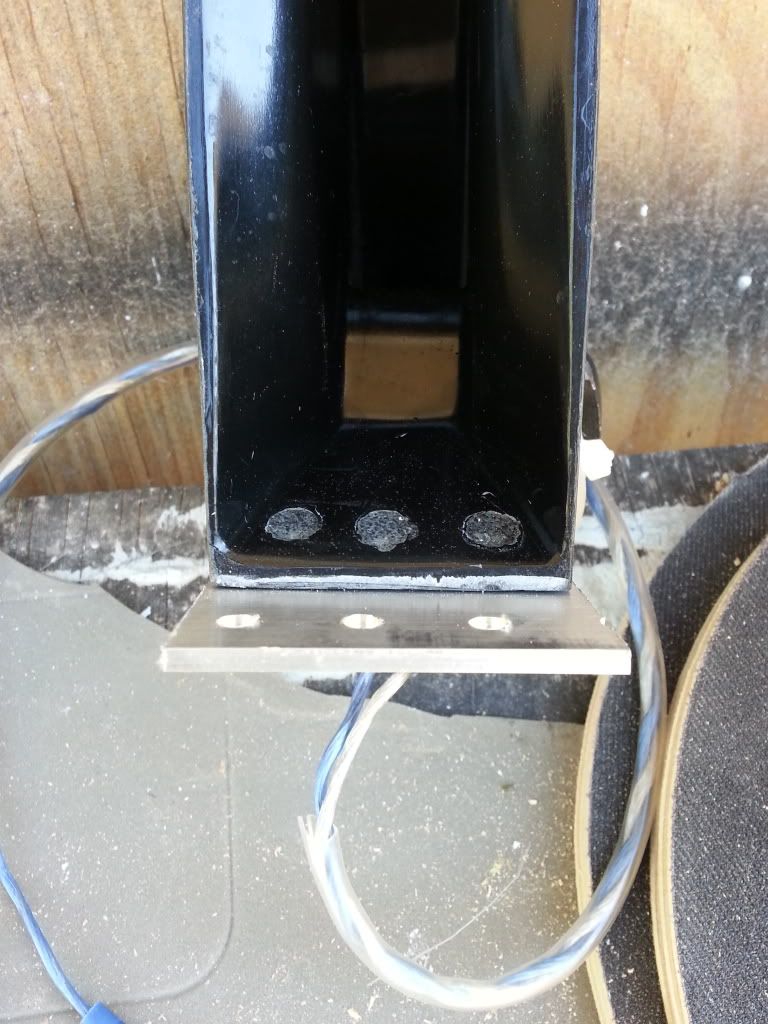 it was important that nothing stuck out of the bracket, so it wouldn't influence the way that this bracket would mate with the one in the car. i trimmed off the excess threads on the bolts that were securing the horn bracket. 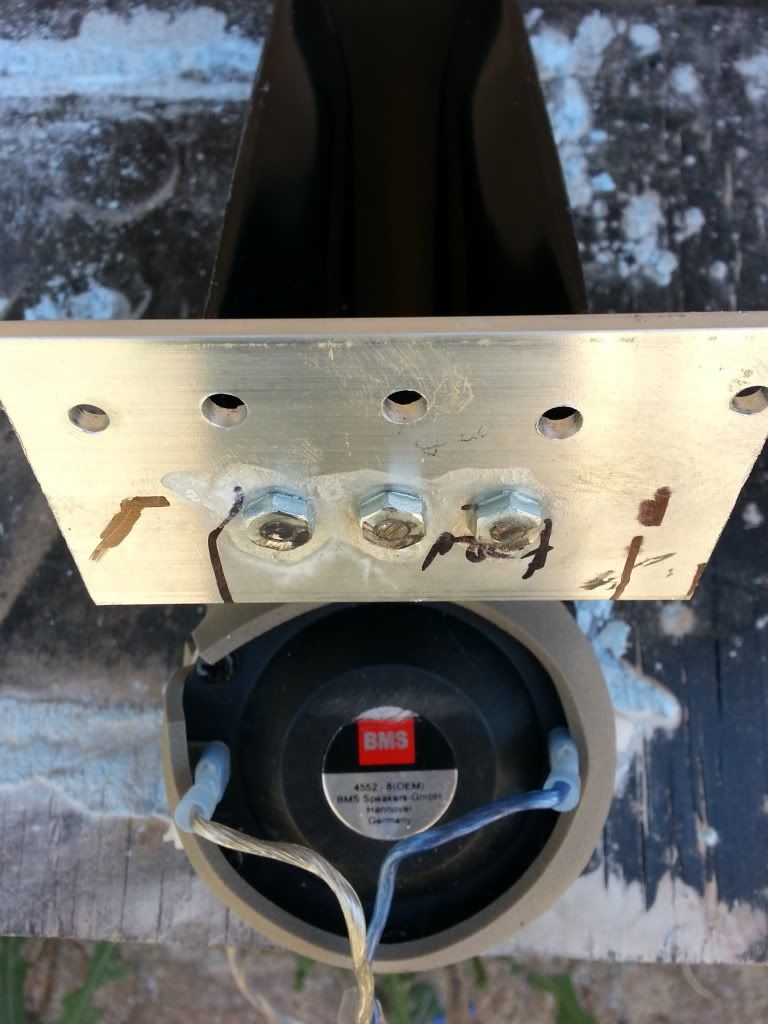 after using some self tapping screws and some patience in lining everything up, here is what we have: 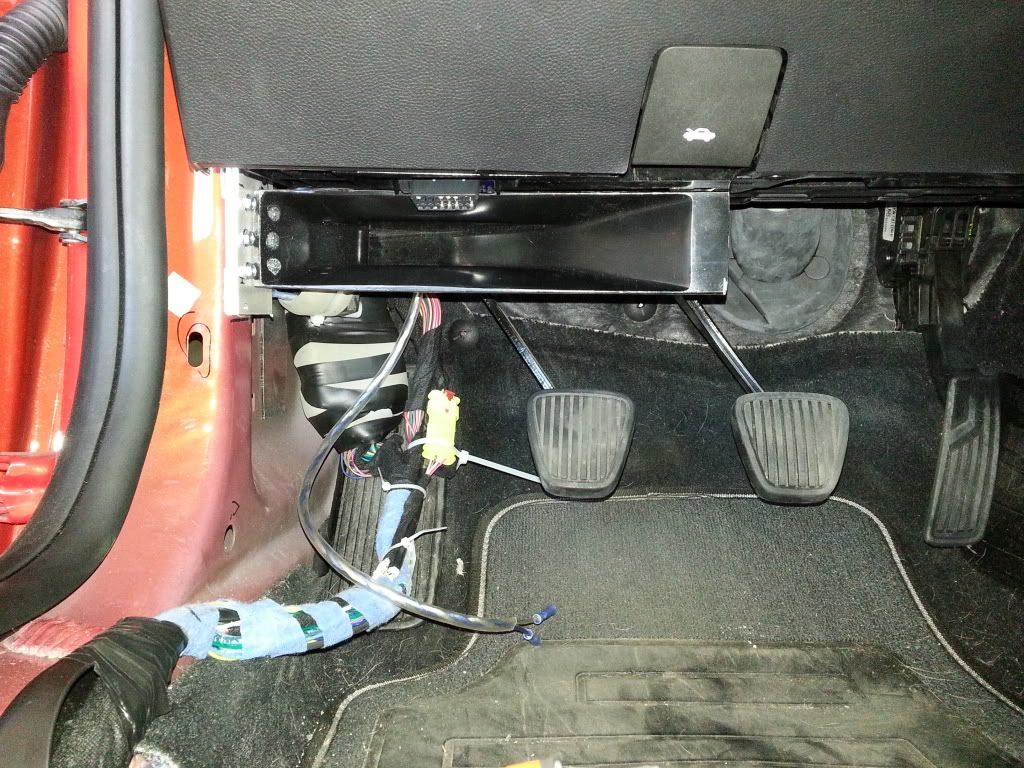 nice, level, and sturdy.  i repeated the same thing on the passenger side: 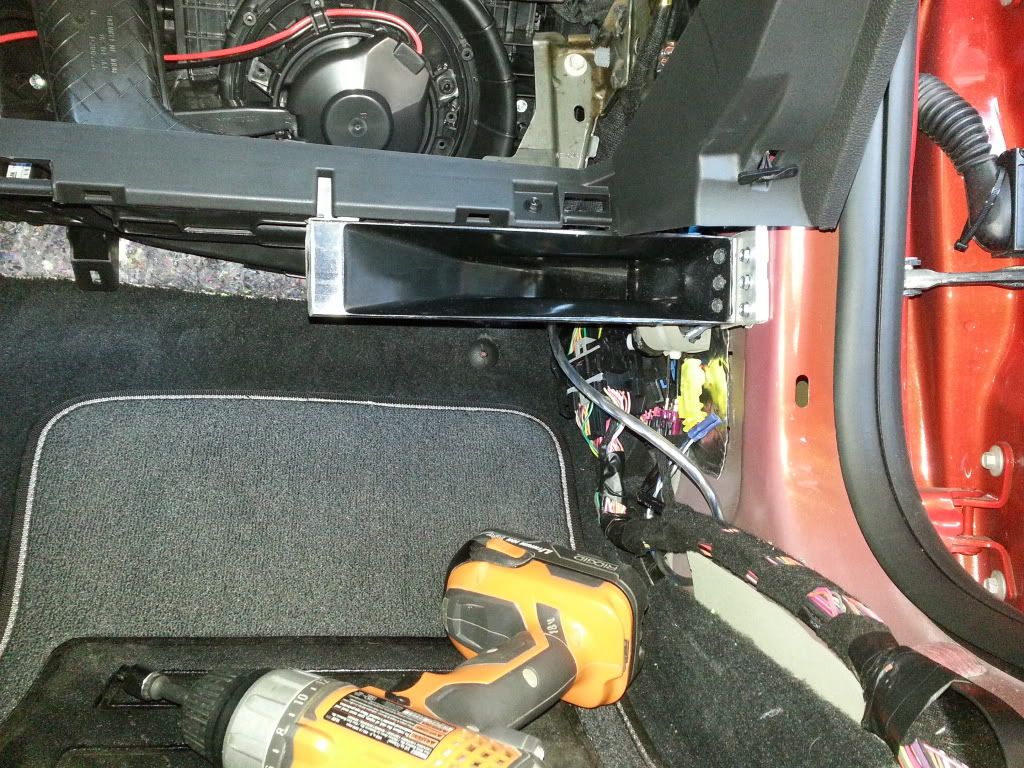 on the passenger side, the glove box makes up part of the underside of the dash. consequently, it also has a hinge that was getting in my way, and so I decided to remove it. in this picture you'll see it trimmed down on the left side: 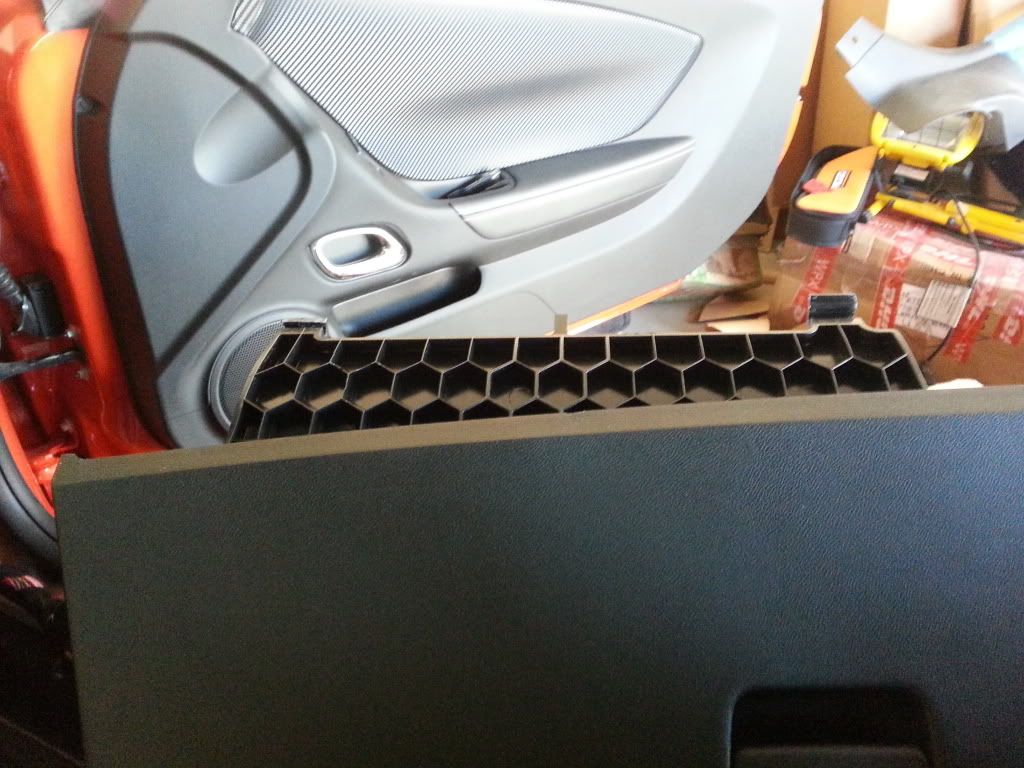 and some final pictures for you... (mind you I still need to address the wiring in the kick areas and reinstall the factory kick panels ... that will be for another day. ) view from the passenger seat: 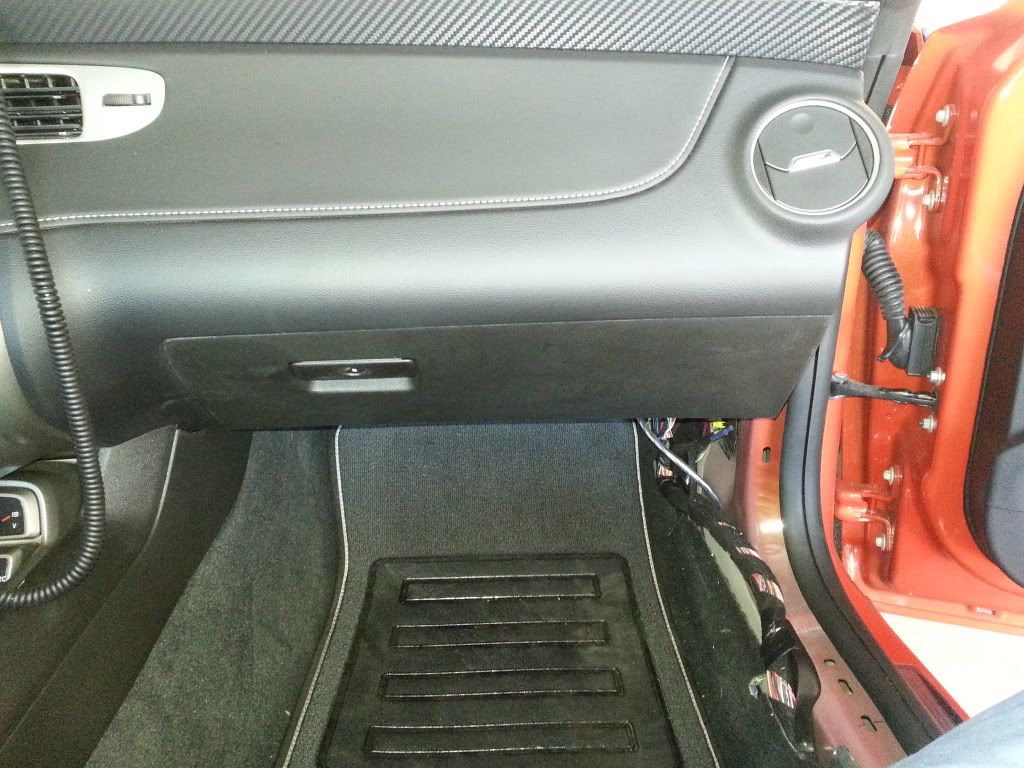 and a little bit lower: 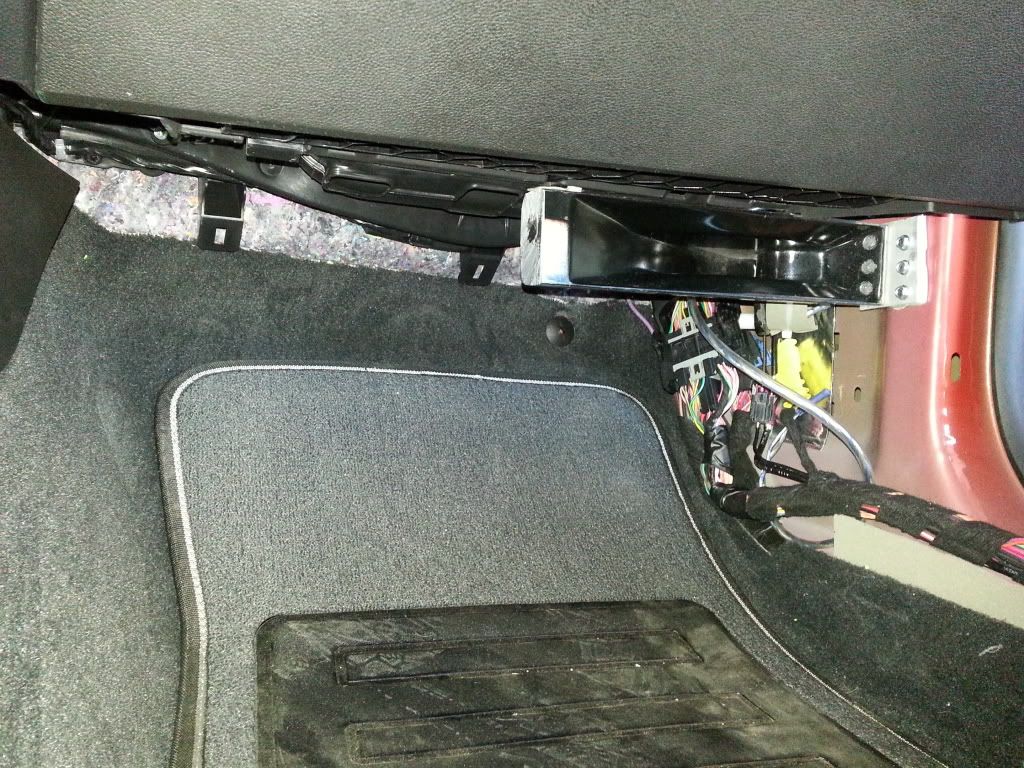 view from the drivers seat (say hello to my legs  ) )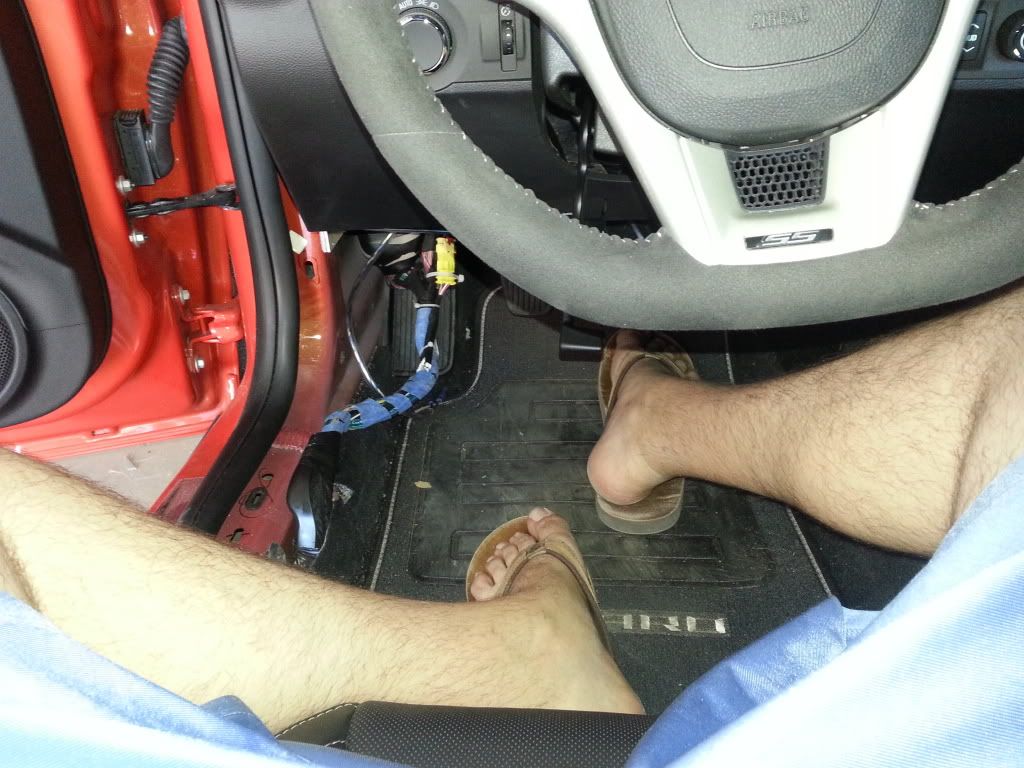 and a little bit lower: 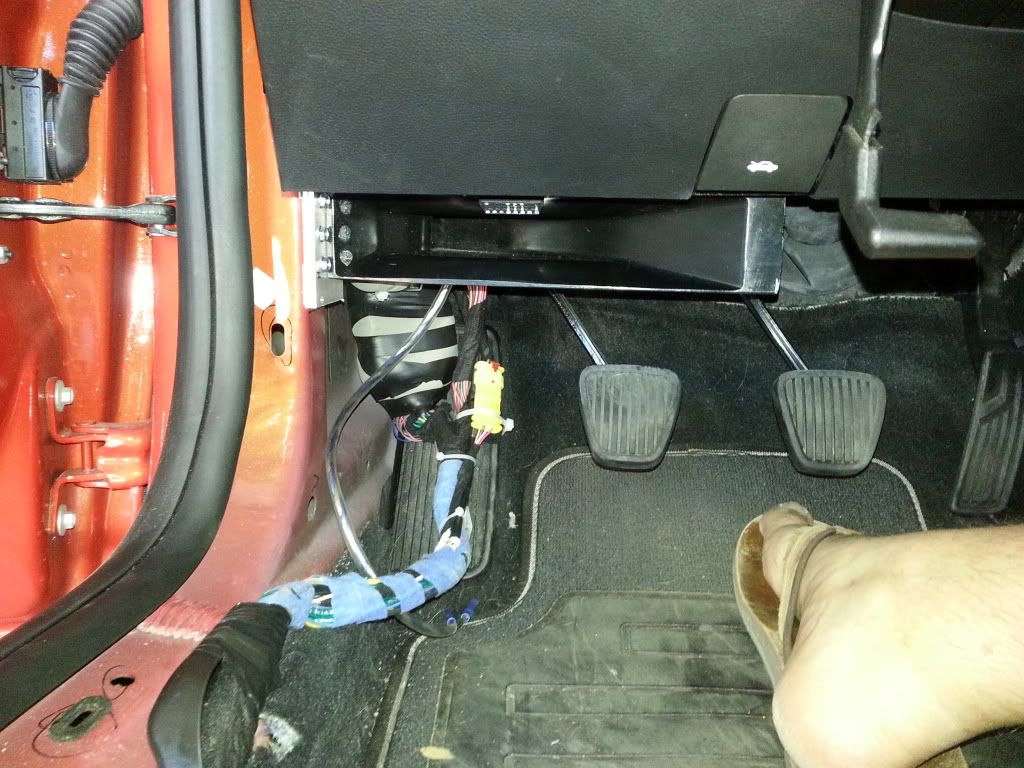 i love horns. i hate the process of installing them. this was, by far, the easiest solution that I have found, but still abiding by conventional horn aiming techniques. i love how they are hidden from complete view, and how they can present a huge stage with depth to spare, good height and width, and most of all, dynamics. i fully intend on telling people my system is factory  because unless you knew better, you really wouldn't be anyone the wiser. because unless you knew better, you really wouldn't be anyone the wiser. i still have a few things to address, like creating a few underdash panels, the kickpanels, etc... but all in all, i got a TON done today and I'm super stoked about it.  edit: oh, I guess I should add, that even my size 12 feet don't have a problem with the clutch pedal... another reason why i like the mini's ... they stay out of my way |
|
|

|
|
|
#45 |
 Drives: 2013 2SS 1LE Join Date: Mar 2013
Location: United States
Posts: 134
|
not much install love from you guys out there... ?
|
|
|

|
|
|
#46 |
 Drives: 2013 2SS 1LE Join Date: Mar 2013
Location: United States
Posts: 134
|
|
|
|

|
|
|
#47 |
    |
 I'm not a audio guy.... But this is an awesome build. I'm not a audio guy.... But this is an awesome build.
__________________
Laus Deo
|
|
|

|
|
|
#48 |
|
Aural Assault Vehicle
Drives: 2010 IBM 2SS/RS, 2015 Sierra Denali Join Date: Jun 2011
Location: Garner, NC
Posts: 792
|
I'd love to hear this in person some day. I've learned a lot just from following this build.
__________________
My amplifier pop/click/thump solution thread
Power Mods * K&N Typhoon CAI, Flowmaster American Thunder cat-back exhaust, Hurst Short Throw Shifter Exterior Mods * Black Phantom Grille * 22" T.I.S. 537MS wheels w/ Nitto INVO rubber * OEM body kit Suspension Mods * BC Racing Coilovers * Lakewood Strut Tower Brace Audio Mods * Stinger SPP 2250 Battery * Mosconi 6to8v8 w/ RCD * Pioneer AVH-X7500BT * Scosche Dash Kit * 2 - Mosconi AS200.4 * 2 - JL Audio 13W6v2 * Focal 165KRX2 Power (active) * Mosconi Gladen One 240.2 * Rockford Fosgate Power T1692 |
|
|

|
|
|
#49 |
|
Billy The Kid
Drives: Cyber Grey 2SS/RS Join Date: Jun 2009
Location: North Alabama
Posts: 637
|
Well after reading through this awesome build all I can say is that I love all of it except for the firing direction of your subs.(trunk pass through) al though it does make the most sense to have them there.
Keep up the great work and would love to hear some specific reviews on whether the sound deadening techniques(layers used) works well or not. I have a friend who ripped his entire interrupt out just like you did, put down a layer of dynomat everywhere and was less than impressed with the results saying that it only improved the audio a little and out side noises are still the same. Please let us all know if it helps reduce out side noise as well as helps your new audio setup!
__________________
CGM 2SS/RS[SIZE="1"]
Performance: LT Headers/Stainless Works cat-back, 225/233 Cam, 1LE 3.91 gears, Custom Tune, BMR suspension, MGW Shifter, Stainless brake & clutch lines, Ideal G Master Cylinder, 275s on all 4 corners Aesthetics: ZL1 Spoiler, DIY LED marker lights, AACPlasma DRL, Yellow Calipers, painted factory wheels |
|
|

|
|
|
#50 |
 Drives: 2013 2SS 1LE Join Date: Mar 2013
Location: United States
Posts: 134
|
thanks guys... i'm glad y'all are getting something out of it... if nothing else, i like to go back and see the whole process from beginning to the end ... it makes me appreciate what it takes to really get good sound ... you can slap some gear in, even really expensive gear, but the install is where systems are made or broken. i've heard very cheap systems that are installed thoughtfully sound way better than an install of very expensive equipment that was just slapped together.
|
|
|

|
|
|
#51 | |
 Drives: 2013 2SS 1LE Join Date: Mar 2013
Location: United States
Posts: 134
|
Quote:
as for the deadening... there is a right way and a wrong way to approach this. first is understanding what tools to use. your friend who dynamated his entire car used the wrong tool to achieve his desired result. dynamat, or the CLD tiles I'm using, are for vibration damping, not noise or sound isolation. you need a noise barrier for that. cld - constrained layer dampener - panel resonances and vibrations mlv - mass loaded vinyl - applied properly, this is what keeps road noise out, as the sound waves can't penetrate the mlv. if you make a seamless barrier around the entire inside of the car, this is pretty effective at quieting the car. it isn't total however, as there is glass, and certain areas that you can't treat. ccf- closed cell foam - decoupling device used between the sheet metal and the mlv - keeps vibrations from getting through to the mlv and interior thinsulate - acoustic material developed to absorb noise these are all the things i used and why. all this is to quiet road noise and exterior noises that come through the car. however it doesn't increase the quality of the sound... it will never do that. this is a pretty oversimplified version of car deadening, but you can quickly see why layering the entire car with dynomat won't achieve the results someone is looking for. that's why i have only gone for 25% coverage ... any more and it's just a waste. hope that helps. |
|
|
|

|
|
|
#52 |
|
Billy The Kid
Drives: Cyber Grey 2SS/RS Join Date: Jun 2009
Location: North Alabama
Posts: 637
|
That's a great help! I will reference this thread when I go to buy the various products you mention.
I can see why you need multiple layer as well. Seems like the reason why he didn't think he got much out of it. Thanks man!
__________________
CGM 2SS/RS[SIZE="1"]
Performance: LT Headers/Stainless Works cat-back, 225/233 Cam, 1LE 3.91 gears, Custom Tune, BMR suspension, MGW Shifter, Stainless brake & clutch lines, Ideal G Master Cylinder, 275s on all 4 corners Aesthetics: ZL1 Spoiler, DIY LED marker lights, AACPlasma DRL, Yellow Calipers, painted factory wheels |
|
|

|
|
|
#53 |
 Drives: 2013 2SS 1LE Join Date: Mar 2013
Location: United States
Posts: 134
|
if you really want a more in depth explanation, check out this site:
http://www.sounddeadenershowdown.com/ it's where i ordered all my stuff, and Don (the owner) is really a helpful guy... good business. |
|
|

|
|
|
#54 |
|
Its so hard
Drives: 2010 SS, 2009 Yamaha Warrior Join Date: May 2012
Location: San Antonio
Posts: 295
|
Are you at the point where you know how much excess sound deadining materials your going to have?
|
|
|

|
|
|
#55 | |
 Drives: 2013 2SS 1LE Join Date: Mar 2013
Location: United States
Posts: 134
|
Quote:
i still have the back seat, deck, rear quarter panels, and the entire trunk to do. I'm thinking i'll probably have 10-15% excess, but it's too early to tell. |
|
|
|

|
|
|
#56 |
|
Its so hard
Drives: 2010 SS, 2009 Yamaha Warrior Join Date: May 2012
Location: San Antonio
Posts: 295
|
Cant wait for the update!
|
|
|

|
|
|
|
|
 |
| Thread Tools | |
|
|