You are browsing camaro5 
|
|
 02-06-2014, 08:00 PM
|
#99 | |
|
Camaro out>CTS-V coupe in

Drives: CTS-V Join Date: Oct 2012
Location: DFW, Texas
Posts: 89
|
Quote:
__________________
CTS-V Coupe Black Diamond Edition
|
|

|

|
|
02-08-2014, 01:09 PM
|
#100 |
 
Drives: 2010 ss rs ls3 red-white rallys Join Date: Oct 2008
Location: Mississippi
Posts: 729
|
I guess they have dis-continued this splitter...dang...anybody got another link for this splitter? Thx
__________________
eps cam 226/234 lsa 113+2, bfe 1 7/8 headers, rotofab cai, katech oil pump, 444 rwhp, 411 rwtq, eps tune, Blanchard performance install
|
|
|
|
|
02-08-2014, 05:27 PM
|
#101 |
|
US Veteran
Drives: 2011 Silver Ice Metallic 2SS/RS A6 Join Date: Jan 2011
Location: Bossier City, La
Posts: 1,407
|
It's still there. Search for seller excessmotors, front lip spoiler. That's where I got mine.
__________________
Dear Lord, give me the strength to carry on despite my Camaro addiction!
JRE iTSX tune, full cat-less Dynatech exhaust, CAI intake, Stillen Slotted/Drilled Rotors, RB braided brake lines, BMR lowering springs, (reserved for definite future MODS) |
|
|
|
|
02-08-2014, 08:34 PM
|
#102 |
 
Drives: 2012 Camaro 1SS/RS Join Date: Nov 2013
Location: Atlanta
Posts: 136
|
I bought this one. Comes with hardware, you have to drill the holes in pre-marked spots.
http://www.ebay.com/itm/151116477314...ht_6074wt_1448
__________________
2012 M6 1SS/RS. R2C CAI, Dynomax Axle back. Just a boring 435 HP or so.
 |
|
|
|
|
02-08-2014, 09:17 PM
|
#103 |
        
|
__________________
Cold Air Inductions CAI Stainless Power LT's with HFC's Flowmaster American Thunder Cat Back APEX Scoop and WW Relocation Kit VMAX Ported Throttle Body Custom Dyno Tune Pfadt 1.25" Lowering Springs ZL1 Rims on 275 front 315 Rear custome underlay vinyl wrap Anvil Spoiler heritage grill APR Front Splitter Custom Emblempros emblems ZL1 Side Skirts 416.5 whp 410 torque (CURRENTLY) Up Next: BTR Stage 3 Cam and supporting mods (in garage now)
|
|
|
|
|
02-09-2014, 04:32 PM
|
#104 | |
|
Drives: 2012 Camaro 1SS/RS Join Date: Nov 2013
Location: Atlanta
Posts: 136
|
Quote:
Use the SLP instructions someone linked earlier. Here is a pic  
__________________
2012 M6 1SS/RS. R2C CAI, Dynomax Axle back. Just a boring 435 HP or so.
|
|
|
|
|
|
02-09-2014, 04:39 PM
|
#105 | |
|
US Veteran
Drives: 2011 Silver Ice Metallic 2SS/RS A6 Join Date: Jan 2011
Location: Bossier City, La
Posts: 1,407
|
Quote:
I used clamps and floor jacks to get it done. You may want to raise the front end, make it easier to drill. I clamped both outsides and then placed 2 floor jacks about midway from center on each side to hold it in place. Don't be in a hurry. I also removed the wind flap (or whatever it is) from underneath the front, permanently. Don't worry about over tightening. Recheck them after a while of driving. I'm not sure if this is common but mine squeaks pretty bad while driving (Probably because I painted mine). I spray some lube in the seam and it quiets it pretty well. Can be annoying at higher than normal speeds....
__________________
Dear Lord, give me the strength to carry on despite my Camaro addiction!
JRE iTSX tune, full cat-less Dynatech exhaust, CAI intake, Stillen Slotted/Drilled Rotors, RB braided brake lines, BMR lowering springs, (reserved for definite future MODS) |
|
|
|
|
|
02-09-2014, 04:49 PM
|
#106 | |
 
Drives: 2012 Red SS/RS Join Date: Nov 2011
Location: Chandler AZ
Posts: 36
|
Quote:
Also, I have done business with Maryland Speed before and I can say without a doubt, they are a top notch dealer for our cars!! Amazing prices and perfect shipping!
__________________
2011 V6 LS.. Traded in..
2012 Red SS/RS! Woot! |
|
|
|
|
|
02-09-2014, 04:52 PM
|
#107 | |
|
Drives: 2012 Red SS/RS Join Date: Nov 2011
Location: Chandler AZ
Posts: 36
|
Quote:
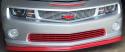
Dude!!! this second pic of your front nose looks absolutely stunning!! Mad props to the Detail job and i'm guessing wax?? Its so rare to see such nice black paint but on the front of wall of a front end, i'm just amazed at yours! 
__________________
2011 V6 LS.. Traded in..
2012 Red SS/RS! Woot! |
|
|
|
|
|
02-09-2014, 06:05 PM
|
#108 | |
|
|
Quote:
Clamps and floor jacks? I didn't know it would be that involved lol. Hoping to get it done this weekend. Where does it all drill into? Does it go OVER the stock bumper? Or beneath it? Sent from my iPhone using Tapatalk 2
__________________
Cold Air Inductions CAI Stainless Power LT's with HFC's Flowmaster American Thunder Cat Back APEX Scoop and WW Relocation Kit VMAX Ported Throttle Body Custom Dyno Tune Pfadt 1.25" Lowering Springs ZL1 Rims on 275 front 315 Rear custome underlay vinyl wrap Anvil Spoiler heritage grill APR Front Splitter Custom Emblempros emblems ZL1 Side Skirts 416.5 whp 410 torque (CURRENTLY) Up Next: BTR Stage 3 Cam and supporting mods (in garage now)
|
|
|
|
|
|
02-09-2014, 06:10 PM
|
#109 | |
|
|
Quote:
How many holes did you drill? Does the splitter have marks on these for where they should be? Also, the splitter comes with all of the hardware, right? Sent from my iPhone using Tapatalk 2
__________________
Cold Air Inductions CAI Stainless Power LT's with HFC's Flowmaster American Thunder Cat Back APEX Scoop and WW Relocation Kit VMAX Ported Throttle Body Custom Dyno Tune Pfadt 1.25" Lowering Springs ZL1 Rims on 275 front 315 Rear custome underlay vinyl wrap Anvil Spoiler heritage grill APR Front Splitter Custom Emblempros emblems ZL1 Side Skirts 416.5 whp 410 torque (CURRENTLY) Up Next: BTR Stage 3 Cam and supporting mods (in garage now)
|
|
|
|
|
|
02-09-2014, 06:18 PM
|
#110 |
|
Drives: 2011 ss Join Date: May 2013
Location: va
Posts: 983
|
I used the same one and it is a easy install and looks great. I didn't want to paint mine black for the fear of chipping, so I use tire shine on it.
|
|
|
|
|
02-09-2014, 07:34 PM
|
#111 |
 
Drives: Camaro SS Join Date: Aug 2011
Location: US
Posts: 401
|
If possible, could someone post a picture of the splitter from underneath? I'd just like see how it bolts up and how far back it goes into the bumper.
|
|
|
|
|
02-09-2014, 10:03 PM
|
#112 | |
|
Drives: 2012 Camaro 1SS/RS Join Date: Nov 2013
Location: Atlanta
Posts: 136
|
Quote:
__________________
2012 M6 1SS/RS. R2C CAI, Dynomax Axle back. Just a boring 435 HP or so.
|
|
|
|
|
|
|
|
|
 |
|
|


