You are browsing camaro5 

|
 03-31-2014, 09:17 PM
|
#1 |
Drives: 2011 LS Join Date: Jul 2013
Location: USA
Posts: 27
|
I couldn't wait any longer for hptuners to be released so on went the bbk LT headers this past weekend. I read a post about difficulties installing and removing old exhaust manifold. More so complaints of reaching certain bolts. Unfortunately, I was on a time crunch to get this done. 5 hours to be precise. So I had to find the most efficient ways. The following is how I accomplished the install.
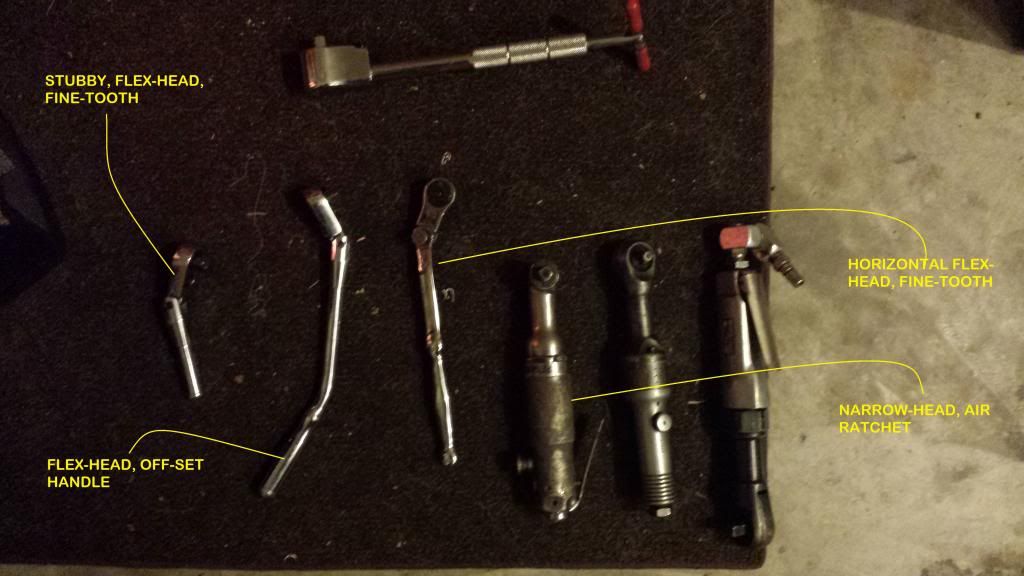
1.) Penetrating oil on the clamps between factory exhaust and cat. 2.) Upper heat shields. 3.) Oil dipstick and tube. 4.) Remove one bolt and loosen the other from the manifold to cat ( both sides) 5.) Loosen clamps to exhaust 6.) Remove last bolt from cat to manifold (assembly drops out assuming you unplugged o2 sensors) 7.) Manifold bolts. Here is the tricky part. Most have trouble with the front bolts passenger and driverside. The driver side: trick one, remove the plastic panel in the wheel well that has two lines running through it. Using a long extension and and joint accessory u can reach the front lower. Trick two, using a FINE TOOTH, FLEX HEAD, STUBBY ratchet with a short extention( this is nearly impossible to reach once the lt is in.) Passenger side: all bolts can be reached from underneath. Except the top front. Trick FINE TOOTH, FLEX HEAD, ratchet with joint accessory. Also, the lower can be a bit of a pain because of the alternator. I used the same setup for that as well. ( there is a small removable paper cover in the bottom of the wheel well, adds another angle for access and viewing.) Here is a small list of tools I had used and reccommend to have on hand for install: 10mm socket short and deep well 13mm socket short and deep well 15mm socket 1/2 in drive 1/2 breaker bar 3/8 air ratchet thin head 3/8 FINE TOOTH, FLEX HEAD, STUBBY ratchet 3/8 Fine tooth, flex head, ratchet 3/8 flex head, offset handle ratchet 3 different sized 3/8 extentions. 3/8 joint 3/8 socket (bbk header bolts) 3/8 torque wrench Once the manifold was out. I threaded two bolts on the top of the headers not all the way. Then lined up the rest just starting them and air ratcheted them in. CAREFULLY. Cats slid into exhaust clamps then on to headers both at the same time. Slight reward pressure on the exhaust to get the flanges over the headers. torque headers to 11 ft/lbs then torque all remaining clamps on exhaust. Start engine to run to operating temp. Cool down. torque headers to 18 ft/lbs I also put anti-sieze on every nut and bolt. Trust me it will help in the future. Sorry I don't have any picture of the install. Will try to get pics of my tools at the end of the week. The biggest significant tool is the fine tooth flex head ratchet. It allows me to get about 5 to 6 clicks to a normal ratchet click. hope this helps someone.
__________________
 BBK Long Tube, HF Cat, RX ICE-Olator, RX OCC, C.A.I Intake, ADM Scoop, ROTO-fab washer relocator, Hurst short throw, MagnaFlow Cat-Back, VMAX TB; ENKEI RAIJIN 19x9.5; HANKOOK Ventus V12 evo2 275/35zr/19 Coming soon... HPtuner... I hope... |

|

|
|
04-02-2014, 06:42 PM
|
#2 |
 
Drives: like a bat out of hell Join Date: Jul 2011
Location: Toledo,OH
Posts: 109
|
Thanks for the great info. I might attempt the header install this summer.
|
|
|
|
|
04-13-2014, 05:49 PM
|
#3 |
           
|
cool info..thanks..did you get a CEL code(you'll be tuning it out eventually)?
|
|
|
|
|
04-13-2014, 08:57 PM
|
#4 |
|
Drives: 2011 LS Join Date: Jul 2013
Location: USA
Posts: 27
|
Yes, I did get a CEL. It took about 50 miles of highway to finally come on. Im going to try a few tricks to rid of it. Ill post it up if it works.
__________________
BBK Long Tube, HF Cat, RX ICE-Olator, RX OCC, C.A.I Intake, ADM Scoop, ROTO-fab washer relocator, Hurst short throw, MagnaFlow Cat-Back, VMAX TB; ENKEI RAIJIN 19x9.5; HANKOOK Ventus V12 evo2 275/35zr/19 Coming soon... HPtuner... I hope... |
|
|
|
|
04-13-2014, 09:19 PM
|
#5 |
|
Drives: 2011 LS Join Date: Jul 2013
Location: USA
Posts: 27
|
__________________
BBK Long Tube, HF Cat, RX ICE-Olator, RX OCC, C.A.I Intake, ADM Scoop, ROTO-fab washer relocator, Hurst short throw, MagnaFlow Cat-Back, VMAX TB; ENKEI RAIJIN 19x9.5; HANKOOK Ventus V12 evo2 275/35zr/19 Coming soon... HPtuner... I hope... |
|
|
|
|
04-14-2014, 01:17 PM
|
#6 |

|
I agree on the front right side, around the alternator, hard to get to. Did you wrap the tubes? with a heat shield?
|
|
|
|
|
04-14-2014, 05:05 PM
|
#7 | |
|
Drives: 2011 LS Join Date: Jul 2013
Location: USA
Posts: 27
|
Quote:
__________________
BBK Long Tube, HF Cat, RX ICE-Olator, RX OCC, C.A.I Intake, ADM Scoop, ROTO-fab washer relocator, Hurst short throw, MagnaFlow Cat-Back, VMAX TB; ENKEI RAIJIN 19x9.5; HANKOOK Ventus V12 evo2 275/35zr/19 Coming soon... HPtuner... I hope... |
|
|
|
|
|
04-14-2014, 05:50 PM
|
#8 |
|
|
Yes I left my lower heat sheild on. Might put back on the other upper sheilds.
|
|
|
|
|
|
|
|
 |
| Tags |
| exhaust, headers, install |
|
|


