You are browsing camaro5 

|
 04-26-2014, 10:21 PM
|
#71 |
Drives: SS, ZL1, V6 Join Date: Jan 2012
Location: So Cal
Posts: 836
|
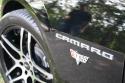
Congrats on COTW! Great looking roof spoiler too I might add...

|

|

|
|
04-27-2014, 07:56 AM
|
#72 |
Drives: ELLE-1 Join Date: Jul 2011
Location: Farmington ,mo
Posts: 1,175
|
Wow!! Looks fantastic..
__________________
 |
|
|
|
|
04-27-2014, 06:46 PM
|
#73 |
|
Optimus Prime
Drives: Camaro ZLS [COTW 09/22/14] Join Date: Dec 2012
Location: CYBERTRON
Posts: 2,315
|
very nice camaro..! congrats on the COTW
__________________
|
|
|
|
|
04-27-2014, 08:57 PM
|
#74 | |||||||||||||||
Drives: 2011 CGM 2SS/RS Join Date: Apr 2011
Location: Louisville
Posts: 368
|
Quote:
Quote:
Quote:
Quote:
Quote:
Quote:
Quote:
Quote:
Quote:
Quote:
Quote:
Quote:
Quote:
Quote:
Quote:
Here are some interior shots since I haven't really posted a whole bunch. You'll mainly see the Remin Dash Kit in their real carbon fiber finish as I wanted to keep the door ABL (which I've changed from the factory blue to a deeper blue) along with some repurposed fender badges and trunk lid SS badge. The arm rest and door sill trim are pieces I successfully laminated myself in carbon fiber. I've got a whole roll of the stuff and I plan on doing some more pieces whenever I find the time. I do plan on some more interior upgrades so keep an eye out for new pictures. The last picture is a shot from a local cruise in this past Friday. |
|||||||||||||||
|
|
|
|
04-27-2014, 09:12 PM
|
#75 |
|
Drives: '15 Z06, '01 NBM SS, '97 SS Join Date: May 2009
Location: Rio Rancho, NM
Posts: 12,170
|
VERY deserving rig!!
Well done and awesome build! Ivan |
|
|
|
|
04-27-2014, 10:16 PM
|
#76 |
|
DAP-ONE [COTW - 12/23/13]
|
Congratulations on COTW! Welcome to the Club!!
__________________
|
|
|
|
|
04-28-2014, 06:28 PM
|
#77 |
 
Drives: 2014 ZL1 SIM Join Date: Feb 2014
Location: Reno,NV
Posts: 49
|
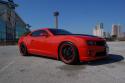
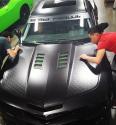
I appreciate all the work you have done to your car, Thanks for the links to Vvivid Vinyl. I am going to contact them to see I they will sell me a sample on the "4D" True R you used as I am going to wrap my rear diffuser, side skirts and lower portion of the front spoiler on my 2014 ZL1. It has the hood insert and these wheels...
 They are one piece forged monoblock lexani's hydrodipped. I will be posting photos as soon as we get it done. We tried wrapping the plastic with 3M but it would not stick at all. I was told all the pieces would have to be painted first, what a drag... $1000.00, just to cover them. I can get your wheels dipped for you if your interested. Keep up the good work. |
|
|
|
|
07-08-2014, 08:22 PM
|
#78 |

|
Congrats on everything you've achieved with this car. Looking at your build and the things you customized is very inspiring. That fire extinguisher mounting is awesome haha . Love the whole carbon fiber look around the car. I'm still really amazed how you installed your sound system and converted the trunk like that. Finally, the whole Cipher Auto business.. how did you mount them, have any pictures and what were the seat belts 4 point or?? Fantastic job, amazing car (l !
Last edited by William.23; 07-08-2014 at 10:11 PM. |
|
|
|
|
07-09-2014, 07:13 PM
|
#79 | |
|
Drives: 2011 CGM 2SS/RS Join Date: Apr 2011
Location: Louisville
Posts: 368
|
Quote:
Thanks! I know carbon fiber isn't for everyone but I think it's hard to beat that look when the sun hits it. The sound system surprised even me because I actually was able to pull it off lol. I do have the Cipher Auto kit but I'll admit its purely there for looks. If you're looking to use it for actual autocross/road course, I'd go with Speedware or the setup Synner has. The belts are 4 point and there's no anti-submarine and I just used the factory mounting points for lower and rear seat mounting points for upper. I don't have a rear seat and I didn't feel comfortable cutting the belts and wrapping around the harness bar. You also have to be careful of the harness bar pinching the factory belts preventing them from retracting and tensioning properly. For the install, there is a DIY I'll try to dig up in the DIY section. Updates! So my rear tires were kind of toast and I explained to my wife they were so worn that it could be dangerous to drive in so she said for me to go ahead and get whatever tires I needed to make it safe again. I ended up going with some Michelin Pilot Super Sports and couldn't be happier. Before and Afters. I also received a set of the Stainless Works 3" ZL1 Retro Chambered Quad exhaust. Now all I'm waiting for is my G5R carbon fiber rear diffuser to come in. Over the fourth of July weekend I went to Camaro Superfest in Ypsilanti, Michigan and we did a few laps on Michigan International Speedway and our club did some pretty neat photos. |
|
|
|
|
|
07-09-2014, 07:17 PM
|
#80 | |
|
Drives: 2011 CGM 2SS/RS Join Date: Apr 2011
Location: Louisville
Posts: 368
|
Quote:
Did the vinyl wrap turn out? |
|
|
|
|
|
07-18-2014, 10:32 PM
|
#81 |
|
Drives: 2011 CGM 2SS/RS Join Date: Apr 2011
Location: Louisville
Posts: 368
|
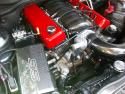
I was tired of the red Holley Big Block Coil Pack covers and decided to switch things up a bit and draw some inspiration from the Moreno brothers in terms of engine clean-up. I also worked on the coil pack harnesses and cleaned them up with some braided nylon. I still need to work on the injector harnesses and switch out to some billet fuel rails.
I purchased some coil pack covers and mounts from CFD and had them powder coated red. I will say that the quality, fit, and finish of these items was superb. Even with my limited knowledge of mechanical skills I was able to complete this task. These are some pictures before the install with the big block covers removed. The kit was CNC machined from solid aluminum and it came with some nice stainless screws for the install. These pictures show how the pieces fit together seamlessly. It was recommended to do the install of the coil packs to the mounts on the bench then attach them back to the valve covers. The installed pictures. It was a little tight on the passengers side with the factory fuel lines but by loosening the bolt on the intake manifold I was able to slip them under and then refasten the line back down. I also purchased a manual pistol grip shifter in brushed aluminum with carbon fiber inserts from CFD. Also a great product, has a nice heavy, solid feel to it. I really dig it. |
|
|
|
|
12-30-2014, 08:34 PM
|
#82 |
|
Drives: 2011 CGM 2SS/RS Join Date: Apr 2011
Location: Louisville
Posts: 368
|
Well it's been awhile since an update! I haven't done too much, but I have done some things.
First up! Moreno Bros ZL1 rear diffuser and Stainless Works ZL1 Retrochambered exhaust These tips don't fit! This hack job needs to go Nice shot of the red BMR goodies New diffuser with quad tipped exhaust |
|
|
|
|
01-01-2015, 04:04 PM
|
#83 |
|
Looking really good!
__________________
Cold Air Inductions CAI Stainless Power LT's with HFC's Flowmaster American Thunder Cat Back APEX Scoop and WW Relocation Kit VMAX Ported Throttle Body Custom Dyno Tune Pfadt 1.25" Lowering Springs ZL1 Rims on 275 front 315 Rear custome underlay vinyl wrap Anvil Spoiler heritage grill APR Front Splitter Custom Emblempros emblems ZL1 Side Skirts 416.5 whp 410 torque (CURRENTLY) Up Next: BTR Stage 3 Cam and supporting mods (in garage now)
|
|
|
|
|
01-01-2015, 09:28 PM
|
#84 |
|
Drives: 2011 CGM 2SS/RS Join Date: Apr 2011
Location: Louisville
Posts: 368
|
As I've mentioned before, I've been following the "Cleaning up your engine bay" thread in the V-8 section and tackled a little more clean up to go along with my new coil pack covers. I wrapped more wires in some awesome split loom that looks like braided nylon and also took my redneck paint pen to exposed wires and connectors.
I also had accidently ordered more touch up paint than I needed and decided to paint some of the cast parts on the front of the engine (Water pump, thermostat, alternator cover, and other parts I can't identify). I didn't clear these parts, and as I'm actually several months behind on updating, I haven't had any issue with the paint changing color or any other ill effects. I painted the throttle body in a satin black finish and added some ARP bolts to spruce things up. Redneck paint pen Loom and fuel injector/coil pack connectors redneck paint penned Cyber grey metallic touch up paint Throttle body and more touch up paint pics |
|
|
|
|
|
|
|
 |
|
|


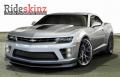
 Gotta luv those Cyber Grays


