You are browsing camaro5 

|
 01-26-2011, 02:00 PM
|
#1 |
|
Smokin Bowties Member

Drives: 2010 Camaro 1LT/RS Join Date: Mar 2010
Location: Concrete Jungle, New Jersey
Posts: 125
|
Amp install and compartment non BA
This is part I of my car audio build for a non BA Camaro, specifically the amplifier and amp enclosure.
Parts needed; -Amp -Amp Wiring Kit -Line Output Converter -6' 18 Gauge Extra Speaker Wire -1/2" MDF -Plexiglass -Speaker Box Carpeting 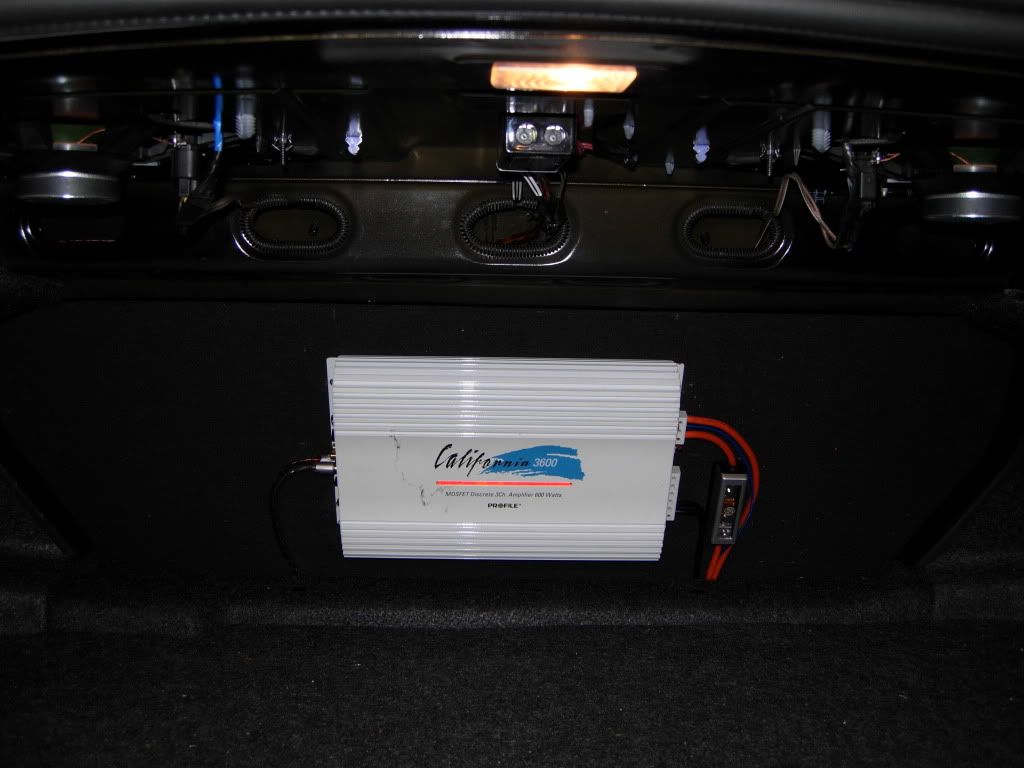 In this first picture you can see the amp mounted on the trunk side of the back seat. The RCA inputs, power wire, subwoofer output and ground wire run down behind the seat cushion and around the trunk pass thru opening and into the trunk compartment. The remote wire which triggers the amp to turn on runs from behind the back seat around the inside of the car on the passenger side around the footwell and inside the center console and connects to the red wire on the back of the power supply plug (inside the center console armrest compartment). The power wire runs to the battery in the trunk and the ground wire runs to the grounding post in the bottom of the spare tire well. The RCA inputs run from the line output converter which you see in the next picture. 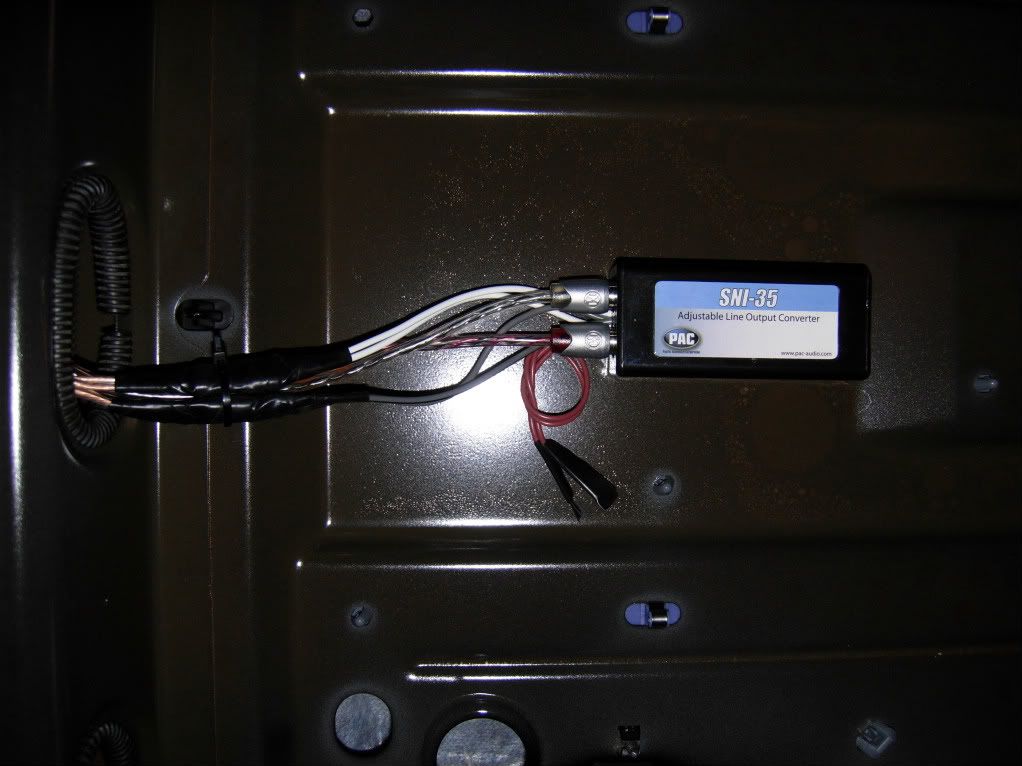 Here is the line output converter which takes a line out signal (signal going to speakers) and converts it to a pre-amp signal that is used as the input on an amplifier. It is attached to the trunk ceiling with some two-sided tape. The gray wires are for the right channel and the white wires are for the left channel. The red wires are only used for grounding required by specific amps (mine did not need them). The extra speaker wire that is needed is used to extend both the gray and white wires from the line output converter to the speaker wires coming from the head unit. See the first picture to see how i ran the wires from the line output converter to the speakers. The line output converter is the box just behind the light and you can see the wires running into the car frame. This is also the area in which i ran the RCA wire to conceal it. NOTE: You need to put something over the rough edges of the elliptical openings so that it does not cut thru your wires!!! 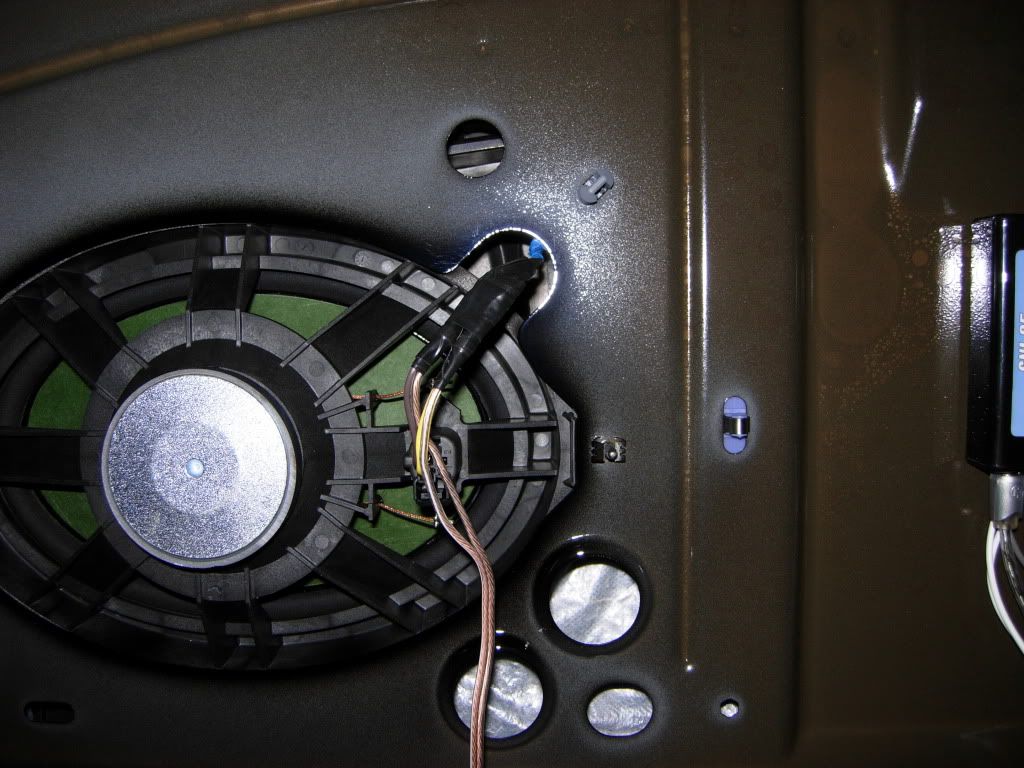 This image is of the left rear speaker as seen from inside the trunk. I spliced in the wire extensions we made for the line output converter into the factory speaker wire. On this side of the car the brown wire is (+) and the yellow wire is (-). This should connect to the white wire (+) and white wire with black stripe (-) from the line output converter respectively. 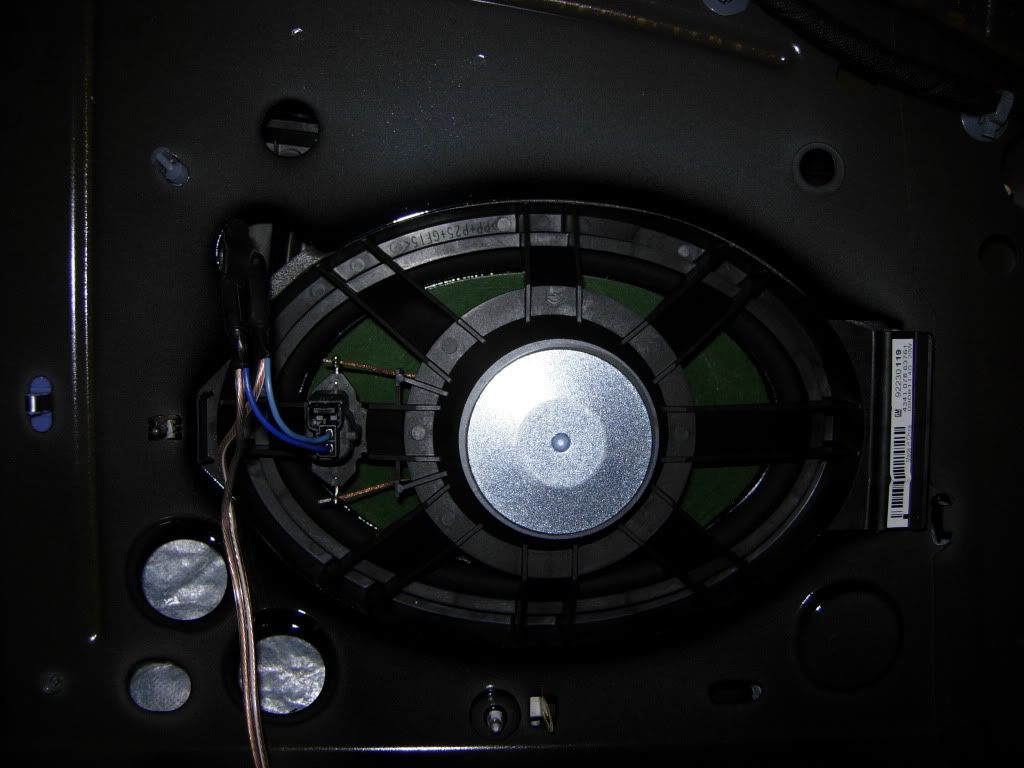 This image is of the right rear speaker as seen from inside the trunk. I spliced in the wire extensions we made for the line output converter into the factory speaker wire. On this side of the car the dark blue wire is (+) and the light blue wire is (-). This should connect to the gray wire (+) and gray wire with black stripe (-) from the line output converter respectively. 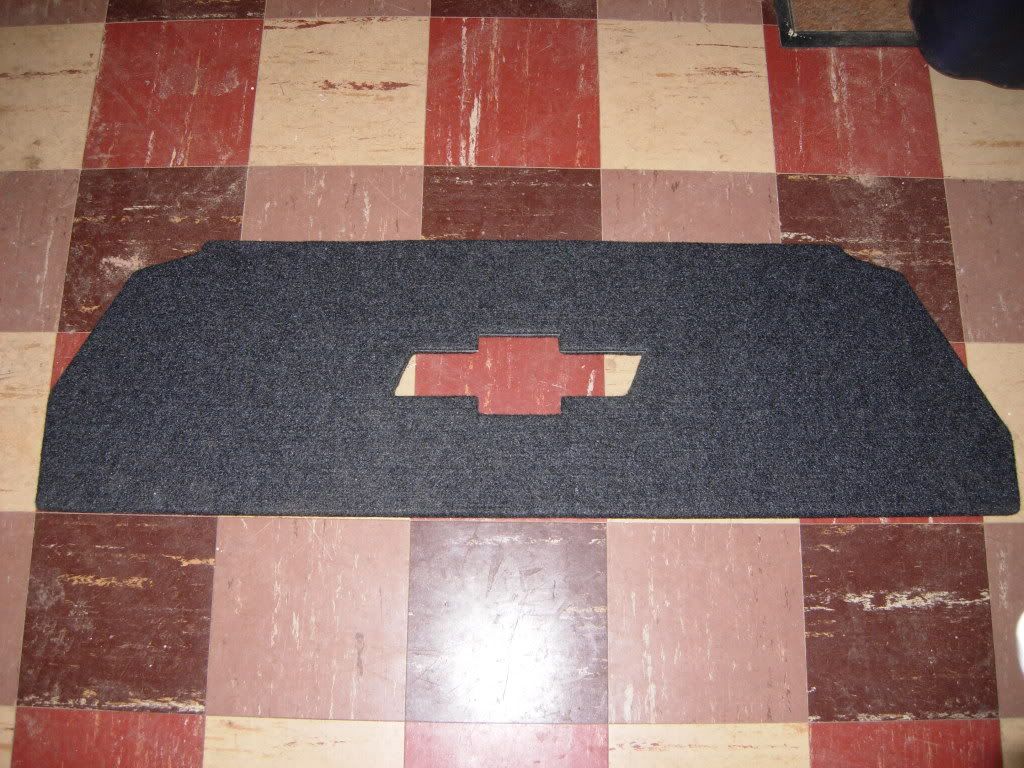 Now that it is all wired up i started making my enclosure for the amplifier. Then i cut out the shape of the trunk in MDF and cut out the bowtie. Then I carpeted the whole thing to match the interior of the trunk. 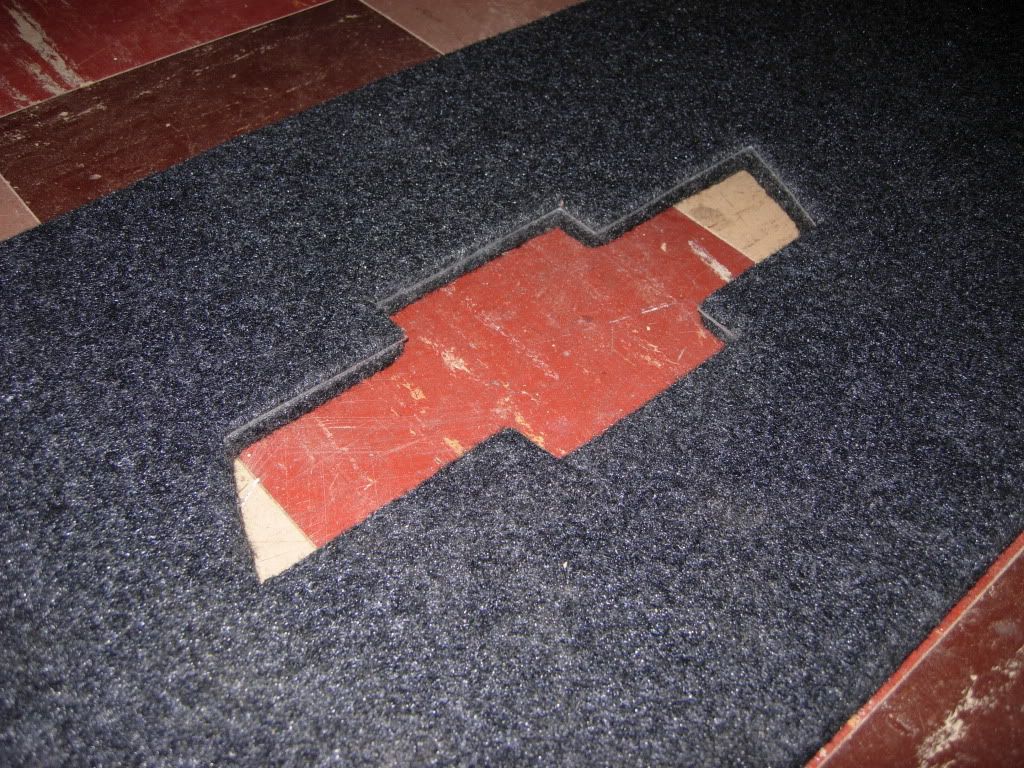 Next I installed the plexiglass window by cutting it to the size of the opening in the MDF, with the carpeting there it provides a nice fit and all i had to do is simply push it into place.  Finally I installed the panel by pushing it into place. It fits snugly against the frame and requires no hardware or drilling to attach. 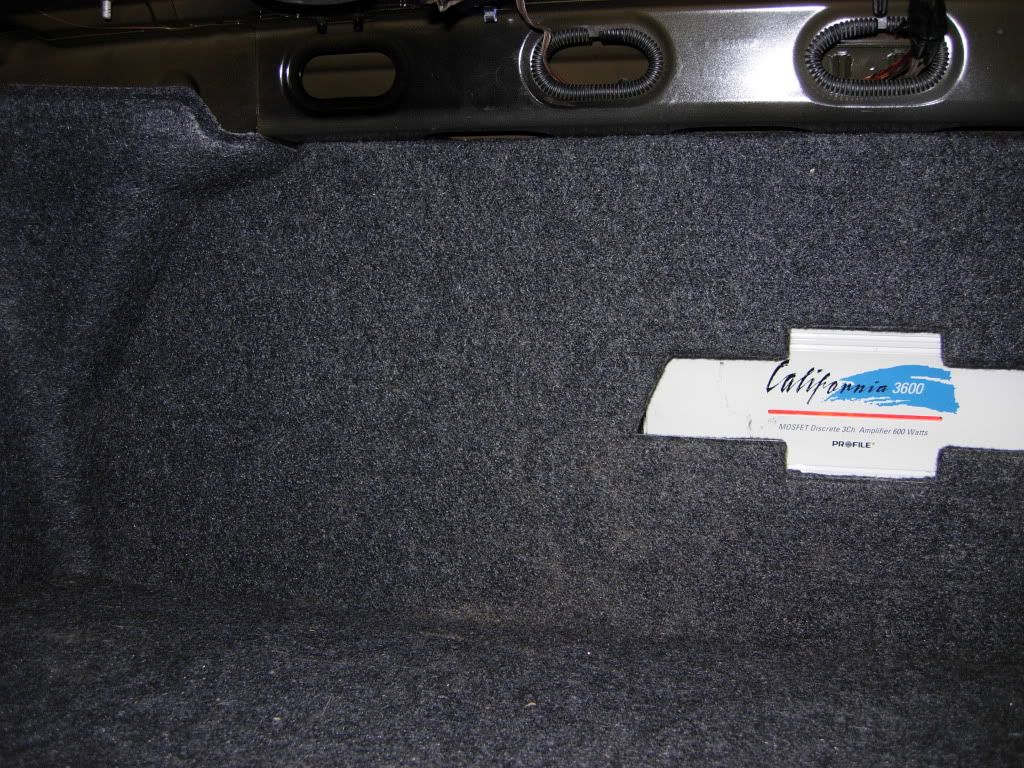 Another picture of the completed install. Please feel free to ask any questions you may have. Also I have another 5 of these enclosure panels I made for sale...if you are interested please PM me. I can make it with or with out the window and can do regular square windows as well.
__________________
Last edited by Black on Black; 01-26-2011 at 03:44 PM. |

|

|
|
01-26-2011, 06:40 PM
|
#2 |
  |
Nice and clean. Only problem I see is the lack of airflow to the amp, but you can install a fan if the amp has overheating problems. Good job.
|
|
|
|
|
01-27-2011, 10:57 AM
|
#3 |
|
SoCal Family Member

|
I'm trying to decide how to hook up my amp. I am thinking of using the output converter like you did but I have heard there are some srawbacks. Is there any distortion problems? Any complaints of hooking it up this way.
|
|
|
|
|
01-27-2011, 11:48 AM
|
#4 |
|
The wait is over!

Drives: 2010 Camaro, IOM, L99, Auto Join Date: Mar 2010
Location: Washington
Posts: 1,081
|
looks good, I would worry a little about airflow, since the heat-sink channels run left to right instead of up and down (allowing for convection to move the heat off the sink), the amp is tilted toward upside-down slightly (top over bottom, causes more heat to stay in the board/chassis) and the Chevy cutout wont allow for a ton of air movement to alleviate the other two issues - however, if the amp isnt being pushed hard or isnt pushed hard often or for long periods, you should be fine. Worst case, you may need to redo the trim panel, but judging by the looks of it, thats WELL within your abilities.
__________________
Ordered - 4/17/2010
Delivered - 5/29/2010 AlphaDamp CLD Mat - Get more Sound Deadening with less Sound Deadener |
|
|
|
|
01-29-2011, 12:12 PM
|
#5 |
|
Smokin Bowties Member
Drives: 2010 Camaro 1LT/RS Join Date: Mar 2010
Location: Concrete Jungle, New Jersey
Posts: 125
|
All good points...mayb I will just take the window out for starts and see how it does until I can get a redesign done. I dont really push the amp that hard and I havent noticed excessive heat yet. Any ideas for the redesign so I can keep the window and the flush edges?
|
|
|
|
|
01-29-2011, 06:35 PM
|
#6 |
|
COTW 5/27/13

|
here how my redesign went,just to help with ideas
http://www.camaro5.com/forums/pictur...ictureid=43298 |
|
|
|
|
01-29-2011, 07:15 PM
|
#7 | |
|
The wait is over!
Drives: 2010 Camaro, IOM, L99, Auto Join Date: Mar 2010
Location: Washington
Posts: 1,081
|
Quote:
__________________
Ordered - 4/17/2010
Delivered - 5/29/2010 AlphaDamp CLD Mat - Get more Sound Deadening with less Sound Deadener |
|
|
|
|
|
01-30-2011, 01:54 AM
|
#8 |
 
Drives: 2010 IBM Camaro 1LT RS Join Date: Sep 2010
Location: Lake in the Hills, Illinois
Posts: 418
|
Hows the sound quality? are you running stock speakers on the rest of the car?
|
|
|
|
|
01-30-2011, 01:11 PM
|
#9 | |
|
Smokin Bowties Member
Drives: 2010 Camaro 1LT/RS Join Date: Mar 2010
Location: Concrete Jungle, New Jersey
Posts: 125
|
Quote:
__________________
|
|
|
|
|
|
|
|
|
 |
|
|
 Similar Threads
|
||||
| Thread | Thread Starter | Forum | Replies | Last Post |
| 2011 Rear Spoiler issue | Memphis SS | 5th Gen Camaro SS LS LT General Discussions | 28 | 12-22-2010 09:08 PM |
| Carbon Fiber Engine Dress-up | Unique Auto Designs |Fuse Box & Engine Compartment | AutoAgenda | Exterior Parts & Accessories | 11 | 11-13-2010 10:37 AM |
| Carbon Fiber Engine Dress-up | Unique Auto Designs | Fuse Box & Engine Compartment | AutoAgenda | Interior Parts & Accessories | 6 | 09-21-2010 07:04 PM |
| How to Install QTP Electric Cutouts | Quick Time | Camaro DIY & HOW-TO instructions & discussions | 73 | 05-03-2010 12:19 PM |
| One more Roto-Fab CAI Install | robertway | Camaro V8 LS3 / L99 Engine, Exhaust, and Bolt-Ons | 21 | 12-27-2009 10:46 PM |


