You are browsing camaro5 

|
 01-20-2012, 10:31 AM
|
#1 |
 
Drives: 2010 2SS/RS IOM M6 Join Date: May 2011
Location: Abu Dhabi, UAE
Posts: 288
|
Tutorial: Tuning Fuel Delivery
First off, if you have not read Tutorial: How the PCM Sets Fueling, start there.
The "meat and potatoes" of street/driveability tuning (in other words, all the tuning that is outside of WOT/PE tuning on the dyno) is correcting the fuel delivery. Luckily for us, this is not an overly complicated procedure. It should prove to be a simple (if time consuming) task for even a beginning tuner. But, before we start talking about the "hows", lets talk a bit about the "whys"! From the "How the PCM Sets Fueling" tutorial, we know that the PCM uses both the MAF table (in conjunction with the MAF sensor) and the VE coefficients (in conjunction with multiple sensors) to determine the airmass entering the engine, and thus how much fuel to deliver- both of course calibrated to be reasonably correct with a completely stock vehicle. We can consider this to be, in essence, the base fuel map. This base fuel map will then be modified, if necessary, using feedback from the O2 sensors when in closed-loop operation. Below 4000 RPM (we could change this RPM boundry if we wanted to), the PCM uses a blended airmass figure that is a combination of the measured airmass from the MAF and the calculated airmass from VE. Above 4000 RPM, it uses only the measured airmass from the MAF. Outside of changing our tune to be MAF-only or VE-only (Speed Density), we need to tune both of these functions to correct the base fuel delivery. For this tutorial, we're going to use the example of a fairly typical bolt-on vehicle, with the modifications of concern being a CAI and long tube headers/exhaust. Lets consider how these mods invalidate the stock tuning and result in an incorrect representation of the airmass entering the engine, starting with VE. The goal of most performance mods is to increase either the efficiency with which the air/fuel charge enters the cylinder, or the efficiency with which the exhaust gas is expelled from the cylinder. Both of these changes results in a corresponding change in the VE of the engine. Thus, it's easy to see that almost every mod requires tuning the VE coefficients. But what about the MAF table? The MAF and the MAF table is a different story. The MAF is generally unaffected by modifications that go in past the throttle body. The MAF just measures the air moving past it, so if we only increase the amount of air it tracks that very well. HOWEVER, when we change HOW the air moves across the sensor itself, the calibrations in the MAF table are invalidated. When you add a CAI, for example, you completely change the flow of air and the position of the MAF sensor. Increasing the size of the TB can also potentially change how the air flows across the MAF. So in general, intake mods will require tuning of the MAF table, where as other mods usually will not. Our example bolt-on vehicle will require us to tune both the MAF table and the VE coefficients. Due to the fact that the PCM uses a blended airmass figure from both MAF and VE for much of the operating range, this is a two step process. First, we have to simulate a failure of the MAF sensor. When the MAF fails, the PCM reverts to Speed Density operation, in which it sets fueling using only the calculated airmass derived from various sensor inputs crammed through the VE coefficients. When we're running solely off of VE, we can log the fuel trims (or alternatively AFR error if using a wideband) and use the resultant data to tune our VE coefficients. When VE has been tuned, we will then do the opposite by forcing the PCM into MAF-only operation by changing the RPM boundry it uses to disable the blended airmass value. Once running solely off the measured airmass from the MAF, we can then use a similar procedure to tune the MAF table, either by logging the fuel trims or the AFR error from our wideband.
__________________
Whipple 2.9L S/C, ARH LT's, Flowmaster AMT, HPTuners
|

|

|
|
01-20-2012, 10:32 AM
|
#2 |
|
Drives: 2010 2SS/RS IOM M6 Join Date: May 2011
Location: Abu Dhabi, UAE
Posts: 288
|
Getting Started with HPT
Getting Started with HPT
As with all of my tutorials, this is geared towards tuning with HPT because that is what I use and what I have the most experience with. The concepts and methodologies outlined in this tutorial are valid regardless of the software you're using, but other software like EFI Live is functionally different than HPT, and some specific procedures will be different. This tutorial is not going to cover how to use the HPT software in any fine detail. It has a fantastic Help section, and it's not difficult to use or navigate. It's up to the reader to familiarize themselves with the software. However, I'm going to cover a few points that are not completely self-explanatory, and some of them are due to the weirdness of the E38 PCM and the way it does things as opposed to, say, an LS1 PCM. From the How the PCM Set Fueling tutorial, we know that the E38 PCM does not have a traditional VE table- instead it has multiple table of VE coefficients that make me angry just looking at them. This causes a few problems for us. Thankfully there are smart, mathy people out there that are going to help us get around this, but we're going to have to jump through a few additional hoops. First off- with the default configs in the VCM Scanner of HPT, several histograms are going to be broken. Namely, our STFT and LTFT histograms, and we're going to need those. Histograms don't work if you're not logging the proper parameters, and the default configs are not set up to log the proper parameters. We COULD empty out the Table display and build a config from scratch, but if you're reading this tutorial you're a beginner and building a config from scratch as well as setting up the histograms will probably be way outside your comfort zone. So, you're going to download the E38VE-MAF.zip file attached to this post and unzip it. The .cfg file is the config file, and we're going to place that in Documents and Settings/YourUserNameHere/My Documents/HP Tuners/VCM Scanner/Configs. The .hst files are histogram files, and we're going to place those in Documents and Settings/YourUserNameHere/My Documents/HP Tuners/VCM Scanner/Histograms. Now, open VCM Scanner, go to File>Open Config and select the config file we downloaded. Now we're properly set up to scan our pesky E38 PCM! In addition to this, we're also going to go here http://www.hptuners.com/forum/showthread.php?t=26884 and download the EQ <> VE conversion tool. This tool is going to allow us to export the VE coefficients from HPT and convert them into a usable table format, make our modifications, and then convert the modified table back into coefficient form and import it back into the tune in HPT. Pretty slick! Now that we've laid the groundwork, we're ready to move on to business!
__________________
Whipple 2.9L S/C, ARH LT's, Flowmaster AMT, HPTuners
|
|
|
|
|
01-20-2012, 10:33 AM
|
#3 |
|
Drives: 2010 2SS/RS IOM M6 Join Date: May 2011
Location: Abu Dhabi, UAE
Posts: 288
|
Tuning VE
Tuning VE
There's more than one way to skin this cat. We can use a wideband, we can use STFTs, we can use LTFTs, or we can use a combination of methods. An experienced tuner will be using a wideband, and a wideband will give you the best results. However, most beginners don't have a wideband, and configuring both the wideband and HPT to use it can be a little complicated for a beginner. So, in this tutorial we're going to use fuel trims. Different tuners have different methods they prefer to use, but here I'm going to outline a method that uses both LTFTs and STFTs. The first thing we need to do is get the vehicle set up so that we can tune the VE. This is going to require us to take the MAF out of the equation, as well disable anything that might artificially monkey around with our fuel trims. But, before we do this, let's talk about some good tuning practices. ALWAYS save a copy of the stock tune. ALWAYS. You may need it at some point. HPT has an online tune repository that does contain stock tunes for most vehicles, but the better solution is not to lose yours in the first place. NEVER flash a tune file from another vehicle into your PCM. NEVER. That's an excellent way to brick your PCM or cause other issues. The HPT tune repository is an excellent resource, but if you download a tune file from a setup similar to your own that you want to try, DO NOT just flash the thing into your PCM. Open it up in HPT's VCM Editor, and copy the tables/values that you want into a tune file from YOUR vehicle. Establish a history of tunes and document what the hell you're doing. The VCM Editor has some built-in functions that help you to do this. Namely, the Calibration Details window and the Change/History Log window. The Change/History Log populates itself, as well as giving you a field to note any comments, and the Calibration Details window has a Calibration Overview Tab with a nice big field for you to enter notes about the tune. Outside of the software itself, get in the habit of saving a new tune file whenever you make changes. Don't just keep modifying the same tune file over and over again. This makes it very easy to go back to the previous tune if you happen to screw something up. It also means that if your file gets corrupted for some reason, you can just go back a step to the previous file. This also means that you should be naming these tune files in such a way that you can keep them organized. Personally, I like to date them in the file name- 20Jan12-BaseVE.hpt for example. This helps me keep everything organized. If you tune more than one vehicle, make a different folder for the tunes for each one. Do whatever works for you, but keep things organized. Okay, back to business... Use the VCM Editor to read the stock tune and save it. Name it something that tells you exactly what it is. Keep a copy of this somewhere safe. Once you've done that, open up the tune and head to Engine Diagnostics>Airflow. Here, we're going to set the MAF Fail High field to a value of 1 Hz. 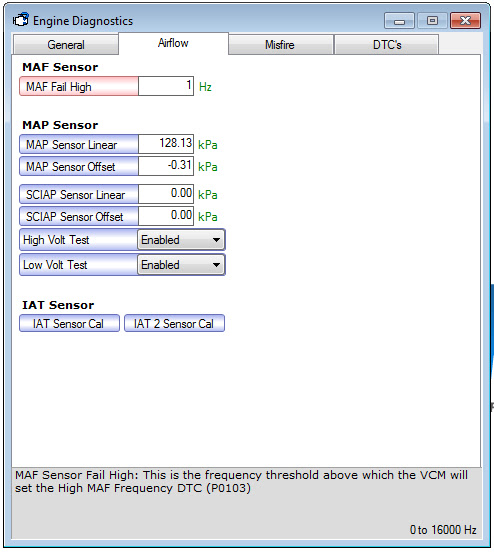 By doing this, we're telling the PCM that whenever the MAF frequency is above 1 Hz (which is always if the engine is actually running) that it has failed. When the MAF fails, the PCM falls into Speed Density operation, meaning that it determines airmass using ONLY the VE coefficients, which is exactly what we want it doing so that we can tune them independently of the MAF and the Dynamic Airflow function. Doing this will throw a DTC, but that's no big deal. Now, we need to disable a few things that can potentially move our trims around. Go to Engine>Fuel>Cutoff, DFCO. Under Deceleration Fuel Cutoff DFCO Enable Normal, change the Enable Temp to the max value of 493. This will effectively disable DFCO. 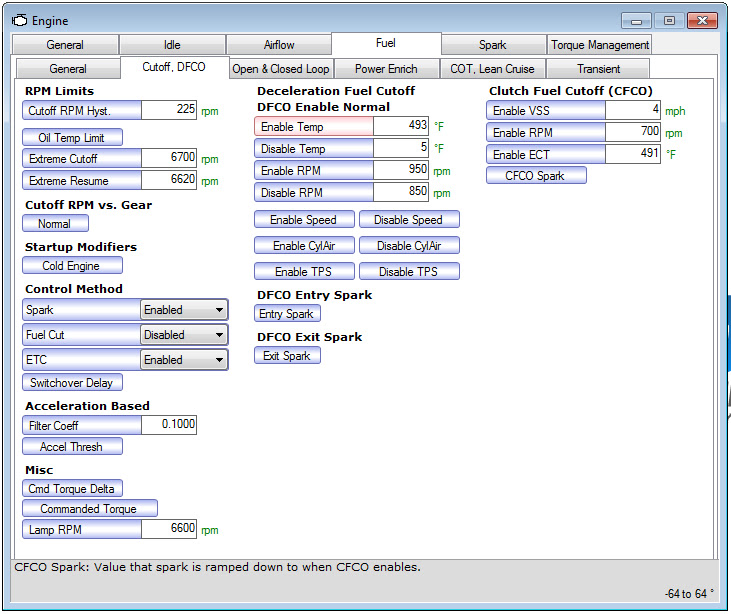 Go to Engine>Fuel>Power Enrich. Under Power Enrichment PE Enable, set MAP to 75. This will help keep us out of PE mode so that we can get fuel trim data over a larger range, and is safer than disabling it entirely. Still, keep an eye on knock retard while you're data logging. 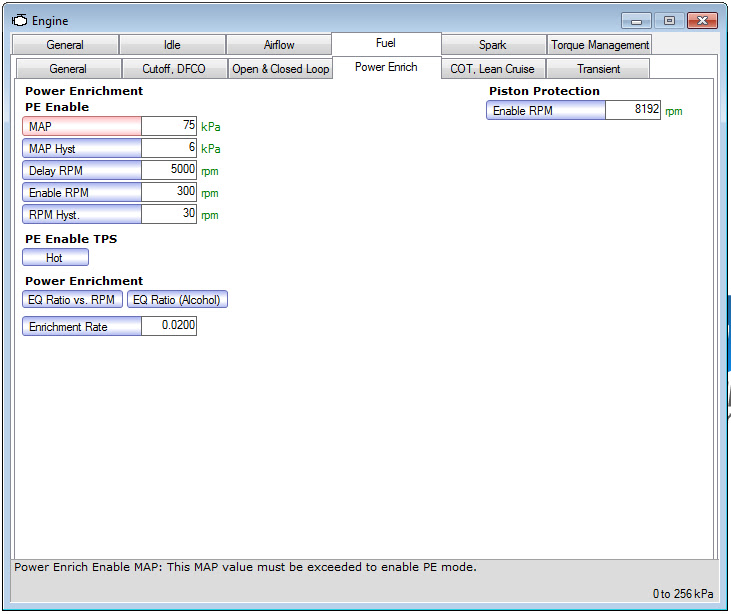 Go to Engine>Fuel>COT, Lean Cruise. Under CAT Over Temp Protection, select Disable from the drop-down menu. 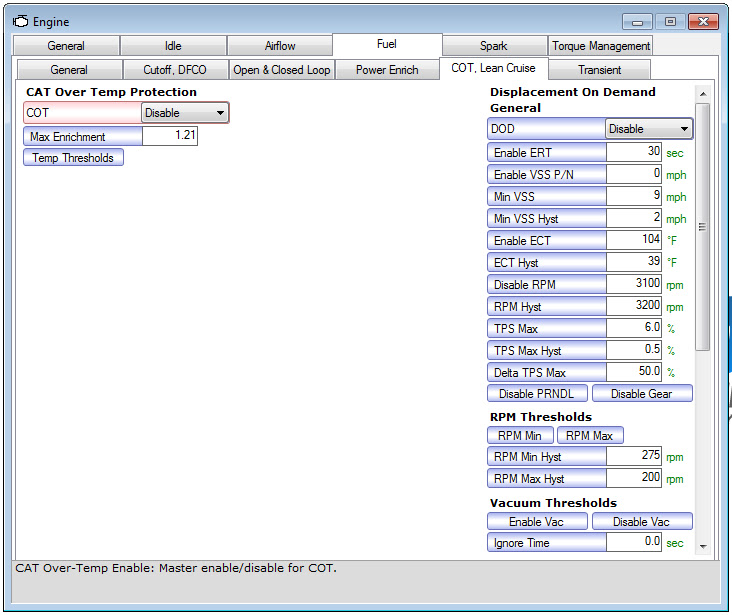 Now, give this file a meaningful name and save it. Flash it into your PCM. Close VCM Editor and open VCM Scanner. Connect to your PCM. Go to VCM Controls>Fuel & Spark. Under Fuel Trim Learn, click the Reset Fuel Trims radio button. 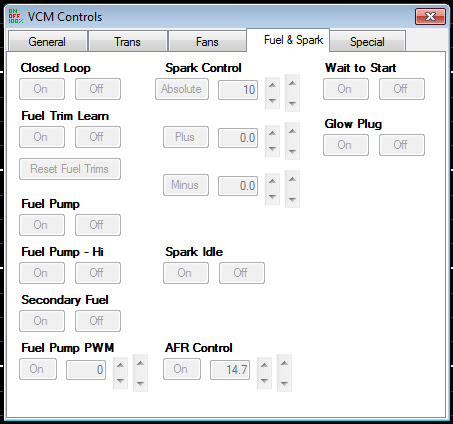 Now we're ready to do some driving and logging! Logging with HPT When logging fuel trims, you always want to make sure that the engine is up to operating temp before logging anything with the scanner. Also, when logging LTFTs for tuning, you need to make sure that the trim values have been fully learned as much as possible. What does this mean? The STFTs are instantaneous modifications of the fueling by the PCM based on feedback from the O2s. If they read rich, the STFTs swing negative, and if they read lean, the STFTs swing positive. Even when the fuel map is spot on, the STFTs will constantly oscillate positive and negative, tracking with the rich/lean swing of the O2 voltages. The STFTs are represented as positive and negative numbers which are a percentage change in the predicted fueling. Thus, an STFT of -4 would mean that the PCM is leaning out the fueling by 4% from what the programmed values say that it should be. Simple! Now, an LTFT is the cumulative average of an STFT over time, and is a learned function in that it writes itself into the PCM calibration. If the STFTs in a particular zone average -4, eventually the LTFT for that same zone will shift to -4. Once that happens, the average STFT for that zone will shift to 0, and that LTFT will be considered fully learned, and become a persistent change in the base fueling. This process takes time. The engine needs to be in that operating zone for long enough for the STFT to fully shift the LTFT. Accurate tuning using LTFTs requires that they be as fully learned as possible, or else you end up chasing a constantly moving target. This means that tuning using LTFTs takes longer than using STFTs alone. So, why do it? Since STFTs are a real-time adjustment based on O2 feedback, they take time to adjust the fueling. The O2s have to first read the lean condition, and then the STFT has to shift. That needed shift could potentially be very large if the base fuel map is really off, like it will be if you throw a cam and supporting mods in all at once. But, the LTFTs are learned, and become a shift in fueling that takes place BEFORE O2 feedback. It's an instantaneous function. I recommend that if you've done significant modification and are starting with a stock MAF table and/or VE coefficients, do your first tuning pass using LTFTs. Once that first pass is done, any large inaccuracies should be eliminated and moving on to using STFTs makes sense. That's the way I like to do it, at least. Some tuners only ever use STFTs. Moving on, I find it helpful to have the laptop positioned such that I can easily see the screen. That way, I have a visual indicator of what cells I'm hitting and what cells I'm not, so I can adjust my driving to hit as many as possible, as often as possible. The MPVI Pro interface has the ability to log without a laptop present, and I really like that functionality, but it won't give you that visual feedback. Tuning with LTFTs There's no predetermined amount of time that it's going to take for the LTFTs to be learned. It all depends on how long the engine is operating in that particular cell. Some will learn quick, and some will take longer. You can learn them over 30 minutes of focused driving using the histograms in the VCM Scanner to try to hit as many cells as possible as many times as possible, or you could just let them learn out over several days of your normal driving routine- it's up to you. How do you know when an LTFT is learned? When the STFT for the corresponding histogram cell is 0, or close to it, it indicates that the LTFT is learned. The goal is to get as many cells on the histogram learned as possible, below 4000 RPM. Above that the MAF takes over completely (when the PCM thinks it's working, at least) so we don't need to tune VE above this if we don't plan on running Speed Density all the time. You won't learn all the cells, which if fine, because we can modify these cells based on the surrounding cells later. So, we're going to get those LTFTs learned, and when we're happy with them, we're going to log them with VCM Scanner and save the file. NOOB MISTAKE TO AVOID: Make sure you stop the scan and save the log BEFORE you turn the vehicle off. Otherwise, you lose the entire log. Trust me, it sucks to forget to do that and lose 30 minutes of logging. Now that we have the log saved, we get to finally do some actual tuning! We're going to open our tune file, and in that tune file we're going to open the 8 tables containing the VE coefficients (the ones in red in the pictures below). 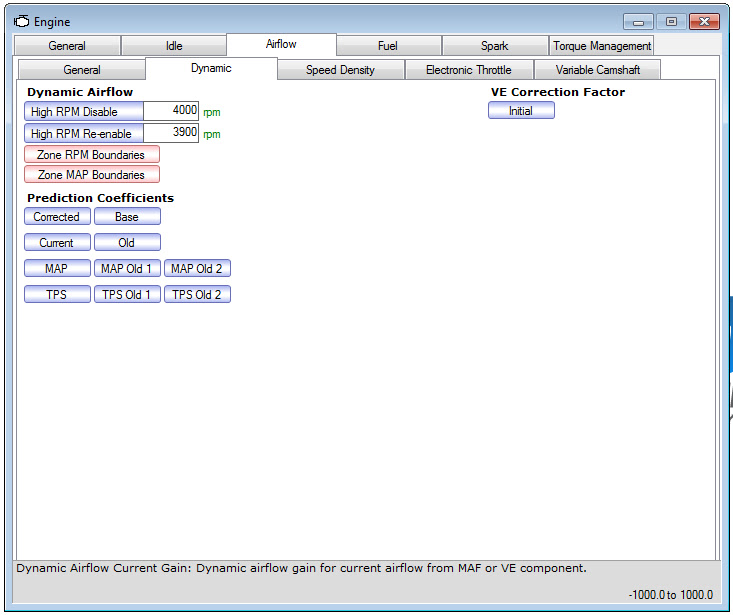  Then, we're going to open the EQ <> VE utility we downloaded earlier. We're going to select HPTuner Hooks>Copy Equations From HPTuner. 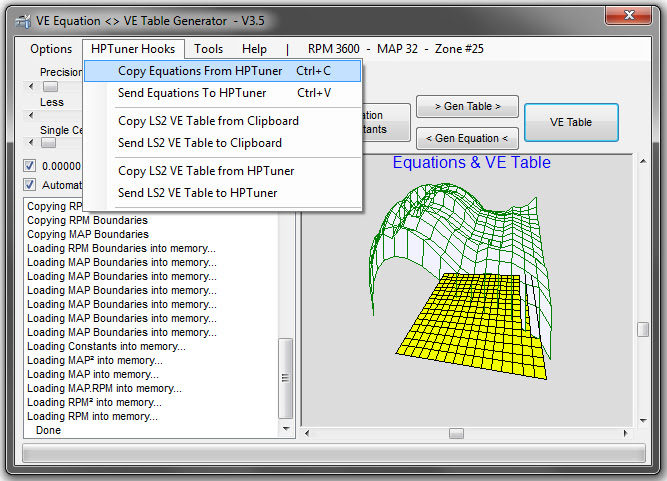 The tool will do it's thing, and copy all the data from those tables over. Next, we're going to click the VE Table radio button, and make sure that LS2 VE Format is selected in the drop down menu. 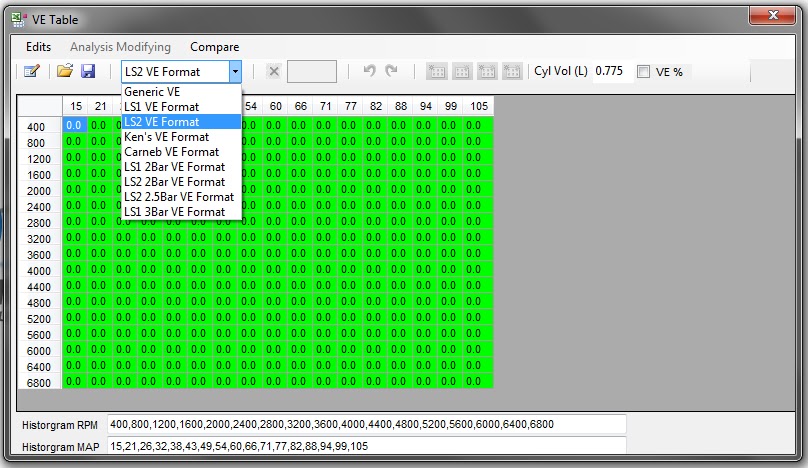 Now, we're going to click the >Gen Table> radio button. 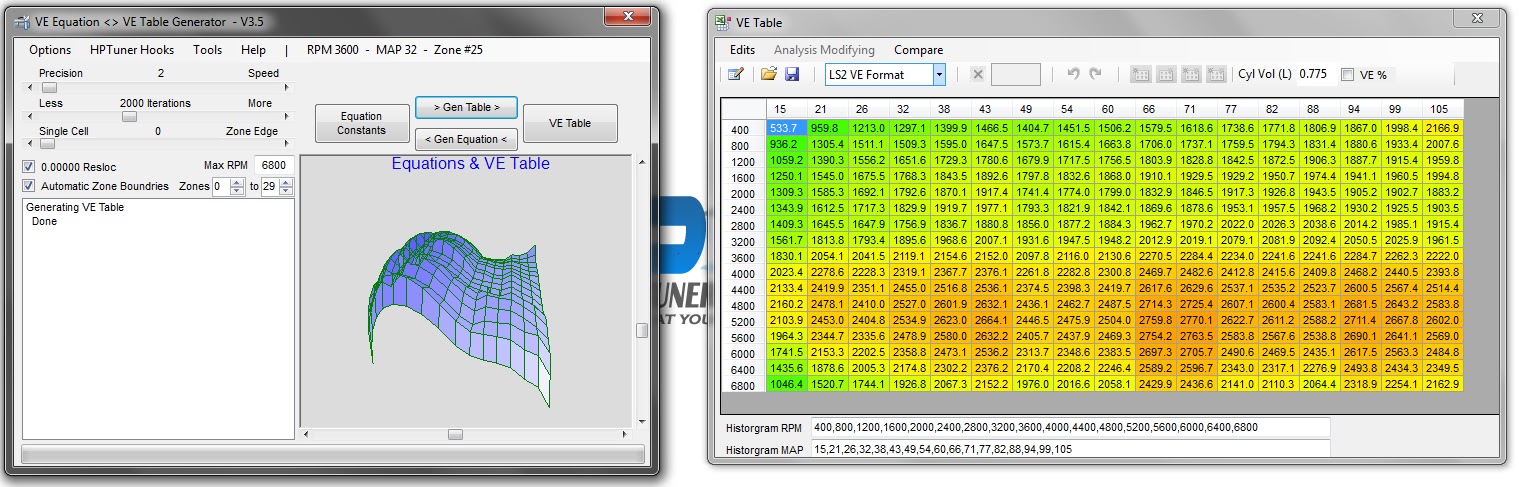 Rejoice, for now we have a VE table from those ungodly equations! Now, go back to VCM Editor and open the Engine>Airflow>General>VE Low Altd table. 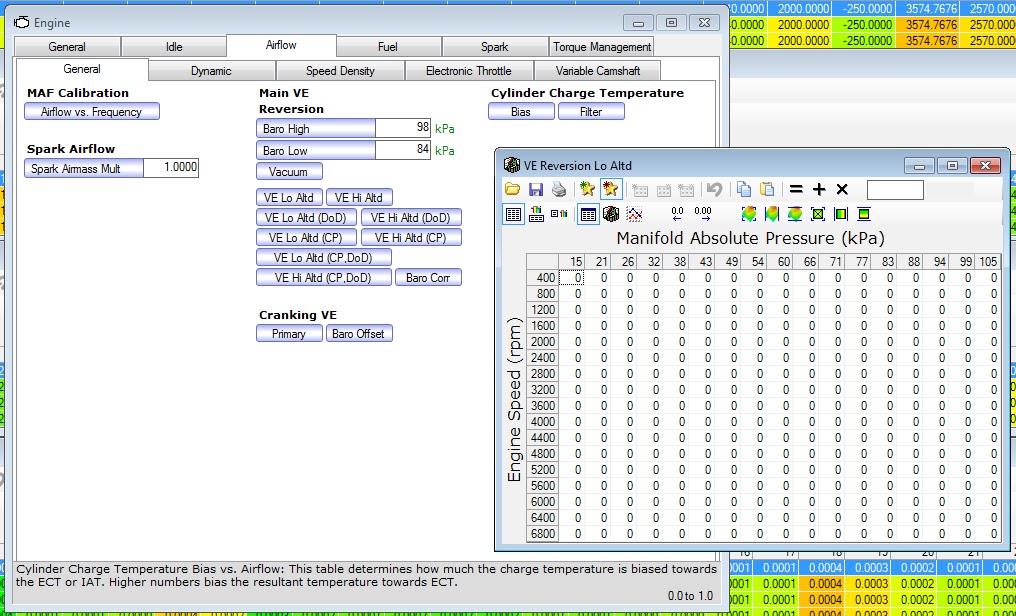 After doing this, return to the EQ <> VE tool, select HPTuner Hooks>Send LS2 VE Table to HPTuner. 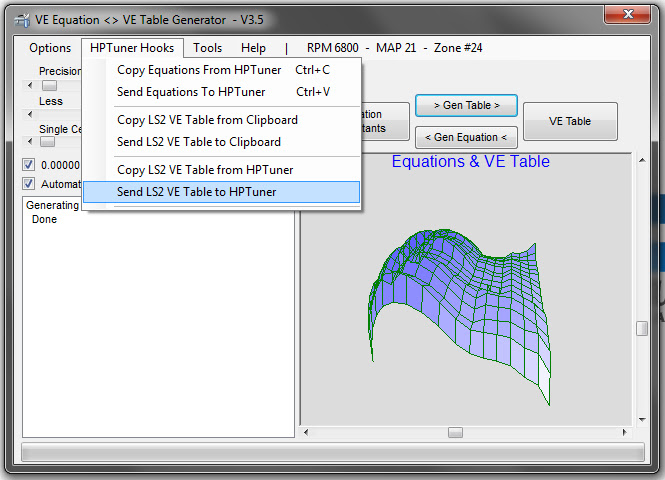 This shoves it into that unused table we opened previously. The reason for this is that now we can use the VCM Editors table functions to view and edit the data. 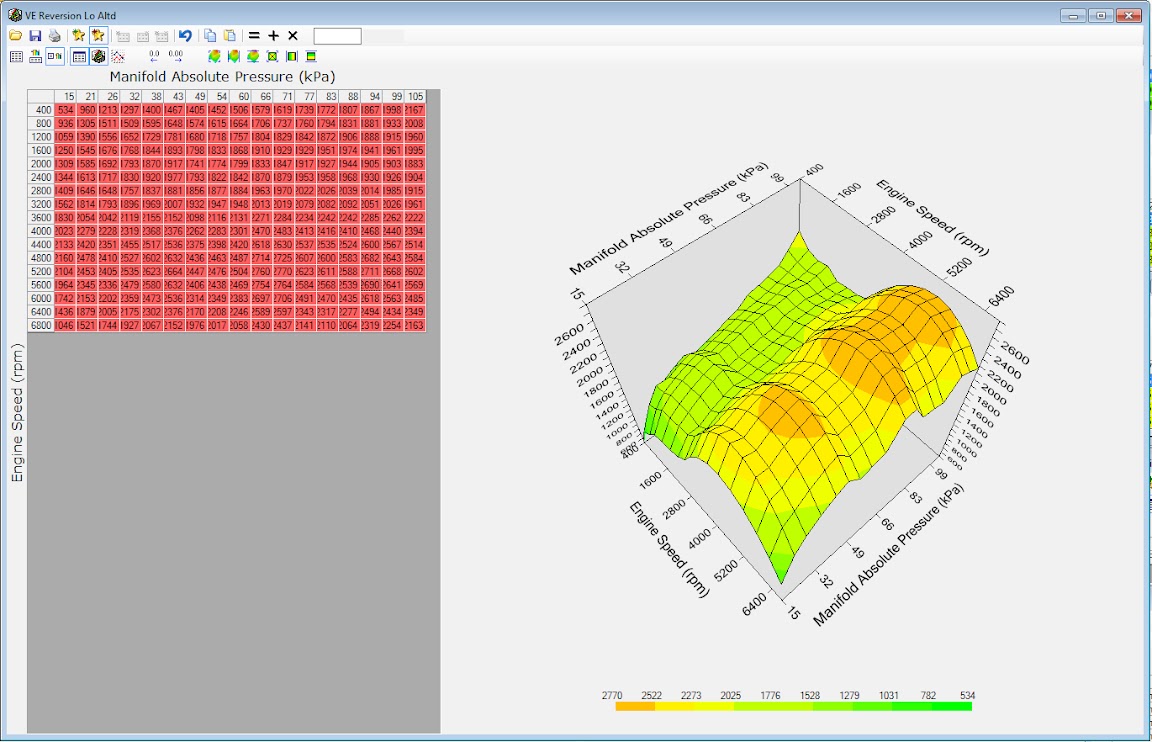 Now, we go to or saved log in VCM Scanner, select our LTFT histogram, and copy the whole thing. 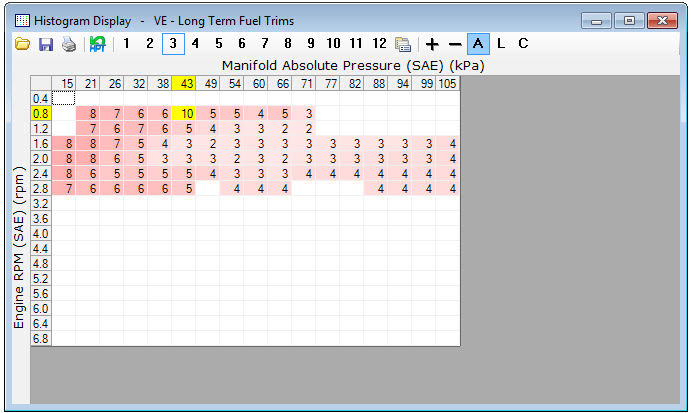 Then we go into our temporary VE table in the Editor, select the entire table, right-click, and select Paste Special>Multiply by %. 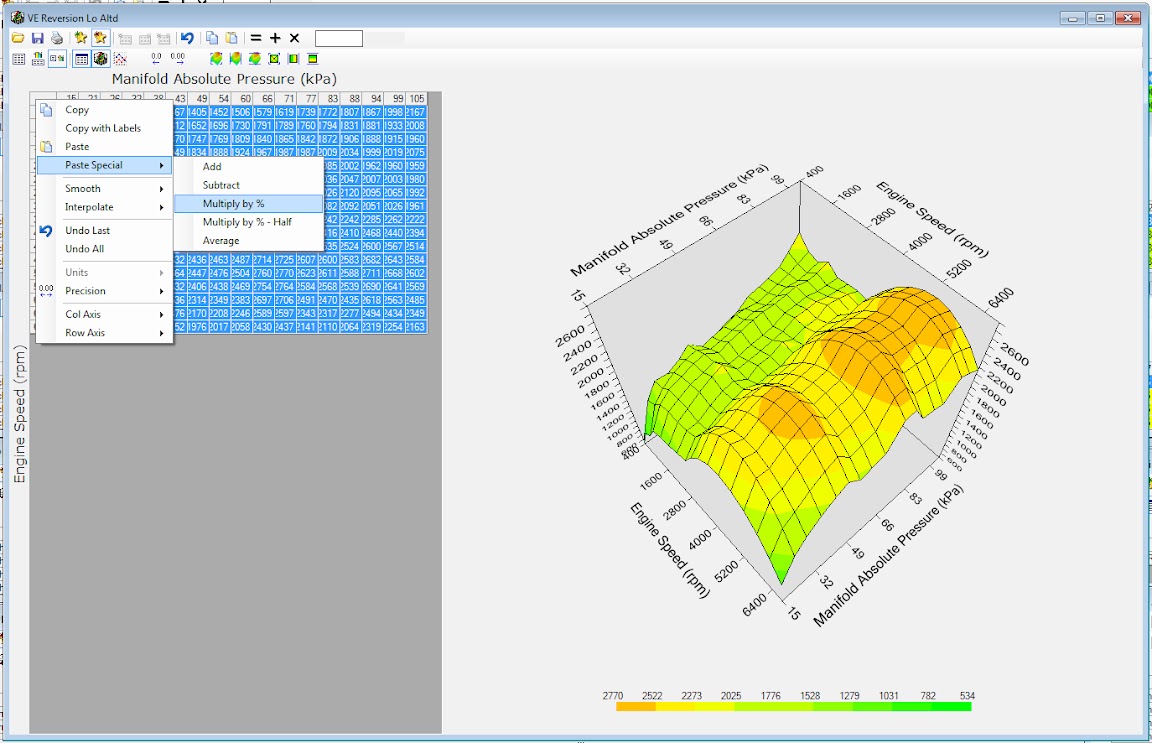 By doing this, we take that learned LTFT percentage shift and bake it into the VE table. Now, we go back to the EQ <> VE tool, and select HPTuner Hooks>Copy LS2 VE Table from HPTuners. (NOTE: Sometimes copying the LS2 VE between the tool and VCM Editor using the HPTuners Hooks menu fails for me. If this happens, just copy and paste it manually.) 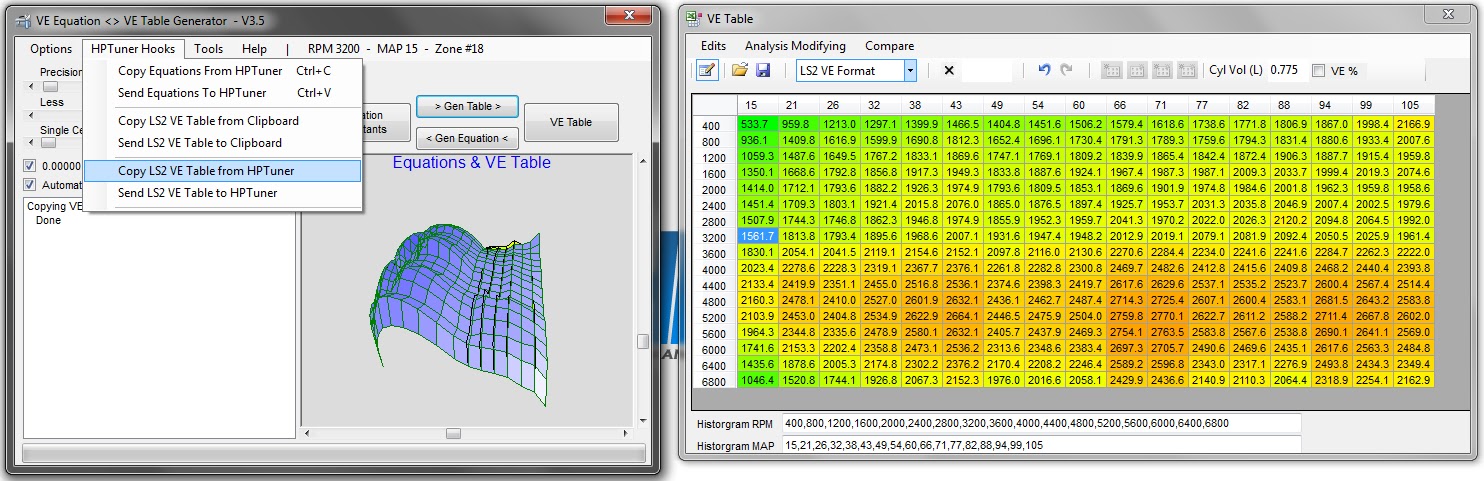 Now, click the <Gen Equation< radio button. This step takes a few seconds. What the tool is doing is taking that modified VE table and converting it into new VE coefficients! When it's finished, select HPTuner Hooks>Send Equations to HPTuners. The tool will then copy the new VE coefficients into the 8 tables we opened earlier. Save the tune file (again, I recommend saving a new file every time you change the tune) and flash it to your PCM! Tuning with STFTs Now that we have a pass using LTFTs behind us, lets speed things up and finish off using STFTs. To do this, we are going to disable our LTFTs for the next bit of logging. With the vehicle up to operating temp, connect the VCM Scanner and select VCM Controls>Fuel & Spark. Click the radio buttons for Fuel Trim Learn>Off and Fuel Trim Learn>Reset Fuel Trims. This will zero any learned LTFTs, and prevent any new LTFTs from being learned, but only for the duration of the logging session. Similarly to when we were logging LTFTs, we want to hit as many of the below 4000 RPM histogram cells as possible. Since STFTs are instantaneous values and constantly oscillating, we have to hit the cells a bunch of time so that we can get a good average. In the included histogram files, I have configured the STFT histogram to only display values for cells that have gotten a minimum of 50 hits. This way, if you only blip through a cell once and catch the STFT at the top of a rich/lean swing, you don't end up with a spike of erroneous STFT value. (The -100 cell in the pic below can be ignored as an aberration) 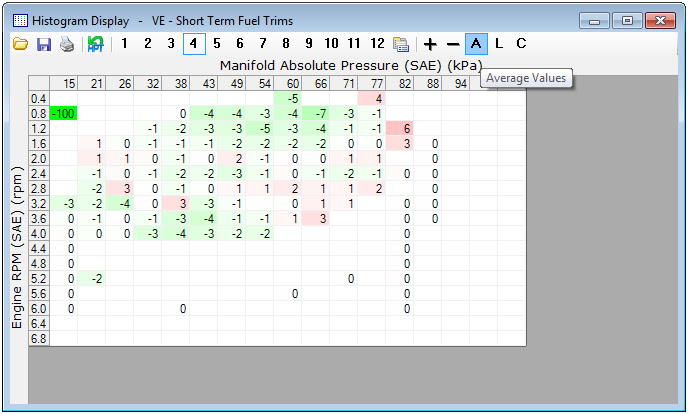 Once we're happy with our STFT histogram, we'll use the exact same procedure as before to export the VE coefficients into table format, edit the table, convert it back into coefficients, and get it back into the tune file. HOWEVER- this time we want to make smaller changes, because we're getting the VE values closer to being correct and we don't want to overshoot. So, I recommend using Paste Special>Multiply by % Half. Save it. Flash it. Do some more logging. The rule of thumb most people use for judging the acceptability of the tune regarding fueling, is that all the fuel trims should be within +/- 4. This can take several iterations of logging and modifying the tune to achieve. Once you're there, pat yourself on the back, because you've just finished tuning VE and the hard part is over! Tuning the MAF is much, much easier.
__________________
Whipple 2.9L S/C, ARH LT's, Flowmaster AMT, HPTuners
Last edited by bluetorp; 01-20-2012 at 11:04 AM. |
|
|
|
|
01-20-2012, 10:33 AM
|
#4 |
|
Drives: 2010 2SS/RS IOM M6 Join Date: May 2011
Location: Abu Dhabi, UAE
Posts: 288
|
Tuning the MAF
Tuning the MAF
Now that our VE tuning is done, we're going to go back into the tune file and return our MAF Fail High Hz value back to normal. You saved the stock tune like I told you to, right? Copy the value over from there. Now, we have to force the PCM to only run off the MAF airmass and ignore the calculated airmass from the VE coefficients. To do this, we're going to go to Engine>Airflow>Dynamic in the VCM Editor. Under Dynamic Airflow, we're going to change High RPM Disable to 2, and 'High RPM Re-enable to 1. This will prevent us from entering Dynamic Airflow mode.  Save the tune and flash it. As before, our first pass will be using LTFTs. Make sure you use the VCM Scanner to reset any LTFTs that have been learned. Like before, you're going to drive around until you've learned the LTFTs out for as many cells as possible.  Then, you're going to copy the MAF LTFT histogram in the VCM Scanner, and in the VCM Editor you're going to go to Engine>Airflow>General. Open up the MAF Calibration>Airlow vs. Frequency table.  Select the entire table, right-click, and select Paste Special>Multiply by %.  Just like we did with VE, we're baking the LTFT percentage shift right into the MAF table. Save it. Flash it. Continue on, using STFTs this time. Remember to force the LTFTs off in the Scanner, as well as resetting any that have been learned. Copy the resulting MAF STFT histogram into the MAF table, using Paste Special>Multiply by % Half. Repeat until you get your trims within the +/- 4 standard. When you're there, go back into the tune and set the Dynamic Airflow parameters back to stock values. Re-enable COT protection, DFCO (or leave it off- up to you), and put the PE Mode MAP Enable setting back to the stock value. Save it. Flash it. Done. Drive around a few days. Hook VCM Scanner up and drive around a bit logging your trims. They should all still be around +/- 4. Congratulations! You have successfully tuned your MAF table and VE coefficients for proper fueling.
__________________
Whipple 2.9L S/C, ARH LT's, Flowmaster AMT, HPTuners
Last edited by bluetorp; 01-20-2012 at 11:08 AM. |
|
|
|
|
01-20-2012, 10:33 AM
|
#5 |
|
Drives: 2010 2SS/RS IOM M6 Join Date: May 2011
Location: Abu Dhabi, UAE
Posts: 288
|
Afterword
Afterword
There are a couple of additional things I want to touch upon. First, I want to reiterate that the tutorial above is not the only way to tune MAF/VE, or the best. Most experienced tuners would use a wideband and be working from AFR error percentage, and not fuel trims., for example. Also, different tuners who do use fuel trims have different methods they like to use, many more advanced than what's outline here. There are good practices and bad practices, but no hard and fast standard of "this is the only correct way to do this", and that stands for many aspects of tuning. The procedure above is just one simple and easy to follow method. Secondly, I want to talk a little further about modifying VE. Specifically, manipulating the table data in VCM Editor. Remember the step where we copied the table data from the EQ <> VE tool into that unused table in VCM Editor? Remember how I said it was so we could use some of the functions built into VCM Editor to manipulate the data? Remember how I didn't say anything about it after that? Well, below is an explanation of what I was talking about. In this example, we're going to take a look at some actual VE tuning I did the other day on my supercharged vehicle. First, we have the VE table built from the coefficients from the Whipple canned tune. You'll notice it looks just like the one in the tutorial. This is because the Whipple tune does not modify the VE coefficients at all.  Next, we have a VE table where I've applied changes based on my logs from VCM Scanner.  As you can see, we have a significant increase in VE values covering the range that was logged in the VCM Scanner histogram. Adjacent to the log coverage zone, we have a big drop off where the VE values fall back to stock. He's where we get to use some of those nifty features VCM Editor has for manipulating graphs and table data. Namely, "Smoothing", "Interpolation", and the ability to drag a plot point up and down on the graph with the mouse. Let's go over interpolation first. Interpolation is going to help me transition the break point between where I have made edits using logged data, and where I haven't. See the big ravine after the 2800 RPM graph line? That's because my VE log info didn't go any higher. By selecting the 2800, 3200, and 3600 table lines and then applying the interpolation function, VCM Editor eliminates the ravine at 3200 by interpolating it between 2800 and 3600. Sweet! From there, I used the mouse to drag graph points up and down, focusing on plot points where data was not logged, or where the cell counts were low. For example, I didn't have any trim data above about 90 kPa because PE was kicking in and zeroing the trims. In those areas, I manually adjusted the graph points to conform with points I was able to log trims for. When my wideband gets here, I'll be able to log AFR error and forget about trims, so I won't have this problem (disabling PE would not have been a good idea). After interpolation and hand-editing graph points, my VE table looked like this:  That's my finished product for this iteration of logging/editing. I don't use the smoothing function in VCM Editor at all. Some tuners love it and smooth the crap out of all their VE tables. I think it's a bad practice. My VE table put through a couple passes of the smoothing function is below:  Smooth as a baby's ass. Looks nice and pretty to human eyes. I've never had good results with the smoothing function, though. It always throws off my trims, always. The VE table does not have to be smooth. You don't want huge mountains and valleys, but the slightly rough contour of my hand-edited VE table is what gives me the best results. It tracks with the logged data. Applying the smoothing function just shifts it away from correctness. My recommendation is to not smooth at all. However, if you just can't bear the thought of the slight chop of a hand-edited VE table, I would strongly recommend you only do one pass of smoothing. More than that and it's really going to skew your table data.
__________________
Whipple 2.9L S/C, ARH LT's, Flowmaster AMT, HPTuners
Last edited by bluetorp; 01-21-2012 at 07:54 AM. |
|
|
|
|
01-20-2012, 12:00 PM
|
#6 |
|
Account Suspended
Drives: jealous vendors mad!! HAHA!! Join Date: Jan 2011
Location: CYBERGMONSTER@GMAIL.COM
Posts: 3,658
|
 Another NICE info! Another NICE info!You should do a complete A-Z write up if you haven't already 
|
|
|
|
|
01-20-2012, 01:21 PM
|
#7 |
|
Drives: 2010 2SS/RS IOM M6 Join Date: May 2011
Location: Abu Dhabi, UAE
Posts: 288
|
It's hard to put together something like an A-Z write up. Not only would it be a massive amount of information, but since everyone's mods are different huge chunks of it wouldn't apply to any given person.
If my motivation holds out, I'll probably just keep taking small bites and tackling individual subjects. It keeps me sane, and lets people easily pick and choose what they want/need to learn about. I'll probably create a master thread to tie all the individual tutorial threads in to a central point, though. Eventually... :P
__________________
Whipple 2.9L S/C, ARH LT's, Flowmaster AMT, HPTuners
|
|
|
|
|
01-21-2012, 07:28 AM
|
#8 |
 
Drives: 2010 AquaBlue 2SS/RS Join Date: Sep 2009
Location: Long Island
Posts: 342
|
Thanks for taking the time to do this. What version of HPT are you using? I'm not sure I have all the screens you do for my LS3.
|
|
|
|
|
01-21-2012, 07:51 AM
|
#9 | |
|
Drives: 2010 2SS/RS IOM M6 Join Date: May 2011
Location: Abu Dhabi, UAE
Posts: 288
|
Added an afterword in the last reserved post spot. Additional VE table editing infos.
Quote:
__________________
Whipple 2.9L S/C, ARH LT's, Flowmaster AMT, HPTuners
|
|
|
|
|
|
01-21-2012, 09:29 AM
|
#10 |
|
Drives: 2010 2SS/RS IOM M6 Join Date: May 2011
Location: Abu Dhabi, UAE
Posts: 288
|
Let's take a look at a little "before and after", featuring me turning my vehicle using fuel trims. Mods of note are the Whipple and the ARH LT's and high flow cats. Below are the fuel trims on the canned Whipple tune.
 As you can see, lots of room for improvement. I actually tuned the MAF first (order doesn't really matter). I didn't use the exact procedure in the tutorial. Setup was the same, but I tune off of both the LTFTs and STFTs at the same time when I'm using trims. It's a little more labor intensive because I have to keep an eye on rogue data points and cell hits, and manually tweak the numbers a bit when I apply them, but in most cases it means I only have to do one logging/editing iteration. I did one trim learning/logging driving session of about 30 minutes, and made my changes to the MAF table. Then I killed the MAF, went full VE, did another 30 minute trim learning/logging session, and then made my VE edits. I turned Dynamic Airflow operation back on (MAF/VE blended operation), normalized the various setting we change for tuning purposes, and flashed the tune. Here are the resulting trims:  Much prettier. So, we're looking at about 1 hour of logging, plus 30 minutes or so of editing. As a beginner, it's going to take you a lot longer. The MAF stuff is piss-easy, but the VE edits will probably take some time. I can knock VE out really quick, in large part because I ran my LS1 open-loop Speed Density for years.
__________________
Whipple 2.9L S/C, ARH LT's, Flowmaster AMT, HPTuners
|
|
|
|
|
01-21-2012, 05:36 PM
|
#11 |

Drives: 2010 Camaro 1SS/RS 6 Speed Join Date: Jan 2012
Location: SC
Posts: 427
|
Subscribed so I can go back and read it later when I have more time. Lot of info there.
|
|
|
|
|
01-21-2012, 10:12 PM
|
#12 |
      Drives: none Join Date: Aug 2011
Location: DFW area
Posts: 1,844
|
Well done. Your two threads are sticky worthy once combined into a single thread.
Time permitting, what do you plan on next? |
|
|
|
|
01-22-2012, 07:53 AM
|
#13 |
 
Drives: 2010 2SS Join Date: Jan 2011
Location: Salisbury, NC
Posts: 149
|
Thanks for the great reference material! OK mods lets sticky these threads...
|
|
|
|
|
01-22-2012, 08:08 AM
|
#14 | |
|
Drives: 2010 2SS/RS IOM M6 Join Date: May 2011
Location: Abu Dhabi, UAE
Posts: 288
|
Quote:
__________________
Whipple 2.9L S/C, ARH LT's, Flowmaster AMT, HPTuners
|
|
|
|
|
|
|
|
|
 |
|
|
 Similar Threads
|
||||
| Thread | Thread Starter | Forum | Replies | Last Post |
| JDP Motorsports' 2010+ Camaro SS Fuel Line Retrofit DIY | JDP Tech | Camaro DIY & HOW-TO instructions & discussions | 27 | 08-17-2017 12:31 PM |
| my dyno today(base for e85 tune) | bmorecam | Camaro V6 LLT Engine, Exhaust, and Bolt-Ons | 51 | 06-08-2011 11:35 AM |
| Best priced camaro corvette GTO Firebird Trans Am GM Truck tuner Tampa Tuning | Tampa Tuning | V8 Bolt-Ons & Tunes | 1 | 01-30-2011 05:02 PM |
| Camaro ls3 news...true or false? | Dark Knight | Camaro V8 LS3 / L99 Engine, Exhaust, and Bolt-Ons | 74 | 06-05-2008 05:29 PM |


