You are browsing camaro5 
|
|
 02-28-2024, 04:19 PM
|
#43 |
|
Boosted Moderator

Drives: Bone Stock LS3 Join Date: Sep 2009
Location: Marion Tx
Posts: 15,495
  |
I was reminded of an mildly interesting tidbit
When the Dove Tail spoilers were finally released by GM, they were only offered in three colors, one of which was the factory black
I think the other two were white and silver
No red jewell tint
. So we ordered this one in black, and applied the color ourselves
at a local paint shop
So I went to UPS, hoping for a one stop solution package and ship They measured and weighed and hmm hawd around a bit and came up with $109.9? thereabouts Just for packaging So I thanked them and bounced, ended up going to Lowes to see what they offered for boxing $ 51.00 and some change later and about half an hour, and walaa . Now to determine reliable shipping without breaking any banks Before the final closing, I will add some peanut packing so nothing moves hopefully
__________________
If the car feels like it is on rails, you are probably driving too slow. -Ross Bentley
Horsepower is how fast you hit the wall. Torque is how far you take the wall with you. If everything seems under control, you're just not going fast enough. Mario Andretti If you can turn, you ain't going fast enough... |

|

|
|
02-28-2024, 05:11 PM
|
#44 |
 
|
No worries. Say what is neessary and I will work it. PM with any specifics necessary.
|
|
|
|
|
02-28-2024, 05:34 PM
|
#45 |
|
|
Worked the Deck Lid a wee bit today. Some deep sand scratches, and wanted to go deep to polish them out. Buffed the crap out of it, but could even wet sand it some more. Just being super picky.
Started on the safe side, increasing deep cut Pad pressure and adding compound. Long story short, looks like the deeper scratches can be buffed out, and looks better than the rest of the car, that which I will address over time. The Stripes hurt the finish, they etch the Paint and leave it mottled. Note: Black Paint sucks, and is brutal for showing every little imperfection. It is a labor intensive process and there are no short cuts to get a mirror like finish, with minimal visible scratches. If there is little distortion when finished in the Black Mirror, you are good to go. I am close, as the overhead lightng is almost crisp... Bring on the Dove Tail Spoiler to make it happy. |
|
|
|
|
02-28-2024, 08:34 PM
|
#46 |
Drives: ABM #93 Join Date: Oct 2018
Location: Lotaburger
Posts: 2,695
|
So glad you were able to round up a dovetail. Congrats on that. Paint work is looking excellent!
__________________
ABM #2399 2SS/RS:SOLD
ABM #93 2SS/RS Black Rally stripes, Titanium Interior 4,000 miles: GM GFX side skirts and diffuser waiting on paint, GM dovetail, GM heritage, RPI ZL1 style splitter. 87 IROC-Z Iroc blue. all original unmolested with 50K miles. |
|
|
|
|
02-28-2024, 08:37 PM
|
#47 | |
|
Drives: ABM #93 Join Date: Oct 2018
Location: Lotaburger
Posts: 2,695
|
Quote:
Such and amazing thing to do, its members like you and a few others that make this board so freaking awesome!
__________________
ABM #2399 2SS/RS:SOLD
ABM #93 2SS/RS Black Rally stripes, Titanium Interior 4,000 miles: GM GFX side skirts and diffuser waiting on paint, GM dovetail, GM heritage, RPI ZL1 style splitter. 87 IROC-Z Iroc blue. all original unmolested with 50K miles. |
|
|
|
|
|
02-29-2024, 12:04 PM
|
#48 |
|
|
Chilling a bit until the Bride comes home from work.
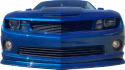
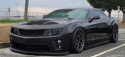
I am compiling a Mod list of things I am considering to flesh the Project out. Not going to go crazy, but want to add things that enhance the car from a appearance standpoint, and some minor performance tweaks. Like I did on my other Camaro, I do plenty of research on what to do, and selecting sources for parts procurement. There were tons of suppliers years ago, that has kind of dwindled to some of the big one's still out there like Phastek, RPI, and of course Jegs and Summit. Gone are Apex, Ohio Speed, JPSS, etc. There are of course many still in the game, but their prices are not competive compared to the Big Boys. So attached is a preliminary list. I would welcome the readership to weigh in on my selections and choices From a performance standpoint, I may need a tune with the Air Box/Shaker Mod. Had a chat with Ted Jannety and he stated if you approach a 10% or so change in Air Flow past the sensitive MAF, you may throw a code. I will probably do LT's and a Borla Atak exhaust, that WILL need a tune. He also stated the L99 is factory tuned with a eye on emissions, that makes it a little doggy. The L99 wakes up with a tune even if stock, and really comes alive with a good Air Box, LT's, and a good Cat Back. I have Stainless Power Headers, Borla Exhaust, and CAI on my other 2010, and loved that before I added the Whipple. The Stainless Power Headers are - yes - made in China, but they were a breeze to install and fit great. THe exact same LT "Stainless Works" is like $900 more, that does not make sense. Kooks are better, but they are WAY more $$. So Air Box/Shaker Mod first to get a driver, then LT's and Exhaust with a tune to follow. Then the appearance mods. I like the Oracle Halo Kits for the Headlights and Fogs. It is a attention getter at Car Shows. I wrote a thread on installation years back. I'm thinking Amber Headlight Halo Rings, and maybe a Blue Inner Ring on the HL and for the Fogs. Other combos would be and Red (no), Blue, Green. Ref my other Camaro Pic. Amber or Blue on the Fogs. Only White and Amber are legal, the others can get you a ticket, esp Red and Blue. I control these with a Latching PB Switch, and a dedicated auxiliary battery in the trunk wired for recharging. Ever leave lots of LEDs on for 10 hrs at a show? Our cars do not tolerate battery drain well. Then some Slotted and Drilled Rotors. The Baer is a "good" Rotor, and can be used with stock Pads to save a buck. So this is a modest starter list. Will probably pop for some of high end Snowflake Wheels, and Tires of some recommended Brand. It is a big ticket, but great W/T combo's always add appeal to a Car. I have attached some pictures of these Mods as installed on "The Beast" as reference. Feel free to make suggestions to spend my $$$ 
|
|
|
|
|
03-01-2024, 05:59 PM
|
#49 |
|
|
Serious progress today, had my fellow retiree help.
I have done all of the exterior removal stuff before on my other 2010, but took the time to look at the Forum "How To's" video's a a refersher. Great Stuff. Broke out the Quick Jack, raised Her up, and pulled the Wheels off. Bought some Pucks for the QJ and they fit nicely onto the Frame Rail Pinch Welds w/o wiping out the Rockers. Front and Rear Fascia's removed, Rockers pryed off (broke (2) clips, Boo-Hoo), and Fenders. Headlights removed for Halo Installation. Cleaned the under structure and suspension, as I will hit it with some rattle can paint so it looks good. Def going with new rotors, stockers are OK but rust just looking at them. Layed on the Hood and Front Fascia to get a idea of how it will look - already Badass.... |
|
|
|
|
03-03-2024, 02:07 PM
|
#50 |
|
|
Boring but necessary stuff today. Pulled off the Rotors, cleaned all suspension parts, hit it with rust reformer, and some rattle can Black. Looks good.
Will slap on the Baer C/D and Slotted Rotors when they arrive. Seemed like low torque when removing the rear Caliper Bolts, but no worries, factory torque. Brake servicing on these cars is wonderful and simple - remove caliper bolts, punch out the retaining pins, slip out the Pads, and done. Rear has you also removing the outer axle nut. Plan is to hack off the "Hockey Pucks" and reuse the like new pads, I think they are a factory noise, rattle, or whatever thing engineering on the OEM car, but Ugly, off they come. There is endless and almost comical debate on the TTY, Tq + Angle, and Bolt Stetch stuff. I weighed in on the forum posting debate with some data, and IMO - reuse once, then replace. Cheap insurance. Gonna paint the Calipers Gold for the Bandit Theme, will try this more expensive kit. Have had good success with VHT Caliper Paint, but it is not available in Gold. Last edited by hesster; 03-04-2024 at 06:21 AM. |
|
|
|
|
03-04-2024, 03:23 PM
|
#51 |
|
|
Finished Painting the Suspension and layed on the Fenders. They are in fact a custom stamping, as the mounting flange to the new Fascia is def different. Ordered a pack of body shims, as tweaking is necessary.
Plan is to fit the Fenders, Hood, and Fascias to make sure everything is aligned, then tear down for Paint. |
|
|
|
|
03-04-2024, 03:45 PM
|
#52 |

|
Very cool, great progress being made!
__________________
2014 1LE - Sold
2014 Z/28 #99008 CTF SIM |
|
|
|
|
03-04-2024, 05:42 PM
|
#53 | |
|
|
Quote:
Will not throw paint until if is a steady 65+degrees out. Today was really uusual in MI at 70 deg! Tempted to break out the Beast and go for a blast., but winter ain't done here yet. |
|
|
|
|
|
03-05-2024, 06:07 AM
|
#54 |
Drives: 2010 Camaro SS , 2011 Colorado LS1 Join Date: Jan 2022
Location: Greenville, SC
Posts: 827
|
The speed that you are getting things done is amazing to say the least!
And better keep the wife happy, she controls all the assets!  I know from experience!
__________________
 |

|
|
|
03-05-2024, 03:45 PM
|
#55 |
|
|
Crap day today here is MI, so elected to do a job in the house - HALOs.
Many of us have probably done them, but I am gonna summarize since it is part of my Build. Plus, I do some extra things which will be part of the Halo Assembly thread. This one is Headlamp tear down. Let's be clear on this Mod - it ain't real easy, and not for the person who does not have lot's of patience, and perserverence. It sucks. There are a few methods to open up the Headlights, both involve Heating them. I prefer to use a heat gun, as I can direct the heat exactly where I want. I just don't like the idea of baking headlights repeatledly. It may make the process much easier, I don't know, but this method works for me and I know I won't trash a $$ Headlamp.. I start by taping up the Clear Lens for protection, cause you are wrestling the odd shaped H/L and don't want scratches. Then begin by heating the Black housing where it is glued to the Clear Lens, so as to not warp the lens. Then gradually pry the housing flange away from the lens, it is flexible under heat and can be bent almost 90 degrees away from it. Then get a small screwdriver or pry tool of choice and begin heating then digging out the sealer. You can only get at the OUTSIDE Sealer, the inner is still inside the Lens, and is another challenge. With a little finess the outer sealer bead can be pryed and pulled out in strips. The more you can remove, the easier it is to seperate the halves. Then heat a area some more, and get your pry tool under the bottom of the Clear Lens Cover and pry it up to seperate it from the inner sealer. This where you don't want to be a "Bull in a China Shop". Work your way around the Headlamp, and you will hear a pop when the adhesive separates from the inside of the lens, then you know it has separated. Work it until it all is separated - BUT! There is a electrical harness connection from the Headlamp "Eye" or whatever it is called, that must be disconnected before separating the two halves. Do not touch any inside part as much as possible, I wear latex gloves. Trust me, any smears on the innards or lens will look like crap once you light them up. Yep - some minor collateral damage to a digit - I ain't got time to bleed... Next is the Halo install, should have them from Phastek any day. |
|
|
|
|
03-06-2024, 01:21 PM
|
#56 |
|
|
This "Dove Tail Spoiler" showed up today, thanks to a incredibly generous individual who is a man of his word - Mr. "SSE 4 2SS".
It was wrapped in a mile of protective wrap, and took me a good 1/2 hour to unwind it all. The anticipation of laying eyes on it was worth the wait. I will figure out how to mount it, as there is not a template anywhere that I can find on the web to locate the end Wing Pieces. Not a big deal, I will determine those hole locations, drill till it fits, and use some 3M tape. I believe the center section bolts right into the existing holes in the Deck Lid. Got to figure out what it takes to wire in the light in the Center Section to the existing 2010 Harness. This will be a very important piece and part of my build, with a great makes Ya feel good story behind it. |
|
|
|
|
|
|
|
 |
|
|


