You are browsing camaro5 

|
 03-15-2014, 08:06 AM
|
#29 | |
 
Drives: 2010 ''RS1'' my own package Join Date: Aug 2010
Location: Concord NC
Posts: 237
|
Quote:
__________________
2010 1LT A6, Hurst shifter and handle, 3pc rear spoiler, streetscene splitter, ss front end with ZL1 grill, ABL , footwell and cup holder lighting, ss cat back exhaust, Eibach lowering springs, custom engine cover, 4pk gauges, speedhut A pilliar pod and gauges, metra kit and kenwood stereo, 2014 ss hood scoop with stock rain tray, 3D Carbon fender vents, rear lighted bowtie, and ultra gauge.
 |
|

|

|
|
03-17-2014, 05:41 PM
|
#30 |
 Drives: 2012 Black 2SS/RS M6 Join Date: Mar 2012
Location: Stamford, Connecticut
Posts: 672
|
Looks great...but what's the deal with water going into the engine? Any solutions to that?
|
|
|
|
|
03-21-2014, 10:30 PM
|
#31 |
 |
wasn't too bad installed tonight. took couple hours looks nice and will play with it tomorrow to get it lined up perfect. thanks for write up...
|
|
|
|
|
03-21-2014, 11:13 PM
|
#32 | |
 
Drives: 2010 SS Join Date: Aug 2006
Location: Mi./Al.
Posts: 829
|
Quote:
__________________
POW/MIA - YOU ARE LOST BUT NOT FORGOTTEN IN SOUTHEAST ASIA
|
|
|
|
|
|
03-22-2014, 08:20 AM
|
#33 |
|
|
   
|
|
|
|
|
03-22-2014, 09:22 AM
|
#34 |

|
That looks nice man. Did you snap any pics of the mounting underneath?
|
|
|
|
|
03-22-2014, 09:33 AM
|
#35 |
|
it's mind bottling..

Drives: SGM Join Date: Apr 2011
Location: miami floirda.
Posts: 5,393
|
Wish I can do this. I'll be Terrified to work on my hood
__________________
 |
|
|
|
|
03-22-2014, 09:43 AM
|
#36 |
|
|
No but i have to take it apart again will get some. i'm about a 1/8 off on being dead centered i have a little more cutting to do.
|
|
|
|
|
03-22-2014, 12:49 PM
|
#37 | |
|
|
Quote:
|
|
|
|
|
|
03-22-2014, 01:25 PM
|
#38 |
|
|
I did paint all the cut area's. I did notice if u push hard in front or behind u can get metal to flex.
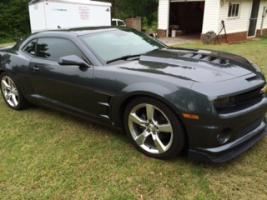
The vent is very solid guess i'll look in to 3m window glue or maybe couple more braces. I think it looks nice and clean, going to order bottom tray. Hopefully can make that work too. So far i have 150.00 in vent and a trip to hardware store. Here are some more pictures         
Last edited by mickmosh; 03-22-2014 at 01:35 PM. |
|
|
|
|
03-22-2014, 01:37 PM
|
#39 |
|
Drives: 2010 ''RS1'' my own package Join Date: Aug 2010
Location: Concord NC
Posts: 237
|
looks great!!!!! mine will be here tues, I think when I cut the hole out im going to leave metal front and rear to drill and put the studs through and a hoop of metal on the side studs. I also got the rain guard but I don't know if it will work with the v6 engine cover, I hope so.....lol
but both of you guys hoods look awesome also did you use the measures that he had in the write up??
__________________
2010 1LT A6, Hurst shifter and handle, 3pc rear spoiler, streetscene splitter, ss front end with ZL1 grill, ABL , footwell and cup holder lighting, ss cat back exhaust, Eibach lowering springs, custom engine cover, 4pk gauges, speedhut A pilliar pod and gauges, metra kit and kenwood stereo, 2014 ss hood scoop with stock rain tray, 3D Carbon fender vents, rear lighted bowtie, and ultra gauge.
|
|
|
|
|
03-22-2014, 01:53 PM
|
#40 | |
|
|
Quote:
The sound deading padding is going to get cut alot smaller than the hole in hood. |
|
|
|
|
|
03-22-2014, 02:11 PM
|
#41 |
      
Drives: 2010 Camaro LS V6 Join Date: Jul 2010
Location: Tampa, Florida
Posts: 2,784
|
Got mine. Will install it in few days
__________________
C-LO or Sonic
"Without Struggle there is no progress" I am your best nightmare!  |
|
|
|
|
03-22-2014, 04:36 PM
|
#42 | |
|
|
Quote:

|
|
|
|
|
|
|
|
|
 |
|
|


