You are browsing camaro5 

|
 12-23-2009, 07:08 PM
|
#85 | |
  Drives: 2011 GT500 Join Date: Jun 2008
Location: southern california
Posts: 902
|
Quote:
|
|

|

|
|
12-23-2009, 07:09 PM
|
#86 |
      
Drives: 2010 RJT 2LT Camaro Join Date: May 2009
Location: East Lansing, MI
Posts: 2,530
   |
I managed to try the 3156 bulb in the 3157 socket. First off, you have to shave part of the bulb off to make it fit, but it will work, but only as the brake/turn signal light.
I also pulled out the LH IN RS tail light. Anyone want the part number? 92212647 and runs about $50 if one wanted to order this to mess around with. I think the best idea is using a board of LEDs for the brake/turn signals, and then use a regular bulb behind the LED board for the afterburner. I would also chrome paint "Part c" just below the clear lense to get the light to reflect off. Oh on these tail lamp there is a blue sticker covering a hole. That would be a great location to run the two wires feeding the LED board. |
|
|
|
|
12-23-2009, 08:42 PM
|
#87 |

Drives: 2014 Z/28 #82+#192, 18ZLE 66Nova Join Date: Oct 2008
Location: By the lake in AZ
Posts: 15,719
|
This is with a lot of LED's i think i got the afterburner looking good but the brake light is ok but can do better.
|
|
|
|
|
12-23-2009, 09:22 PM
|
#88 | |
|
Drives: 2011 GT500 Join Date: Jun 2008
Location: southern california
Posts: 902
|
Quote:
still think we need to scuff/diffuse the chrome inside the main can to help even out the light diffusion. can you show us a break down of what the internals look like? |
|
|
|
|
|
12-23-2009, 09:35 PM
|
#89 |
|
Drives: 2014 Z/28 #82+#192, 18ZLE 66Nova Join Date: Oct 2008
Location: By the lake in AZ
Posts: 15,719
|
Give me 10 min to re-size them.
|
|
|
|
|
12-23-2009, 10:09 PM
|
#90 |
|
Drives: 2014 Z/28 #82+#192, 18ZLE 66Nova Join Date: Oct 2008
Location: By the lake in AZ
Posts: 15,719
|
This pic is with the red lens removed.
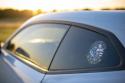
And this is the same pics, There is 3" of depth to the rear lens and i did put 2 layers of tint on the inner lens. This is the back of the tail light hosing you see two sets of wires one is for the afterberner LED's and the next set is for the Brake light LED's One more pic of the hosing with nothing in it. This is the hart of all the light it the 1/2 Moon that i made as you can see its Dark there are 2 layers of 20% tint on the lens, And a lot more as you will see. In the next 2 pics you can see that on the outside of this 1/2 Moon i have almost 50 LED's all red but if need be you can add some yellow ones to add to the look. The 2nd pic. This pic is of the back side of the 1/2 Moon you will see a lot of Small wires.  This is inside that 1/2 Moon look at all the LEDs in that part. One moor pic of the inside for you. I want to thank bolteon593 for the help and all the rest of the members on Camaro5 for all the help. I have one more thing i want to try If i have a relay on the brake side that will run a resister on the afterburner side will that not make the afterburner lees brite as soon as you hit the brake. |
|
|
|
|
12-25-2009, 02:04 AM
|
#91 |
|
Clap Clap

Drives: 2SS/RS LS3 Join Date: Sep 2009
Location: NC
Posts: 326
|
2SSRS-
...DAMN You're leading the pack on this one. You're so close. Keep it up man. |
|
|
|
|
12-25-2009, 09:24 AM
|
#92 |
|
Drives: 2014 Z/28 #82+#192, 18ZLE 66Nova Join Date: Oct 2008
Location: By the lake in AZ
Posts: 15,719
|
Here is one more lens in front of all the LED's.
|
|
|
|
|
12-28-2009, 01:12 AM
|
#93 | ||||
|
Come see me.

Drives: Chevrolet Line-up Join Date: Sep 2008
Location: Virginia Beach, Va.
Posts: 557
|
Quote:
 I personally think you smacked it right on the head of the concept design. 'Direct Hit' I personally think you smacked it right on the head of the concept design. 'Direct Hit'Quote:
 Quote:
Your work is cool and definitely shows serious thought and exicution. I like what you've done a lot. If I designed some I'd have you build it. 
__________________
When you have a finely tuned percision piece of engineering.
  Vin#30271 Vin#30271 |
||||
|
|
|
|
12-28-2009, 01:30 AM
|
#94 |
|
Virologist in the making

Drives: 2010 VR SS/RS LS3 Join Date: Aug 2009
Location: El Paso TX
Posts: 2,865
|
I honestly dont think a handful of LEDs is the answer. Look at the concept pics. The lighting needs to be backlit and etch onto reflective sides to give a burning glow effect. The sides need to be reflective and the center tinted.
__________________
Victory Red 1SS/RS Ordered - 8/4/09 & Joined Camaro5.com family
6000, Delivered to the customer - 12/21/09   |
|
|
|
|
12-28-2009, 01:06 PM
|
#95 |
Drives: the 2nd amendment home Join Date: May 2008
Location: OK
Posts: 14,707
|
2SSRS is looking better, seems to be more of a halo rather than eclipse in the pics tho.
__________________
"They that can give up essential liberty to obtain a little temporary safety deserve neither liberty nor safety."
-- Benjamin Franklin |
|
|
|
|
12-28-2009, 01:47 PM
|
#96 |

Drives: 2016 2SS, SW Join Date: Oct 2009
Location: Chicago Suburbs
Posts: 1,079
|
The damn step in the housing will screw us getting light diffused out to the edges properly. Looks like a new one is required. :(
|
|
|
|
|
12-28-2009, 04:23 PM
|
#97 | |
|
Force RECON

Drives: 2005 Saab 9-5 2.3T Join Date: Jan 2008
Location: Terre Haute, IN
Posts: 1,687
|
Quote:
__________________
|
|
|
|
|
|
12-28-2009, 04:33 PM
|
#98 | |
|
Drives: 2014 Z/28 #82+#192, 18ZLE 66Nova Join Date: Oct 2008
Location: By the lake in AZ
Posts: 15,719
|
Quote:
|
|
|
|
|
|
|
|
|
 |
|
|
 Similar Threads
|
||||
| Thread | Thread Starter | Forum | Replies | Last Post |
| New Camaro Exterior and Interior Stainless Steel Trim Parts from RPI Designs! | RPI Designs | Cosmetics and Lighting Modification Discussions | 36 | 04-02-2020 05:32 PM |
| New Camaro Exterior and Interior Stainless Steel Trim Parts from RPI Designs! | RPI Designs | Exterior Parts & Accessories | 30 | 02-20-2013 03:23 PM |
| Drag Racing Suspension Kits | Info@PeddersUSA.com | Suspension / Chassis / Brakes | 25 | 02-21-2010 08:48 PM |
| Official Camaro Convertible CONCEPT Press Release | Tran | Camaro Convertible Forum | 12 | 11-18-2009 07:05 PM |
| The DEFINITIVE EXPLANATION OF CAMARO SUSPENSION, ISSUES, AND UPGRADES | Info@PeddersUSA.com | Suspension / Brakes / Chassis | 106 | 10-19-2009 06:08 PM |


