You are browsing camaro5 
|
|
 05-09-2012, 12:05 PM
|
#1 |
         
Drives: 2011 2SS Synergy Green Join Date: Nov 2011
Location: Austin, Texas
Posts: 3,670
|
New Era Intake Install with instructions and pics
First, I have to give a huge thanks to the guys at AutoAgenda for being so patient with me as I was trying to make up my mind on what intake to buy. This is my second order with them in a month and I can't say enough good things about them.
Ok so I bought a New Era "Over the radiator" air intake and I bought a different brand "Over the radiator" intake as well. I received both knowing that I would be installing both and sending one back. I feel bad saying, I didn't even install the other one. After messing with the NEPI (New Era Performance Intake) and noticing it's design and beefiness, I decided to not eve install the other one. One of the sweetest things about this intake is that I can paint it to match the body very easily, and mine will be painted next week. There is some discussion about heat-soak and while I realize it is something that occurs with metal parts under the hood, I feel this isn't too much of an issue with an intake with such a short jog to the throttle body. I have driven this in traffic on a warm day and while it is warm to the touch afterward, it's not ridiculously hot. Air doesn't hang around in this tube. The New Era Performance Intake sucks air violently through it's monster chamber and it is devoured by our power hungry V8's dwelling under our hoods. FEED YOUR V8 THE FRESH AIR THAT IT DESERVES!!!! Ok... I received the NEPI and it was well packaged and pretty much assembled already. This is a real straight forward and quick install AFTER I REALIZED A FEW THINGS and I will note those. Obviously we all know how to remove the stock airbox setup. Grab a 10mm socket and remove the two nuts and rubber dampeners off to the side. Grab a flat tip screwdriver and remove the worm clamp at the throttle body and remove it carefully. You;ll also want to grab the PCV line and rotate is clockwise to access the locking tab. Hold the line and move the tab over to release it from the intake nipple. Here is what we're starting with: 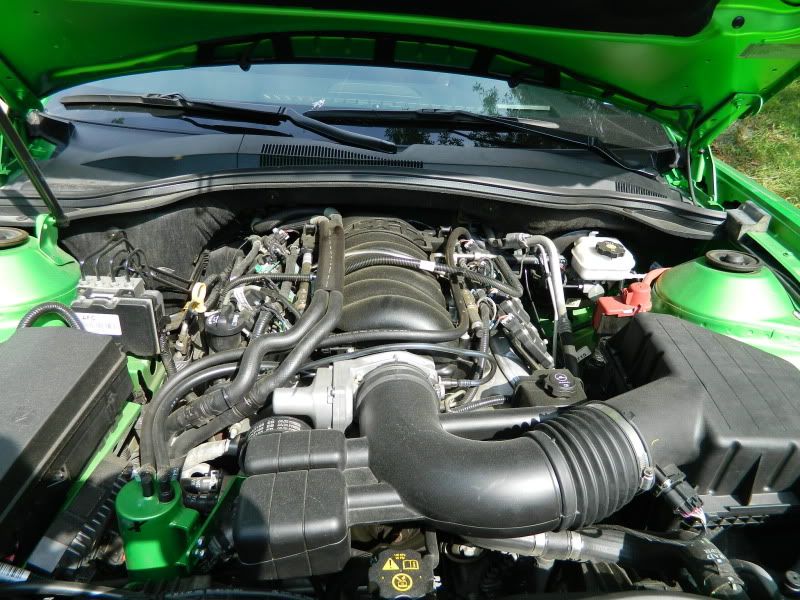 Pinch down and pull out the MAF sensor and set it aside carefully, out of the sun and away from water. 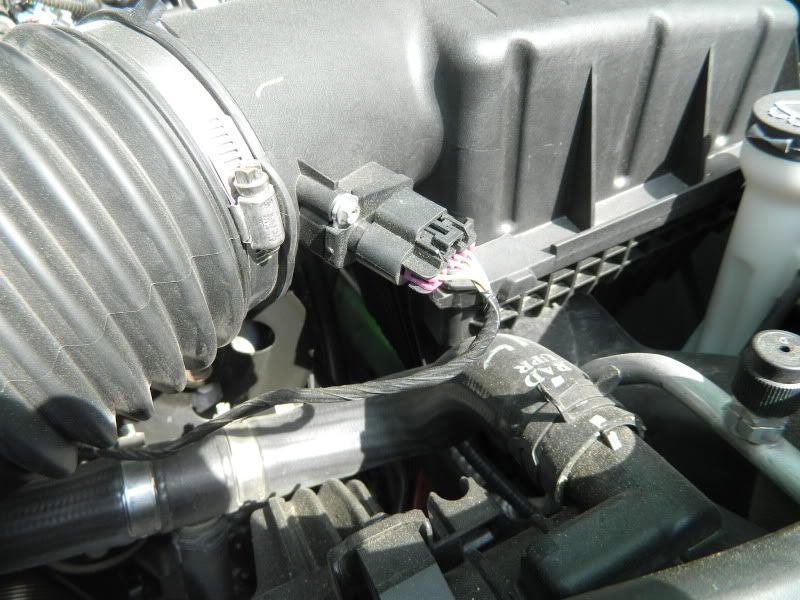 Here is what it looks like without the massive stock airbox setup: 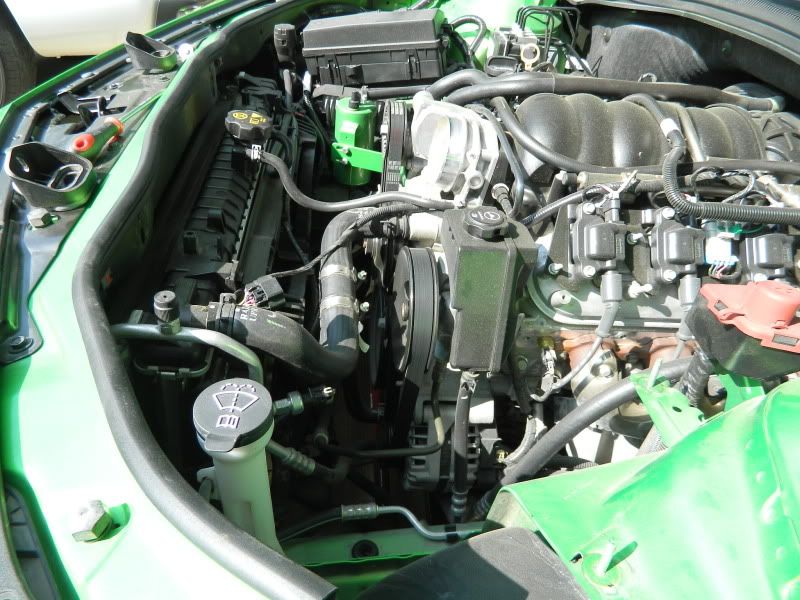 Next we are going to remove these 10mm radiator support bolts (2) of them (1) on each side: 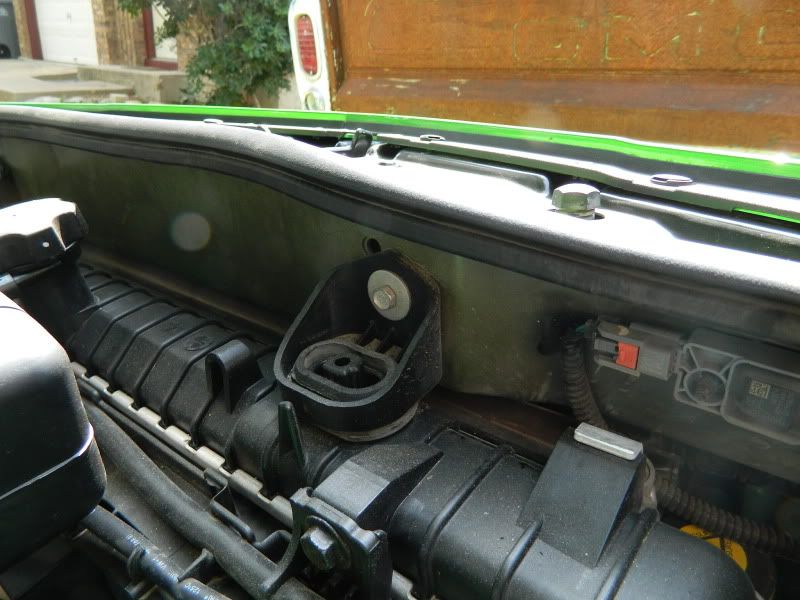 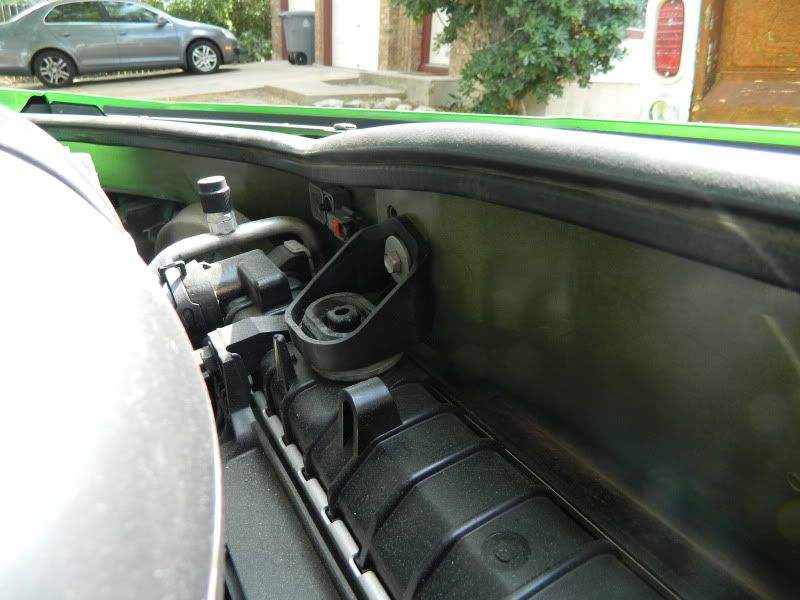 Both supports removed: 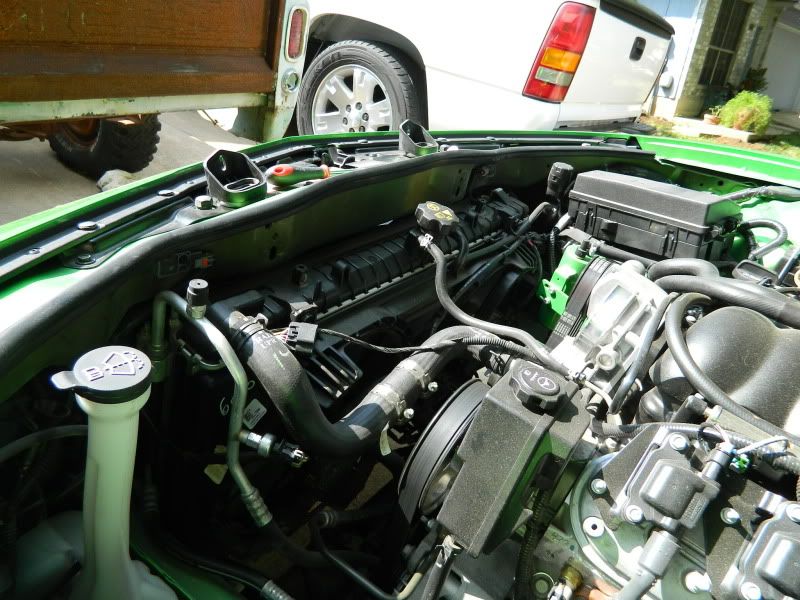 And now you can tilt the radiator back towards the motor 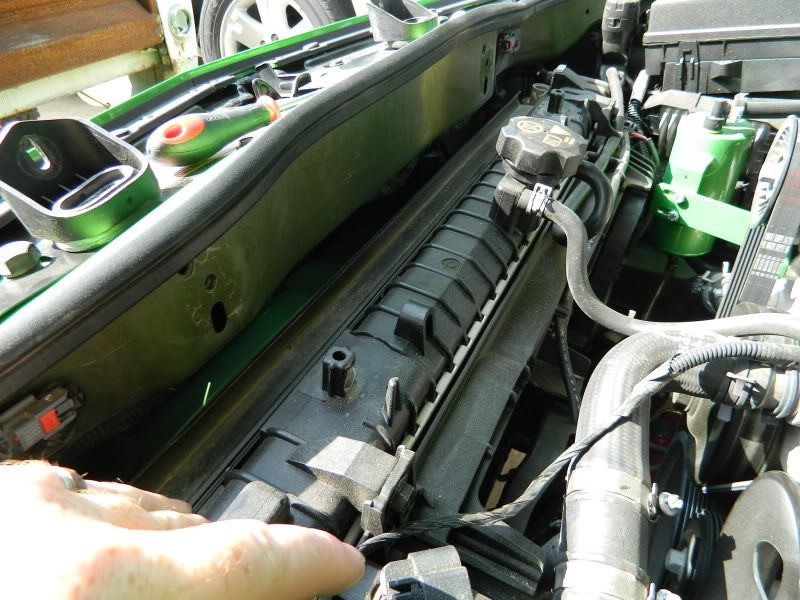 *NOTE* If you have an oil catch can installed on the passenger side, it will be in the way. I bent the crap out of my catch can bracket to move it out of the way but you should relocate to the drivers side like I will do next week. 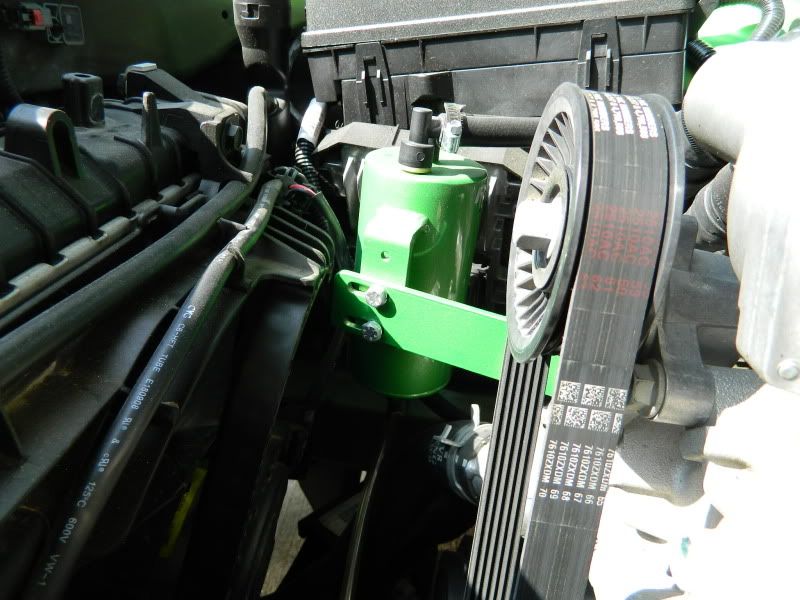 Next, you'll want to install the metal bug/water shield that is supplied using the two radiator support hols and bolts.  Then you'll want to pivot the "Head" of the NEPI into the void you've created between the body and the radiator. ***See Note 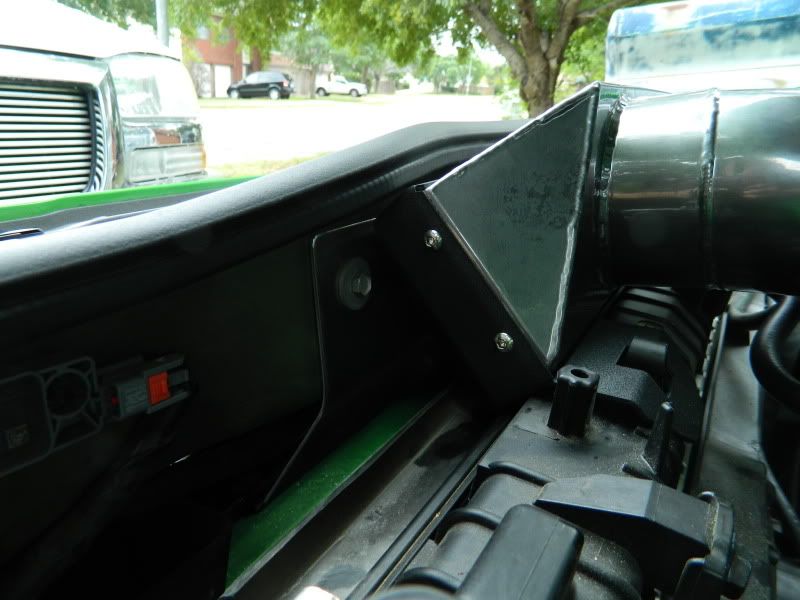 Rest the "shoulders" with the cutouts of the NEPI onto the top of the radiator where the supports where  *** You'll want to install the rubber coupler at the same time and here is what I did after fighting with it for 10 minutes. Put two small drops of liquid dish soap inside the rubber coupler and smear it around using a few drops of water. Once this is lubed up, install it onto the head of the NEPI and slide it all the way back towards the filter area and slip your (2) worm clamps onto it loosely. Install the head into the radiator void and line up the neck with the throttle body. Using the soap as a lube, slide the coupler onto the throttle body and align it correctly. Install the nipple end of the PCV hose into the pre-drilled hole in the coupler. Tighten the (2) clamps on the throttle body and intake mouth.*** Now route the rubber PCV hose away from any moving objects and install it onto the metal intake nipple and tighten using supplied clamp 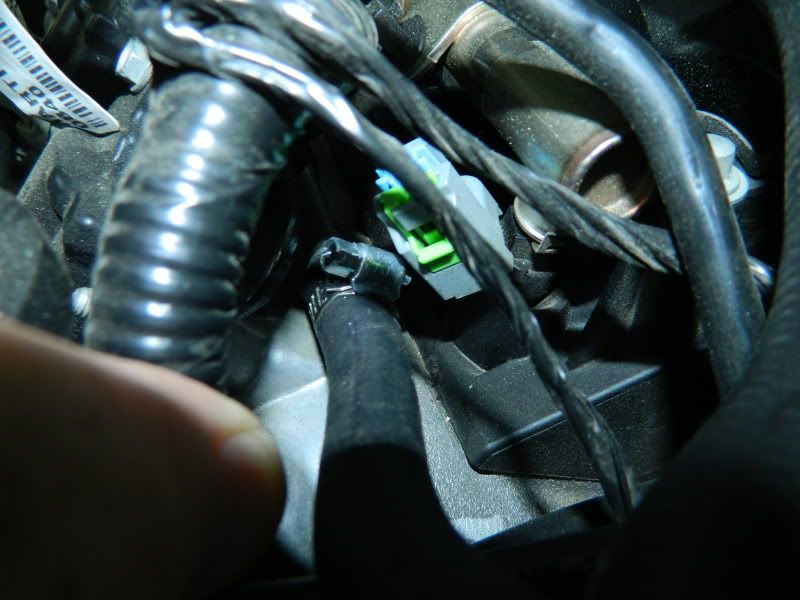 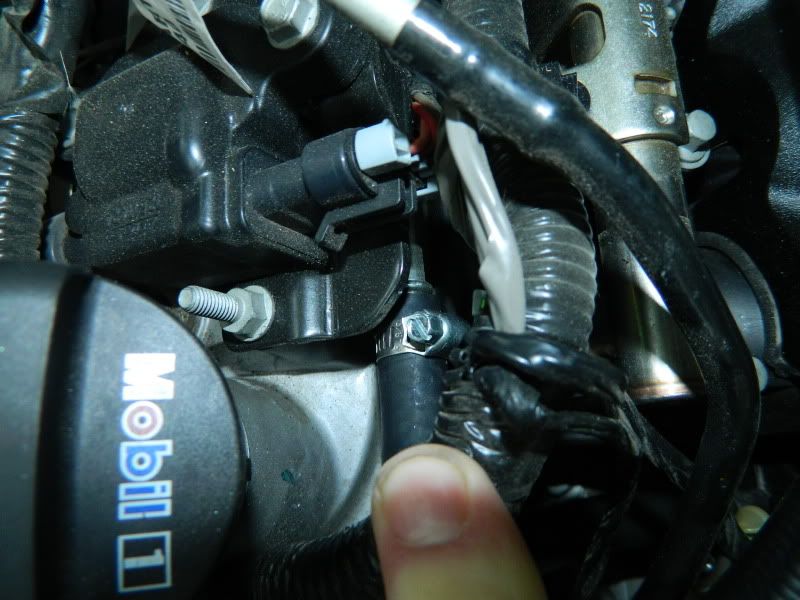 Install the MAF sensor into the NEPI using the supplied Torx screws and snug them up. DO NOT OVER TIGHTEN. Plug the MAF sensor back in: 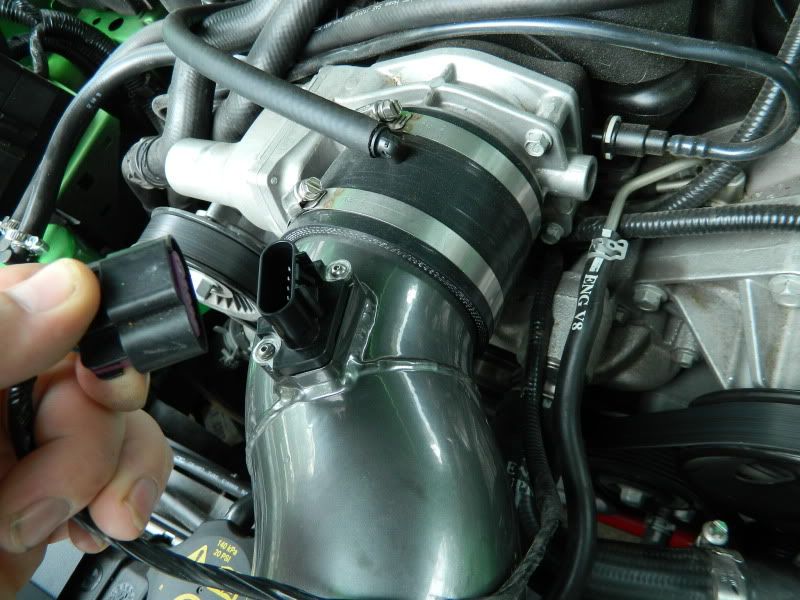 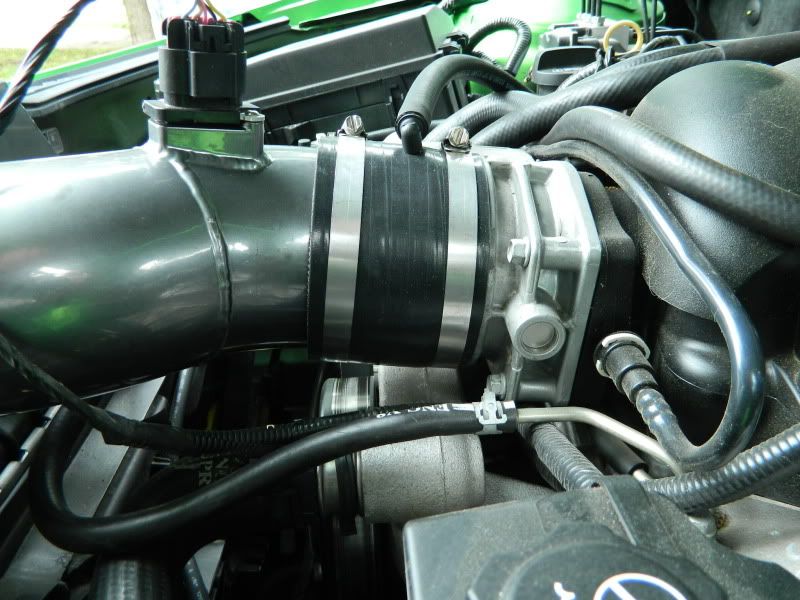 And you are ALMOST done! I smelled coolant after 2 days of driving and I couldn't track it down until this morning. Look at this hose here: 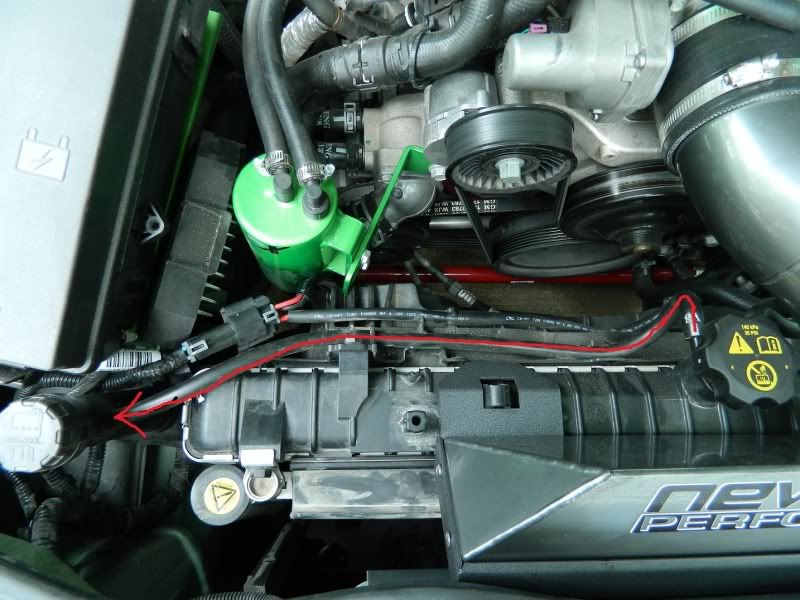 You will want to wiggle it a little and pull some slack to the left and make sure this plug is plugged into the coolant overflow tank. 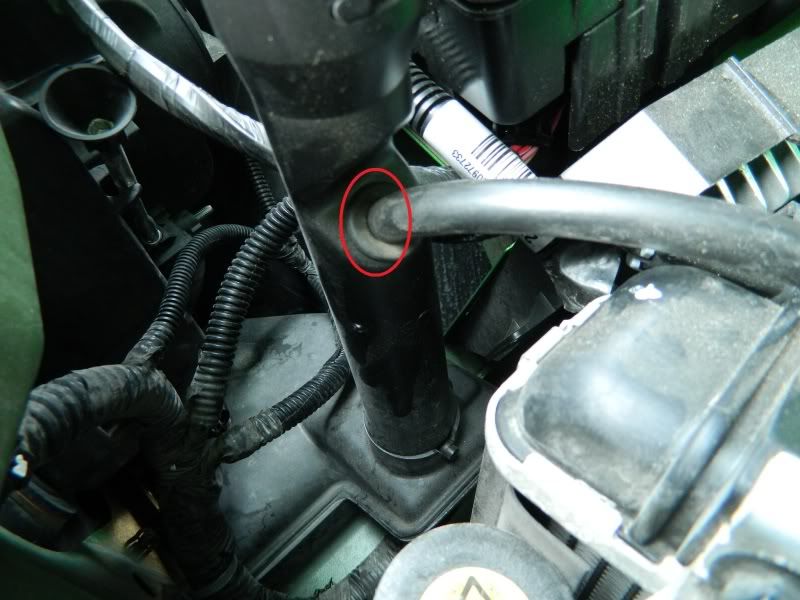 Fire the motor up and let it idle for a few minutes. The computer should re-learn in 40 or so miles but we want to go easy on the driving for around 100 miles according to most people. I didn't have any rough idle on start-up, no missing or other issues. I now have 200 miles on it so far and I am loving it. There is a very noticeable difference in the "pull" of the motor and it feels like it won't stop pulling. When I was cruising on the highway and needed to pass someone or was cruising up a light incline, the L99 would sometimes have to downshift to accomplish that. Now, I have more pedal left in the RPM range to pass someone or climb a hill without the transmission downshifting or "Hunting for gears" I love this intake! Here is what you have when you're done (Yes, I am going to relocate the heater hoses and change some other stuff in the next few weeks. 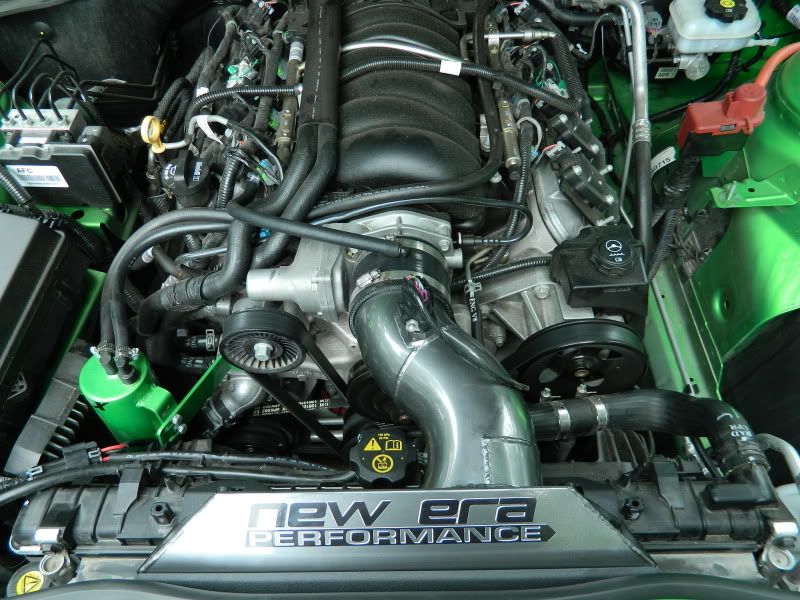 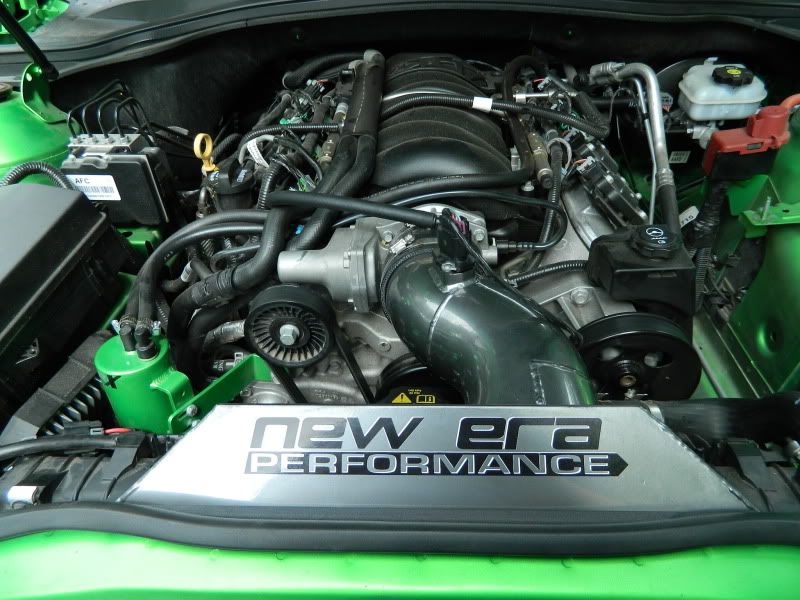 * I am just a hobbyist, not a professional so this write-up and install session is based on my opinion and my opinion only. Your results may vary. 
__________________
L99 With a Maggie
Last edited by Nutro; 05-09-2012 at 04:02 PM. |

|

|
|
05-09-2012, 12:15 PM
|
#2 |
|
by Odeon

Drives: '12 SS/RS A6 IOM SOLD, '13 1LE IOM Join Date: Nov 2011
Location: Good question
Posts: 1,707
|
Great write up!
__________________
"It works 60% of the time, every time."
"Some say it's a waste of time, others say it's an incredible waste of time." "The ultimate measure of a man is not where he stands in moments of comfort and convenience, but where he stands at times of challenge and controversy." 2013 IOM SS/RS - 1LE. Born 5/6/2013 (1 of 32 1SS IOM 1LE's) |
|
|
|
|
05-09-2012, 02:24 PM
|
#3 |
|
3bood

Drives: Camaro 2010 Join Date: Feb 2012
Location: UAE
Posts: 185
|
nice work
|
|
|
|
|
05-09-2012, 03:26 PM
|
#4 |
 |
nice write-up, I only wish that you had included a pic of it completely installed like you had of the stock intake.
|
|
|
|
|
05-09-2012, 04:02 PM
|
#5 | |
|
Drives: 2011 2SS Synergy Green Join Date: Nov 2011
Location: Austin, Texas
Posts: 3,670
|
Quote:
Doh! I took them earlier but forgot to post them. They have been added.
__________________
L99 With a Maggie
|
|
|
|
|
|
05-09-2012, 08:09 PM
|
#6 |
 
Drives: 2010 Black M6 RS/2SS Join Date: Oct 2009
Location: Benbrook, TX
Posts: 287
|
Great post! I went with NEW ERA as well. Bought it before my car was delivered and put on 5 days later
__________________
10 Blk/Blk RS/2SS w/CGM Stripes
ADM H/C/I M6 480rwhp 435rwtq FE4 LCAs w/Pfadt ZL swaybars Diff bushings Trailing arms Drop springs |
|
|
|
|
05-09-2012, 08:13 PM
|
#7 |
|
Drives: 2010 Black M6 RS/2SS Join Date: Oct 2009
Location: Benbrook, TX
Posts: 287
|
Mike at NEP found a way for a few more HP by flipping the Air Filter as shown here and in OP pics. I did mine!!! For those that missed it http://www.camaro5.com/forums/showthread.php?t=119166
__________________
10 Blk/Blk RS/2SS w/CGM Stripes
ADM H/C/I M6 480rwhp 435rwtq FE4 LCAs w/Pfadt ZL swaybars Diff bushings Trailing arms Drop springs |
|
|
|
|
05-09-2012, 11:08 PM
|
#8 |

Drives: 2016 Camaro SS Join Date: Jan 2009
Location: Rochester, NY
Posts: 529
|
Thanks for the post Nutro! By the way, our OTR kit DOES work with the 2012 Camaro SS, we have now installed it on (2) 2012 Camaro SS's with no tuning with no issues. And, ZL1 kits are coming soon, got one in the shop right now.
|
|
|
|
|
05-09-2012, 11:19 PM
|
#9 | |
|
Drives: 2011 2SS Synergy Green Join Date: Nov 2011
Location: Austin, Texas
Posts: 3,670
|
Quote:
You know, when I was installing it, I noticed that this intake would probably fit the 2012 but I forgot to ask you and didn't want to post that without knowing for sure haha It's a great product for sure
__________________
L99 With a Maggie
|
|
|
|
|
|
05-22-2012, 12:32 AM
|
#10 |
 
Drives: 69 Camaro, 02 Escalade, 67 Eleanor Join Date: Nov 2009
Location: Scottsdale AZ
Posts: 5,140
|
Fantastic Write-Up!

|
|
|
|
|
05-22-2012, 12:43 AM
|
#11 |
|
Drives: Exige, Miata, Ghia Join Date: Jun 2011
Location: CA, Bay Area
Posts: 2,309
|
How does this compare to vararam and how much does it cost?
|
|
|
|
|
05-26-2012, 04:36 PM
|
#12 | |
|
Drives: 69 Camaro, 02 Escalade, 67 Eleanor Join Date: Nov 2009
Location: Scottsdale AZ
Posts: 5,140
|
Quote:
This is comparable to the Vararam, both are very high HP per Dollar. This system is custom fabricated by hand and then available in Flat Black Powder Coating, or Gun Metal Finish at $489 Shipped. |
|
|
|
|
|
08-14-2012, 05:07 PM
|
#13 |
|
Drives: 2010 Pace Car Join Date: May 2010
Location: Tucson, Arizona
Posts: 87
|
Does this intake have the same maf signal issue as the Varamm?
|
|
|
|
|
08-14-2012, 11:06 PM
|
#14 |
|
Drives: 2016 Camaro SS Join Date: Jan 2009
Location: Rochester, NY
Posts: 529
|
No.
|
|
|
|
|
|
|
|
 |
|
|


