Camaro5 Chevy Camaro Forum / Camaro ZL1, SS and V6 Forums - Camaro5.com
 
TireRack
Go Back   Camaro5 Chevy Camaro Forum / Camaro ZL1, SS and V6 Forums - Camaro5.com > Technical Camaro Topics > Camaro DIY & HOW-TO instructions & discussions


Reply
 
Thread Tools
Old 10-14-2014, 05:51 AM   #1
X25


X25's Avatar
 
Drives: '16 C7 Z51
Join Date: May 2012
Location: Redmond, WA
Posts: 3,056
How to install air-to-oil engine oil cooler

I could not find a complete how-to on this, so here it is!

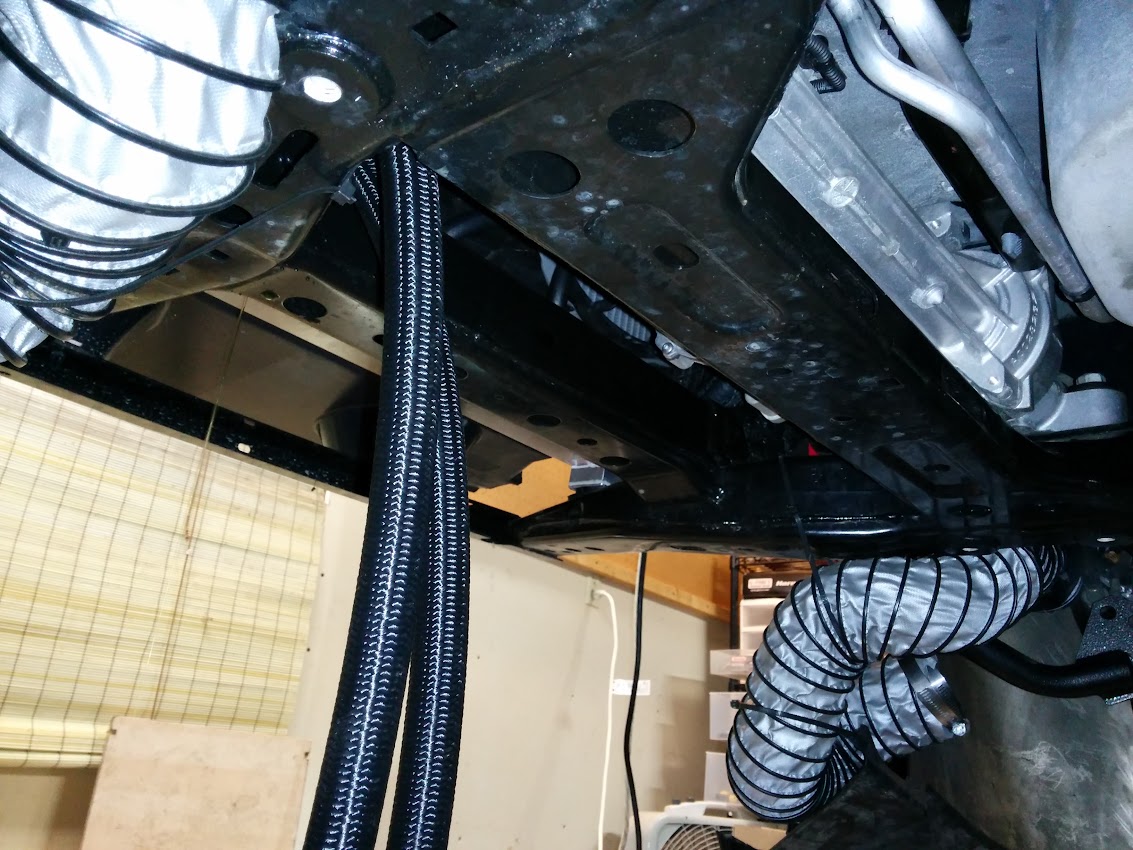
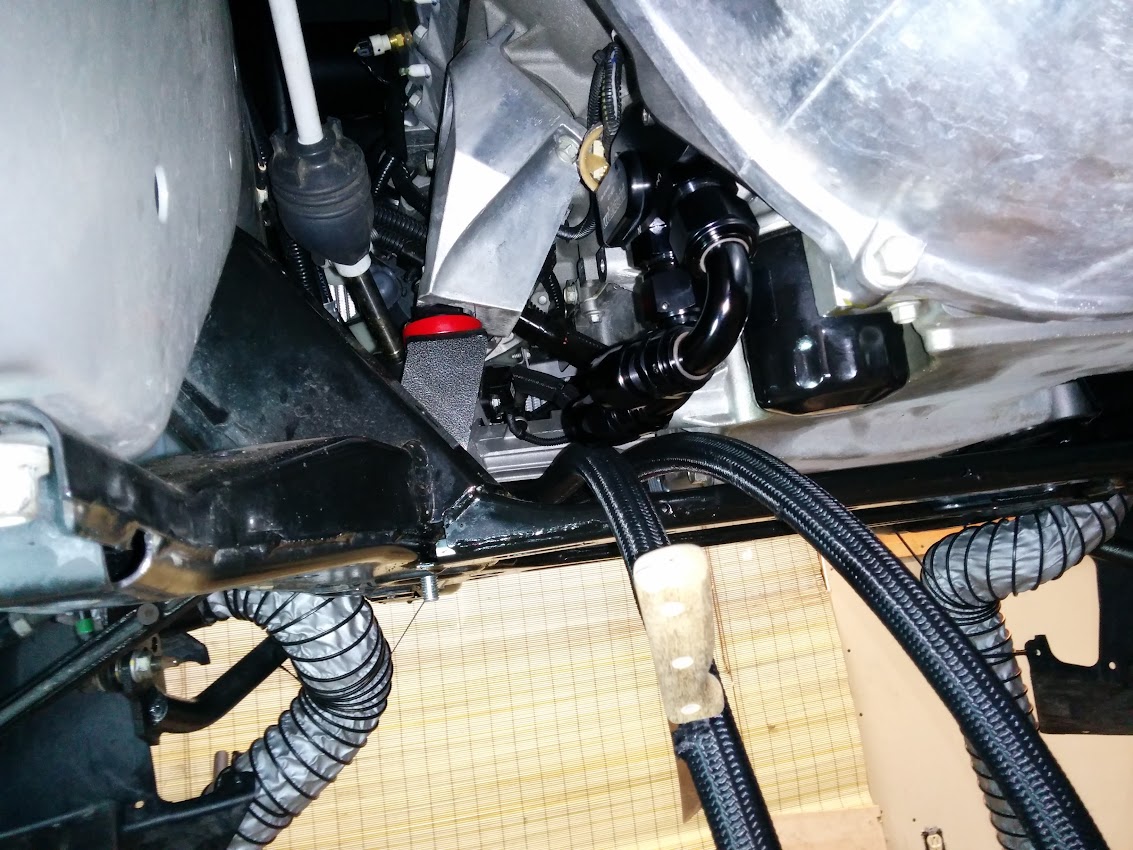
** (1) Please follow the instructions at your own risk. This is one of the mods that can easily lead to get your engine to kaboom, since improper connections might cause an oil leak, etc. If this is your first-ever car/garage project, then this should NOT be your first ever project : ) **

** (2) It turns out our high-end(!) cars don't come with a real oil temp gauge, and oil temp is rather calculated using rate of RPMs, etc. If you want to see what your real oil temps are, you'll need a real gauge. **

Tools:
Besides the usual tools (10mm, 12mm, 13mm, etc.), there are two rare sizes you need: 34mm socket for the engine block's coolant port, and 17mm allen for the bung to shut it.
I also used a 3/4" plug to plug the radiator port which will no longer be needed.

Choosing an ideal setup:
  • I did go with Setrab's Series 9 48-row (most # of rows for least pressure drop) oil cooler core. This is the highest capacity oil cooler core available from Setrab. The original version of this post recommended Series 1 72 row unit, which later turned out to be insufficient. More info on page 3.
  • This core, coupled with huge 12-AN fittings, should provide the least drop in oil pressure possible among Series 9 options. Actually, you might see an increase in oil pressures since it will allow the oil stay much cooler (and thicker) during track duty!
  • I went with the 180 degrees F thermostat for the cooler kit. This means the oil cooler will start working at 180 degrees, and will likely stabilize around 190 degrees F at the street, and will only fully engage at the track. FYI, even when shut, the thermostat allows a small amount of flow through the oil cooler to make sure the oil inside the oil cooler is circulated, and the oil doesn't stay too cool, shocking the engine when the cooling is needed. Update: If I were to do it again, I would rather get the adapter with no thermostat for MAX FLOW, and add a high-flow thermostat to the hoses like this one.

Parts list (The last number is quantity):
  • AHL-12 Raceflux lightweight black nylon racing hose, -12AN 12 feet.
  • DS-090-12 Hose end, double swivel, 90-degree, -12AN, black 3.
  • DS-120-12 Hose end, double swivel, 120-degree, -12AN, black 1.
  • Thermostat / oil cooler adapter (Updated)
    • What I have: EGM-112-12AN / EGM-112 Oil cooler adapter, low-profile, thermostatic, GM LS-series engine, rear sump, high temp (180 degrees F).
    • What I would do if I were to do it again: EGM-106 Oil cooler adapter with no thermostat for MAX flow, and FSM-185 high flow thermostat (installed on the hoses).
    • Note: After inspection, it was revealed that stainless steel bolts provided with the oil cooler adapter were not strong enough. Michael @ Improved Racing stated new kits will come with higher grade (Grade 12.9) bolts. If you have shiny bolts, please know that you're better off using matte-black Grade 12.9 bolts of the same spec (M6x25mm, 1.00mm thread).
  • ORB-12-08 Adapter, -12AN flare to -08AN straight thread o-ring boss, Viton o-ring, black 2.
  • 50-948-7612 Setrab 48 row Series 9 oil cooler, M22F threads (Updated).
  • M22AN12-SE M22 to -12AN Adapter, OEM FD3S oil cooler and Setrab coolers 2.
  • ABKT-310 Setrab oil cooler bracket, 310mm core (Updated).
  • 12561663 PLUG - Coolant Plug for GM LS Engines 1.
  • FF-12 Fireflex hose sleeving, 1" (-12AN) 3.

Important -AN fitting install tip: Any connection that has a plastic o-ring does not need teflon tape. The hose tips don't need anything due to their design. The o-rings need to be thoroughly oiled with engine oil.

Installation steps:
  • Drain the engine oil and coolant. It will get incredibly messy if you don't.
  • Remove the front bumper. You will need to remove the top plastic retainers, two bolts up top by the sides, and a few other bolts that can be accessed by moving the fender liners out of the way.


  • Once bumper is removed, choose a location for your cooler. This pretty much depends on your cooler's shape, and your air flow preferences, as well as the clearances available. I chose the upper bar for mounting. The general rule is, you should stack the radiators (coolers) as close to each other as possible to reduce possible turbulence in between them. Make sure you temporarily put the bumper back on to see if it will fit.

  • Once you determine the location, you might need to drill holes for mounting. If you do, make sure you don't mount through cables. Feel what is behind, and move any cable away, or at least protect it with a metal piece during drilling. In my case, I can use two bolt holes already provisioned by GM (perhaps for ZL1 coolers?):

  • If you will cover the other radiators (condenser, coolant radiator, etc.), it is best if the cooler core is as close as possible, and parallel to the other radiators so the air flow is not upset:

  • Before test fitting, make sure the ports are installed onto the oil cooler since they might impact the clearances.

  • The oil coolers should not be in direct contact with the chassis to reduce vibration. The tab that came with the Setrab oil cooler already has rubber bushings to dampen vibrations. I also put duct tape to the surface where the Setrab bracket would touch to dampen the vibrations further.
  • I cut the hose in half and installed the cooler ports before installing the cooler itself. Then I routed the hoses by the side of the radiator. Make sure hoses don't ever get close to belt, fan, or other moving parts. I used a jagged kitchen knife to cut the hose. Due to its metal layer, regular blade did not work well.

  • Now comes the less fun part; removing the OEM oil cooler. Remove most of the bolts around the cooler. At some point, the seals will detach and it will start leaking both oil and coolant.
  • Push away the black coolant line lock rings, and remove the small lock washers (seen in picture in color) with a hook-pick. If you don't like coolant shower, don't stand right under it while detaching those lines.

  • One of the lines goes to driver side bottom port of the radiator. You will need to plug this port. Use the 3/4" rubber cap (plug) for this purpose. Do not forget to put a clamp on it, or it will pop!

  • Remove the driver side header. Kidding, you don't need to, but I was going to install headers next, and just removed it at this time since it makes accessing the coolant port to remove the last remaining line very easy. The port next to the engine mount is that coolant port. FYI, it is also accessible from the driver wheel well, once the plastic dust cover between the engine bay and the wheel well is removed.

  • Remove the line from the port the same way you did as the oil cooler ports.
  • Be careful when you're screwing or unscrewing anything to/from the engine block. If you screw up the thread, you might need professional assistance to get it re-threaded. Use your time, and unscrew the whole port using a 34 mm socket. Fortunately, it was available at the auto stores, since this size socket is used frequently for axle nuts.

  • Once removed, you will use the GM bung to seal it. It needs a 17 mm allen to screw. Again, use your time. Leave no chance to cross-threading.

  • We're getting close to the end! Now, we will start test-fitting the oil port adapter/thermostat. Find a good layout for your hoses, and then determine what length the hoses should be. If your cooler will have ports on top of each other by the side, the hose going to the higher port in the cooler should carry hot oil (OUT port of thermostat), and the hose coming from the lower port on the oil cooler should carry the cooled oil back, hooking up to IN port of the thermostat.

    NOTE: The oil cooler adapter bolts (M6x25mm, 1.00mm thread) have a torque-spec of only 10 lb-ft, and you might strip the thread on the oil pan if you over-torque. A thread locker (like Loctite) is also recommended.

    At this point, we have two choices:
    • Install the oil cooler adapter upside-down: THIS IS NOT RECOMMENDED! This makes it very easy to install the lines, and is sometimes the only way to install with some of the aftermarket headers. However, if you have a thermostat in your oil cooler adapter, it will not run optimal.
      WARNING: Since we're installing the thermostat upside down, IN/OUT markings are now reversed!

      How it looks when installed upside down:

    • Install the oil cooler adapter upright: If possible, do it this way. This ensures the thermostat works as intended (i.e. monitors the oil temps at/coming from the engine, not the temps of oil after it was cooled down). It also gets the hoses away from the bottom of the car, making them less vulnerable in case you hit something on the road. FYI, I was able to easily clear my 1 7/8" headers.

      How it looks when the oil cooler adapter is installed upright:
  • Don't forget to give a bit of slack to the hoses. Your engine buckles during acceleration and deceleration, and if you leave the hoses too tight, they might eventually get ripped.
  • Once the hoses are cut to their final length, put on the fire sleeves, and then install their tips.

  • You will need to install the hoses onto the thermostat before installing the thermostat itself. The reason is that there is just not enough space to wrench them tight when the thermostat is in its location.
  • I used metal zip-ties to fix the lines' route on the sub-frame rails. I also wrapped the part of the hoses that are closest to the headers.

  • Refill oil and coolant as much as you can.
  • Now that you're done, you need to make sure everything is oiled (primed) before the engine starts. For this, you need to crank it. There is an easy way for this (besides pulling fuses). Before turning the ignition key, push throttle pedal ALL THE WAY. This enables a special mode, where the engine cranks without starting it. Let the engine crank a few seconds, then wait 30 seconds (to let the starter cool), and repeat a few more times.
  • Check the engine oil and coolant levels one last time and refill as necessary.
  • Start the engine! Don't wait in the car; get off and check for any leaks. If you see anything leaking, immediately shut off the engine before investigating any further; better be safe than sorry.
  • Hopefully everything went well, and now you have a shiny new engine oil cooler; enjoy!
__________________
'16 Corvette C7 Z51 1LT (Build Thread)
'14 AGM 1SS 1LE [COTW 11/17/14] (Build Thread) (SOLD)
'13 Mazda MX-5 Club (Build Thread)
'17 RAM 1500 Crew Cab 4x4 Night Edition
'15 Nissan Rogue S AWD

Last edited by X25; 10-23-2015 at 03:31 PM.
X25 is offline   Reply With Quote
Old 10-14-2014, 08:17 AM   #2
cdb95z28


cdb95z28's Avatar
 
Drives: 2022 1SS 1LE A10 BCD WCT+PDR
Join Date: Mar 2008
Location: Johnstown, PA
Posts: 3,200
X25, Excellent write up!!!! Thank You!
__________________
2022 1SS 1LE A10 BCD WCT+PDR2014 1SS 1LE NPP RECARO SIM-SOLD1995 Z28 M6 GSC PGM-SOLD1975 NOVA COUPE 300HP 350 TH350 FLASH RED-SOLD
cdb95z28 is offline   Reply With Quote
Old 10-14-2014, 08:45 AM   #3
hcsi99
Cadillac Service Manager
 
hcsi99's Avatar
 
Drives: 2014 Camaro 1SS, 1LE, NPP, RECAROS
Join Date: Jun 2013
Location: Indiana
Posts: 672
Very nice write up. Looking forward to seeing your oil temps after the cooler has been installed. I've been looking for some good data all over the place, and nobody seems to have any before and after numbers.
__________________
hcsi99 is offline   Reply With Quote
Old 10-14-2014, 12:13 PM   #4
djpelosi

 
djpelosi's Avatar
 
Drives: 2010 Camaro 2SS/RS
Join Date: Aug 2012
Location: Cordova, TN
Posts: 774
IIRC, the temperature shown on the oil gauge isn't the ACTUAL temperature. From what I've read, it is corrected / pre-calculated, and adding oil coolers won't change the reading on the gauge.

http://www.camaro5.com/forums/showthread.php?t=376900
http://www.camaro5.com/forums/showpo...8&postcount=12
__________________
2010 Camaro 2SS M6
2" Stainless Power Longtube Headers
3" Full exhaust w/ Off-Road H-Pipe
Bo White Ported Throttle Body
Hurst Short Throw Shifter
Best Time: 12.43 @ 114, 1.99 60' on stock wheels and stock tires
Build Thread
djpelosi is offline   Reply With Quote
Old 10-14-2014, 02:32 PM   #5
X25


X25's Avatar
 
Drives: '16 C7 Z51
Join Date: May 2012
Location: Redmond, WA
Posts: 3,056
Quote:
Originally Posted by djpelosi View Post
IIRC, the temperature shown on the oil gauge isn't the ACTUAL temperature. From what I've read, it is corrected / pre-calculated, and adding oil coolers won't change the reading on the gauge.

http://www.camaro5.com/forums/showthread.php?t=376900
http://www.camaro5.com/forums/showpo...8&postcount=12
EDIT: YOU'RE RIGHT, the oil temps are fake. More on that later on the thread.

I've heard the same, too, but in my experience, the oil temps kept climbing to 290s at the track while the coolant did not go above 220F (I do have a DeWitt's radiator). This tells me that the oil temps can not be calculated off of coolant temps since they have clearly diverged. Perhaps this was the case in earlier model years, but I know for sure that my '14 SS 1LE shows me the oil temps.

There is one issue, though: the display at DIC does not show above 266 degrees. The sensor still works fine, but to get the actual reading above 266 degrees, you need to read it from OBD II port. I do so using Torque App and a Bluetooth OBDII bung.
__________________
'16 Corvette C7 Z51 1LT (Build Thread)
'14 AGM 1SS 1LE [COTW 11/17/14] (Build Thread) (SOLD)
'13 Mazda MX-5 Club (Build Thread)
'17 RAM 1500 Crew Cab 4x4 Night Edition
'15 Nissan Rogue S AWD

Last edited by X25; 11-04-2014 at 05:59 AM.
X25 is offline   Reply With Quote
Old 10-14-2014, 03:01 PM   #6
hcsi99
Cadillac Service Manager
 
hcsi99's Avatar
 
Drives: 2014 Camaro 1SS, 1LE, NPP, RECAROS
Join Date: Jun 2013
Location: Indiana
Posts: 672
X25, Have you ever been able to capture the oil temp you are actually running at the track (since the gauge only goes up to 266), and if so what was it?
__________________
hcsi99 is offline   Reply With Quote
Old 10-14-2014, 03:06 PM   #7
X25


X25's Avatar
 
Drives: '16 C7 Z51
Join Date: May 2012
Location: Redmond, WA
Posts: 3,056
Quote:
Originally Posted by hcsi99 View Post
X25, Have you ever been able to capture the oil temp you are actually running at the track (since the gauge only goes up to 266), and if so what was it?
Yes, I did. I talked more about it in my build thread. It got to 280+ degrees in a matter of 4-5 laps, this despite having an upgraded radiator and about 75 degrees ambient temp. Clearly, the OEM heat exchanger unit is limited in capacity, which is why I installed this behemoth. The highest I saw was 289 degrees before I started yet another cool-down lap, but having cool-down laps every 4-5 laps was not amusing at all. In comparison, my C6 Corvette Grand Sport, in stock form, never shot above 270 degrees F, and was usually around 265 degrees during track days no matter how long the session is. My '06 C6 Z06 was similar, but '13 C6 Z06 (which has the same cooling system as Camaro SS) was running a bit hotter, which I remedied by using a Z07-spec aluminum radiator at the time. The same trick (radiator) did not help enough with the Camaro, though.

The DIC reads oil temp correctly until 266 degrees. From there on, the display keeps showing 266 degrees, while the reading I got from OBD II port kept reading higher.
__________________
'16 Corvette C7 Z51 1LT (Build Thread)
'14 AGM 1SS 1LE [COTW 11/17/14] (Build Thread) (SOLD)
'13 Mazda MX-5 Club (Build Thread)
'17 RAM 1500 Crew Cab 4x4 Night Edition
'15 Nissan Rogue S AWD
X25 is offline   Reply With Quote
Old 10-14-2014, 03:14 PM   #8
hcsi99
Cadillac Service Manager
 
hcsi99's Avatar
 
Drives: 2014 Camaro 1SS, 1LE, NPP, RECAROS
Join Date: Jun 2013
Location: Indiana
Posts: 672
Looking forward to seeing what temps you'll be running now.
__________________
hcsi99 is offline   Reply With Quote
Old 10-14-2014, 03:15 PM   #9
X25


X25's Avatar
 
Drives: '16 C7 Z51
Join Date: May 2012
Location: Redmond, WA
Posts: 3,056
I will be attending a track day at the same track I got my first measurements, this weekend. Hopefully I will finish prepping the rest of the car so I can give it a shot : )
__________________
'16 Corvette C7 Z51 1LT (Build Thread)
'14 AGM 1SS 1LE [COTW 11/17/14] (Build Thread) (SOLD)
'13 Mazda MX-5 Club (Build Thread)
'17 RAM 1500 Crew Cab 4x4 Night Edition
'15 Nissan Rogue S AWD
X25 is offline   Reply With Quote
Old 10-14-2014, 03:33 PM   #10
hcsi99
Cadillac Service Manager
 
hcsi99's Avatar
 
Drives: 2014 Camaro 1SS, 1LE, NPP, RECAROS
Join Date: Jun 2013
Location: Indiana
Posts: 672
Quote:
Originally Posted by X25 View Post
I will be attending a track day at the same track I got my first measurements, this weekend. Hopefully I will finish prepping the rest of the car so I can give it a shot : )
__________________
hcsi99 is offline   Reply With Quote
Old 10-14-2014, 04:37 PM   #11
White_SS/RS

 
White_SS/RS's Avatar
 
Drives: 14 1LE
Join Date: Mar 2013
Location: Spokane, WA
Posts: 1,567
Quote:
Originally Posted by hcsi99 View Post
X25, Have you ever been able to capture the oil temp you are actually running at the track (since the gauge only goes up to 266), and if so what was it?
Do the 1ss have the gauge cluster in the console? Anyway, the console has oil temp. It will read beyond 270, up to 320 I think. I don't have my cooler installed yet but I've noticed in various types of track weather that my oil temp is consistantly at 290. I will have the cooler set up for next year and seeing that I have enough data collected from this year I should have some good comparisons.
__________________
LMS Engineering
White_SS/RS is offline   Reply With Quote
Old 10-14-2014, 05:03 PM   #12
hcsi99
Cadillac Service Manager
 
hcsi99's Avatar
 
Drives: 2014 Camaro 1SS, 1LE, NPP, RECAROS
Join Date: Jun 2013
Location: Indiana
Posts: 672
1ss only have the performance menu display on the drivers info center.
__________________
hcsi99 is offline   Reply With Quote
Old 10-14-2014, 05:09 PM   #13
402
 
Drives: Camaro
Join Date: Aug 2014
Location: NEB
Posts: 242
Keep an eye on that thermostat, they have been known to fail.
402 is offline   Reply With Quote
Old 10-14-2014, 05:28 PM   #14
X25


X25's Avatar
 
Drives: '16 C7 Z51
Join Date: May 2012
Location: Redmond, WA
Posts: 3,056
Quote:
Originally Posted by 402 View Post
Keep an eye on that thermostat, they have been known to fail.
If it fails, it will either keep temps too high, or too low. There is no location of the valve which would block flow if it ever got stuck. Pretty much like the coolant thermostat. When they fail, it's not the flow but rather the temps that go out of design spec.
__________________
'16 Corvette C7 Z51 1LT (Build Thread)
'14 AGM 1SS 1LE [COTW 11/17/14] (Build Thread) (SOLD)
'13 Mazda MX-5 Club (Build Thread)
'17 RAM 1500 Crew Cab 4x4 Night Edition
'15 Nissan Rogue S AWD
X25 is offline   Reply With Quote
 
Reply


Posting Rules
You may not post new threads
You may not post replies
You may not post attachments
You may not edit your posts

BB code is On
Smilies are On
[IMG] code is On
HTML code is Off

Forum Jump


All times are GMT -5. The time now is 02:11 AM.


Powered by vBulletin® Version 3.8.9 Beta 4
Copyright ©2000 - 2024, vBulletin Solutions, Inc.