You are browsing camaro5 

|
 06-02-2010, 09:10 PM
|
#1 |
|
Darth Martel

Drives: Black 1SS with 20% tinted windows Join Date: May 2009
Location: Bizzaroland
Posts: 1,496
|
DIY Dash and Door trim for under $30
Hello boys and girls. Are you disappointed with the charcoal fabric trim on our Camaro's? I know I was and I wanted to do something about it. Now there's several ways of going about this. You could purchase replacement trim pieces from GM to the tune of about $400. CarID.com has some quality overlay pieces for about $175. However, with a little bit of work and some creativity you can get pretty close for under $30. Now before I begin, I just want to say that I purchased and installed CarID.com's normal trim kit for the Camaro. It covers the instrument cluster, steering wheel, shifter, air vents, and the arm rests on the doors. These overlays are really nice and are fine quality. The kit is $125 with a 10% discount. There's some small pieces to be cut so, combine that with the quality and I didn't mind spending the money on it. For the door and dash trim though, $175 is pretty steep. Originally, I tried to paint the pieces but, I suck at painting. I kept getting wrinkles in the paint. I entered an endless loop of wetsanding and smoothing it out and then painting only for wrinkles to return. I was about to say screw it and order the $175 package when a light went off. I could make my own overlays. I needed to do a little searching for material and my search took me to Joann fabrics. Yes, I know, it's kind of a girly store but, sometimes you've just gotta get creative. I have a black car and the original trim kit I got from CarID was a glossy black. I wanted to stay with that theme and get something that closely matched. What I found was a black pleather that was fairly glossy. I purchased 2 yards of it ($18) and I also got a can of Super77 3m spray adhesive ($8). The pictures below shows the process and results.
I used the cloth I removed from the door trim as a template to cut the pleather to the correct size. 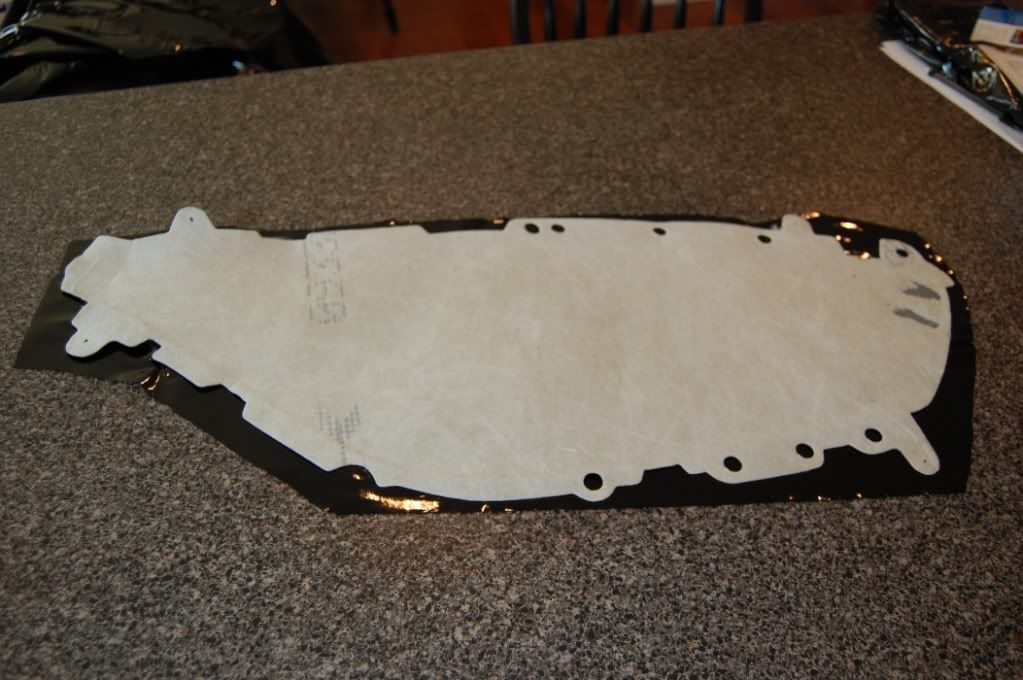 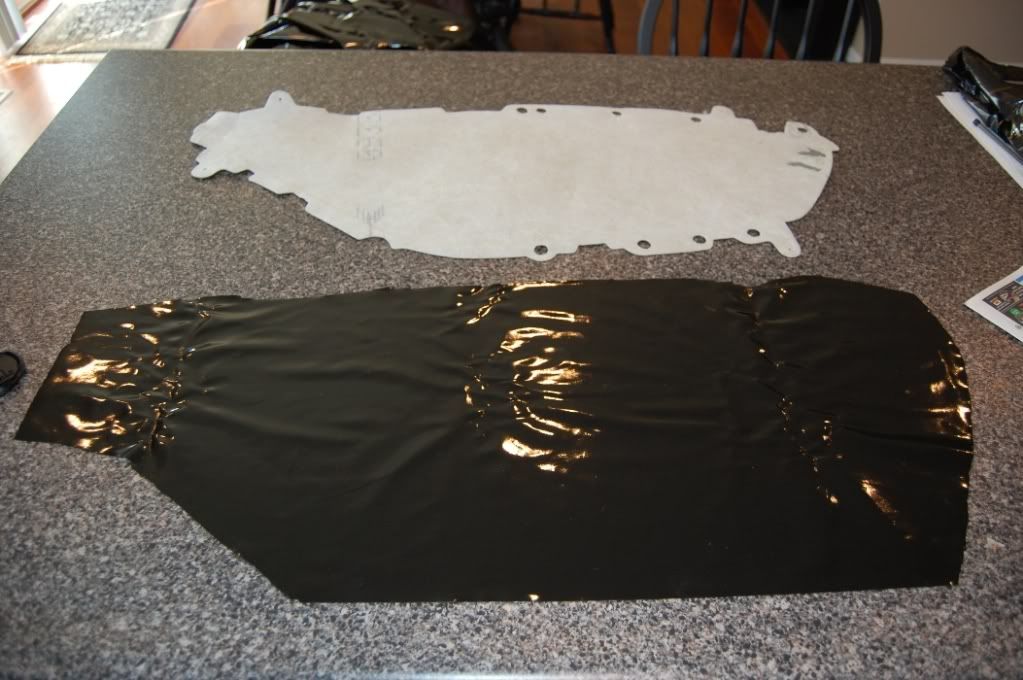 The plastic pieces were sanded down a little bit to give them a slight roughness so the adhesive would stick. As you can see, they were already painted black but, I've already told you about the problem I had with wrinkles. They were sanded down so the wrinkles were smoothed out but, the surface was just right for adhesive. 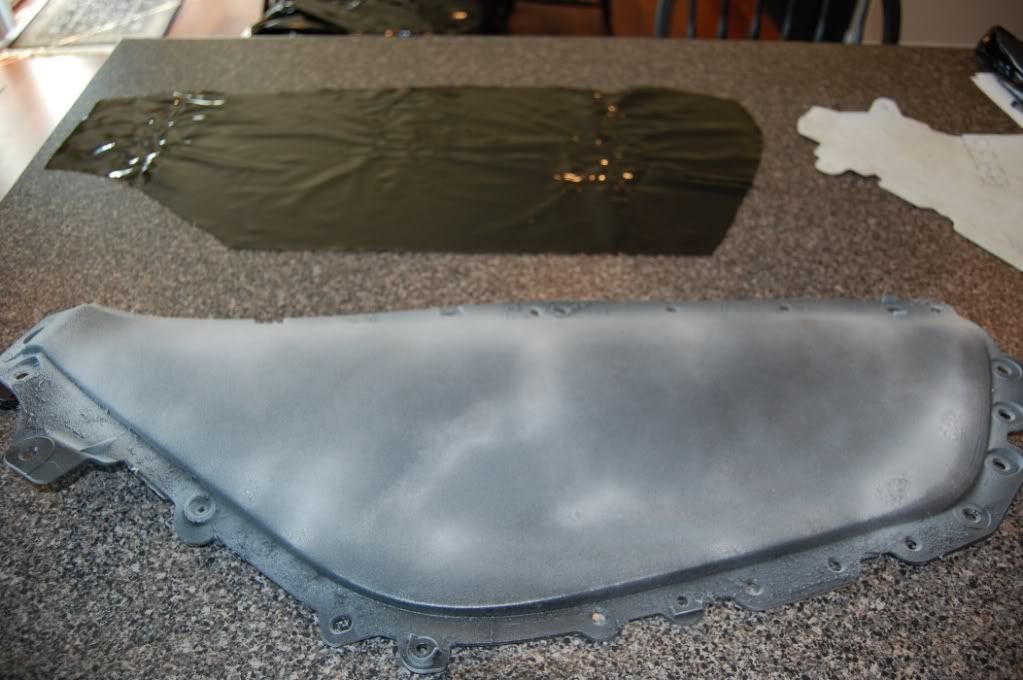 This is the adhesive I used. Great stuff. Be generous with it when you spray. You don't want to miss a spot and you want to make sure there's enough adhesive. 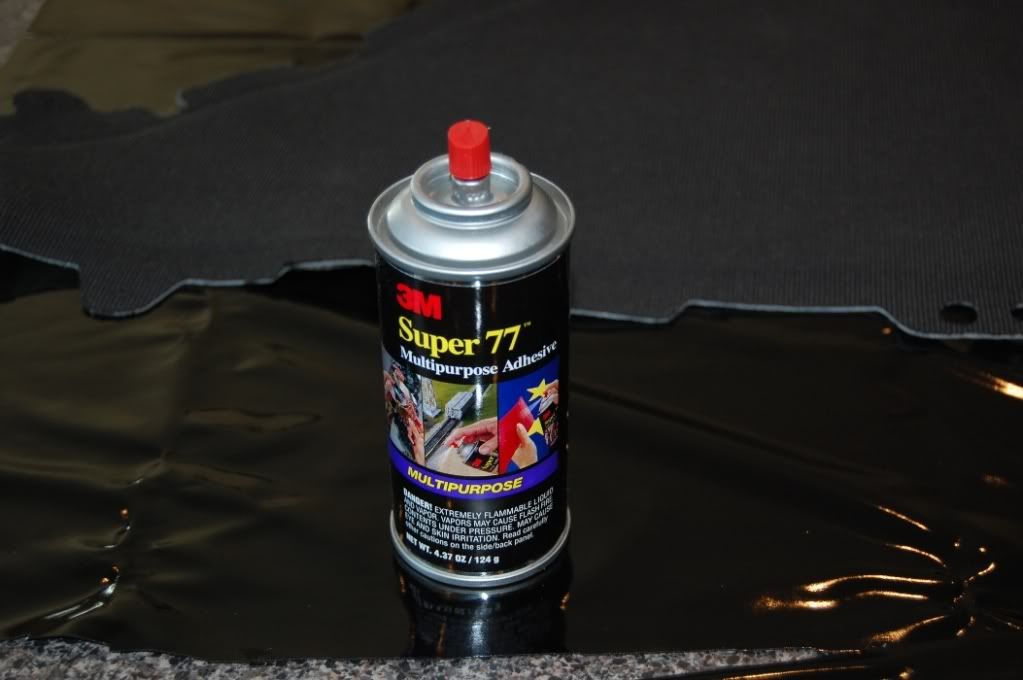 Now carefully, place the pleather on top of the plastic piece. Start from the top right and stretch and smooth out with your hand. There will be a wrinkle here or there. Simply lift up the pleather that's wrinkled and stretch and smooth. You'll get the hang of out to smooth it out fairly quick. It's not difficult. Once you're all done it should look like this. 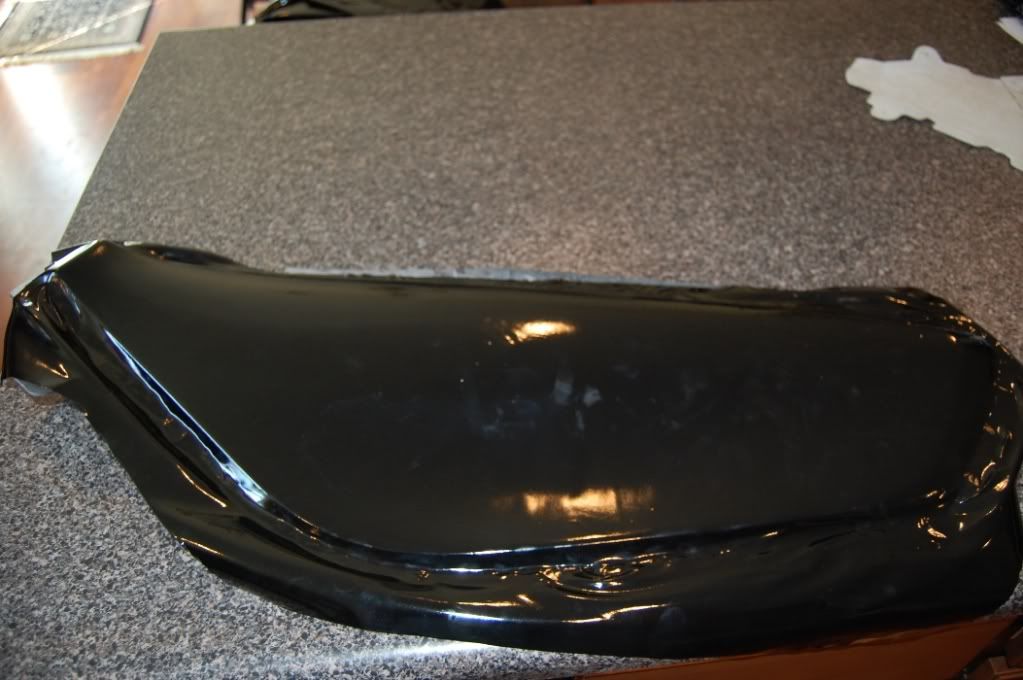 Now repeat the same process for the other one. 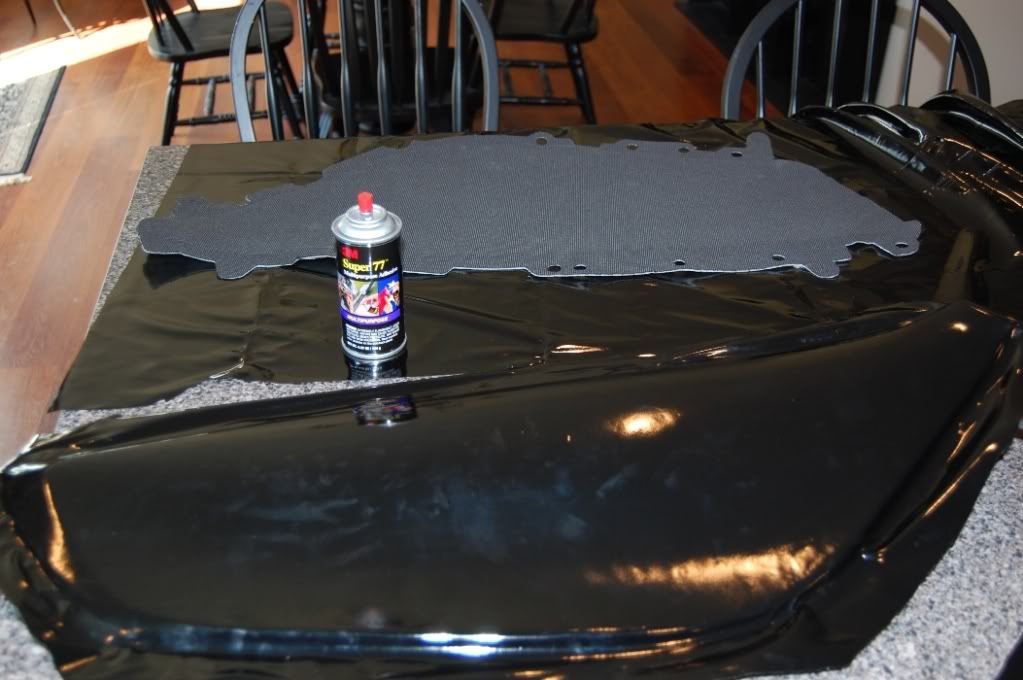 Now you want to do the dash trim. The process for this is similar but, you have to do more of a wrap job with the dash trim pieces. Prepare the pieces the same way as the door trim. I already tossed the fabric for the dash trim so I couldn't use that as a template. Not a big deal. I just used the trim pieces themselves. I left enough overhang for about a 1/2 inch to 3/4 inch piece to fold onto the back of the trim. And don't forget to have the extra length on the end for the piece that overlaps. 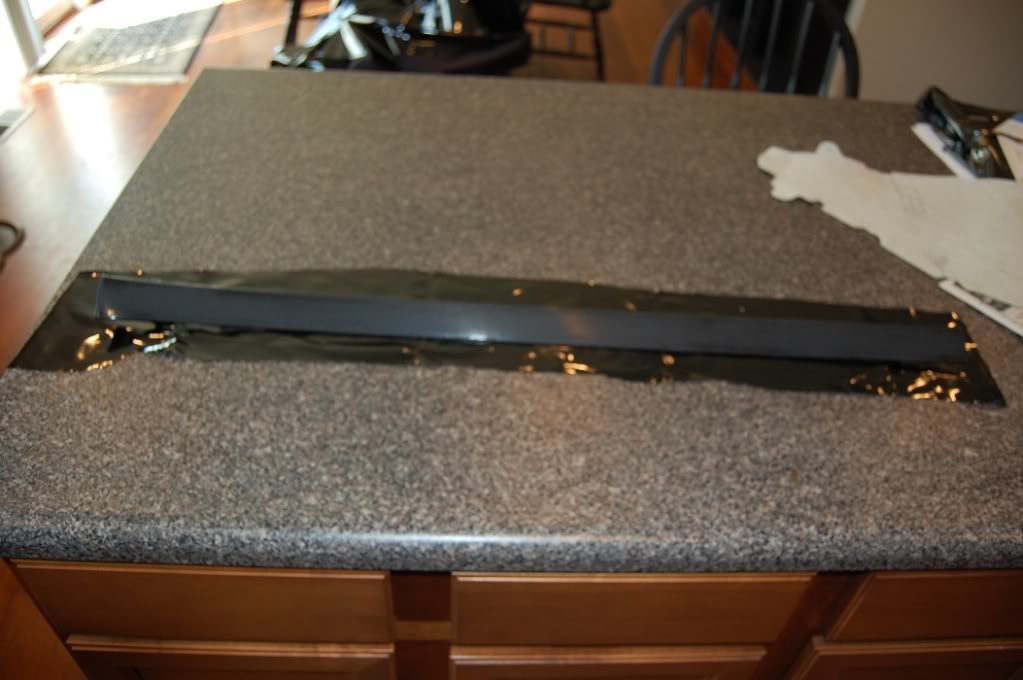 As you can see, I taped up the tabs cuz I didn't want to get those all nasty with adhesive. Lay a thick coat of adhesive down and you're ready to put the pleather on. Do it just like you did the door trim. Tighten and smooth. You should be a pro at this by now. 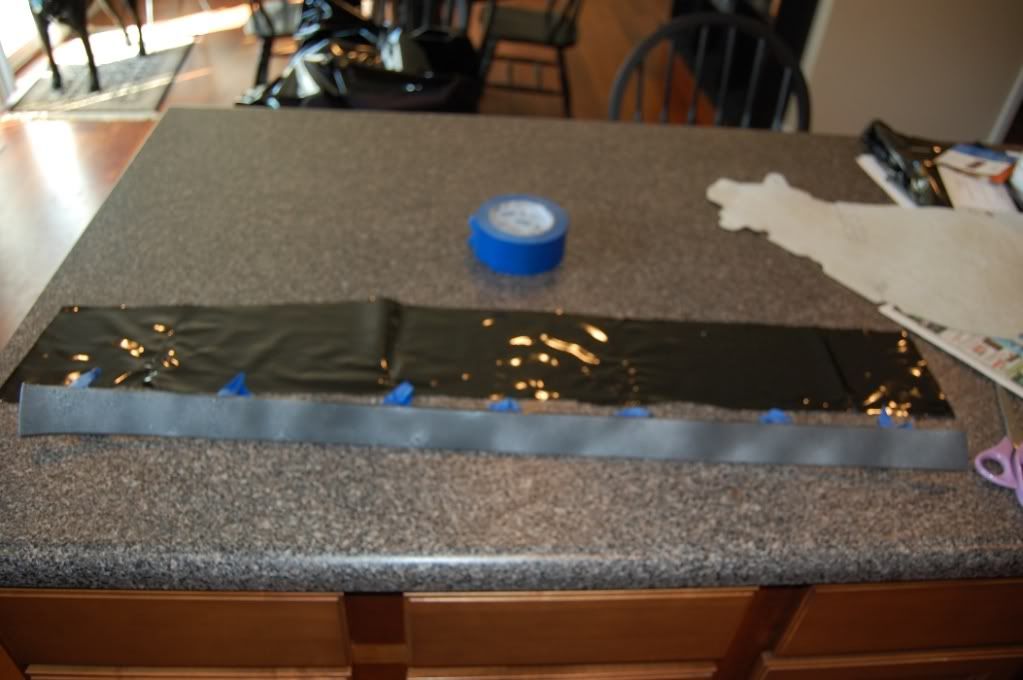 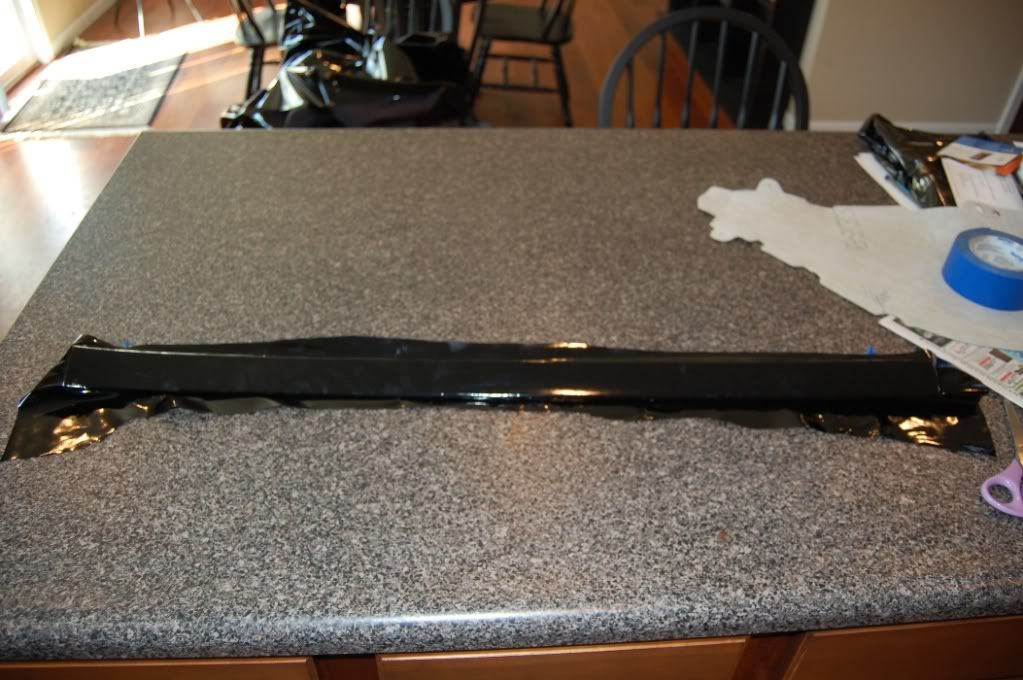 Now here's where you have to do the wrapping part. Simply fold the pleather over to the back and fasten it to the back. The original fabric had a whole shit-load of staples. That was fun to yank off. I didn't have a staple gun that would work properly so I simply used some shipping tape to hold it down. Be sure to pull it tight before you tape it down. 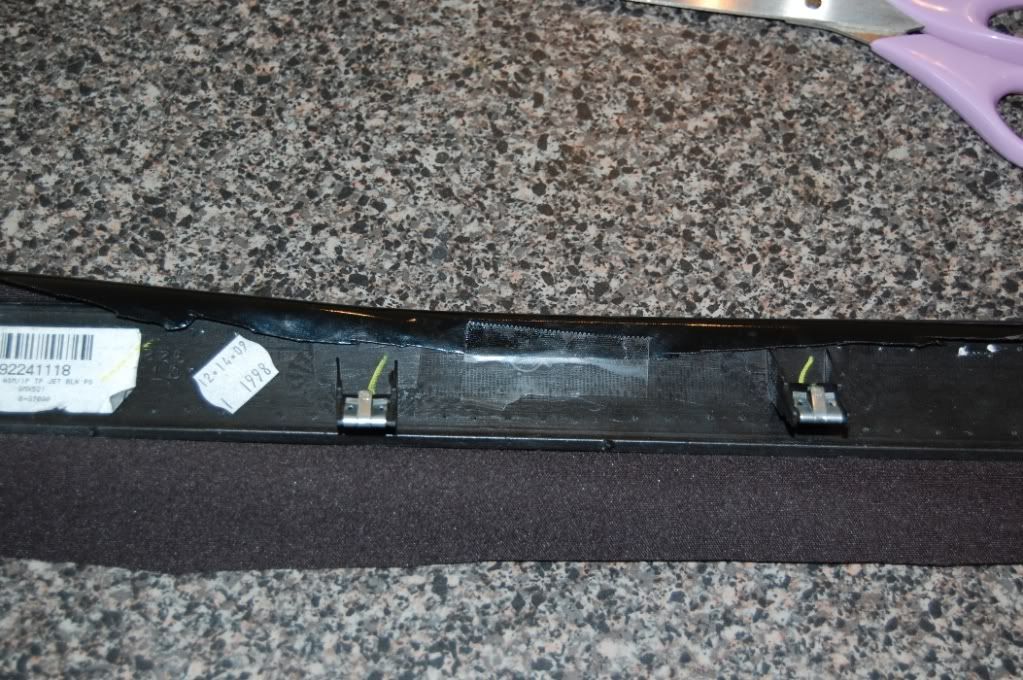 Do the whole side. 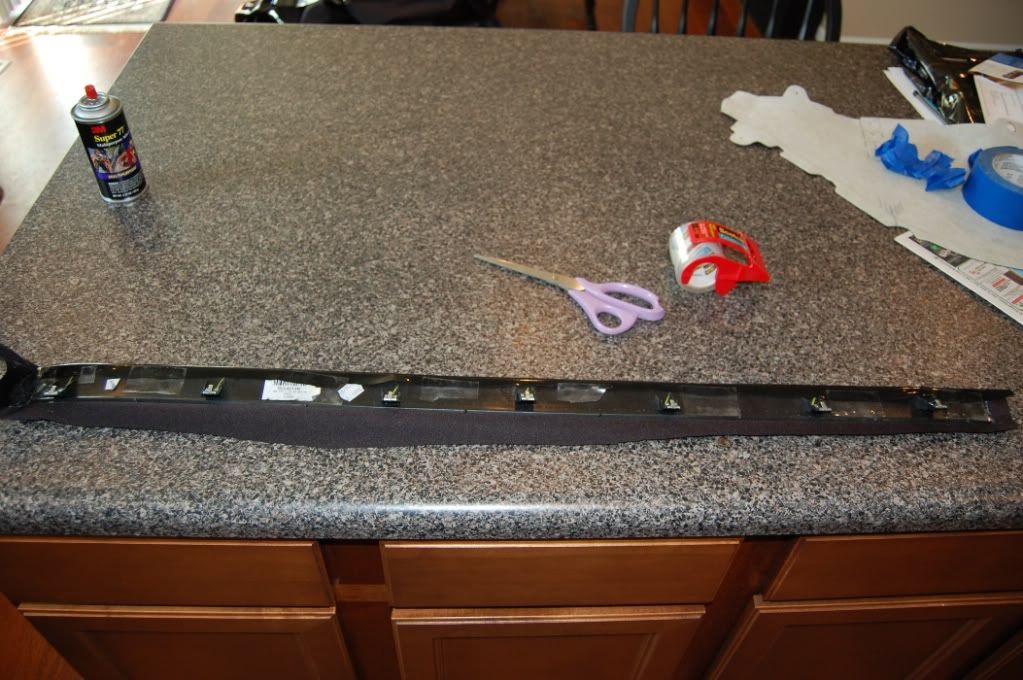 Then do the other side the same way making sure to pull it tight before you tape it down. 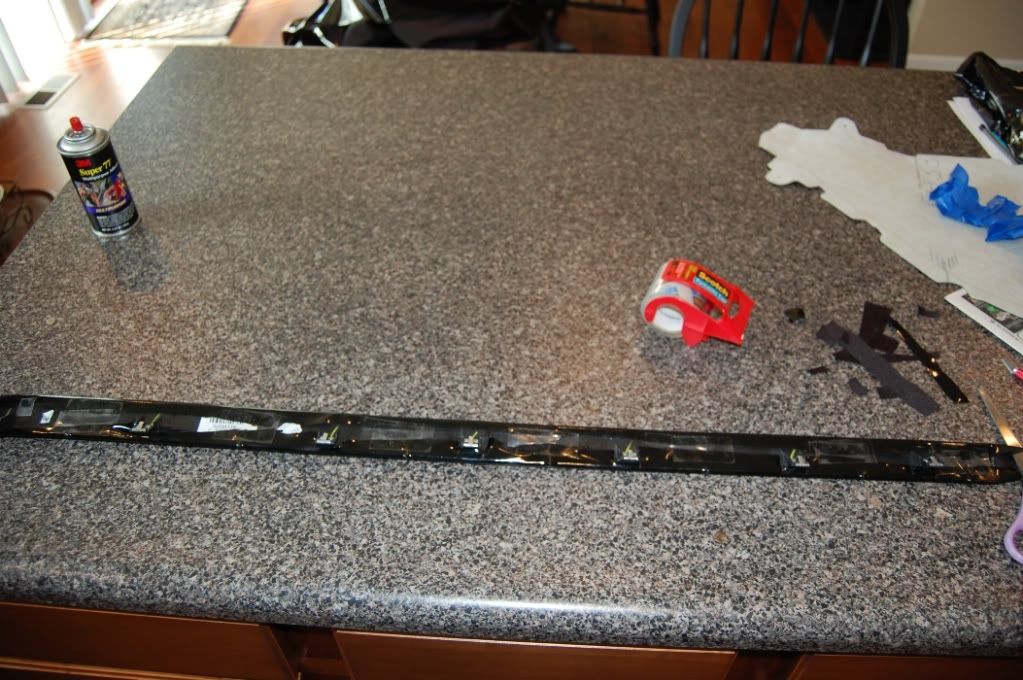 Now the tricky part is doing the folds and taping right so the overhang piece looks right. You're just going to have to play with that as I don't really know how to describe doing it.  Now you should be all done. 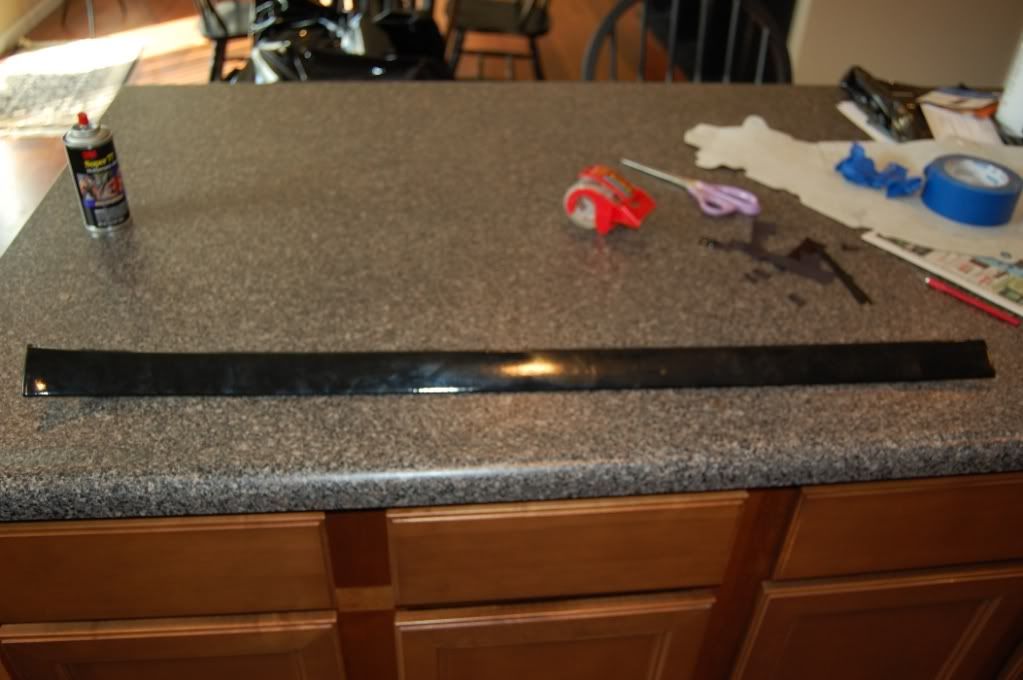 Don't forget the little piece on the left of the steering wheel. I'm not showing a how to on that since it's just a smaller version of the larger piece. Now that you have all the pieces done. Put them back on the door panels and reassemble your doors. There will be some fingerprint marks or possibly some glue fingerprints from handling the pieces when they were sticky. Not a big deal. Just wipe the trim pieces down with an alcohol swab or towelette. Everything comes right off and it won't hurt the pleather. Just clean up and now you can admire your work. Here's some pics of my door and dash trim and how it looks with the CarID trim pieces that I bought for $125. The quality is not 100% the same. There are some small visual abnormalities with the pleather. You cannot see them unless you really look at it with direct light and even then they are minor. Does it look as good as the CarID trim pieces? Probably not. It's close but, no cigar. Keep in mind that this mod can be done for $30. It doesn't look "ghetto". It looks pretty darn good if you ask me. But, it's not 100% perfect. You be the judge. 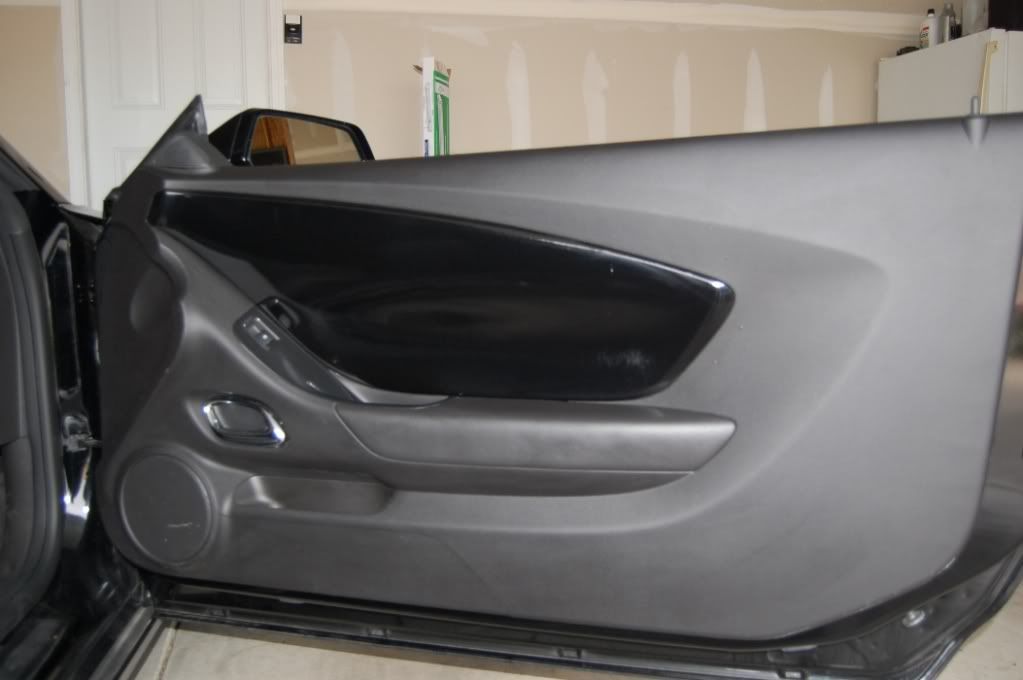 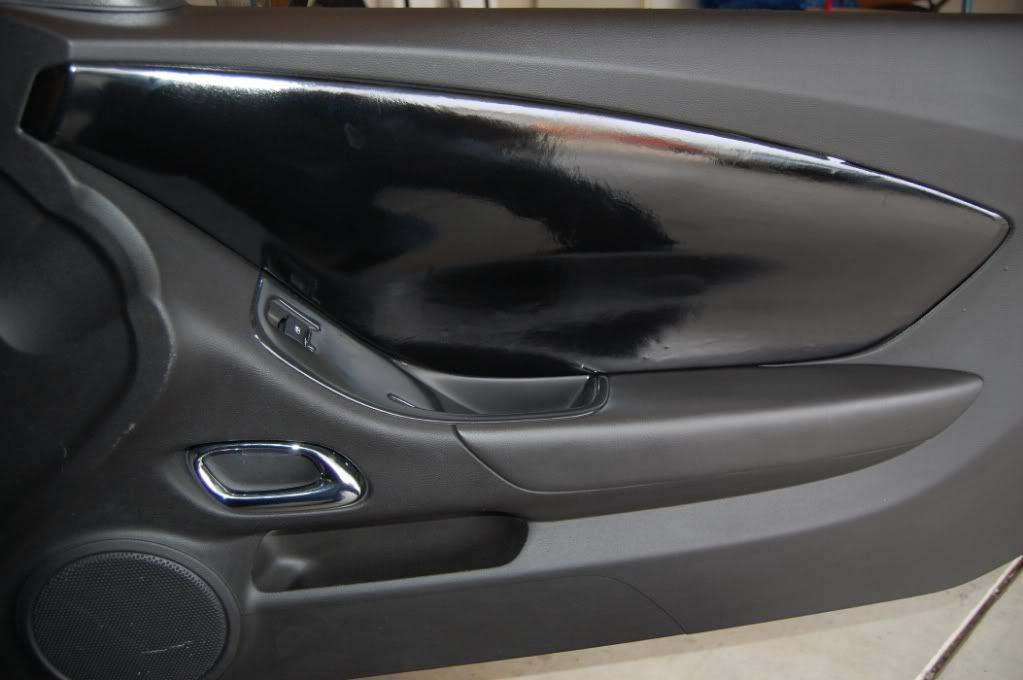 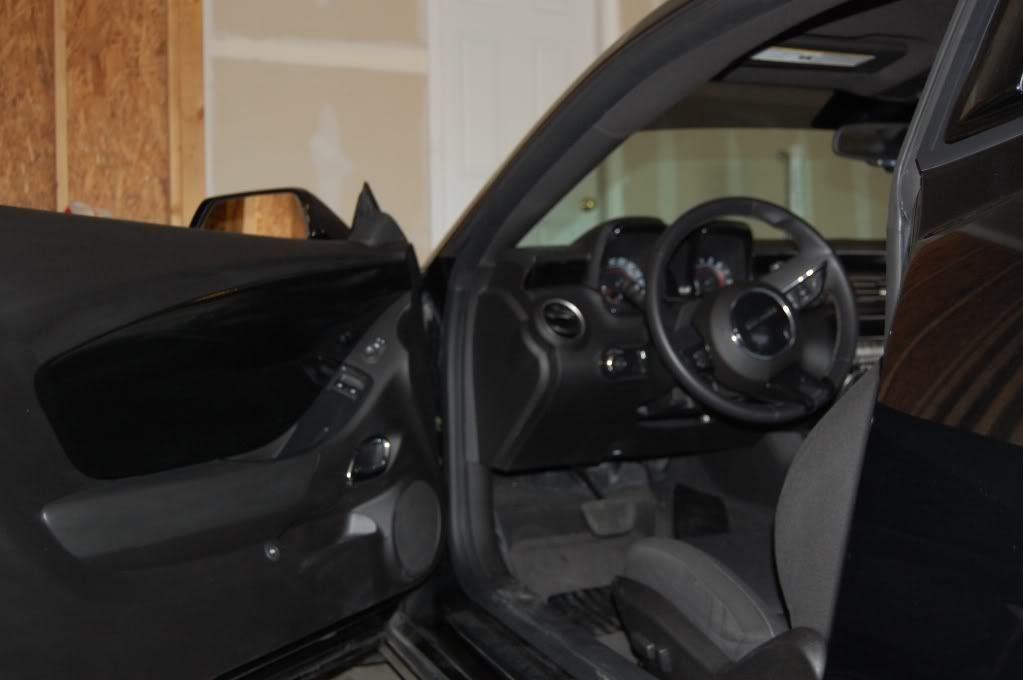 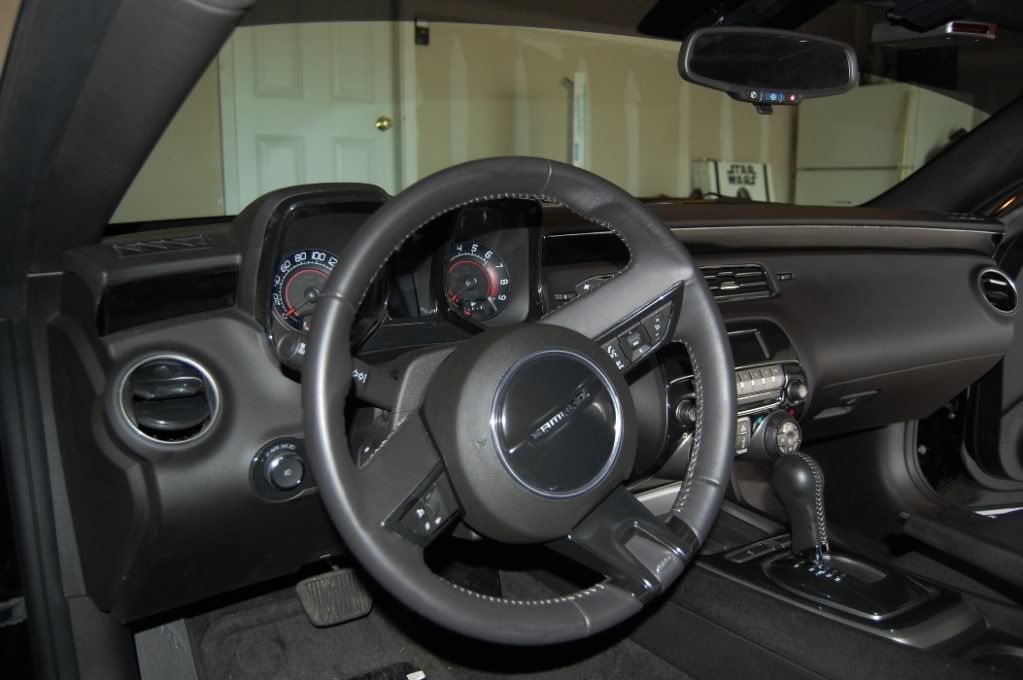 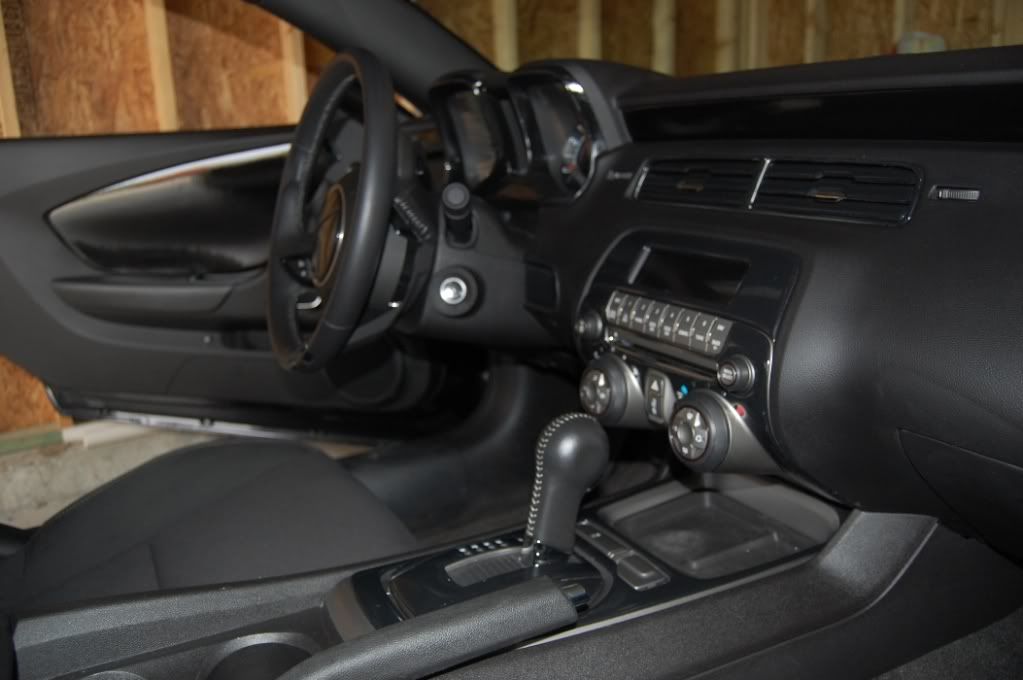 Let me know what you guys think. 
|

|

|
|
06-02-2010, 09:27 PM
|
#2 |
|
Manual 6 Speed Tran.
Drives: 2010 2LT Camaro IOM Join Date: May 2010
Location: Philly Area (Bristol) PA
Posts: 239
 |
Nice work, seems like a cheap/efficient mod..... too glossy for my liking though.... how do you think it will weather over time? I'm thinking the stock/GM parts would be much more durable.... IMO
__________________
EXHAUST , CAI , TINT , CALIPERS , SPOILER & SILLS , GILLS, BOW TIES , LED'S , AFTERBURNERS , COVERS , HID'S & HALOS, MOLDING
|
|
|
|
|
06-02-2010, 11:19 PM
|
#3 |
   Drives: Camaro 2010 Join Date: Jun 2009
Location: Arizona
Posts: 1,201
|
Hmmm Interesting how will that hold up in the sun over the years
|
|
|
|
|
06-03-2010, 06:28 AM
|
#4 |
|
Darth Martel
Drives: Black 1SS with 20% tinted windows Join Date: May 2009
Location: Bizzaroland
Posts: 1,496
|
I'm not sure how it will hold up over time. It's a wait and see thing. I see this as a couple steps above vinyl as it'll be more durable than that but, it's not like the OEM replacement trim pieces for $400. Those are the plastic pieces painted and clear coated. Basically, those are a hard shell. This is a fabric of sorts. It will handle water just fine and it will handle casual touching just fine. The question is how it will hold up over time with heat. However, for $30, if I have to do it again in a year or two I don't think that's a big deal. The gloss black isn't for everybody. There are many other color fabrics and materials to use. If I get bored of the gloss black though, I can just change it to something else down the line. The big thing is the ease and the amount of money it takes to do this mod. It's cheap and pretty easy. As for the sun beating on it? I have 20% tint and don't think it will be a big issue. It looks like storms the majority of the week coming so, I won't have the car out in the hot sun all day for awhile. We'll see how it holds up after a 90 degree day. I'll update as time passes.
|
|
|
|
|
06-03-2010, 06:41 AM
|
#5 |
       
Drives: Kami, 2013 2SS LS3 Luvin Join Date: Oct 2008
Location: Eufaula, Alabama
Posts: 6,427
 |
My worry would be more like what kind of fumes is it going to give off being in a hot car.
|
|
|
|
|
06-03-2010, 07:01 AM
|
#6 |
|
Darth Martel
Drives: Black 1SS with 20% tinted windows Join Date: May 2009
Location: Bizzaroland
Posts: 1,496
|
The Super77 3M adhesive is similar to what is used on the original trim panels. They are glued down as well so, aside from a day or two of the adhesive smell I don't think it'll be a long term concern. The pleather isn't going to give off any fumes. Now, the paint underneath may be a different story. There may be some more curing that takes place and that would give off some vapors. I'm not sure how much the pleather would breathe to release that. Perhaps with the pleather on top of the paint, it seals the paint from getting oxygen and allowing the paint to cure fully. I'm just not sure.
|
|
|
|
|
06-06-2010, 08:26 AM
|
#7 |
|
Darth Martel
Drives: Black 1SS with 20% tinted windows Join Date: May 2009
Location: Bizzaroland
Posts: 1,496
|
Just an update on this. We've had a few hot and humid days here and this mod is holding up. The smell from the adhesive has passed and now there's just fresh polish smell. One of the days we had a large downpour and rain got on the driver side panel. It just beaded and rolled down to the armrest. I keep a towel in my car so I just wiped it up. This mod is a Win!!!
|
|
|
|
|
06-06-2010, 09:02 AM
|
#8 |
|
Drives: 2010 IOM 2LT 334HP Join Date: Feb 2010
Location: NC
Posts: 1,586
|
I took the plunge and chucked out $375 for a factory set of IOM. Got a good deal though. The dealership installed it for FREE!!!!
__________________
 |
|
|
|
|
06-06-2010, 10:09 AM
|
#9 |
|
Darth Martel
Drives: Black 1SS with 20% tinted windows Join Date: May 2009
Location: Bizzaroland
Posts: 1,496
|
After doing this mod... having them do the install for free is pretty close to getting the factory set for $30. That install is a complete pain in the ass. They don't have factory black replacement panels unfortunately or I might have thought about buying them if I could get a free install. This is exactly the look I was going for so, I'm really happy with the look and the cost.
|
|
|
|
|
06-06-2010, 11:25 AM
|
#10 |
|
San Diego Head Tuners

Drives: 2016 Camaro 1SS ,NPP,MagRide, A8 Join Date: May 2009
Location: Temecula, CA
Posts: 2,440
|
I totally thought about doing this myself also. Cool to see someone who pulled it off. Cool job
__________________
2016 1SS A8, NPP, MagRide, Black Rims
My 5th Camaro (3 Gen5, 1 Gen4) Member of San Diego Head Tuners https://www.youtube.com/c/MojaveKY https://www.instagram.com/mojaveky/ https://twitter.com/MojaveKY http://dinowax.refr.cc/bryanm 15% off DinoWax orders |
|
|
|
|
06-06-2010, 03:16 PM
|
#11 | |
|
Drives: 2010 IOM 2LT 334HP Join Date: Feb 2010
Location: NC
Posts: 1,586
|
Quote:

__________________
|
|
|
|
|
|
06-06-2010, 06:22 PM
|
#12 |
|
Darth Martel
Drives: Black 1SS with 20% tinted windows Join Date: May 2009
Location: Bizzaroland
Posts: 1,496
|
thanks Camaro Freak
|
|
|
|
|
07-07-2010, 09:12 PM
|
#13 |
 
|
Darth Martel, cool mod - looks awesome, nice work. What did you have to do to remove the door panels? Did you have to grind of the plastic tabs and if so, what did you use to reinstall the panels?
|
|
|
|
|
07-08-2010, 05:41 PM
|
#14 |
|
Darth Martel
Drives: Black 1SS with 20% tinted windows Join Date: May 2009
Location: Bizzaroland
Posts: 1,496
|
I used a pair of wire cutters to cut the tabs off and then I used some short, fat screws to put the panels back on. You want to make sure the screws are fat enough to fit in the holes that are left after you cut the tabs off. You could probably dremel them off with greater ease though.
|
|
|
|
|
|
|
|
 |
| Thread Tools | |
|
|


