You are browsing camaro5 
|
|
 07-25-2012, 05:06 PM
|
#1 |
        
Drives: 2011 Camaro LS Join Date: Feb 2011
Location: Southern California
Posts: 2,920
|
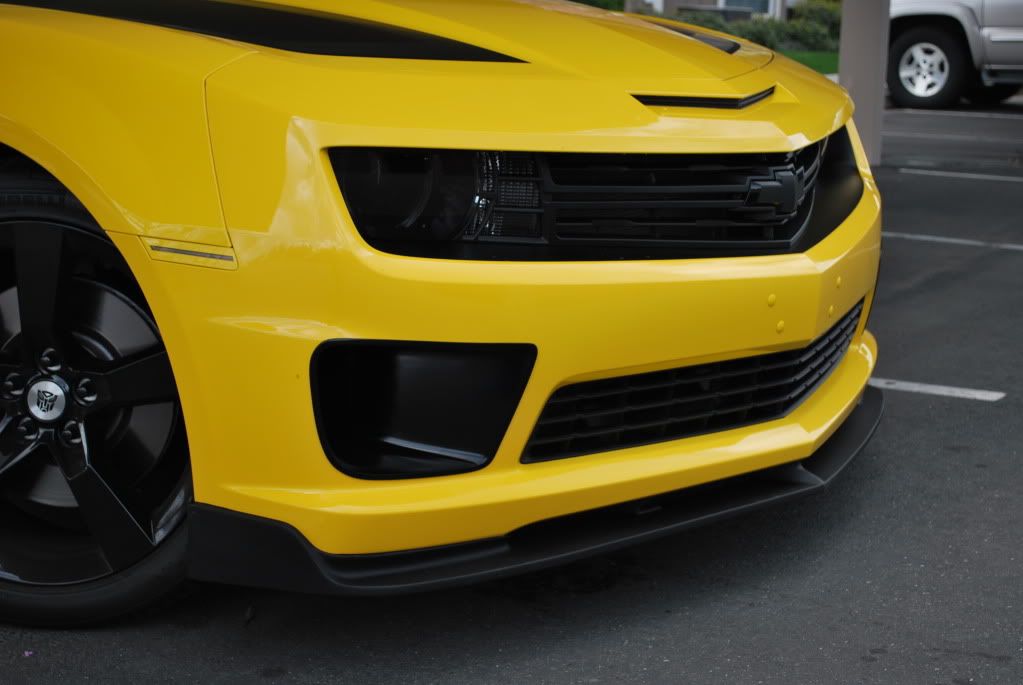
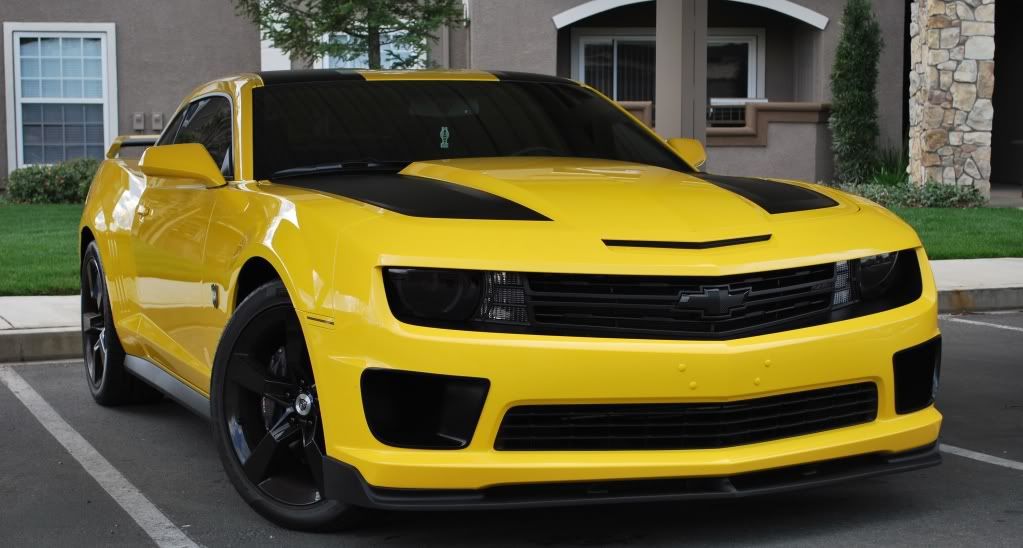
street scene splitter install
so i got my street scene splitter in today. i'm gonna spray it with bed liner and then have someone install it for me. anyone have tips for the install?
__________________
|

|

|
|
07-25-2012, 05:18 PM
|
#2 |
 
Drives: 2018 Hot Red ZL1 Join Date: Nov 2010
Location: Los Angeles, CA
Posts: 3,599
|
make sure it fits prior to spraying anything. then if possible two people to put it in place at one time.. its easier that way.. also go buy some bigger screws for the middle part. I got three and just drilled them into the bumper and splitter.. and I used the provided ones for the sides.. its held up pretty good... Also, you can use clear or black silicon to go over the top.. because you are using tape, water will be able to sit there. I used black silicone for plastic parts.
__________________
 |
|
|
|
|
07-25-2012, 05:27 PM
|
#3 | |

Drives: 2010 2SS/RS,M6,Black w/CGM Stripes Join Date: Jan 2010
Location: Nashville, NC
Posts: 1,778
|
Quote:
Sent from my DROID BIONIC using Tapatalk 2
__________________
 3" RDP Motorsports aggressive cat-back exhaust w/ x-pipe, Vararam CAI, Hurst's short throw shifter, Gary's Customs painted bowties, Ofer's HID DRL/Fog Light wiring harness, Kelvin 8K HID DRL bulbs, ZL1 grille. Johnson's window tint film, LSR lowering springs, Metra dash kit with Pioneer In-Dash DVD head unit. |
|
|
|
|
|
07-25-2012, 05:32 PM
|
#4 |
|
Drives: 2018 Hot Red ZL1 Join Date: Nov 2010
Location: Los Angeles, CA
Posts: 3,599
|
street scene is does not have a nice finish as Stillen does. most of them come with sanding marks from the vendor. so you have to spray them with some kinda paint or so.. Bed liner is really good or flexible bumper coating from duplicolor..
__________________
|
|
|
|
|
07-25-2012, 05:32 PM
|
#5 | ||
|
Drives: 2011 Camaro LS Join Date: Feb 2011
Location: Southern California
Posts: 2,920
|
Quote:
Quote:
__________________
|
||
|
|
|
|
07-25-2012, 05:35 PM
|
#6 |
|
Drives: 2018 Hot Red ZL1 Join Date: Nov 2010
Location: Los Angeles, CA
Posts: 3,599
|
Well the install is easy man. you could do it yourself.. did you get the adhesion promoter from 3M?? I think street scene sent you some. use that or get some from 3M... it makes it stick harder to the bumper.. if you find urself a friend, its an easy DIY.. i did it on my own and it was still easy.. Im not expert in doing stuff but I have done everything to my car so far..
__________________
|
|
|
|
|
07-25-2012, 05:39 PM
|
#7 | |
|
Drives: 2010 2SS/RS,M6,Black w/CGM Stripes Join Date: Jan 2010
Location: Nashville, NC
Posts: 1,778
|
Quote:
Sent from my DROID BIONIC using Tapatalk 2
__________________
3" RDP Motorsports aggressive cat-back exhaust w/ x-pipe, Vararam CAI, Hurst's short throw shifter, Gary's Customs painted bowties, Ofer's HID DRL/Fog Light wiring harness, Kelvin 8K HID DRL bulbs, ZL1 grille. Johnson's window tint film, LSR lowering springs, Metra dash kit with Pioneer In-Dash DVD head unit. |
|
|
|
|
|
07-25-2012, 05:58 PM
|
#8 |

|
I installed mine myself as well. I put new tape & 15 small bolts to hold it on. Probably overkill, but I wasn't leaving anything to chance...
As for paint I used Plastidip for mine. It has been a couple months of daily driving & not one rock chip in it yet. Super easy to do & looks good!
__________________
 CAI intake | OBX LT Headers | Flowmaster AT Exhaust | Trifecta Tune | SS Rear Diff, Axles & Driveshaft Zex 100 Shot Nitrous | Konig Airstrike Wheels | Custom Engine Cover, Fuse Box & Underhood Bowtie Eibach Springs & SS Sway Bars | BMR Strut Brace | Drake Shifter | Vitesse Paddles | 13.26 @ 105.88 mph |
|
|
|
|
07-25-2012, 06:14 PM
|
#9 |
|
Drives: 2018 Hot Red ZL1 Join Date: Nov 2010
Location: Los Angeles, CA
Posts: 3,599
|
15 screws??? Woahhh. Thats a lot. I used 5 total.. and mine is solid.
__________________
|
|
|
|
|
07-25-2012, 08:29 PM
|
#10 | |
|
|
Quote:
__________________
CAI intake | OBX LT Headers | Flowmaster AT Exhaust | Trifecta Tune | SS Rear Diff, Axles & Driveshaft Zex 100 Shot Nitrous | Konig Airstrike Wheels | Custom Engine Cover, Fuse Box & Underhood Bowtie Eibach Springs & SS Sway Bars | BMR Strut Brace | Drake Shifter | Vitesse Paddles | 13.26 @ 105.88 mph |
|
|
|
|
|
07-25-2012, 08:39 PM
|
#11 |

Drives: 2012/2ss "transformers edition" Join Date: Oct 2011
Location: vacaville
Posts: 528
|
i sprayed mine with duplicolor bedliner, turned out great.
__________________
 |
|
|
|
|
07-25-2012, 08:41 PM
|
#12 |
  
|
got mine painted SIM, but still waiting for installation.
|
|
|
|
|
07-25-2012, 08:48 PM
|
#13 | ||
|
Drives: 2011 Camaro LS Join Date: Feb 2011
Location: Southern California
Posts: 2,920
|
Quote:
i just test fitted it and it fit perfectly. i'll clean it up and spray it. and you said that the install was easy..do i need to remove the bumper? Quote:
__________________
|
||
|
|
|
|
07-25-2012, 10:25 PM
|
#14 |
|
HT5 COTW 1/21/13

Drives: 2010 Camaro Inferno 2SS RS 6M Join Date: Apr 2011
Location: Pleasant Hill, Or
Posts: 2,486
|
I installed mine and haven't had one problem. Make sure and use the primer for the 3M tape. The 3 attachment places in the middle. I drilled and and used a 1/4 bolt with big washers to hold it on. That way it will stay on at high speeds.
__________________
 |
|
|
|
|
|
|
|
 |
|
|


