You are browsing camaro5 
|
|
 03-19-2011, 10:38 PM
|
#561 | |
|
Account Suspended
Drives: 2013 SS Join Date: Dec 2009
Location: Boyertown, PA
Posts: 1,374
|
Quote:
|
|

|

|
|
03-19-2011, 10:40 PM
|
#562 | |
|
Account Suspended
Drives: 2013 SS Join Date: Dec 2009
Location: Boyertown, PA
Posts: 1,374
|
Quote:
I like to use the second one from the right in the photo alot. Once you have the trim removal tool it makes getting that trim off the least of your worries. 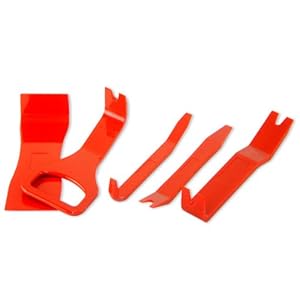
|
|
|
|
|
|
03-20-2011, 12:51 AM
|
#563 |
|
www.Camaro5store.com

|
I just pull off the right side of the dash cover. ON the right. I pull that off and push the first tab out while pulling on it. That first tab pops right out and then you slide your fingers behind the dash trim popping out the rest one at a time.
Also, taking out the gauges trim is easy...just pop it out. It's when you put it back IN that you must be VERY careful. I snapped one part of the trim ON THE DASH and there is nothing I can do but get a new dash...and that sure as shit ain't happen'in. I have tomorrow off...going to get clear spacers. |
|
|
|
|
03-22-2011, 08:38 PM
|
#564 |
|
buzzy56

|
Walla finished !
I thought I would do a update on my ABL install.Received the replacement LED yesterday but thought I would wait until today to install.Things were not going well yesterday so my better judgment told me to wait until today.So I purchased a package of (12) 3/8 " rubber bumpers from ACE hardware for $3.99.Placed (8) of them across the back side of passenger side dash trim. One at each plastic clip between the sidewall of clip near the top but covered by the stick um tape.Placed the others in the middle section equally spaced across the trim and (1) on the far left hand side of the passenger trim next to the speedometer opening as it sucks in there.You have to play with it to get it to set just right.Trim off and trim on about 6 times.It gets easier every time you remove it.I did put a little Vaseline *(little) * on the tip of the retainer clip and it goes in and out easier and still seats in.Pics attached but do it no justice.Reflections and shadows are only in the pictures.In reality it is even and matches the door panels as good as I believe possible.The pics do show small dot shadows but only show up in pictures not when you view them in person.Could not be happier with the result. Highly recommend this project.Now just waiting for May to get her out of hibernation and hit the road.
 :happy anim:: happyanim: :happy anim:: happyanim:
__________________
 OLD SCHOOL / NEW SCHOOL COOL OLD SCHOOL / NEW SCHOOL COOL |
|
|
|
|
03-22-2011, 09:42 PM
|
#565 |
 
|
Everyone says this is easy, yet there are a lot of people running into problems during the install... Why doesn't someone have a install video yet? That would be cool.
__________________
 |
|
|
|
|
03-22-2011, 11:13 PM
|
#566 | |
|
buzzy56
|
not easy
Quote:
__________________
OLD SCHOOL / NEW SCHOOL COOL |
|
|
|
|
|
03-23-2011, 12:50 AM
|
#567 | |
|
www.Camaro5store.com
|
Quote:
|
|
|
|
|
|
03-23-2011, 11:11 PM
|
#568 |
|
:chevy:

Drives: 2LT/RS Join Date: Jun 2008
Location: Toronto
Posts: 13,033
|
anyone think ill run into problems if I broke out the clips for the abl, well those metal retainers? lol im soo annoyed of them. Ill probably do the vasoline trick
__________________
CAMARO
Consult your doctor before taking Camaro Side effects include Sudden increase in Heart Rate, Insomnia and occasional hallucinations If you experience Permagrin exceeding 4 hours after taking Camaro, seek immediate Camaro5 Help CAMARO Bringing excitment back into the Garage |
|
|
|
|
03-24-2011, 09:55 AM
|
#569 | |
|
buzzy56
|
no worry
Quote:
 Never ends ! Never ends !Warning be very careful when putting the spedometer benzel back in really delicate and need to use a lot of caution to keep from breaking it.
__________________
OLD SCHOOL / NEW SCHOOL COOL |
|
|
|
|
|
03-24-2011, 10:53 AM
|
#570 | |
 
Drives: 2010 Camaro LS, 1973 Corvette Join Date: Dec 2010
Location: Olathe, KS
Posts: 807
|
THAT'S WHAT SHE SAID!!! Sorry, I had too!
Quote:
__________________
 |
|
|
|
|
|
03-25-2011, 12:11 AM
|
#571 |
|
www.Camaro5store.com
|
Yep...be VERY careful.
|
|
|
|
|
03-25-2011, 12:08 PM
|
#572 |
|
zoneblitz

Drives: 2010 2SS/RS red jewel 22" Foose Le Join Date: Mar 2011
Location: dallas
Posts: 100
|
Could you pleae tell me a fair price if I was willing to pay someone to do this project for me . Say a body shop? And how much do you charge for the things I need to purchase from you.
|
|
|
|
|
03-25-2011, 12:50 PM
|
#573 |

Drives: Red 2SS/RS M6 Join Date: Apr 2010
Location: San Antonio, Texas
Posts: 6,219
|
got mine done, sorry no pics yet, but came out even. i tried at least dozen times on n off. the light tube would be uneven in some spots, the light tube would be higher or lower it areas. so i purchased some 1/4 weather stripping, and put it along the trim about 1/3 inch down (not on the car, but the piece that you remove). then i installed it, it held the entire way
, if the intensity of the light was off, i remove the trim and either raised of lowered the weather stripping and reinstalled and bam, the light tube creates the perfect gap, worked for me. lupe |
|
|
|
|
03-25-2011, 03:42 PM
|
#574 |
|
:chevy:
Drives: 2LT/RS Join Date: Jun 2008
Location: Toronto
Posts: 13,033
|
wish you tok pics of the weather stripping :(
__________________
CAMARO
Consult your doctor before taking Camaro Side effects include Sudden increase in Heart Rate, Insomnia and occasional hallucinations If you experience Permagrin exceeding 4 hours after taking Camaro, seek immediate Camaro5 Help CAMARO Bringing excitment back into the Garage |
|
|
|
|
|
|
|
 |
|
|
 Similar Threads
|
||||
| Thread | Thread Starter | Forum | Replies | Last Post |
| V8 Camaro Performance Upgrades List | Milk 1027 | Camaro V8 LS3 / L99 Engine, Exhaust, and Bolt-Ons | 93 | 08-30-2021 05:56 PM |
| EXHAUST | Milk 1027 | Wiki | 2 | 03-07-2010 09:20 PM |
| IMPORTANT Part 1 Warranty Disputes | Zeus | Camaro Issues / Problems | Warranty Discussions | TSB and Recalls | 11 | 08-25-2009 11:37 AM |
| got my new Camaro today pictures included !! | yesno20102ssblack | Camaro Photos | Spyshots | Video | Media Gallery | 33 | 05-02-2009 10:05 AM |
| First Camaro Impressions (Pictures Included) --- Red Jewel Tintcoat! | dect | Camaro Photos | Spyshots | Video | Media Gallery | 80 | 01-27-2009 06:45 PM |


