You are browsing camaro5 

|
 03-12-2015, 06:29 AM
|
#85 | |
 Drives: 2015 CRT 2SS/RS 1LE Join Date: Feb 2014
Location: IN
Posts: 638
|
Quote:
|
|

|

|
|
03-12-2015, 09:36 AM
|
#86 | |
 
|
Quote:
|
|
|
|
|
|
03-12-2015, 09:55 AM
|
#87 | |
|
Drives: 2015 CRT 2SS/RS 1LE Join Date: Feb 2014
Location: IN
Posts: 638
|
Quote:
|
|
|
|
|
|
03-12-2015, 10:37 AM
|
#88 | |
|
|
Quote:
|
|
|
|
|
|
03-15-2015, 01:33 AM
|
#89 | |
|
Go fast, please.

|
Quote:
|
|
|
|
|
|
03-15-2015, 03:51 PM
|
#90 | |
|
Chevy Power
Drives: 13 ZL1 M6 #123, '98 Jeep Wrangler Join Date: Dec 2011
Location: Tampa
Posts: 134
|
Quote:
__________________
2013 #123, M6 2.38 upper, ID850, dynatech 1 7/8 headers, cats, X pipe, ADM CAI, 160 Tstat, Hurst line lock, tune by FSP
Sebring 2:39.20 MPSS  |
|
|
|
|
|
03-15-2015, 05:38 PM
|
#91 | |
|
|
Quote:
|
|
|
|
|
|
03-15-2015, 05:42 PM
|
#92 | |
|
|
Quote:
|
|
|
|
|
|
03-15-2015, 07:32 PM
|
#93 |
|
Go fast, please.
|
PM'd.
|
|
|
|
|
03-16-2015, 10:36 AM
|
#94 | |
|
Drives: 2015 CRT 2SS/RS 1LE Join Date: Feb 2014
Location: IN
Posts: 638
|
Quote:
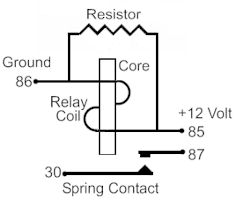 Maybe it's hard to say without having an actual relay opened up, but based on that picture, can't you just insert your wires at node 86? |
|
|
|
|
|
03-16-2015, 10:57 AM
|
#95 | |
|
|
Quote:
|
|
|
|
|
|
03-16-2015, 09:37 PM
|
#96 | |

Drives: 2014 1SS/RS LS3 Join Date: Jul 2012
Location: Wisconsin
Posts: 621
|
Quote:
__________________
2014 1SS/RS LS3 AGP TT, Custom TSP Cam, 4L80E Swap 1/4 mile- 9.53 @ 145mph
 |
|
|
|
|
|
03-16-2015, 09:44 PM
|
#97 | |
|
|
Quote:
|
|
|
|
|
|
03-17-2015, 03:52 AM
|
#98 |
|
Go fast, please.
|
Is there any drawback of running these flaps CLOSED all the time? Does it hurt HP at all or anything to do that?
|
|
|
|
|
|
|
|
 |
| Tags |
| dual mode exhaust, npp, quiet exhaust, stealth exhaust |
|
|


