You are browsing camaro5 

|
 02-08-2016, 07:53 AM
|
#1 |
 Drives: 1986 camaro, 2013 genesis coupe Join Date: Mar 2015
Location: Houston
Posts: 25
|
2014-2015 Non RS camaro + Z/28 Headlight Retrofit DIY WITH PICS!!!
Whats up CamFam,
So i decided i would do a headlight build as a project of mine and wanted to share tips and trick and step by step in case any of you were thinking of doing this on your car. So for starters i got a set of headlights that had been previously split and modded by Oracle from Nacolsdream2012 so shout out to her for allowing me the chance to risk free build a set of lights. So the first thing you should know before you start is that this process can get really expensive really fast and DO NOT buy cheap equipment to put in your headlights, because if you ever have to replace a halo or something you will have to re-split the lights. So here we go.... I am doing a quad projector headlight mod that will be Bixenon(meaning dual beam projector) with 4 Red Halo's and 4 RGB demon eyes. Things you will need: -Retrofit Projectors - I used 2.5" Bixenon projectors from Theretrofitsource.com. I Needed 4 of them - Projector shrouds - I bought black Gatling projector Shrouds from Retrofit source as well - Stock Headlights - I had a set donated - Halo's - I have a halo dealer but you can get them from Retrofit source as well - RGB strip - This is used inside the projector to create the "demon Eye" Effect - Retro Rubber or some sort of Butyl to reseal your headlight. For this DIY i am using silicone because the person who split the headlight before me ruined the channel where you put the butyl and it seals and instead sealed them with silicone. So in order for me to reseal them well i have to use silicone again. - Any other goodies you want in your headlight - Wire to wire all this stuff together once it is in. - Bulbs to go into the new projector - I am using 4(yes 4) HID bulbs and Ballasts for a quad headlight that flips up for brights - Paint and primer- The chrome part of the housing is now your canvas, make it a cool color or make it disappear, the choice is yours. - Epoxy or other glue to hold Halo's as well as picture frame wire - RGB controller Step 1: Prepare your headlights for the oven - Take off all of the plastic pieces and brackets until the headlight has just the lens on front(the clear glass part) - Make sure the headlight is clean, once ou bake it is is very hard to get a Lens clean if the dirt sets in. - Plan out how you are going to split the light Before you bake it, really analyze it so you do not make mistakes when it is hot and crunch time Step 2: Bake the headlights Many people who do this have different temps and methods to this. For this headlight i baked them at 270 for 8-10 minutes. Many people use 225 for a little longer. You are just heating the headlight to soften the butyl seal that is from the factory enough to be able to split the Lens away from the housing. Pro tips: Do nots: -Do not stick your headlight into the oven while it is heating up - Do not let any wires or anything like that touch the sides of the oven - Do not use your mothers oven - Do not touch the Lens - Do not pry too hard on the Lens and crack it -Do not get butyl on the lens or in the housing - Do not use place headlight onto the metal grate - Do not cook meatballs right after your headlights -Do not do this while your wife is home Do's: - Place something under the headlight so it does not melt the back plastic - Do use gloves and care when removing the headlight -Do bake each headlight one at a time and split each one at a time - Do turn every vent on in the house - Do take your time and be prepared for the task at hand. Step 3: Split your Headlights Use a plastic pry bar or a flathead screwdriver to GENTLY pry apart the lens from the headlight housing. Take your time and work around the light to get it to come off. DO NOT break the headlight housing to get the lens off, if you have to force it you are most likely doing something wrong. Step 4: Test fit projectors and prep headlight for paint Test fit your retrofits and see how they will fit and look, this step is important to do before paint. Make any modifications needed for wires or to mount the projector. Test the height of the projectors if using more than 1 in a headlight to see any adjustments you will have to make to beam height. Step 5: Paint Housing Prime and then paint your housing whatever color you are going with, I chose gloss black to give a nice clean look. The rears of my projectors were chrome so they also got painted gloss black This is where i am at right now and will continue this DIY once i get the HIDs in and the Halo's... |

|

|
|
02-08-2016, 07:54 AM
|
#2 |
|
Drives: 1986 camaro, 2013 genesis coupe Join Date: Mar 2015
Location: Houston
Posts: 25
|
Halo's came in today, i decided to run 4 Red 80mm COB plasma Halos and do all 4 projectors with RGB demon eyes. I plan to try to do RGbs in the nostrils as well.
|
|
|
|
|
02-08-2016, 07:56 AM
|
#3 |
|
Drives: 1986 camaro, 2013 genesis coupe Join Date: Mar 2015
Location: Houston
Posts: 25
|
I should mention i am copying all this off my other camaro forum so the progression will seem quick
So i finished up my projectors and assembled one of the headlights to get an idea of what it would look like. I have not decided whether to LED light the nostrils but i do think i am going to try to Smoke tint them to give a nice clean black look all around. Here is what i got |
|
|
|
|
02-08-2016, 06:54 PM
|
#4 |
 
|
Wow those look mean, great job on those.
|
|
|
|
|
02-10-2016, 10:16 AM
|
#5 |
      Drives: 2015 1LS Red V6 Join Date: Aug 2015
Location: St Joseph, MO
Posts: 1,849
|
I feel like i need to try this now...but.....i dunno. Kinda nerve-racking !
__________________
Sponsors:
Overkill Motorsport BCS Auto JacFab Machining APDEG Dream Gear Mobile Audio Thanks to Will @ Overkill Motorsports, Jason @ JacFab, Jim @ Ohio Speed, Brandon at Dream Gear, and the boys at Randy Curnow Chevrolet 5th Gen V6 Performance Facebook Group |
|
|
|
|
03-15-2016, 10:26 AM
|
#6 |
|
Drives: 1986 camaro, 2013 genesis coupe Join Date: Mar 2015
Location: Houston
Posts: 25
|
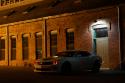
Got them on the car, figured i should finish the thread.
The quad low beams looks badass |
|
|
|
|
03-15-2016, 10:38 AM
|
#7 |
Drives: 2010 2SS/RS Join Date: Dec 2009
Location: Clarksville Tennesse.
Posts: 6,064
|
Very Cool and could this be applied to the 2010-2013s??
An nice neighborhood!!!!
__________________
Orange Krush II
1LE Front sway bar, Splitter, shocks and struts, Z28 dual mode mufflers, Intake, UCA Bushings, and Toresen 3.91 Diff. 1 piece DSS Drive Shaft, ZL1/C7 Calipers, and 32mm JPSS Rear Bar. ASC race spec splitter and wicker. 6th Gen M017 Wheels. Stainless Works 1 7/8 LTs. DSE and PAFDT Suspension components. |
|
|
|
|
03-15-2016, 12:22 PM
|
#8 |
Drives: 2011 Camaro SS Summit White Join Date: Sep 2015
Location: Massachusetts
Posts: 159
|
Jesus this is sick!! Love it
__________________
D1sc procharger, gpi ss3 vvt cam, alky control, build 6l80e, tsp longtubes, corsa zl1 catback, eibach pro 1 springs
 |
|
|
|
|
04-11-2016, 08:37 AM
|
#9 |
|
Drives: 1986 camaro, 2013 genesis coupe Join Date: Mar 2015
Location: Houston
Posts: 25
|
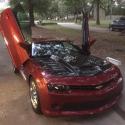
For those of you in the houston area i just finished another set of 10-13 headlights that i am going to be selling. This set has amber halo's, RGB demon eyes, LED headlight conversion( might change to HID), and black housings. I am considering tinting the blinker part to keep with the all black look. I also have a matching set of amber halo's for the fog lights as well as extremely bright LED bulbs for the fog lights and switchback LEDs for the blinkers that can be included if needed.
Before and after pics as usual |
|
|
|
|
04-13-2016, 09:34 AM
|
#10 |
Drives: 2015 2LS Join Date: Mar 2016
Location: Atlanta
Posts: 238
|
Very Nice!!!
|
|
|
|
|
05-05-2016, 07:22 AM
|
#11 |
|
Drives: 2015 2LS Join Date: Mar 2016
Location: Atlanta
Posts: 238
|
You should come up with pricing to do this on the side and charge a core charge refundable if they send you their housings after they install the new ones. I would be interested for my 2015 LS.
|
|
|
|
|
05-05-2016, 09:54 AM
|
#12 |
 
Drives: 2010 SS Join Date: May 2014
Location: Maryland
Posts: 418
|
Great work
|
|
|
|
|
05-05-2016, 10:45 AM
|
#13 |
|
|
Now that is what I've been looking for. A bad ass look for the 14-15 years without replacing the whole front end with zl1 and new headlights from 10-13 which costs $$$. If you have any more info on this, thank you.
|
|
|
|
|
05-05-2016, 01:11 PM
|
#14 |

Drives: 2010 2SS Camaro 6sp. Join Date: Jan 2012
Location: South Jersey
Posts: 639
|
Wow nice work!
__________________
|
|
|
|
|
|
|
|
 |
|
|


