You are browsing camaro6 
 02-03-2017, 02:43 PM
|
#1 |
 
Drives: 2017 Camaro SS Convertible 50th Join Date: Nov 2016
Location: Ojai, CA
Posts: 340
|
Installing GM Splash Guards
Hey, guys - this is not really a how-to but wanted to share my experience buying and installing these on my 50th. While the instructions are indeed included in other threads, I found that there were some minor tips that could have been useful so I wanted to include them here.
First off, I purchased both front and rears from the below links. That was the cheapest I found. Shipping was quick and they arrived perfectly. http://www.shopchevyparts.com/advanc...splash&x=0&y=0 I did not have to remove any wheels and was able to install them both front and rear with no major issues. Here are the only tools I used:  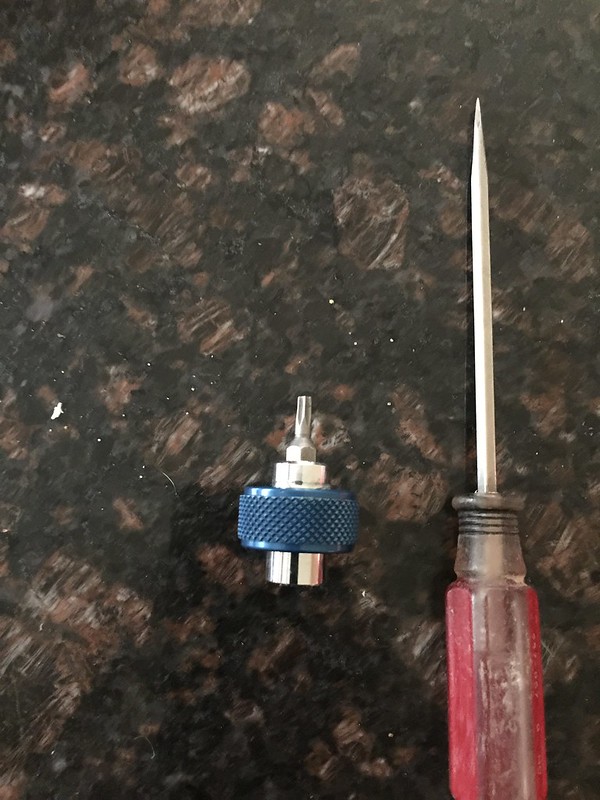 The instructions are fairly straightforward, but here are some tips I found. No great knowledge here just things I ran into. 1 - The Thumb screwdriver you see above, with a T15 tip was perfect and enabled me to both remove the screws in the rear and install the screws up front as required. Fit nicely without having to remove the rear wheels. **Edit** Link to the thumb screwdriver I used is here: http://www.sears.com/craftsman-3-pc-...7&blockType=G7 2 - The rears were simple, just remember to slightly pull the red adhesive backing out before you tighten too much. There isn't much excess so if you tighten the screws too much you will have to undo them to get at the adhesive strip. 3 - The fronts were slightly more complicated. Turn the wheels to stop for each side and you will have plenty of room to work. Where it tells you to pull out the liner, to get at the hole behind it, you don't need to pull the whole side of the liner outwards. In fact, it's in there pretty tight and is pretty stiff. so if you are not careful, you can actually bend the fender lip while trying to pull as much out as they say in the instructions. You just need to pull the bottom section out. It will be clear when you go to do it, if I am not being eloquent enough here  4 - The rivets are a bit of a PITA. This is because the rivets go through both pieces (bracket and splash guard) and then are tighten as required. The problem is that the rivet is long enough that to get the rivet head flush with the splash guard, you are pushing the rivet against the liner. It takes a good but of force pushing in while squeezing the handle of the rivet gun. 5 - Make sure you pull a little of the adhesive backing out BEFORE you rivet anything. Similar to what I said for the rears. On one side there was not really enough excess to grab the strip, and I played hell trying to get it after I had riveted the top and bottom rivets as shown in the directions. Other than that, i think they look great and were not too hard at all to install. Took me about an hour for all of them and I am EXTREMELY retentive. All the best! 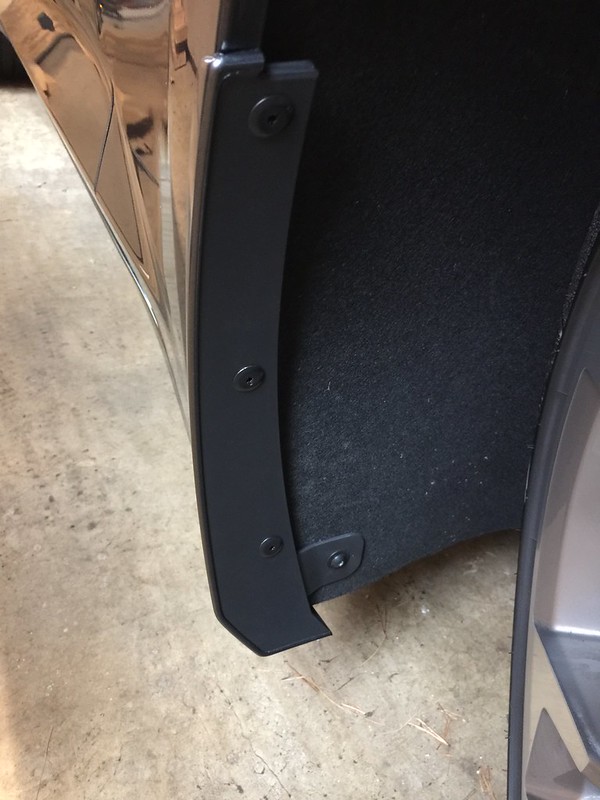 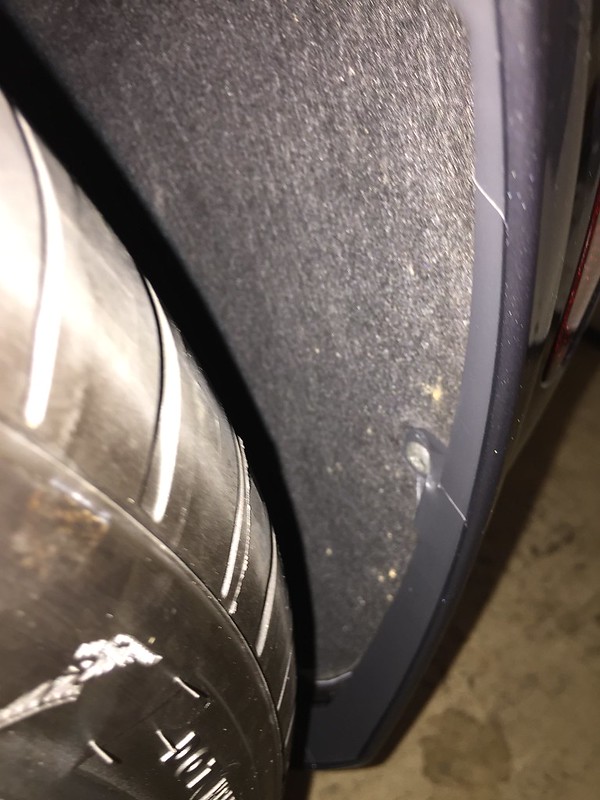
Last edited by toro1966; 02-04-2017 at 09:19 AM. |

|

|
|
02-03-2017, 02:57 PM
|
#2 |
|
#becauseracecar

Drives: 2016 SS Sedan, 2016 Camaro SS Join Date: May 2015
Location: Phoenix
Posts: 2,959
|
Great write up. Thanks.
|
|
|
|
|
02-03-2017, 03:02 PM
|
#3 |
|
Retired from Car mfrs....

Drives: 2LT RS/HR-V Join Date: May 2013
Location: /Fort Lauderdale
Posts: 10,048
|
Good write up. No one should let the dealer do this install. It's easy but It takes some adjusting and patience, being careful when you pull the tape, and it's very easy to get it on lopsided, Like so many dealers do , that don't give a crap about your car.
__________________
Last edited by Glen e; 02-03-2017 at 03:29 PM. |
|
|
|
|
02-03-2017, 03:27 PM
|
#4 |
    
Drives: SS-6-SPD Join Date: Jan 2017
Location: New Jersey
Posts: 1,364
|
very nice............
|
|
|
|
|
02-03-2017, 04:08 PM
|
#5 |
|
San Diego Head Tuners

Drives: 2016 Camaro 1SS ,NPP,MagRide, A8 Join Date: May 2009
Location: Temecula, CA
Posts: 2,440
|
Nice job ! Looks really clean and thanks for the help !
__________________
2016 1SS A8, NPP, MagRide, Black Rims
My 5th Camaro (3 Gen5, 1 Gen4) Member of San Diego Head Tuners https://www.youtube.com/c/MojaveKY https://www.instagram.com/mojaveky/ https://twitter.com/MojaveKY http://dinowax.refr.cc/bryanm 15% off DinoWax orders |
|
|
|
|
02-03-2017, 05:02 PM
|
#6 |
|
Drives: 2017 Camaro SS Convertible 50th Join Date: Nov 2016
Location: Ojai, CA
Posts: 340
|
Thanks guys. Just trying to give back to this great site!
|
|
|
|
|
02-04-2017, 05:34 AM
|
#7 |

Drives: 2002 Camaro SS Join Date: Jun 2012
Location: Evansville, Indiana
Posts: 526
|
I'm guessing with these that most of the aftermarket rocker panels out there won't work correct?
__________________
2017 1SS Hyper Blue M6
2001 Ford Lightning |
|
|
|
|
02-04-2017, 08:13 AM
|
#8 |
|
"Lohla"

|
I'm about to add these. 285s in front are trashing the waiter panels on my car. Thanks for the write up, OP!
__________________
OG Trans and Diff but all else is upgraded. Twins bring wins ;-)
|
|
|
|
|
02-04-2017, 09:06 AM
|
#9 |
 
Drives: 2017 Hyper Blue Camaro 2SS Join Date: Aug 2016
Location: Grayling Michigan
Posts: 90
|
Thanks for the write-up Toro! The timing is awesome. I just picked these up at the dealer yesterday, and plan to install today!! Where did you get the little thumb screwdriver?
Thanks again! |
|
|
|
|
02-04-2017, 09:15 AM
|
#10 | |
|
Drives: 2017 Camaro SS Convertible 50th Join Date: Nov 2016
Location: Ojai, CA
Posts: 340
|
Quote:
http://www.sears.com/craftsman-3-pc-...7&blockType=G7 |
|
|
|
|
|
02-04-2017, 05:59 PM
|
#11 |
|
Drives: 2017 Hyper Blue Camaro 2SS Join Date: Aug 2016
Location: Grayling Michigan
Posts: 90
|

|
|
|
|
|
06-06-2017, 09:35 AM
|
#12 |
|
The Go Fahst Girl

Drives: 17 2SS Join Date: Jun 2010
Location: Houston
Posts: 161
 |
Thanks to your write up I was able to do this on my own. Appreciate it!
__________________
CMRA Novice #904
Team Chasing Danger #91 "Go FAHST or go Home" |
|
|
|
|
06-16-2017, 01:23 PM
|
#13 |
|
Enigma

Drives: 2017 ZL1 Hyper Blue A10 Join Date: Feb 2010
Location: Bethel Island California
Posts: 11
|
Thanks for the write up. My front and rear guards came yesterday from shopchevyparts. Installing them on my ZL1 today. Your post will be helpful. I chose the GM painted splash guards because I don't care for the look of the other rock guard options that look like a piece of black plastic stuck on the car. These splash guards are expensive but hopefully worth every penny. I purchased these primary for a rock protection, I will never drive my ZL1 in rail and avoid water whenever possible.
In your opinion do these splash guards offer much protection from rock chips? |
|
|
|
|
06-16-2017, 01:53 PM
|
#14 |
   
Drives: S O L D Join Date: Aug 2016
Location: Ontario
Posts: 2,106
|
GREAT write up! Thank you for taking the time to share. MUCH appreciated.... Considering getting these soon......
__________________
Club F1FTY
2017 2SS 50th Anniversary Convertible Borla S-Type exhaust NPP| GM CAI | Color matched GM side skirts | Color matched 3rd brake light | Big Worm Graphics smoked out tail lights & rear reflectors | Oracle ghosted side markers | LED License plate bulbs | Door striker covers | Jam handle | Engine emblems from RiverCity Creations | 50th Center Console | Black bow ties | Hawk Performance ceramic brake pads | ZL1 Start button | CQuartz ceramic paint finish | Novistretch bra | S O L D |
|
|
|
|
|
|
|
|
Post Reply
|
|
|


