You are browsing camaro5 

|
 05-29-2012, 06:50 PM
|
#1 |
    
Drives: 2010, 2LT, RS, 6M, ABM (#1893) SOLD Join Date: Mar 2011
Location: Willits, CA
Posts: 1,437
|
DIY V6 Mace ported IM/25mm spacer/porting heads install
i received my ported IM from Mace today, so i started the tear down. Here is a partial step by step, i will update as i go, i am going to paint the ported IM and also port the intake ports on the heads so it will take a bit between updates, but let's get this party started.
i took a lot of before pics, i won't bore you with those, we have all seen our engine bays!! i started by removing the engine cover and then my SLP intake tube.   then unplug the harness from the TB, and remove the 4 bolts with a 10mm wrench of your choosing. i used 1/4 drive ratchet and socket. set TB aside, then i popped off the little clips that hold the rear part of the cover on, then fished it out of the engine bay, a little tricky!! then disconnect all the hoses (3) and clip (1) holding stuff to the IM.   there is a bracket at the front of the engine that needs to be removed, (2) bolts, 10mm wrench. there is also a bolt holding a harness bracket on the pass side of the IM, also a 10mm wrench required. next i removed the 8 bolts holding the plenum cover on, 10mm wrench. then the 4 bolts that go through the cover to the heads, 13mm wrench. then you can remove the cover after removing the bolts, the rear bolt wouldn't come all the way out, so leave it in while you wiggle the cover out. this gives you a bit better access to the rear bolts that are horizontally installed. this is where a 13mm ratcheting box wrench with a swivel head works well, but mine hasn't arrived yet!!! i used an open end wrench to break them loose, then a crows foot by hand to take them the rest of the way out, worked ok, but the swivel wrench will be much appreciated!!  remove the 2 remaining bolts that have a 13mm head, at this point the IM should come right off, just make sure you have all the hoses and stuff disconnected.   there was a bit of oil in the intake, i guess i'll be adding a catch can soon as well. here is a pic of the gasket sitting on the head ports, i will be fixing this myself, stay tuned for that.  quick shot of the ports of the Mace IM versus stock. stock;  Mace; 
|

|

|
|
05-29-2012, 07:44 PM
|
#2 |

Drives: Beest Join Date: Aug 2011
Location: Indy
Posts: 660
|
great idea! Thanks for this write up as many of us v6 owners will be doing these mods
|
|
|
|
|
05-30-2012, 01:28 PM
|
#3 |
|
Drives: 2010, 2LT, RS, 6M, ABM (#1893) SOLD Join Date: Mar 2011
Location: Willits, CA
Posts: 1,437
|
received the spacers today, picked up some hardware for the brackets, will post details later, got to go give the IM a bath to prep for paint!!
|
|
|
|
|
05-30-2012, 02:53 PM
|
#4 |
|
Drives: 2010, 2LT, RS, 6M, ABM (#1893) SOLD Join Date: Mar 2011
Location: Willits, CA
Posts: 1,437
|
ok, after a thorough cleaning with simple green, the IM is drying.
note; good idea to mark the spacers so you know which one goes where after you start porting them. if you are skipping this step, then it doesn't really matter. i marked mine with an arrow pointing up at the rear face, they can't be switched accidentally now. i'll also mark the gaskets so they cant be switched around. (probably overkill, but oh well!) i am using 2 oem IM gaskets, one below the spacer, and one above. you have to trim off the little cone shaped alignment bosses on the gasket going below the spacers. i used a side-cutter to snip the little legs off and an exacto blade to trim the flash away so the cones would separate. i used an exacto miter saw to trim the alignment nipples off the gasket that goes above the spacers.  then i dry fit everything to see how much porting will be needed on the spacers...wow, quite a bit!! next i have to scribe the spacers so i know how far to grind them open!! |
|
|
|
|
05-30-2012, 03:32 PM
|
#5 |
|
Drives: 2010, 2LT, RS, 6M, ABM (#1893) SOLD Join Date: Mar 2011
Location: Willits, CA
Posts: 1,437
|
spacers marked;
up to .1" in spots. time to go throw a first coat on the IM |
|
|
|
|
05-30-2012, 04:00 PM
|
#6 |
    
Drives: 2017 1SS 6spd Join Date: Jan 2011
Location: Utah
Posts: 2,869
|
Nice work- I'll enjoy and learn from your progress!
Thanks for taking the time and effort! 
|
|
|
|
|
05-30-2012, 05:35 PM
|
#7 |

Drives: LLT Machine Join Date: Nov 2011
Location: VIC/AUS
Posts: 563
|
Wow....thank you for the write up. Now maybe this can save me some time?
  Nice job lee! Jay@TEAM MACE USA/TEAM LLT! Direct email: Velocityport410@gmail.com |
|
|
|
|
05-30-2012, 08:07 PM
|
#8 |
|
Account Suspended

Drives: camaro Join Date: Aug 2011
Location: east coast
Posts: 570
|
did you have to use any rtv at all or did you just place it on the 25mm?
|
|
|
|
|
05-30-2012, 08:23 PM
|
#9 | |
|
Drives: 2010, 2LT, RS, 6M, ABM (#1893) SOLD Join Date: Mar 2011
Location: Willits, CA
Posts: 1,437
|
Quote:
|
|
|
|
|
|
05-31-2012, 01:39 PM
|
#10 |
|
Drives: 2010, 2LT, RS, 6M, ABM (#1893) SOLD Join Date: Mar 2011
Location: Willits, CA
Posts: 1,437
|
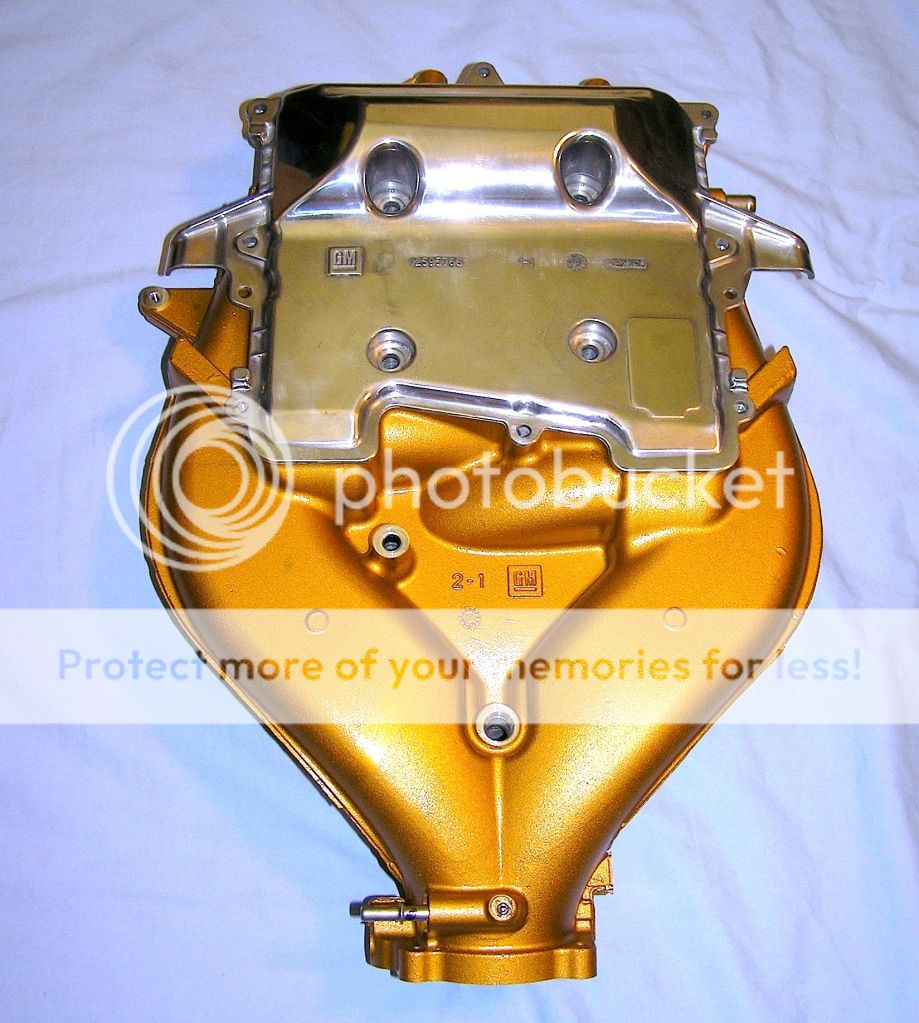
i had some left over paint from my calipers, so i sprayed it on the IM yesterday. let it sit overnight and baked it for an hour today.
i went a little crazy!!! i wasn't planning on going nuts polishing the plenum cover....really!!! i was just going to hit it with some 600 grit and polish it to get some shine...but the Marine in me took over....went back to 220 grit and started sanding, after about 2 hours this is what i have;  i am still going to continue the polishing process, to 320, 400, and 600 grit before hitting it with the polishing wheel!! |
|
|
|
|
05-31-2012, 05:05 PM
|
#11 |
|
Drives: 2010, 2LT, RS, 6M, ABM (#1893) SOLD Join Date: Mar 2011
Location: Willits, CA
Posts: 1,437
|
a bit more polish; not show quality by any means, i'll probably hit it a bit more tomorrow.
|
|
|
|
|
05-31-2012, 06:31 PM
|
#12 |
|
Always bet on Black

Drives: 2011 turbo LS, 2012 f 150, Join Date: Nov 2010
Location: Concord Nc
Posts: 1,983
|
The jarhead in me is screaming second best not good enough. With that said you know marines dont half-step. That looks awesome.
Sent from my iPad using Tapatalk HD
__________________
 |
|
|
|
|
05-31-2012, 07:11 PM
|
#13 |
|
Drives: 2010, 2LT, RS, 6M, ABM (#1893) SOLD Join Date: Mar 2011
Location: Willits, CA
Posts: 1,437
|
thank you!
|
|
|
|
|
06-01-2012, 03:18 PM
|
#14 |
|
Drives: 2010, 2LT, RS, 6M, ABM (#1893) SOLD Join Date: Mar 2011
Location: Willits, CA
Posts: 1,437
|
didn't do much today, frikkin' hot!!
polished the plenum cover a bit more. went to look at removing the plastic wiper trim at the back of the firewall, pretty easy, except it is adhered to the firewall, and if you pull it off, it won't save you more than about 1/16", plus you'll have to deal with the edge of the sheetmetal instead of the fairly forgiving plastic. i'll leave it on. i still have to gasket match the spacers and the head ports, then i can begin the re-assembly. hopefully by the end of the weekend???? and i have to make the bracket spacers for the rear horiz bolts in the back, and the one in the front, i have what i think will work, just have to test them before posting the details. |
|
|
|
|
|
|
|
 |
| Tags |
| llt, mace, manifold, ported intake, spacer |
|
|


