You are browsing camaro5 

|
 09-26-2012, 10:29 AM
|
#1 |
|
Perma Grinning
Drives: 2012 Tom Henry Racing ZL1 Join Date: Feb 2012
Location: Schaumburg, IL
Posts: 452
|
ZL1 Canard Project ( AKA Splash Guard )
Items & Tools needed 18 x 12 Dura Flex splash guard set ( purchased from Pep Boys ) Black Sharpie Tin Snips Torx Bit / Driver ( forgot the size ) Four Small Office Binder Clips Drill & Bit Electrical Tape Slip Clips Belt Sander & 80 Grit Belt I wanted to try my best to come up with a decent looking solution to protect the side of my new ZL1, other than wrapping the entire car in film . . . On the back wheel well of the ZL1 GM designed a canard that does provide protection from flying rocks, so I used that part as the basis of my design. There is not much material to the factory rear canards, so buying a set of those and modifying to fit did not appear to be an option, so . . . I purchased a set of 18 x 12 Dura Flex Splash Guards. (Pic 1) Ideally I would like the material to be a little thicker so as to create the rounded edge like the factory canard, but this will suffice for now.  Using a section of corrugated cardboard I created a rough template by tracing the rear facing canard on the back wheel well. With the piece of card board I adjusted the shape and height of the shield to fit my liking and the curvature of the front fender. The bottom of the template aligns with the bottom of the factory rocker. (Sorry no Pic) I then traced the final card board template onto the clear package face of the splash guards, using the clear material I was able to trace the thin line of the inside fender lip and locate the two factory torx bits. (Sorry no Pic) I used the small office binder clips to temporarily hold the template on the car as I worked. To test the appearance, I used black duct tape on the clear template to see how it looked. Bumble Bee is watching my progress . . the two factory torx screws that I removed are laying on the counter. (Pic 2)  Trace your final template onto each of the splash shields and mark the two screw holes needed. Note if your splash shields have one textured face make sure to cut a right and left canard. (Pic 3 & 4)   Carefully cut out each shield with the tin snips, (Pic 5 & 6)   Rough shape of new canard (Pic 7)  For drilling and finishing the edges I clipped the right and left splash shield together with the small binder clips (Pic 8)  Drill the two holes for the factory screws, I used my drill press but a hand held unit will be just fine. (Pic 9)  Sand the rough edges of the shields smooth. I started with my little Mouse sander and that was too slow so I used an 80 grit belt sander and that worked great. (Pic 10) Sand splashes until desired shape and finish of edges is complete.  Here is the end result of the cut and sanded canards (Pic 11)  To install, turn the wheel all the way to the left or right (depending on which side you mount first). Here you can see the holes where the factory torx bits are removed. The small tab of electrical tape marks the height of the shield. Although really hard to see in the pic, I lined the fender lip with a strip of electrical tape to protect the paint from any possible chafing from the installed shield. (Pic 12)  Mount the bottom of the shield to the car with the two original torx bits, and use two slip clips to secure the remaining section of splash shield to the fender. These clips were laying around in my spare bits tins from an old set of splash guards, I assume you can buy something from the auto parts store. (Pic 13)  Finished mounting. The clips I have are pretty big, I want to find something a little smaller, but if not, I will paint the clips black later (Pic 14)  Drivers side finished (Pic 15 & 16)   Repeat the mounting process on the passenger side (Pic 17)  Mounted view passenger side (Pic 18) 
|

|

|
|
09-26-2012, 10:39 AM
|
#2 |

Drives: 2014 Z/28 #82+#192, 18ZLE 66Nova Join Date: Oct 2008
Location: By the lake in AZ
Posts: 15,719
|
Nice work, but that will fit all gen5 Camaro's.
|
|
|
|
|
09-26-2012, 11:32 AM
|
#3 | |
|
Perma Grinning
Drives: 2012 Tom Henry Racing ZL1 Join Date: Feb 2012
Location: Schaumburg, IL
Posts: 452
|
Quote:
It should. . . nothing else is really different between the models. |
|
|
|
|
|
09-26-2012, 06:26 PM
|
#4 |
    
|
nice work...... I work in schaumburg how much installed?
__________________
Laus Deo
|
|
|
|
|
09-26-2012, 07:00 PM
|
#5 |
|
#TeamBeckyD

Drives: 2017 HBM 2SS Convertible A8 Join Date: Aug 2008
Location: Apopka, FL
Posts: 10,496
|
Great work Andy I think I need a set of those

__________________
 #TeamBeckyD #TeamBeckyD**FIFTY HBM 2SS VERT** |
|
|
|
|
09-26-2012, 07:49 PM
|
#6 | |
 
|
Quote:
Sent from my PG86100
__________________
 |
|
|
|
|
|
10-05-2012, 04:17 PM
|
#7 |
 
Drives: 1981 Z28 // 2010 1SS LS3 Join Date: Aug 2011
Location: Winnipeg, Canada
Posts: 254
|
This is awesome! Was just about to pull the trigger on some factory molded quarter flares but I think I wanna try this out now in the front, with the stock ZL1's in the rear! Cheaper and looks wayyy better.
|
|
|
|
|
10-13-2012, 06:58 PM
|
#8 |

Drives: 13 AshGray M6 ZL1 w/Nav/ECF/Sunroof Join Date: Aug 2012
Location: Galveston, TX
Posts: 76
|
Thank you so much for the idea!!! Here's how mine turned out
The materials cost less than the 18pack of beer I bought.
I got the flaps from Autozone, but O'Reily and Advance also have them. Use the transparent package casing to trace on the wheel well where you want to make the cuts and mark the screw placement with a sharpie. The clips are actually black but the camera flash made them look somewhat white/unpainted. I used 2 different sized clips. Bottom clips are #6 Wide Speed Nut (bigger), top clips are 10x11/32 U-Type (smaller). I got the clips at Lowes, and they are not an exact perfect fit but they get the job done. I used my belt saw to cut out the flaps and my drill press for the screw holes and smoothed out the inside rough edge with 150 grit sand paper. The outside of the flaps have the factory finish since I only cut on the inside of the flap. I didn't want them to sick out further or look larger than the rear flaps so they are just a little more narrow. Disregard the date stamp on the pics, I need to update my camera clock  . .By the way, this was VERY EASY to do, you don't have to be an Engineer, but it helps !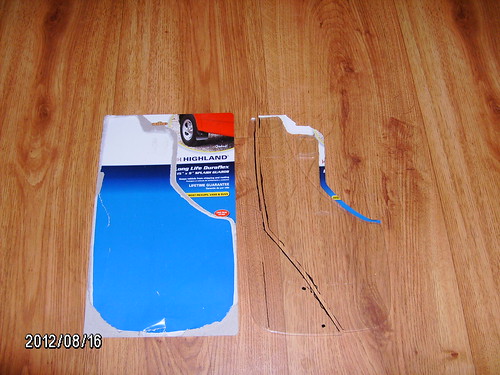 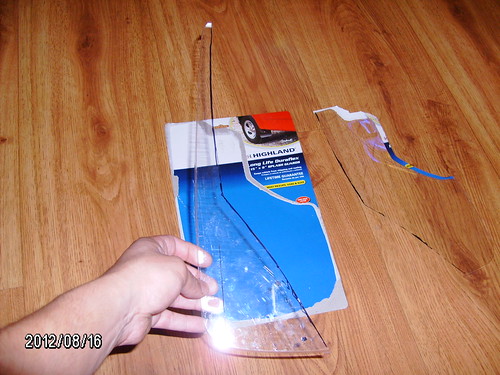 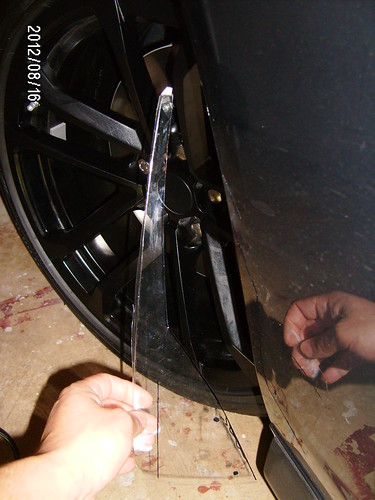 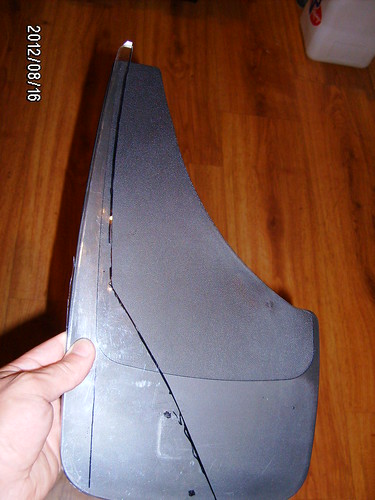 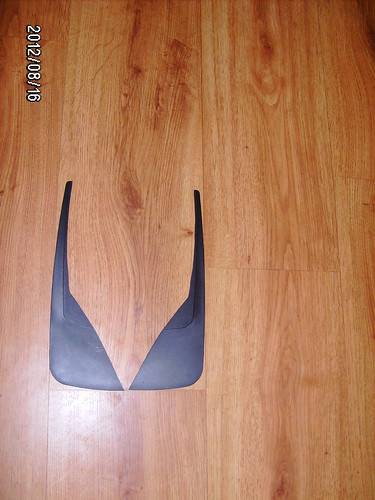 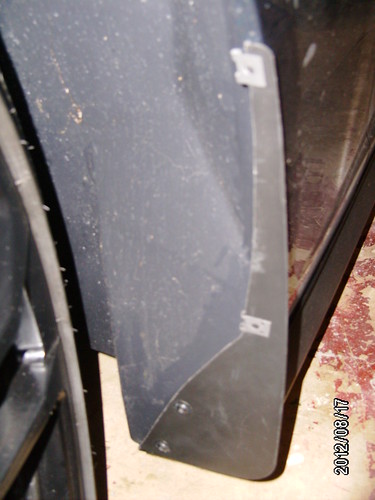 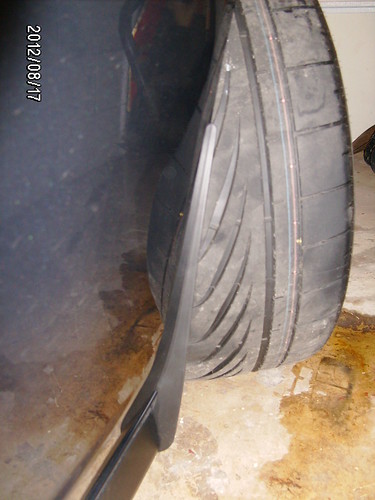 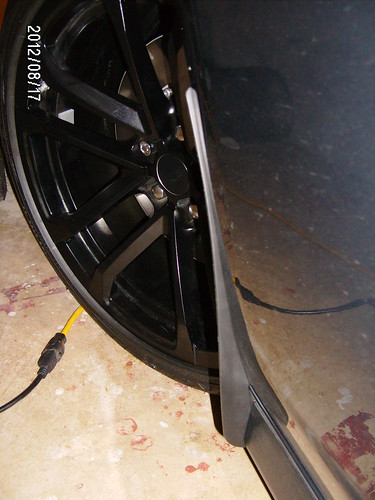
Last edited by shiner98; 10-13-2012 at 08:36 PM. |
|
|
|
|
10-13-2012, 07:58 PM
|
#9 |

Drives: 2013 2LT Camaro Join Date: Jun 2012
Location: Austin
Posts: 239
|
Hi,, I am not able to remove the screws that are shown in this pic. What tool did you use to unscrew them?? |
|
|
|
|
10-13-2012, 08:17 PM
|
#10 |
|
NEcamaro5

|
Torque Bits. Maybe a #7
|
|
|
|
|
10-13-2012, 08:29 PM
|
#11 |
|
Drives: 13 AshGray M6 ZL1 w/Nav/ECF/Sunroof Join Date: Aug 2012
Location: Galveston, TX
Posts: 76
|
I used a Torx T-20
It's a Torx fastener. I used size T-20 with a 1/4" drive ratchet. No extension.
Do not overtighten because these fasteners go into the factory plastic ground effects! You do not want to strip the plastic threads!!! |
|
|
|
|
10-13-2012, 09:58 PM
|
#12 |
 
Drives: 2011 2LT RS Join Date: Apr 2010
Location: Kansas
Posts: 331
|
I did mine today as well. Turned out fantastic and I couldn't be happier! Thanks for saving my gills and the little bit of sanity I have left!
__________________
 |
|
|
|
|
10-13-2012, 11:08 PM
|
#13 | |
|
Drives: 2013 2LT Camaro Join Date: Jun 2012
Location: Austin
Posts: 239
|
Quote:
Thanks |
|
|
|
|
|
10-13-2012, 11:24 PM
|
#14 |
|
Drives: 13 AshGray M6 ZL1 w/Nav/ECF/Sunroof Join Date: Aug 2012
Location: Galveston, TX
Posts: 76
|
Advance Autoparts has the flaps for 2 bucks less than Autozone. ~$7.99 vs. $9.99. I should of went to Advance first
|
|
|
|
|
|
|
|
 |
|
|


