You are browsing camaro5 
|
|
 01-14-2011, 11:50 AM
|
#1 |

Drives: 2010 1SS Join Date: Jan 2010
Location: Tampa, FL
Posts: 1,002
|
BMR Subframe Connector Installation How-to
I was thinking about this the other day and realized that a lot of people may be intimidated by the complexity of this installation when, in fact, it is probably one of the easiest and quickest mods you can do to your new Camaro. Once the vehicle is supported, the whole process can be done in as little as an hour!
If interested, follow along as we show you how simple it is to install our SFC015 subframe connectors on your 2010+ Camaro. NOTE: It is recommended to perform this installation with the suspension loaded. It is possible to use drive-on ramps as long as the full weight of the vehicle is resting on the wheels/tires and the suspension is fully loaded. Required Tools: • 3/8” ratchet • 15mm socket • 3/8” Allen wrench or Allen socket Installation Procedure: 1. Lift vehicle. 2. Using a 15mm socket, remove the four bolts that secure the OE driveshaft tunnel brace and remove the brace. (see IMAGE 1) 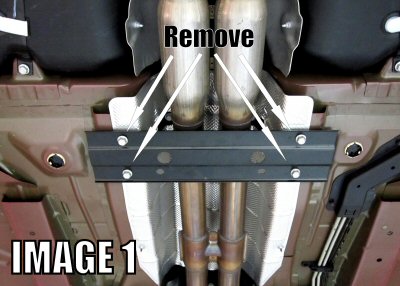 3. Locate the 2 sets of frame inserts provided with your BMR Subframe Connectors. The smaller of the two fits the rear frame rails and the larger fits the front rails. As shown in Image 2 below, slide the smaller insert up through the oblong frame hole and into the frame rail. It should fall rearward, then can be positioned over the existing holes as in Image 3. 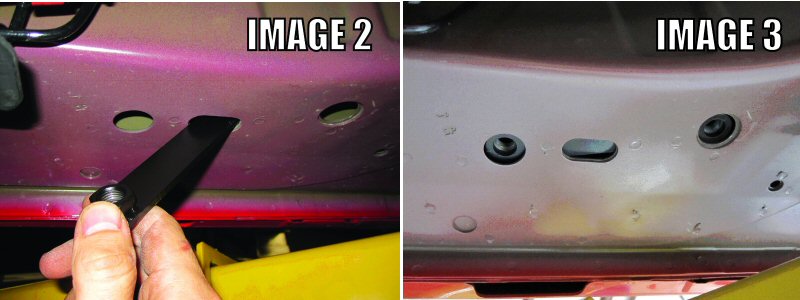 4. Slide the larger front frame inserts into the front rails and position them over the existing frame holes as in Image 4 below. 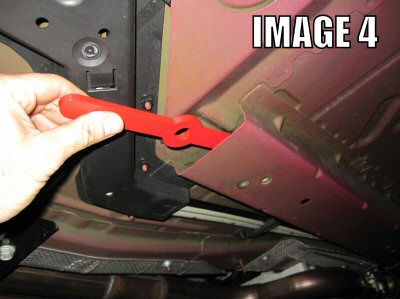 5. Choose a side and hold a subframe connector up into place as shown in the last image on the following page. Insert (2) of the supplied ½” Allen bolts and washers into the rear-most bolt holes and (1) into the most forward bolt-hole. Thread the 10mm bolts into the remaining holes. Do not tighten any of the bolts until all six bolts are partially threaded in. NOTE: a screwdriver or tapered alignment tool may be used to line up the bolt holes. 6. Once all bolts are inserted, tighten the ½” Allen bolts to 45 ft/lbs. 7. Remove the (2) 10mm tunnel brace bolts that were installed in step 5 above. 8. Repeat steps 5-6 for the other subframe connector. 9. If re-using the factory tunnel brace, it is necessary to modify the brace for re-installation. Begin by measuring 2” from each end and marking the tunnel brace for cutting. As shown in Image 5, cut along the previous mark using a bandsaw, hacksaw, or cut-off wheel. Re-install tunnel brace over the subframe connectors and thread the 10mm bolts back into place. Tighten bolts to 48 ft/lbs. NOTE: BMR heavy duty tunnel brace shown below is highly recommended to take full advantage of the subframe connectors. When using this brace, no modifications are necessary. 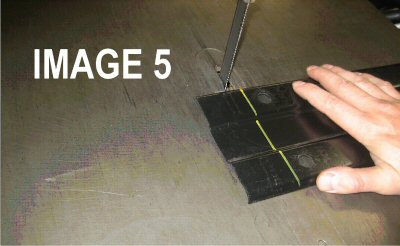 10. Lower vehicle. 
Last edited by BMR guy; 04-18-2011 at 10:49 AM. |

|
|
04-17-2011, 08:09 PM
|
#2 |

Drives: 10 SS,11 SS Pace, 13 ZL1 IOM Join Date: Oct 2008
Location: Pennsylvania
Posts: 1,735
|
Do these pieces fit the 2011 Convertible?
|
|
|
|
04-18-2011, 10:58 AM
|
#3 |
|
Drives: 2010 1SS Join Date: Jan 2010
Location: Tampa, FL
Posts: 1,002
|
We have not had the opportunity to test fit a set yet. At first glance they appear to be compatible, despite all the additional bracing on the convertible, but we can't recommend them until we have the opportunity to test the compatability.
|
|
|
|
04-20-2011, 11:48 PM
|
#4 |
|
Drives: 10 SS,11 SS Pace, 13 ZL1 IOM Join Date: Oct 2008
Location: Pennsylvania
Posts: 1,735
|
Any idea when you might have an answer? I have a customer waiting to place an order.
|
|
|
|
04-21-2011, 12:00 AM
|
#5 |
|
Quit being a pu$$y

|
I have a convertible, hint, hint.
__________________
|
|
|
|
04-21-2011, 11:08 AM
|
#6 |
          
Drives: Race Car Join Date: Sep 2009
Location: Seffner, FL
Posts: 6,226
|
Well bring it to Florida so we can do the install and make the instructions! You better get on the road because it is a long trip. Hopefully we will have an answer for you convertible guys very soon.

|
|
|
|
04-29-2011, 07:54 PM
|
#7 |
|
Drives: 10 SS,11 SS Pace, 13 ZL1 IOM Join Date: Oct 2008
Location: Pennsylvania
Posts: 1,735
|
Hey BMR guys, we just installed these on a friends 2011 Convertible and they fit perfect. Only thing he said his tech did was add a washer in the area of the rear diagonal support braces. He will be sending me pics shortly and I will post them. Sounds like you will only Maybe have to add a couple spacers to your hardware kit and it will work with both coupe and convertible. LCA, TRE's and DTB fit with no mods as well.
|
|
|
|
04-30-2011, 10:06 AM
|
#8 |
|
|
Installed a set on my 2010 a few weeks back. The installation was quite easy and straightforward. One thing that could have been easier was the nut plates you slip into the channel were difficult to keep in place while attempting to install the bolts. Do not know how that could be eliminated, just was a pain.
|
|
|
|
05-02-2011, 07:25 PM
|
#9 |
|
So Cal Race Team

Drives: 2013 Camaro Join Date: Mar 2010
Location: Sunny So Cal
Posts: 3,584
|
Bought mine, got them installed, much more fun at Autocross....More parts and then even more fun...
__________________
 |
|
|
|
05-05-2011, 04:38 PM
|
#10 |

Drives: 2011 1LT/RS A6 RJT SuperCharged Join Date: Mar 2011
Location: 87114
Posts: 3,501
|
I had these installed today and the mechanic had difficulty with one of the frame insert mounting holes. The instructions tell to use a 10mm bolt threaded into the hole just behind the front-most mounting hole (step 10 on the OP post, the two silver bolts located near the bottom of the picture). The hole in the mounting brace is non-threaded so the bolt would free spin, we had to locate a nut to attach the bolt to the frame rail as well as use a larger washer. The supplied one were too small and would be pulled through the space when tightened. The 10mm also wouldn't thread when attaching the BMR Tunnel Brace, so I ended up using the stock ones. Did anyone else who installed these experience these issues? Overall I'm happy with the added firmness to the rear-end.
|
|
|
|
05-06-2011, 11:07 AM
|
#11 | |
|
Drives: 2010 1SS Join Date: Jan 2010
Location: Tampa, FL
Posts: 1,002
|
Quote:
|
|
|
|
|
05-06-2011, 11:07 AM
|
#12 | |
|
Drives: 2010 1SS Join Date: Jan 2010
Location: Tampa, FL
Posts: 1,002
|
Quote:
|
|
|
|
|
05-07-2011, 12:49 AM
|
#13 |
|
Drives: 2011 1LT/RS A6 RJT SuperCharged Join Date: Mar 2011
Location: 87114
Posts: 3,501
|
My Camaro is a 2011 1LT RS. Yeah, it didn't have a threaded insert. I hate small little changes made to vehicle like this. What should have been a 45min job ended up being 1-1/2 hours.
|
|
|
|
05-07-2011, 12:59 AM
|
#14 | |
|
Drives: 10 SS,11 SS Pace, 13 ZL1 IOM Join Date: Oct 2008
Location: Pennsylvania
Posts: 1,735
|
Quote:
|
|
|
|
|
|
|
|
 |
|
|
 Similar Threads
|
||||
| Thread | Thread Starter | Forum | Replies | Last Post |
| BMR Subframe Connectors: $249.95 at Apex Motorsports!!! | Apex Motorsports | Suspension / Chassis / Brakes | 11 | 10-08-2010 11:44 AM |
| BMR Lowering Springs - How It's Made | BMR Suspension | Suspension / Brakes / Chassis | 40 | 06-22-2010 11:32 AM |
| Subframe Bush Upgrades. From Simple DIYer to Full Race Capable | Info@PeddersUSA.com | Suspension / Brakes / Chassis | 16 | 05-03-2010 10:29 PM |
| BMR SUBFRAME CONNECTORS | Robert@LateModelSpeed | Exterior Parts & Accessories | 0 | 05-03-2010 01:05 PM |
| New to Suspension (look over list please) | Brokenlizrd | Suspension / Brakes / Chassis | 19 | 04-24-2010 12:31 AM |


 <-----
