You are browsing camaro5 

|
 03-20-2017, 09:58 PM
|
#1 |
|
Guest
|
Coolant Leak at Fitting on Engine Block
Hello,
I'm new to the forum - so Hi! My wife bought a 2011 Camaro SS back in December 2010. To date, things have been very good. All I have done is regular maintenance work - brakes, tires, oil+filter, air/cabin filters. That's really it. The car has only 62K miles, and is no longer under warranty due to time. Over the past few months, I found a few colored drops of fluid on the garage floor, and initially I thought they were transmission fluid, as they looked red. As of last Sunday, I finally put the car up in the air and traced the leak to a fitting on the engine block, where I believe an oil cooling line passes into the engine. This is a very slow leak right now. During my waiting time to get my forum account authorized here, I found other references to this issue, and I found the TSB for this issue (attached). I've also attached my picture, which is not unlike the other people's pictures posted a few years ago. Now, today I contacted GM Priority Care, to see if they really care, and they responded with a big middle finger. They even claimed the car's VIN number was not part of the set of cars exhibiting this issue. I guess that just makes us lucky, or I must be imagining the leak.  I have the option of taking the car to the dealership to see what they say, taking the car to an independent shop (Austin TX area), or simply trying to handle it myself. I am interested in hearing what you folks would suggest, as this is actually my first real need to repair the car since purchase. Thanks! |

|
|
03-20-2017, 10:06 PM
|
#2 |
         
Drives: 2010 Inferno Orange 2SS/RS Join Date: Apr 2010
Location: Clermont, IN
Posts: 3,297
|
Yep....an old tsb for a cross threaded fitting. Got mine done a few years back and that was at the tail end. If it were me, I'd just get it done and forget about it.
__________________
2010 Inferno Orange 2SS/RS M6 Black Leather, Sun Roof, OBX Headers, Borla touring axle back, Cold Air Inductions CAI , non synthetic fluids, BMR total bushing upgrade/1" lowering springs, DSE 32mm rear sway bar. GM fe4 shocks/struts/LCA's, AAM 3.91 diff, Vertini RFS1.8 20x9 +30. Conti ExtremeContact Sport 275/35/20. sjm autoprod ABL dash kit. Mike Norris tuned 413/419.
Avenging Orange: 43 years of not buying into the Hype........and damn proud of it!! https://youtu.be/9JD9it6SmB8 https://youtu.be/xmelTlEzI34 KICKING CANCERS ASS SINCE 2015!! |

|
|
|
03-20-2017, 10:06 PM
|
#3 |
 
Drives: 2010 2SS M6 Join Date: Nov 2012
Location: SE Michigan
Posts: 266
|
If you can find a good dealership "good luck", they should take care of it for you cause it's a known issue but trying to find a dealership that will actually take the time to care about its customers is getting hard to come by.
__________________
Mods: SW Retro Chambered cat back, CAI cai black, APEX scoop and ww tank, RX catch can, APEX Skip-shift Eliminator, Hurst short throw, Speeddawg knob, Kooks 1 7/8 headers high flow cats, BMR trailing arms and toe rods, Livernois dyno tune, ZL1 grill and side skirts.WHP: 415 WTQ: 407
|
|
|
|
|
03-20-2017, 11:07 PM
|
#4 |

Drives: 2010 2SS Join Date: Apr 2010
Location: Washington
Posts: 677
|
That's an aluminum fitting. I took this fitting out, prior to selling the engine, and the threads galled on both in the block and the fitting. Luckily there was enough thread in the block to allow for a steel plug to be screwed in.
You may want to consider having GM replace the fitting. |
|
|
|
|
03-21-2017, 07:36 AM
|
#5 |

Drives: 2014 2SS/RS Join Date: Dec 2014
Location: Raleigh, NC
Posts: 1,053
|
Is it possible this is just a leak at the coolant seal and not on the threaded fitting?
Here is a picture of the coolant line removed from that fitting with arrow pointing to the end that plugs in to the fitting; held in place with the plastic cap/collar. Have you checked to see if it leaking at that quick disconnect joint at the fitting? 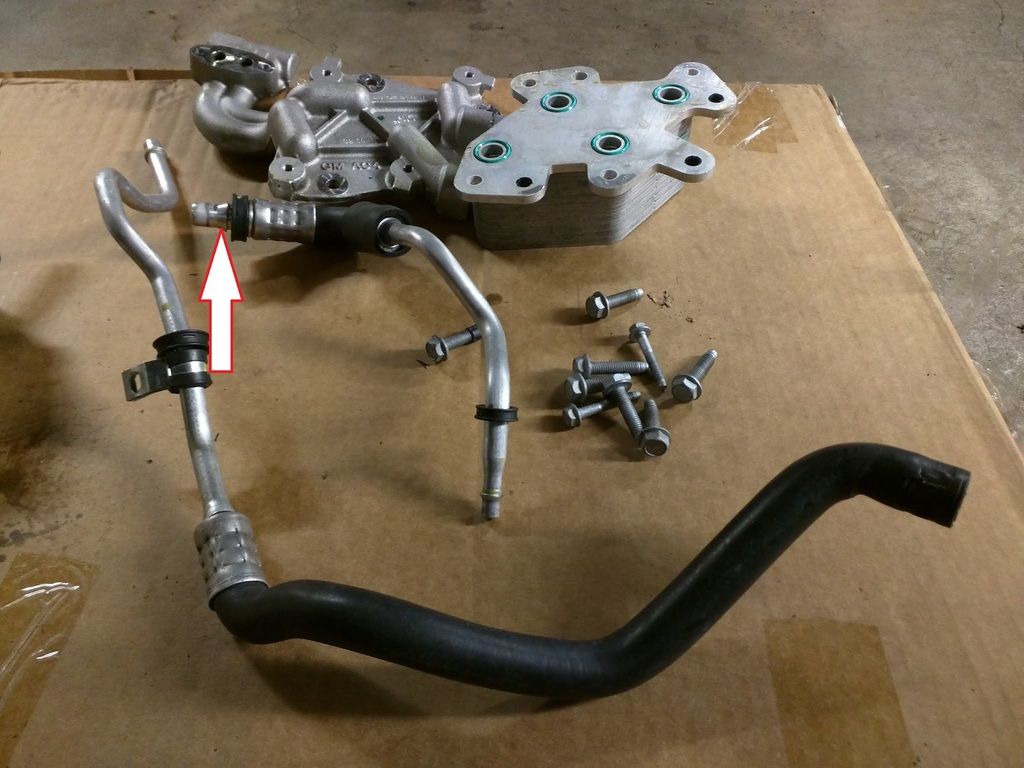 Ron
__________________
2014 2SS/RS, Z28 CAI and High Wing Spoiler, ZL1 5.1:1 Ratio Short-Throw Shifter, ZL1 Pedals, ZL1 splash guards, NPP Dual-mode quad tip exhaust, Z28 strut tower brace, Camaro LED Cup-holders with footwell Lighting option, Leather visors, and Leather E-brake boot. Chevy dealer sponsored 67 retro SS nose stripe package.
 |
|
|
|
|
03-21-2017, 11:34 AM
|
#6 | |
|
Drives: 2010 Inferno Orange 2SS/RS Join Date: Apr 2010
Location: Clermont, IN
Posts: 3,297
|
Quote:
__________________
2010 Inferno Orange 2SS/RS M6 Black Leather, Sun Roof, OBX Headers, Borla touring axle back, Cold Air Inductions CAI , non synthetic fluids, BMR total bushing upgrade/1" lowering springs, DSE 32mm rear sway bar. GM fe4 shocks/struts/LCA's, AAM 3.91 diff, Vertini RFS1.8 20x9 +30. Conti ExtremeContact Sport 275/35/20. sjm autoprod ABL dash kit. Mike Norris tuned 413/419.
Avenging Orange: 43 years of not buying into the Hype........and damn proud of it!! https://youtu.be/9JD9it6SmB8 https://youtu.be/xmelTlEzI34 KICKING CANCERS ASS SINCE 2015!! |
|
|
|
|
|
03-21-2017, 11:38 AM
|
#7 | |

Drives: 2011 2SS/RS M6 Join Date: Oct 2015
Location: Utah
Posts: 1,940
|
Quote:
|
|
|
|
|
|
03-21-2017, 06:29 PM
|
#8 |
 
Drives: 2013 Camaro SS and 2014 SS Sedan Join Date: Jan 2013
Location: Las Vegas, NV
Posts: 308
|
My 2013 was doing that...dealership fixed it
__________________
2016 Lexus GS-F
2014 SS Sedan #2577/3537 2013 Camaro 2SS/RS. 2013 Camro ZL1 Vert 2009 Dodge Daytona Charger #332/400 |
|
|
|
|
03-21-2017, 07:51 PM
|
#9 |

Drives: 2012 M6 Camaro SS (RIP) Join Date: Nov 2014
Location: Virginia
Posts: 1,684
|
My car started running hot about a month ago and I checked my coolant level. It was damn near empty, I think the radiator took about 3/4 of a coolant bottle, and I've kept an eye on mine ever since. It doesn't seem to be losing coolant, and I don't have any drops under my car when I park.
I was made aware of this issue as it may leak slowly, but idk what to think. It may have been natural evap considering I never checked the coolant and my car is at ~66K miles. Have you noticed any significant loss in coolant? I figure at my next oil change I'll be checking this as well, if it's a pain to swap I'll just add coolant every year or so if needed
__________________
Speed engineering 1 7/8 LTs, CAI inc Cold Air Intake, offroad connectors, Solo performance axle back with J pipes, tune, and in need of a driver mod LOL
|
|
|
|
|
03-25-2017, 10:39 AM
|
#10 |
|
Guest
|
Thanks for all the replies. I did need to add about 1 qt. of coolant. This was actually the first time I had to remove the radiator cap, and that was frankly not easy as it was installed dry and very, very tight. Kind of like taking off the first oil filter. I almost felt like I was going to break the cap trying to remove it.
I do almost all work on my cars myself. I studied the TSB and am in process of getting the tap, just in case I have to clean the threads. Does anyone have the part number for the fitting that should be replaced? The TSB does not list the part number. Thanks, James Last edited by JamesU; 03-25-2017 at 10:51 AM. |
|
|
|
03-25-2017, 10:46 AM
|
#11 |
|
Guest
|
And I apologize for my naivety here, but I don't have much exposure to this system. Is this an Oil Cooling line, that passes through the water jacket of the engine block? Is that why it leaks coolant, not oil? Seems like this is also an opportunity for oil & water to mix, if there is another seal in there somewhere. Just guessing, I don't know how long this type of fitting has been in use by GM.
Thanks, James |
|
|
|
03-29-2017, 10:50 PM
|
#12 | |
|
Drives: 2014 2SS/RS Join Date: Dec 2014
Location: Raleigh, NC
Posts: 1,053
|
Quote:
Did you determine exactly where the leak is? From the threaded side of the fitting or the quick disconnect side? When you get the replacement fitting maybe the seal is removable and can be swapped in to old one if you do not need to disturb the threaded side on the engine block. If you are going to remove the threaded side of the fitting from the block would be a good idea to have the engine stone cold since it is aluminum (like when changing spark plugs). Maybe someone in the forum here that has the shop manuals can provide the torque spec. Ron
__________________
2014 2SS/RS, Z28 CAI and High Wing Spoiler, ZL1 5.1:1 Ratio Short-Throw Shifter, ZL1 Pedals, ZL1 splash guards, NPP Dual-mode quad tip exhaust, Z28 strut tower brace, Camaro LED Cup-holders with footwell Lighting option, Leather visors, and Leather E-brake boot. Chevy dealer sponsored 67 retro SS nose stripe package.
|
|
|
|
|
|
03-30-2017, 03:08 AM
|
#13 |
|
"BEASTM*DE"

|
Regardless of what the tele rep said I would take it to a Chevy dealer and let them run the VIN per TSB, worst case is they will not repair it, benefit you will know the exact part needed...
__________________
Vengeance Racing Stage 1 Kit 575rwhp, 569 rwtq...
Rims powder coated gloss black...BFG'S Comp 2 A/S... Dual 10" Kicker Comp S Subs 1200w...  |
|
|
|
|
05-05-2017, 10:29 AM
|
#14 |
|
Guest
|
Just to close the loop on this thread...
I ended up buying the fitting from Chevrolet and replacing it myself. The fitting is GM 22912546. Currently retails for $29.21, but you can find it for less online. It will require a 34mm socket, which is a bit of an oddball size. I bought a socket from Amazon for about $9 after hitting up some local stores and not finding it. You will also lose about a gallon (or maybe a bit more) of coolant doing this job, so be prepared to have coolant available. And lastly, I have fat forearms and it was tough reaching into the engine compartment in this area, but I got it done. Took me about 2 hours, and the car fought me at almost every step along the way. Description of the steps I took: 1. Slide the black plastic cap back along the hose to reveal the spring lock. 2. Use a sharp pry tool or something sharp, and work the spring out of the fitting on the car (you will have the spare part in hand at this time and you can see how it works). In my case I used a small pry tool to get it started then finished it off with a 1/4" flat blade screwdriver. Remove the spring completely. 3. Pull the hose straight out of the engine. It may be tight at first. Wiggle only a little, but at this point with the spring gone, you are only fighting the internal O-ring inside the fitting. 4. Coolant will gush out. Maybe there's a cleaner way to manage this, but I chose not to disconnect the lower fitting on the hose and drain it there since I was trying to avoid disconnecting any of these spring lock connections which were already good. 5. Feed a 1/2 drive socket wrench with a 12" extension and the 34mm socket from the direction of the front wheel, over the frame, and you can get on the fitting completely straight. Take out the existing fitting. In my case, this is where I first learned that my leaky fitting was leaky because it was loose, not cross-theaded. 6. Take out the old fitting and hand thread in the new one. This was the only part of the job that made me a bit uneasy about the fix, because this thing threaded in almost too easy. Just by hand, I was able to thread it in until it bottomed out. I could feel the pre-installed sealant on the fitting adding friction, but nonetheless I would have felt better had it been a tighter fit. Once it bottomed out, I put the wrench on it and tightened it good. 7. Now, insert the hose fitting. Get it straight, and push. Push hard. And if pushing hard doesn't work, then I suggest gently tapping it in with a tool against metal crimp joint with the rubber along the top edge of the hose. With a few taps it will begin to spread the spring and go in. You should be able to see the spring when it closes down behind the flange on the hose, then you are done. 8. Slide the black plastic cap back from the hose over the new fitting. 9. Follow the coolant refill procedures you see online. Please don't run the engine too long as it takes a few On/Off cycles to force the engine to take in and replace the fluid lost. It is very easy to overheat your engine as it is almost void of coolant at the end of this job, while your radiator still looks full. After two weeks, I saw no signs of a drip anymore. Thanks, James |
|
|
|
|
|
|
 |
|
|


