Camaro5 Chevy Camaro Forum / Camaro ZL1, SS and V6 Forums - Camaro5.com
 
TireRack
Go Back   Camaro5 Chevy Camaro Forum / Camaro ZL1, SS and V6 Forums - Camaro5.com > Engine | Drivetrain | Powertrain Technical Discussions > Camaro V8 LS3 / L99 Engine, Exhaust, and Bolt-Ons


Reply
 
Thread Tools
Old 07-26-2014, 07:34 PM   #1
flaguy
 
flaguy's Avatar
 
Drives: 2014 2SS RS Spring Edition
Join Date: Mar 2008
Location: Ga
Posts: 230
For anyone that's installed an air scoop for their intake

Where exactly do i dremel? I've seen all the threads that show pictures...and read all the how to's and instructions from apex...but everything references the two "fins" to use as a guide as to where to cut.

Problem is....mine does not have those fins...it's completely flat. I have a 2014 SS. Did this change?
flaguy is offline   Reply With Quote
Old 07-26-2014, 09:08 PM   #2
Pluto

 
Pluto's Avatar
 
Drives: 2013 Camaro 2SS/RS
Join Date: Jun 2013
Location: South Texas
Posts: 1,198
I believe it did change for the 2014 I'm sure one of these 2014 owners will chime in...but you're cutting the plastic right behind the lower grill
__________________
2013 VR Camaro 2SS/RS LS3

Small, but effective mod list:

Roto-Fab Intake, TSP 2" Long tubes, TSP catless mids, MSD spark plug wires, stock catback, Elite Catch Can, APEX washer relocation and scoop, VMAX throttle body, Diablo InTune-Tuned by Matt@FSP, and a JacFab license plate bracket.
Pluto is offline   Reply With Quote
Old 07-26-2014, 10:23 PM   #3
F-16 Camaro
 
Drives: 2010 Camaro 2SS Black
Join Date: Jun 2013
Location: Alamogordo, NM
Posts: 608
Temp mount the scoop and eye ball where to cut.

If you miscut it will most likely be hidden after the scoop install
F-16 Camaro is offline   Reply With Quote
Old 07-26-2014, 10:37 PM   #4
rdrfronty
 
rdrfronty's Avatar
 
Drives: 2019 ZL1 1LE CRUSH
Join Date: Jun 2013
Location: Texas
Posts: 298
Quote:
Originally Posted by F-16 Camaro View Post
Temp mount the scoop and eye ball where to cut.

If you miscut it will most likely be hidden after the scoop install
Agreed. I just did the Apex scoop last week on my 14' and it was really straight forward what and where to cut once you put you scoop into place. From what I seen of the 2010-2013, it looks like the 14's are even easier. All look simple though. The scoop mounting at the horn bolt location was by far the biggest pain for me. Wasn't hard persay, just a little tricky getting to it to start and tightening it up.
rdrfronty is offline   Reply With Quote
Old 07-26-2014, 10:38 PM   #5
62nalide


62nalide's Avatar
 
Drives: 2013 SS
Join Date: May 2013
Location: DFW
Posts: 4,102
Same as the 2010-2013s I installed an ADM Race intake on one easy and simple
62nalide is offline   Reply With Quote
Old 07-27-2014, 10:26 AM   #6
Apex Motorsports
 
Apex Motorsports's Avatar
 
Drives: 2000 Camaro SS
Join Date: Feb 2010
Location: Louisville, Ky.
Posts: 25,165
Quote:
Originally Posted by flaguy View Post
Where exactly do i dremel? I've seen all the threads that show pictures...and read all the how to's and instructions from apex...but everything references the two "fins" to use as a guide as to where to cut.

Problem is....mine does not have those fins...it's completely flat. I have a 2014 SS. Did this change?
Quote:
Originally Posted by F-16 Camaro View Post
Temp mount the scoop and eye ball where to cut.

If you miscut it will most likely be hidden after the scoop install
Quote:
Originally Posted by rdrfronty View Post
Agreed. I just did the Apex scoop last week on my 14' and it was really straight forward what and where to cut once you put you scoop into place. From what I seen of the 2010-2013, it looks like the 14's are even easier. All look simple though. The scoop mounting at the horn bolt location was by far the biggest pain for me. Wasn't hard persay, just a little tricky getting to it to start and tightening it up.
Yes, that panel is different on the 2014s. With it being flat there is nothing there to reference for the cuts. It is pretty clear where it needs to be cut though. Just start smaller than you thing you need it and then open it up as needed. You are not going to hurt anything if you make it a little too big.
Apex Motorsports is offline   Reply With Quote
Old 07-27-2014, 10:59 AM   #7
flaguy
 
flaguy's Avatar
 
Drives: 2014 2SS RS Spring Edition
Join Date: Mar 2008
Location: Ga
Posts: 230
Thank you everyone, I just kind of winged it and errored on the side of caution. Turns out i did it perfectly. But, I don't see the point of the horizontal cut. I just cut straight down vertically and completely removed the piece. Fit perfectly, and the scoop lined up perfectly with the bottom of the opening in the bumper.

Here is the piece i cut out. (Don't judge the cut lol...i filed the edges!)
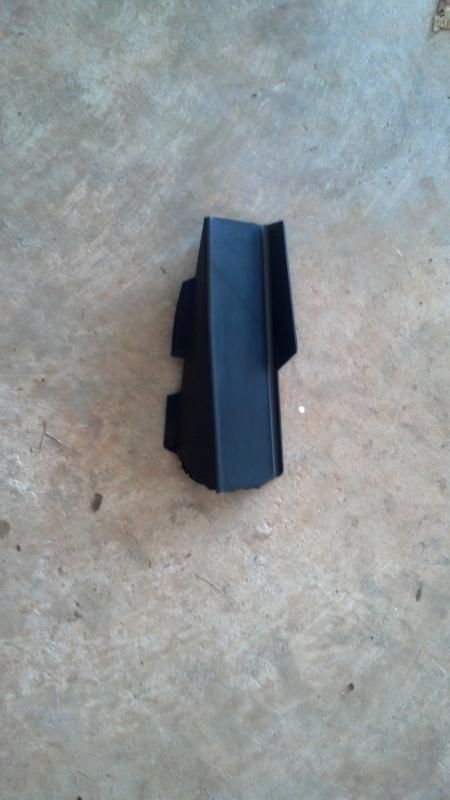


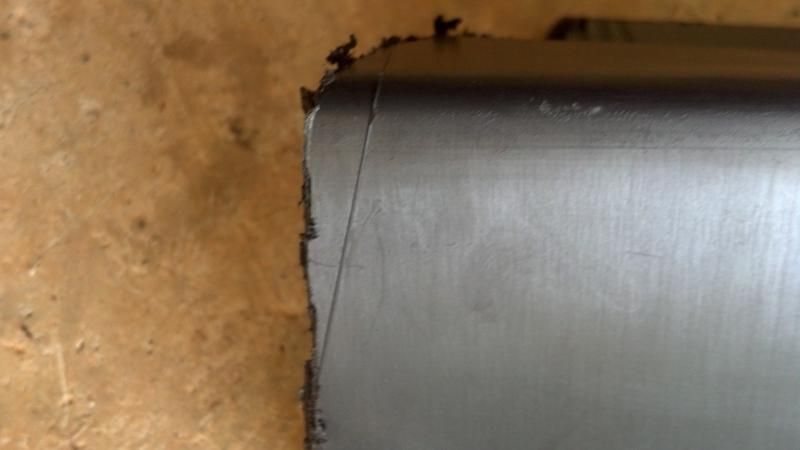
Also, there is KIND OF a reference point on the 2014. There is a diagonal line instead of those two fins. I pretty much cut vertically down the center of the diagonal line. I wish I would have taken a pic before the cut, but you can kind of see the line in this pic:


As far as the intake/scoop...the sound alone made the intake worth it. Butt dyno honestly doesn't feel much difference. There is quicker throttle response though. Again, sound alone made this piece worth it. (Note I installed CAI intake and Apex scoop/washer relocation kit at the same time)

Thanks again everyone.
flaguy is offline   Reply With Quote
Old 07-27-2014, 11:13 AM   #8
flaguy
 
flaguy's Avatar
 
Drives: 2014 2SS RS Spring Edition
Join Date: Mar 2008
Location: Ga
Posts: 230
And here is the scoop from the outside.


Close up of why you don't need a horizontal cut. It lines up perfectly with the bumper opening and extends well past the drivers side edge of the opening.

flaguy is offline   Reply With Quote
Old 07-27-2014, 11:58 AM   #9
Tenring

 
Tenring's Avatar
 
Drives: 2014 2SS/RS - SIM
Join Date: Apr 2014
Location: Arizona
Posts: 2,188
It seemed the ADM scoop fit a little more precise/tight on the 14, than earlier years. As said there is no reference as to where to cut. This is at the angel of the scoop and how far back/side to cut. I made two cuts, the first was a safe judge on the angle and then after checking fit, just opened it up a little.

Nice how to and pics flaguy!.
Tenring is offline   Reply With Quote
Old 07-27-2014, 01:06 PM   #10
Apex Motorsports
 
Apex Motorsports's Avatar
 
Drives: 2000 Camaro SS
Join Date: Feb 2010
Location: Louisville, Ky.
Posts: 25,165
Quote:
Originally Posted by flaguy View Post
And here is the scoop from the outside.


Close up of why you don't need a horizontal cut. It lines up perfectly with the bumper opening and extends well past the drivers side edge of the opening.


Looks good.

Apex Motorsports is offline   Reply With Quote
Old 07-27-2014, 04:43 PM   #11
Camaro Dude


Camaro Dude's Avatar
 
Drives: ‘13 1LE
Join Date: Jul 2013
Location: Earth
Posts: 3,904
Quote:
Originally Posted by flaguy View Post
Where exactly do i dremel? I've seen all the threads that show pictures...and read all the how to's and instructions from apex...but everything references the two "fins" to use as a guide as to where to cut.

Problem is....mine does not have those fins...it's completely flat. I have a 2014 SS. Did this change?
Dremel is preferable, but a really sharp knife and some patience will do the trick as well .
Camaro Dude is offline   Reply With Quote
Old 07-28-2014, 10:59 AM   #12
Apex Motorsports
 
Apex Motorsports's Avatar
 
Drives: 2000 Camaro SS
Join Date: Feb 2010
Location: Louisville, Ky.
Posts: 25,165
Quote:
Originally Posted by Camaro Dude View Post
Dremel is preferable, but a really sharp knife and some patience will do the trick as well .
The dremel makes life a lot easier.
Apex Motorsports is offline   Reply With Quote
 
Reply


Posting Rules
You may not post new threads
You may not post replies
You may not post attachments
You may not edit your posts

BB code is On
Smilies are On
[IMG] code is On
HTML code is Off

Forum Jump


All times are GMT -5. The time now is 01:58 PM.


Powered by vBulletin® Version 3.8.9 Beta 4
Copyright ©2000 - 2025, vBulletin Solutions, Inc.