You are browsing camaro5 
|
|
 02-05-2017, 10:56 AM
|
#43 | |
 Drives: . Join Date: Jun 2016
Location: .
Posts: 589
|
Quote:
The sale was a private sale from a member on here, I have no way to verify the exact previous usage, but from what I understand he didn't use the car hard. He even swapped out the Trofeos to Nitto NT05s from new. There is no sign of abuse on these tyres, they still have the rubber moulding dimples. No stonechipping to rear quarters. I do wonder is someone at a loading yard during the journey could have slipped the hell out of it trying to get it up a ramp or something? But I'd be very surprised if they managed to totally destroy a brand new friction plate doing that?! 1) Maybe it's glazed now and it will come back with a bit more driving? Maybe it wont? 2) Maybe it's got air in somehow (it's a 2014 car so has obviously spent long periods standing) and needs new fluid / bleeding? How easy is this to do with only axle stands (no 4 post lift) 3) Is there anything on the clutch switch/electronics side that can be reset to default or anything on the OBD readout that can give you a wear reading on the clutch? |
|

|

|
|
02-05-2017, 12:10 PM
|
#44 |
|
Drives: . Join Date: Jun 2016
Location: .
Posts: 589
|
To answer my own point #2
I just found a significant amount of water condensation on the underside of the fluid reservoir cap. Also the reservoir tank showed signs of a small leak indicating cap not sealed or tightened maybe. The fluid is nasty and dark so will get that flushed out and bled through with some fresh fluid ASAP. Fingers-crossed this may resolve the clutch issues. Also attached a couple of pics of Uh-0o in her new home 
Last edited by pat_t; 11-24-2021 at 04:00 AM. |
|
|
|
|
02-05-2017, 01:12 PM
|
#45 |
|
Raging Bull Reborn

Drives: '09 CGM Z063LZ '15 RH Z/28 #0631 Join Date: Mar 2012
Location: Broken Arrow OK
Posts: 765
|
pat
over at Corvette Forum, they came up with the "Ranger Method " of changing the clutch fluid. It basically involves extracting as much as you can from the reservoir with a large syring and a thin plastic tube. You then fill the reservoir, you pump your clutch 25 to 30 times, which mixes the new fluid with the nasty stuff still in the clutch reservoir. Repear step one with the syringe/tube... Pump clutch... Repeat step 1..as many times as needed until the fluid is pristine, It takes like 3 or 4 times per car for me for me to do the procedure. I make sure my clutch fluid in both cars is pristine at all times; as I do this every 500 to 700 miles...shoot thats easy as it's every 10 to 14 weeks (40-50 miles per week on one or the other). Any questions..I posted a thread on Camaro 5 this section with pictures, and a search for "Ranger Method " over on the Corvette Forum yielded this: http://www.corvetteforum.com/forums/...er-method.html Cheers Mate! Below is how I do both my Z/28 and Z06. Procedure Posted below 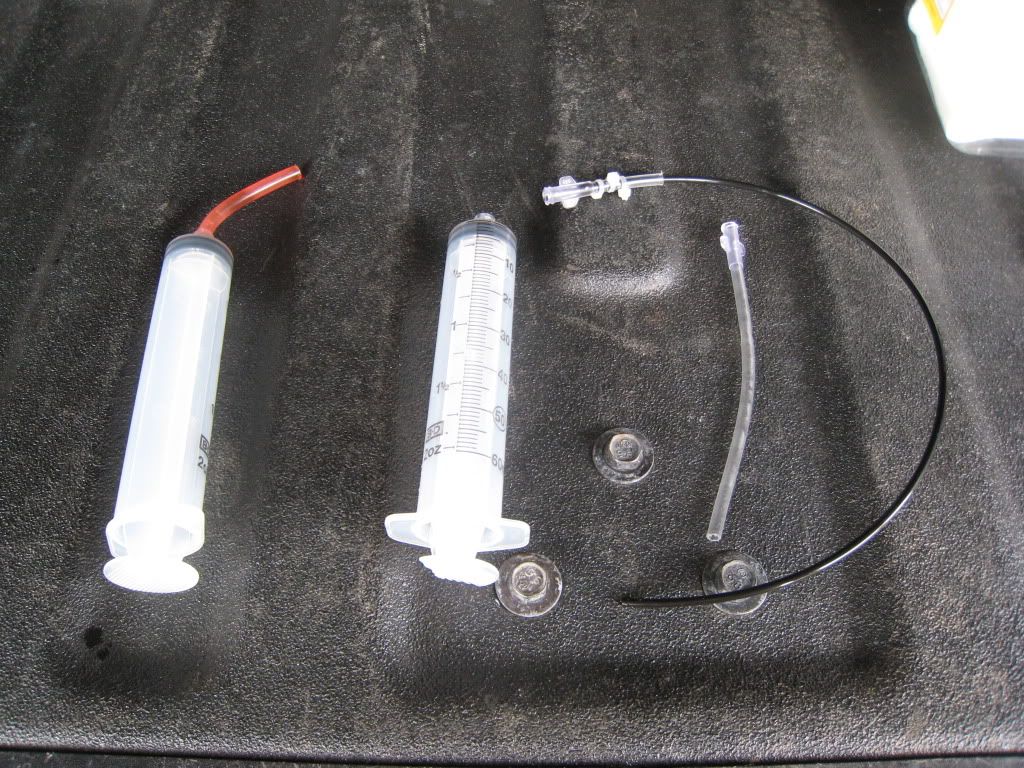 Here is my latest design that seems to work best for me. I replaced the needles with some tubing as it allows for better flow. These are 60CC Syringes. The one on the left is used to remove (suck out) bad material from the clutch reservoir. I stuck a small piece of small engine gas line into it to extend the end. The one on the right is used to inject new fluid. I found access to some tubing that has connections that screw directly into the syringe. The short piece I use to extract good fluid from the Dot 4 Brake fluid container. Once I fill the syringe with new fluid, I change tubes to the black tube. I invert the syringe and pump material to remove air. I insert the long black tube down into the reservoir feed tube at the bottom of the clutch reservoir (small hole at the bottom). Once I insert it all the way in, I inject the good material in, it then pushes the bad fluid up into the reservoir, thus cleaning out the fluid line. I then remove the material from the reservoir, and refill with good fluid. If you can't find the tubing that screws into the syringe (medical supply), then you can try the small engine gas line. Again, the intent is to remove as much as possible all of the clutch fluid. This basically eliminates the pumping one needs to do with Rangers original method, and for me, does a better job of changing out the fluid. The only way to better change the fluid is to have the system bled. Steps: 1) Use syringe to suck out fluid from reservoir (just like the ranger method) 2) Fill second syringe with new fluid. 3) Install long black tube on syringe that is filled with new fluid. 4) Invert syringe and squeeze some fluid out to purge out air from the black tubing (just like the nurse before she/he jabs ya). 5) Insert long black tube down the hole located in the bottom of the reservoir 6) Inject new fluid into clutch fluid feedline. Old fluid gets pumped up into reservior. 7) Pull out the syringe and black tube. 8) Use the removal syringe to suck the bad fluid from reservoir that used to be down in the feedline. 9) Fill reservoir with fresh fluid to fill mark. 10) Clean-up
__________________
 Toy 1 '15 RH Z/28 w/AC & Radio S/N 0631 Toy 2 '09 CGM Z06 3LZ My DD: '17 Ford Mustang GT Her DD: '14 F150 Ecoboost 3.5 |
|
|
|
|
02-05-2017, 06:14 PM
|
#46 |
 
Drives: 2015 Z/28; 1969 Camaro SS Join Date: Nov 2015
Location: York, PA
Posts: 810
|
Sorry to see your having clutch issues. I would say that based on your description it's probably not good. The fluid and throwout bearing would only effect disengagement of the clutch. Without the throwout bearing engaged you should have full engagement, no pedal engagement. I guess it's possible that the throwout bearing is not fully releasing due to a fluid issue but not likely.
Air in the system would not effect engagement. Again, may effect disengagement but not likely. Are you sure the clutch is slipping for sure? Do you get the smell? The traction control on these cars is very good meaning they jump in quickly. Is the clutch stock or aftermarket? If it smelled and over rev'ed with no tire spin then your into the clutch. I saw a video one time where they tried to power brake a Vette and the smoke show was all clutch. Rear tires never spun but lots of smoke. |
|
|
|
|
02-09-2017, 12:33 PM
|
#47 |
|
Drives: . Join Date: Jun 2016
Location: .
Posts: 589
|
Thanks Raging Bull. I bought the syringe and changed the fluid via your method and went for a couple of miles run this afternoon but the problem hasn't gone away. If anything the gear selection from stationary issue has got worse.
69L48Z27 Yes it's definitely clutch slip, can do it in 6th gear at 50mph, even a Z28 is not engaging TC then!! Also get the clutch smell when it does it. It's a totally standard clutch. 1380 miles on only. It looks like I'm going to have to take it to a garage and get the entire clutch system changed. Any recommendations... should I stick to OEM parts or upgrade anything while I am in there? |
|
|
|
|
02-09-2017, 02:05 PM
|
#48 | |
|
Drives: . Join Date: Jun 2016
Location: .
Posts: 589
|
Quote:
My issue will be proving who, when and where. The car has been through so many places on it's way here. Hauler company from Port Saint Lucie to Florida Port. Loaded on a shipping container. Florida to Antwerp (Belgium). Unloaded. Loaded. Antwerp to Felixstowe (UK). Unloaded. Loaded. Felixstowe to Southampton. Southampton to Reading. There's going to be no way I can definitively point the finger of blame at one particular firm or individual. I picked it up from Reading and drove it ~150 miles home. I suppose these risks just come with the territory when you decide to ship a car that distance :( To cheer myself up while I wait to call some garages and speak to some parts stockists I did a little mod and de-shark-finned the car. It's saves a few hundred grams from the worst possible place to put weight (up high), it's un-needed aero drag (can't get OnStar in the UK anyway) and the car looks waaaay cleaner with out it 
Last edited by pat_t; 11-24-2021 at 04:01 AM. |
|
|
|
|
|
02-09-2017, 03:05 PM
|
#49 |

Drives: Z/28 Join Date: Oct 2015
Location: NJ
Posts: 538
|
Jack the front of the car up and on the right lower side of the transmission clutch housing you will see a large 4 hole vent for the clutch. You can shine a light inside and look for any excessive dust or something out of ordinary. You should be able to get a peek at the whole clutch system. With your low miles there should be 0 clutch dust inside. Look for corrosion as well, with the car being around salt water.. Corrosion could have built up around the input shaft guide and is not letting the slave cyl/ bearing retract all the way. Just a thought..
|
|
|
|
|
02-09-2017, 04:33 PM
|
#50 |
|
Raging Bull Reborn
Drives: '09 CGM Z063LZ '15 RH Z/28 #0631 Join Date: Mar 2012
Location: Broken Arrow OK
Posts: 765
|
save the shark fin antenna for posterity, if the values skyrocket, you'll want it.
__________________
Toy 1 '15 RH Z/28 w/AC & Radio S/N 0631 Toy 2 '09 CGM Z06 3LZ My DD: '17 Ford Mustang GT Her DD: '14 F150 Ecoboost 3.5 |
|
|
|
|
02-09-2017, 04:52 PM
|
#51 |

Drives: 2015 Z/28 #397 2022 ZL1 #1799 Join Date: Jul 2009
Location: DC
Posts: 521
|
If and I mean IF you need a new clutch a C6 ZR1 twin disc clutch would work and provide some improved power handling capability. It wouldn't be absurdly expensive either.
|
|
|
|
|
02-11-2017, 11:33 AM
|
#52 | |
|
Raging Bull Reborn
Drives: '09 CGM Z063LZ '15 RH Z/28 #0631 Join Date: Mar 2012
Location: Broken Arrow OK
Posts: 765
|
Quote:
__________________
Toy 1 '15 RH Z/28 w/AC & Radio S/N 0631 Toy 2 '09 CGM Z06 3LZ My DD: '17 Ford Mustang GT Her DD: '14 F150 Ecoboost 3.5 |
|
|
|
|
|
02-19-2017, 01:26 PM
|
#53 |
|
Drives: . Join Date: Jun 2016
Location: .
Posts: 589
|
update
I've booked the car in with the best LS specialist in the UK to have a look at the clutch and replace if necessary, unfortunately they didn't have space for me until the start of March.
So frustrating as it is not being able to drive my new car, I've decided to use the time wisely and dive in and make a number of the mods that I would have done anyway. I've got my first trackday booked for Easter Friday at Angelsey in north Wales so I need to have both the clutch and the track-prep completed before then. Angelsey is one of the few tracks in the UK I've not driven at yet, as well as being probably one of the most picturesque racetracks in the whole world, so as you can imagine I'm really looking forward to that.  So I've got all the rear interior out, got the rear bumper and crash bar off. Rear tow bar will be going on, a bit of weight reduction with the rear crash bar, and sorting out a harness bar inside. Once I've finished the rear I'll move to the front and sort out a front towing eye. Here's the car as of now: Last edited by pat_t; 11-24-2021 at 04:02 AM. |
|
|
|
|
02-19-2017, 01:53 PM
|
#54 |
 Drives: 17 SS 1LE, 14 Yukon Denali Join Date: May 2015
Location: Austin, TX
Posts: 355
|
What rear tow bar will replace the crash bar?
|
|
|
|
|
02-19-2017, 02:08 PM
|
#55 | |
|
Drives: . Join Date: Jun 2016
Location: .
Posts: 589
|
Quote:
I didn't like the aftermarket ones for two reasons: 1) some of them were so lightweight that I doubted it you actually needed to use the tow hook in anger that it wouldn't bend the bar. Especially if you were being towed out of a gravel trap. 2) I noticed that the lower edge of the diffuser panel clips onto the lowermost part of the standard crash bar. All the aftermarket ones do away with this so the rear diffuser is potentially not as supported as it could be. I'm sure it works for a while, but I imagine there is additional load going through the other bumper fixings because of it. Might fatigue them over time... So instead I will mount a tow hook and lighten the standard crash bar. It's still work in progress but you get the idea. I'll post up better pictures when I'm done. Last edited by pat_t; 11-24-2021 at 04:02 AM. |
|
|
|
|
|
02-24-2017, 01:58 PM
|
#56 |
|
Drives: . Join Date: Jun 2016
Location: .
Posts: 589
|
more progress...
after many hours I've finished the rear crash bar mods.
Quite pleased with it, saves 16lbs. Includes a nice strong M14 weldnut for tow hook, and retains the all-important bottom edge which is what the rear diffuser lip clips on to. Another area I found some weight was the battery bracket (battery itself I will address in the future). Before: After: Aluminium channel, new plastic cap, downsized plastic cap screw from M8 to M6 stainless. Another 1.4lbs saved. All looks entirely factory still: That large black wheel well cover weighs a hefty 4.4lbs though, I'll probably replace with some 1-2mm carbon sheet soon.. Last job for today was making a template for headlight film. My car already has clear xpel protection film all over the front end, but I want to protect the headlights on track too. Hopefully get the rear crash bar and headlight film installed this weekend. Stay tuned for more pics 
Last edited by pat_t; 11-24-2021 at 04:03 AM. |
|
|
|
|
|
|
|
 |
|
|


