You are browsing camaro5 

|
 03-10-2016, 09:07 PM
|
#15765 |
       
Drives: 2015 Black 2LT RS M6 Join Date: Aug 2015
Location: Cali
Posts: 2,033
|
Nice
__________________
Overkill tune/E85/80mmCAI cold air intake w/my custom maf tubeApex air scoopJacFab ported intake/ExtendolaterVitesseEE EX2 catch canInnovate widebandARH HFC'sNPP exhaust11386 xpipeBrembos/cross drilled/slotted rotorsSS M/CPfadt 1.25 springs1LE struts/sways/strut tower braceBMR diff bush, trail arms/bush, adj toe linksMy custom Tunnel braceHurst short throw shifterJDP stage 1 clutch res1LE steering wheel, shift bootZL1 rear diffuser/splash guardsGM splitterZ/28 grille/flowtie/spoiler/wheelsGM performance pedals"Chevrolet" door sills10" Kicker subBigWorm overlays
|

|
|
03-10-2016, 09:35 PM
|
#15766 |

Drives: 23 LT1 / 19 Z06 / after 6 5th gens Join Date: Jan 2014
Location: MI
Posts: 2,023
|
Looks great premad. The 1st hole is the worst. Then you have no choice but to continue
__________________
"Make yourself sheep and the wolves will eat you"
|
|
|
|
03-10-2016, 10:42 PM
|
#15767 |
 
Drives: 2014 Crystal Red Tintcoat - 2LT Join Date: Dec 2015
Location: Kearney, MO
Posts: 18
|
Washed, detail sprayed and drove!
 This weekend, caliper painting!
|
|
|
|
03-10-2016, 11:41 PM
|
#15768 | |

Drives: 2015 1lt Join Date: Oct 2015
Location: Garner, NC
Posts: 43
|
Quote:
|
|
|
|
|
03-11-2016, 12:04 AM
|
#15769 |

Drives: 2010 2SS/RS L99 IBM silver stipes Join Date: Dec 2015
Location: K.C. Kansas
Posts: 1,329
|
Put a transmission cooler in.....

__________________
2010 Imperial Blue w/ Silver stripes 2SS/RS L99
Mods = Not enough.... |
|
|
|
03-11-2016, 07:02 AM
|
#15770 |

Drives: '10 T/A Conv, '10 2SS, '77 SE T/A Join Date: Dec 2015
Location: Michigan
Posts: 938
|
Got my Cradle Bushings in - what a pain!
REAR CRADLE SUB FRAME BUSHINGS - these can be removed using the 1 Socket and Torch method. Put a hydraulic jack under the Diff. I also used (4) Jack Stands for safety. Remove one 24mm Sub-Frame bolt, screw it back in 1/2" and repeat on the remaining three. Remove two sub-frame bolts on either the driver or passenger side. Lower the jack under the differential just enough to place a 1" socket in between the top of the sub-frame bush ferule. Use the second floor jack to lift the corner of the sub-frame with the socket. Add pressure once you are sure the socket is secure between the top of the bushing ferule and the 'frame' rail. Start with the Left Front. When you start to lift the car off the jack stand or Hoist/QuickJack, heat the metal that surrounds the sub-frame bushing. Keep heating until the bushing falls on the floor. Repeat on the Left Rear, you have to heat the hell out of it as it is a larger bushing. Clean the inside of the Bushing Housings in the Frame with a drill and wire wheel. Pop off the Bottom Bushing Metal Caps with a Pry Bar or Socket and extension. Install your new Bushings, I made a tool, ref the pics. Note it is very unlikely that you can use the Vehicles weight or Cradle Bolts to seat the Rear Bushings, it will strip them. Use the lube supplied with the Bushings! Screw in the Cradle Bolts at least ½. Repeat on the other side. Carefully cinch the Cradle up ensuring the Rear Dowels are aligned and the Cradle is seated, and Torque the (4) 21mm Bolts to 130 Ft Lbs. These are TTY, you should buy new! 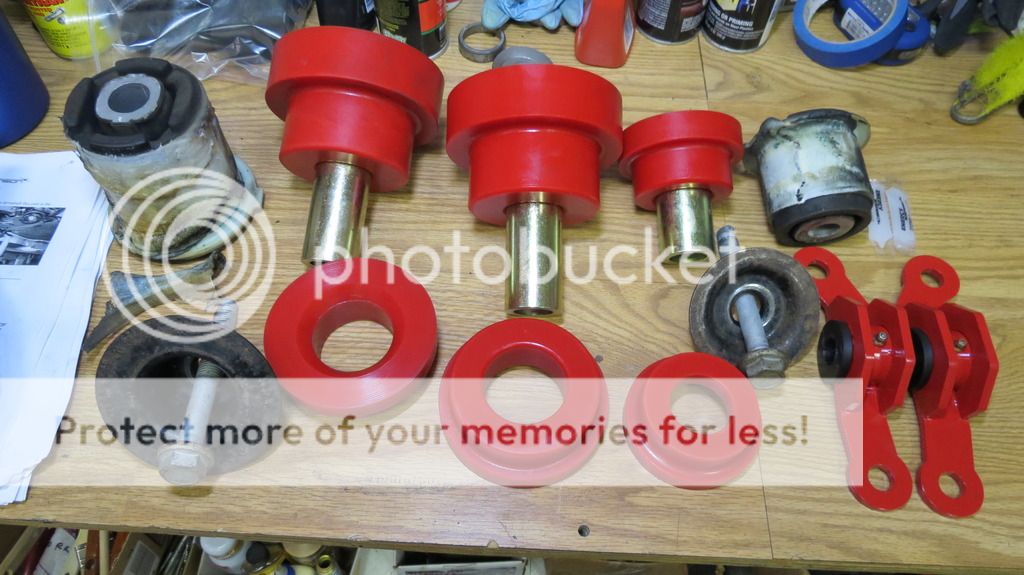 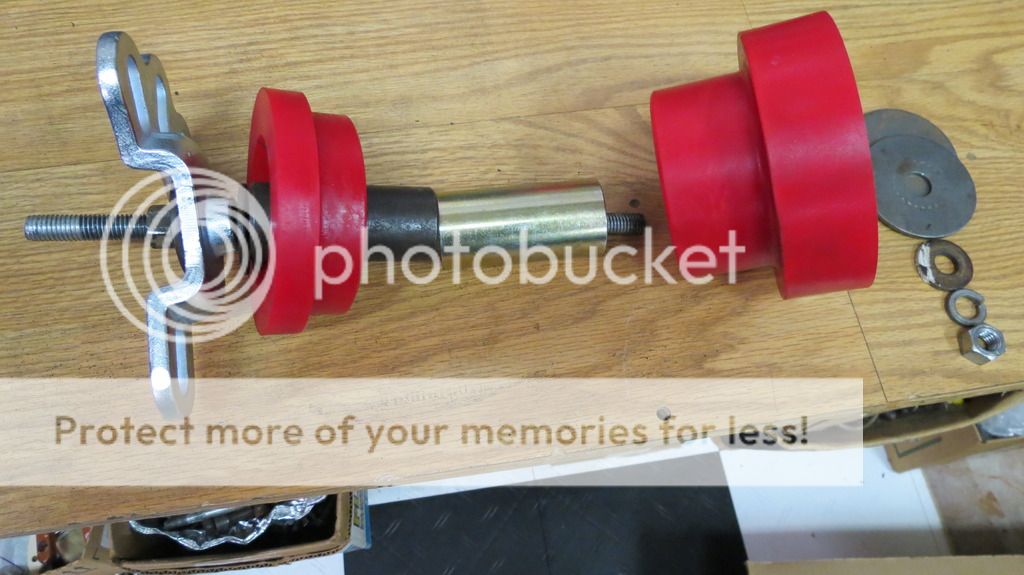  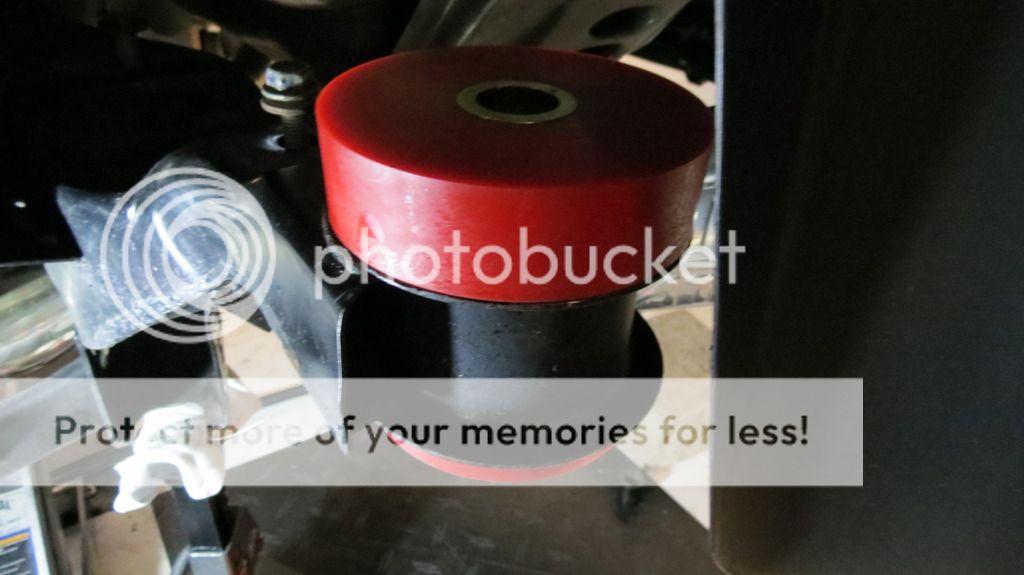 
|
|
|
|
03-11-2016, 07:13 AM
|
#15771 | |
|
Drives: 2015 Black 2LT RS M6 Join Date: Aug 2015
Location: Cali
Posts: 2,033
|
Quote:
__________________
Overkill tune/E85/80mmCAI cold air intake w/my custom maf tubeApex air scoopJacFab ported intake/ExtendolaterVitesseEE EX2 catch canInnovate widebandARH HFC'sNPP exhaust11386 xpipeBrembos/cross drilled/slotted rotorsSS M/CPfadt 1.25 springs1LE struts/sways/strut tower braceBMR diff bush, trail arms/bush, adj toe linksMy custom Tunnel braceHurst short throw shifterJDP stage 1 clutch res1LE steering wheel, shift bootZL1 rear diffuser/splash guardsGM splitterZ/28 grille/flowtie/spoiler/wheelsGM performance pedals"Chevrolet" door sills10" Kicker subBigWorm overlays
|
|
|
|
|
03-11-2016, 07:48 AM
|
#15772 |
|
Drives: '10 T/A Conv, '10 2SS, '77 SE T/A Join Date: Dec 2015
Location: Michigan
Posts: 938
|
The actual replacement of the Bushings was around 6 hours, but I take my time and am in no rush. A key point I learned is you are NOT gonna push these bushings in by hand - they are too tight. So make a tool out of threaded rod, washers, and 1" sockets like I did. Install the top hat first, then the bottom, THEN the metal insert. The bigger project was the total suspension tear down, documented in my member car journal. This took "days" for the front, and more "days" for the rear. Time to clean and paint parts to be reused, install all of the bushings, and reassemble.

|
|
|
|
03-11-2016, 07:51 AM
|
#15773 | |
|
Drives: 2015 Black 2LT RS M6 Join Date: Aug 2015
Location: Cali
Posts: 2,033
|
Quote:
__________________
Overkill tune/E85/80mmCAI cold air intake w/my custom maf tubeApex air scoopJacFab ported intake/ExtendolaterVitesseEE EX2 catch canInnovate widebandARH HFC'sNPP exhaust11386 xpipeBrembos/cross drilled/slotted rotorsSS M/CPfadt 1.25 springs1LE struts/sways/strut tower braceBMR diff bush, trail arms/bush, adj toe linksMy custom Tunnel braceHurst short throw shifterJDP stage 1 clutch res1LE steering wheel, shift bootZL1 rear diffuser/splash guardsGM splitterZ/28 grille/flowtie/spoiler/wheelsGM performance pedals"Chevrolet" door sills10" Kicker subBigWorm overlays
|
|
|
|
|
03-11-2016, 02:53 PM
|
#15774 |
|
slower than you

|
Had Jannetty Racing properly button up my catback system. I'm 100% pleased with the results. Due for a wash tomorrow.
|
|
|
|
03-11-2016, 02:59 PM
|
#15775 |
|
Drives: '10 T/A Conv, '10 2SS, '77 SE T/A Join Date: Dec 2015
Location: Michigan
Posts: 938
|
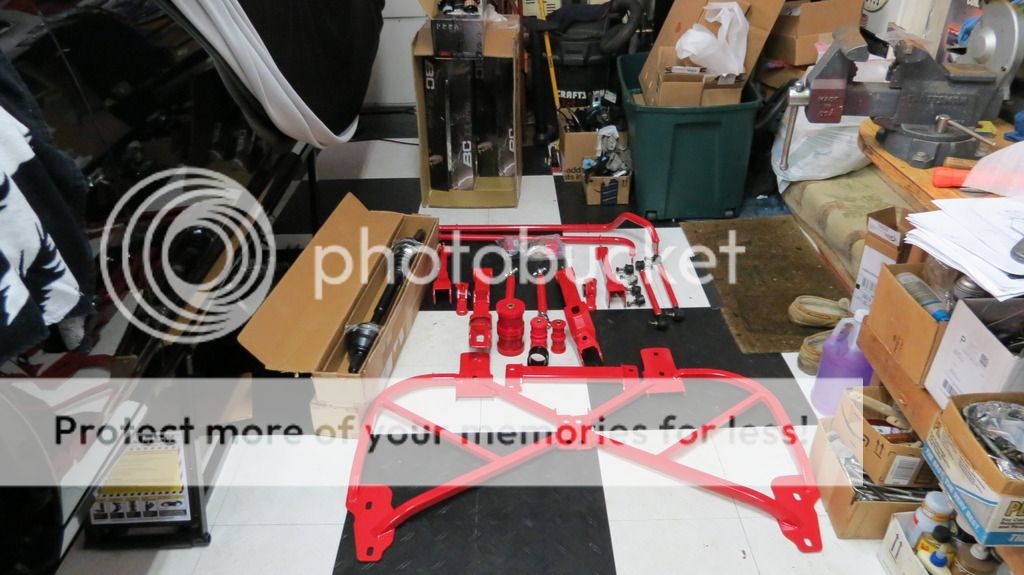
Ready to install, gotta paint a few parts first.
|
|
|
|
03-11-2016, 03:34 PM
|
#15776 | |
   
Drives: 2021 ZL1 1LE Satin Steel Join Date: Jul 2011
Location: Brownsburg, Indiana
Posts: 6,409
|
Quote:
__________________
Ryan
2021 ZL1 1LE Satin Steel Metallic Build Page: https://www.camaro6.com/forums/showthread.php?t=632481 |
|
|
|
|
03-11-2016, 09:25 PM
|
#15777 |

Drives: 14 1LT RS, 98 Firebird, 01 4runner Join Date: Mar 2016
Location: FL
Posts: 17
|
installed some accessories today
__________________
2014 Chevy Camaro 1LT RS Factory: 6spd manual * NAV * NPP Exhaust * GM Strut Bar Aftermarket: K&N CAI * 10" Kicker sub * |
|
|
|
03-11-2016, 11:26 PM
|
#15778 |
 
Drives: 2011 SGM 1SS A6 & 2014 SW 2SS/RS M6 Join Date: Jul 2014
Location: Lighthouse Point, Fl
Posts: 490
|
Waxed up for the weekend, gonna cruise the Ft Lauderdale stripe and have some fun with the spring breakers....
__________________
 Last edited by rjinotti; 01-10-2017 at 11:28 AM. |
|
|
|
|
|
|
 |
|
|
 Similar Threads
|
||||
| Thread | Thread Starter | Forum | Replies | Last Post |
| GM memo to dealers | Moose | 5th Gen Camaro SS LS LT General Discussions | 41 | 02-04-2010 07:33 PM |
| Major Pedders Event in Houston! Saturday, Jan 30th! Meet DMS | Info@PeddersUSA.com | USA - Texas | 39 | 02-01-2010 12:48 PM |
| Answeres to questions I have stumbled on | dieseldave24v | 5th Gen Camaro SS LS LT General Discussions | 13 | 02-23-2009 06:56 PM |


