You are browsing camaro5 

|
 03-14-2012, 09:04 AM
|
#533 |
|
Furious Shine
Drives: None Join Date: Mar 2011
Location: Indiana
Posts: 669
|
So has anybody found any options (other than the eBay guy) for coil brackets? I thought I had some lined up - but it does not appear to be working out, and I am getting tired of waiting..

|

|

|
|
03-14-2012, 09:38 AM
|
#534 |
|
Drives: G5.R Join Date: Sep 2010
Location: SoCal
Posts: 2,377
|
Indy, I think Vengeance was putting a kit together. Kilo-9 used a different style but didn't like that they needed two screws. Have you decided on mounting location yet?
Here is another option, just pricier: http://www.jcgrestorationandcustoms.com/parts/ Chris is a friend of my Dad. If you call him, mention "Al" 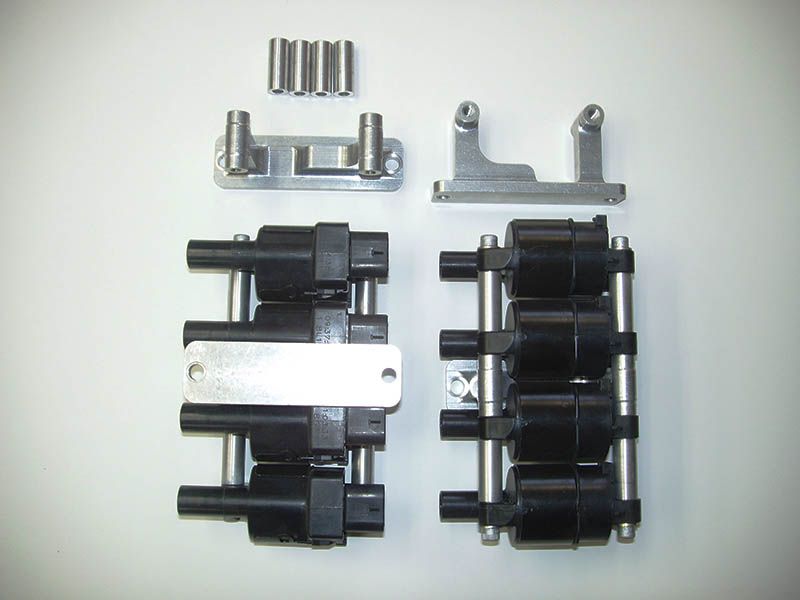
|
|
|
|
|
03-14-2012, 10:02 AM
|
#535 | |
|
aka Patrick

Drives: '10 Camaro 2SS '04 Silverado Join Date: Jan 2009
Location: Derby Kansas
Posts: 3,072
 |
Quote:
__________________
Current Modifications: Your average Bolt-ons & Suspension Upgrades
GForce Engineering: 9" Rear End, Strange Pro Iron Case w/Moser Nodular 3.70:1 Detroit locker, 3.5" Solid Drive Shaft |
|
|
|
|
|
03-14-2012, 10:04 AM
|
#536 |
|
Furious Shine
Drives: None Join Date: Mar 2011
Location: Indiana
Posts: 669
|
OK - thanks (I was actually hoping for less expensive than the eBay guy lol)! I think I am leaning towards the frame rails where I can just drill and use a self tapping screw. In the fenderwell is kind of neat, but I don't want to have to weld and that could be a pain if you need to get to them...
I actually just finished painting the engine bay last night the best I could with everything masked off, much better! I will post some pics today 
|
|
|
|
|
03-14-2012, 10:33 AM
|
#537 |
|
The New Guy

Drives: 2010 2SS/RS IBM M6 Join Date: Sep 2009
Location: Cali
Posts: 1,147
|
I have access to a machine shop and so if one of you can get all the dimensions of the coils and an idea of what you want (or just the dimensions and we can work on an idea) i may be able to make it. The only CNC equipment i have is a waterjet, but i do have a conventional mill and lathe
Let me know P.S. i also have a powder coating gun and oven to finish the parts as well 
__________________
|
|
|
|
|
03-14-2012, 11:07 AM
|
#538 |
   
|
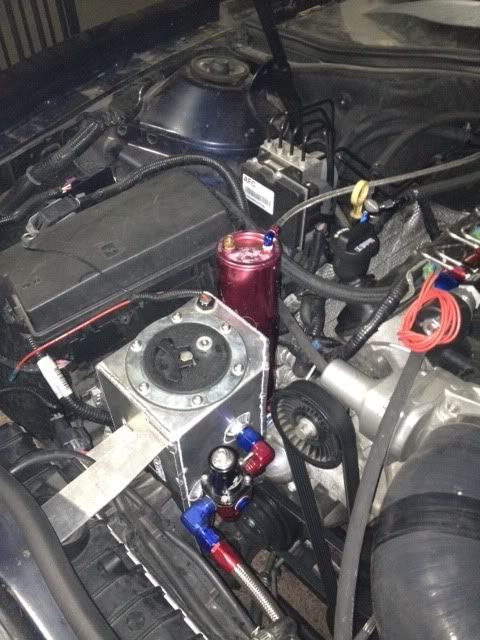
I almost hate to follow up those awesome and beautiful radiator pics with this....
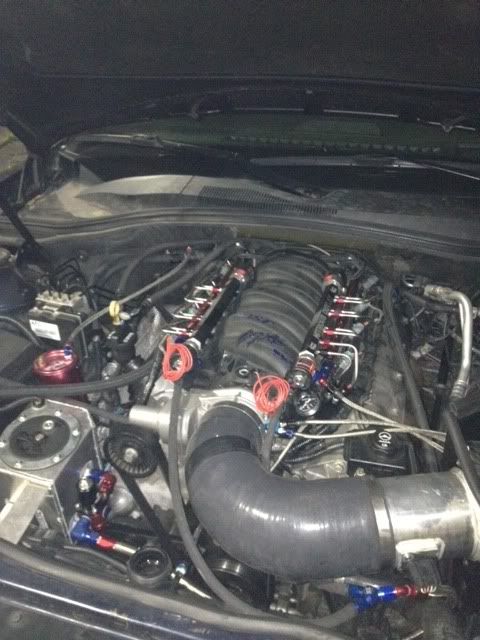
But... I get a lot of questions on how I moved my ABS module. Especially from Nathan !! LOL Please excuse the “Down and Dirty” way I did this. And for the record…I replaced the kinked brake line in the second pic and cleaned up everything and it looks much nicer now…But I just haven’t found the time to remove the tire and inner fender to take new pics of how much better it looks now. The wiring harness had to be extended 36” if I remember correctly ( sorry but its been over a year since I did this) Never had a problem since I moved it..no ABS light on the dash..no strange braking…nothing at all..you would never know it was moved. Now if I could just get motivated to move the fusebox into the trunk..LOL Here are a couple of pics. In the first pic you can see the factory bracket from the ABS that I welded in place, and you can also see the seam that i cut and rewelded to make room for the brake lines to pass through. Second pic is how it looked once I loosely assembled it all....I later removed everything and painted and replaced some of the brake lines I kinked. .
__________________
2020 Range Rover Sport HSE P525 Supercharged 5.0 - Firenze Red - 9012 wheels
SOLD 2019 Camaro SS -Wrapped in Matte Magnectic Black - Anderson Carbon Hood and Rear Spoiler Ikon front spoiler OEM ZL1 Side Rockers - ZL1 Addons Diffuser - BMR 1.0 Lowering Springs - MRR 228 Wheels 20x10 and 20x11 RIP 2016 Camaro SS https://www.camaro6.com/forums/showthread.php?t=565453 SOLD 2010 Camaro SS Featured in GM High Tech Performance and Camaro Now Magazines - http://www.superchevy.com/features/g...of-perfection/ |
|
|
|
|
03-14-2012, 03:31 PM
|
#539 |
|
Furious Shine
Drives: None Join Date: Mar 2011
Location: Indiana
Posts: 669
|
I took advantage of WAY above normal 80 degree temps here in IN (and low humidity) to repaint the engine compartment. All done with spray cans from AutomotivetouchUp.com!
I scuffed it with gray scotchbrite wiped it down with lacquer thinner, shot 3 coats of base & 3 coats of clear. You might notice I also removed & repainted the shroud for the hood latch IOM as well (had to prime that first). Got down to the frame rails best I could without removing the engine lol! Considering I barely had 1 coat of paint with no clear from the factory, this is a HUGE improvement! 
|
|
|
|
|
03-14-2012, 04:09 PM
|
#540 |
|
Dont H8 Me Cuz U Aint Me

Drives: 2016 SS Sedan, 2017 Explorer Sport Join Date: Feb 2010
Location: Tulsa, Oklahoma
Posts: 2,910
|

__________________
 |
|
|
|
|
03-14-2012, 05:06 PM
|
#541 |
 
|
Really nice job!
|
|
|
|
|
03-14-2012, 08:25 PM
|
#542 |

Drives: 2011 Camaro SS Join Date: Nov 2010
Location: Greeley, CO
Posts: 769
|
Makes it hard on us regular guys.....great job guys.
__________________
2011 Camaro SS Synergy Green
CAI Cold Air Induction, ADM Race Scoop, Apex Washer Bottle Kit, Vengeance Racing Kaotic Cam, DOD/VVT delete and LS3 conversion, American Racing LT Headers, American Racing Headers Off Road pipes, Borla S-Type Catback, FTI Billet Triple Disk 3600 rpm Torque Converter, DSS Aluminium Drive Shaft, AAC Plasma DRL's, Showstopper LED Sidemarkers,Carbon FIber Bow Ties, 35% Window Tint, Llyod's Floor Mats, JBL MS-8 Sound Processor, 2 Alpine PDX-1.600, Alpine PDX-4.100, JL Audio C5-650, JL Audio C5-650x, Alpine T10 Type R Shallow Mount, Stinger Dry Cell Battery |
|
|
|
|
03-14-2012, 09:06 PM
|
#543 |
|
Drives: G5.R Join Date: Sep 2010
Location: SoCal
Posts: 2,377
|
Wow Indy, very nice!
|
|
|
|
|
03-14-2012, 09:19 PM
|
#544 |
|
Drives: 2011 2ss/rs Join Date: Aug 2010
Location: houston
Posts: 531
|
The red can is my coolant expansion tank.
|
|
|
|
|
03-14-2012, 09:27 PM
|
#545 |

Drives: cts-v Join Date: Dec 2011
Location: Mooresville, NC
Posts: 506
|
Lookin good Indy!
Nathan, after seeing EZSPEED's setup, I'm confident it would be simpler for you to do something similar to that if keeping the engine in the car. There is definitely a lot more wiggle room to bend and form the brake lines.
__________________
|
|
|
|
|
03-14-2012, 09:37 PM
|
#546 | ||||
|
Drives: G5.R Join Date: Sep 2010
Location: SoCal
Posts: 2,377
|
Quote:
Quote:
. I might have to take you up on that offer. Quote:
Quote:
Thanks again guys for all the help! I think I said this before but I'll say it again, I really love the direction the tread has taken. My initial vision for creating this tread was so that we can all help each other by sharing experiences, ideas, etc so that others could save time, money and avoid making mistakes, etc ......And this is what it's become, a community project. So thanks again to all for making this a reality. I love this community! Time for a group huge 
Last edited by Moreno1; 03-15-2012 at 10:07 AM. |
||||
|
|
|
|
|
|
|
 |
|
|
 Similar Threads
|
||||
| Thread | Thread Starter | Forum | Replies | Last Post |
| Roto-Fab | Engine Covers - S/C | Fuse Relay Cover | Radiator Cover | Billet Oil Cap+ | AutoAgenda | Exterior Parts & Accessories | 14 | 02-06-2013 08:43 PM |
| New Texas Speed & Performance Engine Machining Center! | Trevor @ Texas Speed | Camaro V8 LS3 / L99 Engine, Exhaust, and Bolt-Ons | 18 | 01-16-2013 03:46 PM |
| Hawk Performance Brake Pads part HB247Z.575 $85.00 | Rogan | USA - Florida | 2 | 10-07-2011 12:10 PM |
| Acronyms? | KEEP RT | Camaro V8 LS3 / L99 Engine, Exhaust, and Bolt-Ons | 20 | 03-11-2011 08:57 PM |
| Great Read and Info on Oil Weight | Banshee | Mechanical Maintenance: Break-in / Oil & Fluids / Servicing | 1 | 11-23-2009 09:03 PM |


