You are browsing camaro5 

|
 12-14-2012, 11:18 AM
|
#43 |
|
Older Than Dirt

Drives: 2010 & 2013 Camaros Join Date: Apr 2010
Location: Aiken, SC
Posts: 4,686
|
With the gas mileage savings claims, even filling up twice a month on average and making a couple of other assumptons, for the price it MIGHT pay for itself in approx 2 years.
Don't know about anyone else, but I didn't worry about gas mileage when we bought ours.
__________________
2010 2SS TE, 1 of 822/2013 Camaro ZL1 vert, 1 of 54
 |

|

|
|
12-14-2012, 05:11 PM
|
#44 |
|
car enthusiasts

|
ok, this mod seems to have a few benny's. first is my engine bay seems to be cleaner. We are about 8 miles from the beach and get sand/dust/dirt more than the average person. The MPG that I listed needs to be tested again on another trip, could be a bit diffferent??? I do have a hood that lets the heat out, oil changes will be a pain. The pan should fit in the back with no issues, if you have headers then some cutting will need to be done. The clips/screws go in easy and easy to figure out where they go. The front will need some work. I drilled bigger holes for the plastic nuts on the front end to go thru. If your wondering what I'm talking about just look under the car where the small air dam is and you will see the screws/nuts that hold the item on the front end.
__________________
 |
|
|
|
|
12-14-2012, 06:43 PM
|
#45 | |
     
Drives: 2011 2SS/RS M6 VR Join Date: Aug 2011
Location: Chicagoland
Posts: 1,536
|
Quote:
__________________
 |
|
|
|
|
|
12-15-2012, 08:30 PM
|
#46 |
|
Drives: 2011 2SS/RS M6 VR Join Date: Aug 2011
Location: Chicagoland
Posts: 1,536
|
Well the belly pan is pretty much a bust on the SS. I put the car up on the lift today and found that bumper nose is apparently longer on the bottom than the ZL1's. I aligned the pan to the frame and then using masking tape drew a line on the front of the pan where the bottom of the bumper hit it. Sorry for the cell phone pic, the line is faint but you can see that the bottom edge of the bumper is about 2-1/2 inches too far back. The only way I see around this is to notch the bumper to allow the front of the pan to fit and line up
Of course you'll have to notch out for the headers, but I also noticed that on the manual trans there are some metal lines on the passenger side that will have to cut out for as well. So I'm scraping the ZL1 pan and making my own using it as a template to get started. I'm not going to run the pan back as far to avoid hitting the headers. After talking with a buddy that built stock cars, I'm going to widen the pan at the nose to extend to the front of the wheel wells and close up the nose. Then I'm going to make the duct work to feed my CAI from the lower grille since it pulls air from the bottom of the car. I'll also copy the Naca duct design and incorporate that too. I don't get how other guys were able to install this without cutting the bumper. Perhaps the bumper is different on the model years. 
__________________
|
|
|
|
|
12-15-2012, 08:43 PM
|
#47 |
|
Livin the Dream

Drives: sold Join Date: Apr 2011
Location: The Good Land
Posts: 425
|
I will also post what happens with my install as I have added the zl1 front fascia and wheel wells for the brake duct vents. I have installed some vents on my hood to allow heat and pressure to exit.
|
|
|
|
|
12-15-2012, 08:46 PM
|
#48 | |
     Drives: cars Join Date: May 2011
Location: Oversneeze
Posts: 4,542
|
Quote:
|
|
|
|
|
|
12-15-2012, 09:14 PM
|
#49 | |
|
Drives: 2011 2SS/RS M6 VR Join Date: Aug 2011
Location: Chicagoland
Posts: 1,536
|
Quote:
Sent from my DROID RAZR using Tapatalk 2
__________________
|
|
|
|
|
|
12-15-2012, 09:46 PM
|
#50 | |

Drives: 2021 1LE Join Date: Jul 2011
Location: N'Awlinz
Posts: 6,315
|
Quote:
|
|
|
|
|
|
12-16-2012, 08:44 AM
|
#51 |
|
Drives: 2011 2SS/RS M6 VR Join Date: Aug 2011
Location: Chicagoland
Posts: 1,536
|
So here's the test report I was speaking about that my buddy was showing me. Now granted it's for a Corvette, but I think the principles apply to the Camaro as well. It you look at the belly pan Katech design it's not even as encompassing as the ZL1 pan. So the biggest improvement with minimal parts was a front splitter and pan.
http://www.katechengines.com/street_...a%20report.pdf Pan picture: http://store.katechengines.com/carbo...-kit-p212.aspx So the design I'm shooting for will be similar to the Katech design but incorporating the ZL1 pan as well. I have a custom fiberglass heat extracting hood being made for me which in combination of the belly pan should work well. I already have a fiberglass ZL1 style splitter installed. Now if I only had a wind tunnel. 
__________________
|
|
|
|
|
12-29-2012, 08:32 PM
|
#52 |
|
Drives: 2011 2SS/RS M6 VR Join Date: Aug 2011
Location: Chicagoland
Posts: 1,536
|
I finally had some time to mock up a template of my future belly pan. Taking ideas from the Corvette I came up with a two-piece pan that covers the front of the wheel wells sealing those cavities and giving me a flat bottom. Doing so will mean I need to open the lower front grille and use a scoop for the CAI. The reason I decided to make it two-piece was for a couple of reasons. It will be easier to find material in smaller pieces and makes changing the oil not as difficult.
My template still has some trimming to do on the front by the bumper, but it's mostly complete. I plan on using aluminum so I can form NACA ducts and weld them in near the tranny. 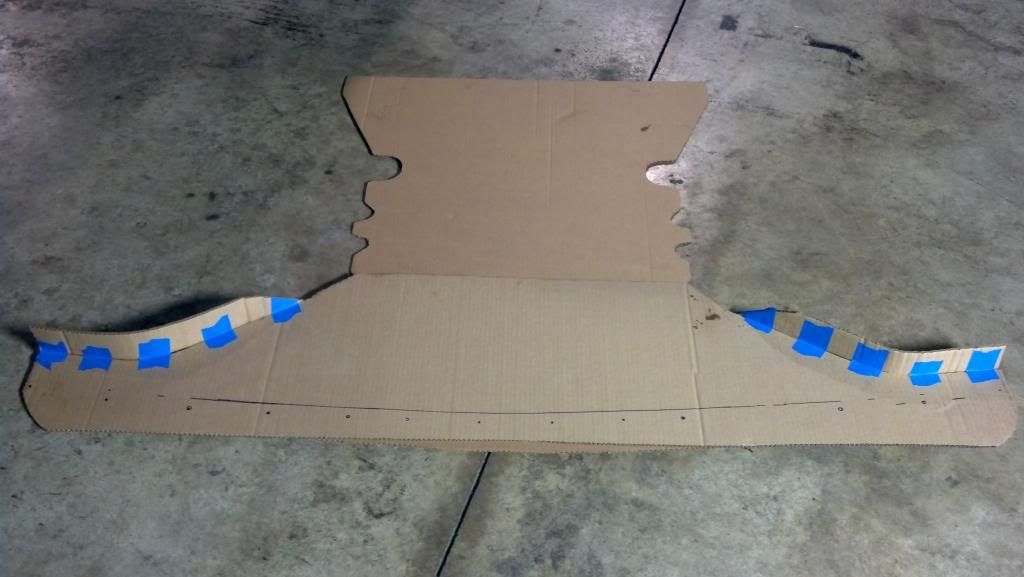
__________________
|
|
|
|
|
12-29-2012, 08:54 PM
|
#53 |
|
Drives: 2021 1LE Join Date: Jul 2011
Location: N'Awlinz
Posts: 6,315
|
Man that's a lot of work... looking good.
|
|
|
|
|
12-29-2012, 10:12 PM
|
#54 | |
|
Drives: G5.R Join Date: Sep 2010
Location: SoCal
Posts: 2,377
|
Quote:
WOW! your doing a great job. Can't wait to see more. |
|
|
|
|
|
12-30-2012, 12:26 AM
|
#55 |
|
Drives: '15 Z06, '01 NBM SS, '97 SS Join Date: May 2009
Location: Rio Rancho, NM
Posts: 12,161
|
Worth it......I did it after the ZL1 Conversion.
Noticed it on the highway for sure. Plus it keeps the Twins nice and clean for those with bottom mounts....  Dew Eet! Ivan @ Southwest Speed |
|
|
|
|
12-30-2012, 04:48 AM
|
#56 |
|
Supercharged LSX

Drives: 2011 2SS/RS Black/Carbon Fiber Join Date: Dec 2010
Location: City of Angels
Posts: 6,741
|
Subscribed.
__________________
 |
|
|
|
|
|
|
|
 |
|
|


