You are browsing camaro5 

|
 01-11-2016, 04:40 PM
|
#547 |
   Drives: too many to say! Join Date: Nov 2010
Location: S.E. Michigan
Posts: 1,016
|
looks like you are just adding a 2nd hx pump (bosch- CTSV style)... assume the 2 will be directly in series?
Anyway, would you have opted for the true ZL1 hx pump or a Varimax up front rather than go with the setup you are going to? I'm building my parts up, and an hx pump is soon on the list. |

|

|
|
01-11-2016, 05:42 PM
|
#548 |
|
'It's an experiment'

Drives: [COTW 2/09/15] '11 GPI LSA SC Z/LE Join Date: May 2014
Location: Dallas TX
Posts: 8,709
|
I've actually purchased the Varimax instead -- It will hook into the existing Bosch wiring. I will, however, need to move the fuse to a 10 amp, just to be safe since the Varimax goes up to 7.3 amps...
-Don
__________________
747 RWHP 794 RWTQ
"Horsepower sells cars, torque wins races." - Enzo Ferrari See My Build: http://www.camaro5.com/forums/showthread.php?t=385577 |
|
|
|
|
01-12-2016, 06:34 PM
|
#549 |
|
'It's an experiment'
Drives: [COTW 2/09/15] '11 GPI LSA SC Z/LE Join Date: May 2014
Location: Dallas TX
Posts: 8,709
|
Drive shaft is on the way!
Another weekend project! -Don
__________________
747 RWHP 794 RWTQ
"Horsepower sells cars, torque wins races." - Enzo Ferrari See My Build: http://www.camaro5.com/forums/showthread.php?t=385577 |
|
|
|
|
01-13-2016, 06:16 PM
|
#550 |
|
'It's an experiment'
Drives: [COTW 2/09/15] '11 GPI LSA SC Z/LE Join Date: May 2014
Location: Dallas TX
Posts: 8,709
|
This is coming on Friday:
http://www.turnone-steering.com/#!on...egory=12405744 with the pulley... 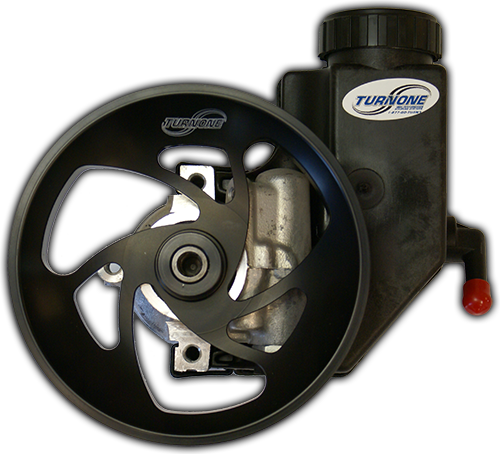 JDP has them http://www.jdpmotorsports.com/brands...ro-ss-t40rbz28 Not for the HP gain, but to help with pressure/lower temps when you road race/auto cross... Used ones like these in the past - like the way the car gives me 'feedback' -- thus why I'm experimenting with them again... -Don
__________________
747 RWHP 794 RWTQ
"Horsepower sells cars, torque wins races." - Enzo Ferrari See My Build: http://www.camaro5.com/forums/showthread.php?t=385577 |
|
|
|
|
01-16-2016, 06:51 PM
|
#551 |
|
'It's an experiment'
Drives: [COTW 2/09/15] '11 GPI LSA SC Z/LE Join Date: May 2014
Location: Dallas TX
Posts: 8,709
|
Installed the turn one Power Steering pump today. After reading ALL the legalese on the use of the pump (you can't help it, if you open the box, you have to read it), I began by removing the CAI intake tube, belt, and then began draining the fluid from the stock pump (use a turkey baster or fluid pump -- I used the pump https://www.amazon.com/gp/product/B0...?ie=UTF8&psc=1). Once that was done, I took the return side line off and 'captured' what remaining fluid was in the pump. Then I removed the 'high-side' line using 5/8 line wrench (or 16MM).
I did cover everything just in case fluid escaped -- once that was done, I did cap the lines (I had already replace the fluid earlier last year). Getting to the 3 bolts was not bad, the stock pulley allows access: .jpg) .jpg) Caped: .jpg) Bolts off and Pump removed: .jpg) .jpg) Here is the pump: .jpg) Bottom: .jpg) Nicely wrapped and ready to install (I did get the aftermarket pulley) Pump in place -- the new pulley makes it MUCH easier to install the bolts AND you can use your thumb through the opening to hand start the high side line! .jpg) I have to move the intercooler pump bracket as the 'return' line on this one is on the side and not the bottom like 'stock'. Here is the opening of the pump with new fluid in (note I have the 'felt' buffer for the intercooler hose), also noticed the return line is 'closer' to the frame (metal section of the return line) so I added a 'felt' buffer on the frame just in case. Here it is in all its glory: .jpg) .jpg) So I primed the pump (so to speak) and turn the wheel from left to right to get the air out (used Joe Gibbs Power Steering fluid). Much larger opening than stock, will keep 'temps' down vs stock, also will reduce parasitic loss (claim is it adds 3 hp). What I like most is the feel the steering has and its barely noticeable that the pressure is lower (steering is not that much harder in my opinion). Like it! Pretty easy to install and I kept the 'mess' to a minimum too ;o) -Don
__________________
747 RWHP 794 RWTQ
"Horsepower sells cars, torque wins races." - Enzo Ferrari See My Build: http://www.camaro5.com/forums/showthread.php?t=385577 Last edited by hammdo; 01-20-2017 at 06:36 PM. |
|
|
|
|
01-19-2016, 05:33 PM
|
#552 |
|
'It's an experiment'
Drives: [COTW 2/09/15] '11 GPI LSA SC Z/LE Join Date: May 2014
Location: Dallas TX
Posts: 8,709
|
Drive shaft is HERE! JDP has my Detroit Speed drive shaft loop on its way...
Another weekend project Still waiting on the Varimax pump so I can install the Ron Davis HX... -Don
__________________
747 RWHP 794 RWTQ
"Horsepower sells cars, torque wins races." - Enzo Ferrari See My Build: http://www.camaro5.com/forums/showthread.php?t=385577 |
|
|
|
|
01-23-2016, 07:10 PM
|
#553 |
|
'It's an experiment'
Drives: [COTW 2/09/15] '11 GPI LSA SC Z/LE Join Date: May 2014
Location: Dallas TX
Posts: 8,709
|
Started on the R-n-R of the driveshaft today. Merc has a great doc so I won't go into too much detail (his is excellent)
http://www.camaro5.com/forums/showth...eshaft+install However; I will detail the differences since mine is Carbon Fiber. I did notice one thing though -- I had my wheels refinished, and I only drive it once since then, but while prepping I found the the rear wheels were on wrong -- the directional LEFT was on the RIGHT and vice-versa. I even told these folks about the wheels and tires -- I just don't understand how folks can be so incompetent anymore. I guess I'm spoiled by places like ADM. I had to use a breaker bar to get those lug nuts off -- supposed to be 111 ft lbs (blue tint on the lug nuts). Crazy... Anyway, Hotchkis Chassis Max Brace, exhaust, and the heat shield covering the drive shaft is now off... More tomorrow... -Don
__________________
747 RWHP 794 RWTQ
"Horsepower sells cars, torque wins races." - Enzo Ferrari See My Build: http://www.camaro5.com/forums/showthread.php?t=385577 Last edited by hammdo; 01-24-2016 at 09:05 PM. |
|
|
|
|
01-24-2016, 09:55 PM
|
#554 |
|
'It's an experiment'
Drives: [COTW 2/09/15] '11 GPI LSA SC Z/LE Join Date: May 2014
Location: Dallas TX
Posts: 8,709
|
DSS Carbon Fiber installation begins!
OK, the DSS Carbon Fiber drive shaft is on!
You'll need a 10mm, 8mm allen socket (both short and long), an E18 socket, plus wrenches and 5/16 allen (both short and long), torque wrench, 15 mm socket and a T60 torx socket. Here are all the instructions you'll get: .jpg) Its not a hard install, but it does take some time... So, after the Hotchkis, exhaust, and heat shield were off, I began by unbolting the transmission side first. I noticed after I loosened up the main bolts (from the flange to the rubber isolator, that I would be better unbolting all of it so I could easily remove the shaft by myself so, here is the transmission side removed: The bolts are loosened (I did mark the original position if I ever had to re-install the stock shaft): .jpg) .jpg) Rubber isolator unbolted and separated from the transmission: .jpg) .jpg) Unbolted the rear 3 bolts from the flange of the differential: 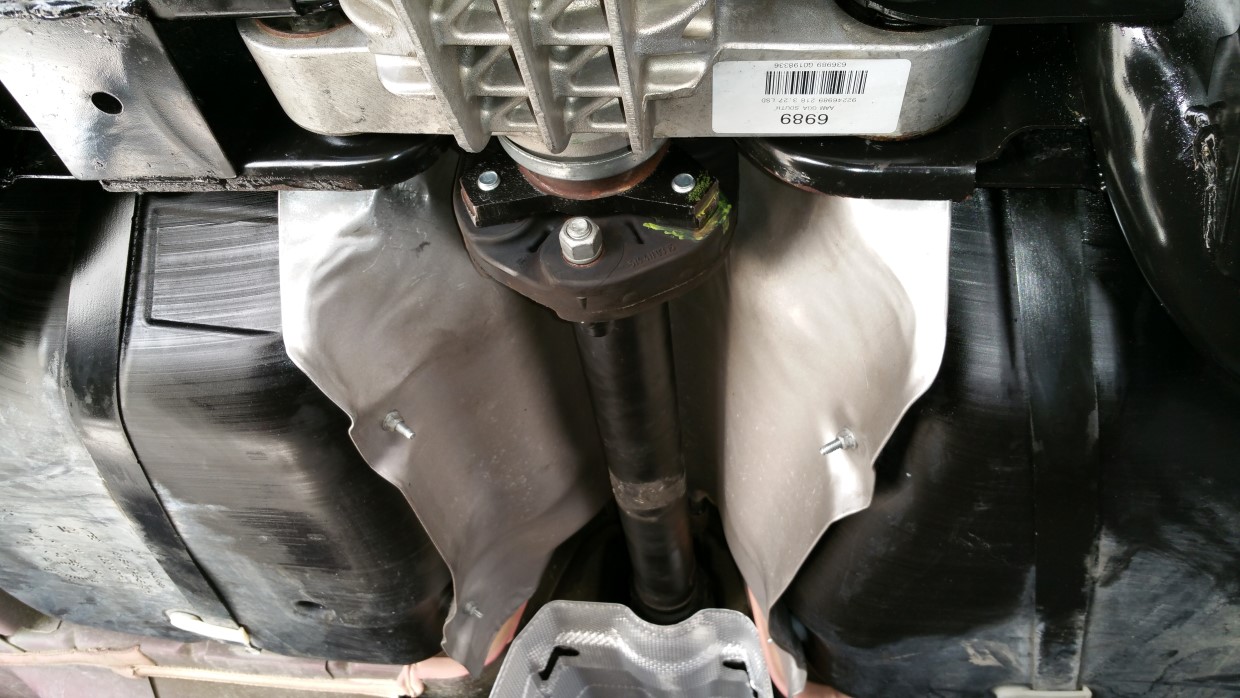 Unbolting the drive shaft center support bearing: .jpg) Dropped the front of the drive shaft while supporting the rear with a jack stand: .jpg) .jpg) Prepping the DSS Carbon Fiber Driveshaft: Unboxing, removing the couplers, bag n tag the bolts with the location and torque specs: .jpg) .jpg) .jpg) Using a automatic center punch, notate the locations where everything needs to line up: Front: .jpg) .jpg) Rear: .jpg) .jpg) Marking and noting the specs on the couplers: .jpg) Now, installing on the transmission: I used RED loctite on the bolts/nuts that are used on the flange: Front: .jpg) .jpg) .jpg) Rear: .jpg) Now, I installed the DSS shaft -- this was easy -- I used a jack stand to assist and bolted the front, then the rear (using BLUE loctite) and started the threads to 'just' enough to hold them in place. I verified I had everything lined up: Front lined up and bolted (57 ft lbs torqued) with blue loctite: .jpg) Rear lined up and bolted (54 ft lbs torqued) with blue loctite: .jpg) .jpg) Torqued and ready to measure! .jpg) Measured and in spec! .jpg) .jpg) Now, my Detroit Speed Drive shaft loop will be here on Monday and I'll install that before doing the last parts... -Don
__________________
747 RWHP 794 RWTQ
"Horsepower sells cars, torque wins races." - Enzo Ferrari See My Build: http://www.camaro5.com/forums/showthread.php?t=385577 Last edited by hammdo; 04-12-2016 at 11:54 PM. |
|
|
|
|
01-25-2016, 07:58 PM
|
#555 |
|
'It's an experiment'
Drives: [COTW 2/09/15] '11 GPI LSA SC Z/LE Join Date: May 2014
Location: Dallas TX
Posts: 8,709
|
Got the Detroit Speed Driveshaft loop today from JDP! Instructions were ok, had to really look @ the pieces and bolts to verify where everything went and fit -- once I did that, it all made sense.
Firstly, I supported the transmission: .jpg) Then located the bolts to remove (4 outer and 2 inner for the trans mount): .jpg) Remove these first, then the outer 4 (leaving one of the outers on so you can ease the mount down: .jpg) For the A6, there is a vent tube attached to the mount, you'll need this to remove it (its on the passanger's side -- thus why you keep a bolt in): .jpg) Where the vent tube is mounted: .jpg) and the tube: .jpg) ready to install!: .jpg) Now, I separated all the bolts and stands-offs so I could 'pre-fit' everything: .jpg) .jpg) So, now I test fitted the support plate and spacers on the mount: .jpg) .jpg) Then I installed '2' of the stand offs using the longer 10mm bolts (for ALL these bolts use blue loctite): .jpg) .jpg) Once that was done I prepped the mount (with the crossmember spacers) and installed the 2 other standoffs on the trans mount studs (blue loctite again and installed loosely the outer support mount bolts) and torqued the standoffs down to 40 ft lbs (you need to use a wrench on the top bolts for the stand off): .jpg) Now I installed (loosely) the 4 stand-off bolts and the 2 3/8" bolts into the loop bracket -- the instruction say bolt down the standoffs first, but experience told me -- no put them all in -- and I'm glad I did as the 2 3/8 bolts were a tight fit! .jpg) once I had those all on, I then tightened everything down and torqued them to: 40 ft lbs for the stand-off bolts, 35 ft lbs for the 3/8 bolts/with nylok nuts. Verified everything was clear: .jpg) Now, install the driveshaft loop: .jpg) .jpg) Tightened and torqued to 35 ft lbs. Verified everything cleared then tightened and torqued the outer 4 crossmember bolts to 40 ft lbs. I re-installed the heat shield -- no clearance issues what-so-ever -- plenty of room. Not a bad install -- EASY with the exhaust out of the way! Next, diff fluid change, then install the exhaust and do a test drive with the new Power Steering pump and driveshaft! -Don
__________________
747 RWHP 794 RWTQ
"Horsepower sells cars, torque wins races." - Enzo Ferrari See My Build: http://www.camaro5.com/forums/showthread.php?t=385577 |
|
|
|
|
01-26-2016, 08:57 PM
|
#556 |
|
'It's an experiment'
Drives: [COTW 2/09/15] '11 GPI LSA SC Z/LE Join Date: May 2014
Location: Dallas TX
Posts: 8,709
|
Finally, Lingenfelter notified me the Varimax is on its way. That will be next!
It was a bit cool today so I'll wait until Friday to do the diff fluid and exhaust -- hopefully by then, the pump will be here and I can do the Ron Davis HX over the weekend! -Don
__________________
747 RWHP 794 RWTQ
"Horsepower sells cars, torque wins races." - Enzo Ferrari See My Build: http://www.camaro5.com/forums/showthread.php?t=385577 |
|
|
|
|
01-27-2016, 11:41 PM
|
#557 |
|
'It's an experiment'
Drives: [COTW 2/09/15] '11 GPI LSA SC Z/LE Join Date: May 2014
Location: Dallas TX
Posts: 8,709
|
Got things buttoned up -- all ok except the resonator is too close to the drive shaft loop and rattles a bit -- that 3/4 " clearance is down to < 1/4 " -- I guess its time to remove that...
Will be looking @ options -- already have the Magnaflow axle backs so just want to do a cat to axle replacement. On top of that, the right rear tire sprung an air leak -- now gotta get that fixed... Did an easy drive -- drive shaft is nice -- new fluid in the diff doesn't hurt that is for sure... Still waiting on the pump from Lingenfelter -- hope that get's here by the weekend... -Don
__________________
747 RWHP 794 RWTQ
"Horsepower sells cars, torque wins races." - Enzo Ferrari See My Build: http://www.camaro5.com/forums/showthread.php?t=385577 |
|
|
|
|
01-28-2016, 12:25 AM
|
#558 |
 
Drives: 2012 1SS M6 IOM Join Date: Dec 2012
Location: New Rochelle New York
Posts: 1,428
|
Did the car feel any different with the new drive shaft?
__________________
2012 1SS Camaro LS3 Inferno Orange
Mods: LSA Supercharger, 2.55 Pulley, Custom Boost Cam, ARH LTH 1 7/8, HFC, 3' Magnaflow Exhaust, JLT CAI, Elite CC V2, BO White Stage 2 TB, GM 3.91 Gears, DSS CF Driveshaft, BMR Bushing Kit.... . Tuned by JTM Motorsports 540 Hp 550Tq on 9PSI Axles, Monster Clutch, Hotchkis TVS Track Pack kit.......For 2018. |
|
|
|
|
01-28-2016, 12:45 AM
|
#559 |
|
'It's an experiment'
Drives: [COTW 2/09/15] '11 GPI LSA SC Z/LE Join Date: May 2014
Location: Dallas TX
Posts: 8,709
|
I'll know more once I take it out on the highway, but just taking off there is no delay to get it moving. Used to feel a slow reaction, push the gas and wait to move, now it just moves. Once I correct the exhaust and put the Ron Davis in, I'll be taking it out for a good run...
-Don
__________________
747 RWHP 794 RWTQ
"Horsepower sells cars, torque wins races." - Enzo Ferrari See My Build: http://www.camaro5.com/forums/showthread.php?t=385577 |
|
|
|
|
01-29-2016, 01:32 PM
|
#560 |
|
'It's an experiment'
Drives: [COTW 2/09/15] '11 GPI LSA SC Z/LE Join Date: May 2014
Location: Dallas TX
Posts: 8,709
|
Ok B&B Muffler did an X-Pipe install. Car sounds great and took care of the rattle. I'll post pics later today.
Took the car out on the highway and wow, smooth! The driveshaft eliminated all of the little clicks that would pop up here and there. Now it delivers the power very smoothly and no vibrations at all at any speed. Love the difference.. Now, when the Varimax arrives, upgrade the pump and heat exchanger... -Don
__________________
747 RWHP 794 RWTQ
"Horsepower sells cars, torque wins races." - Enzo Ferrari See My Build: http://www.camaro5.com/forums/showthread.php?t=385577 Last edited by hammdo; 01-29-2016 at 06:49 PM. |
|
|
|
|
|
|
|
 |
|
|


