You are browsing camaro5 

|
 06-06-2017, 11:36 PM
|
#1 |
     Drives: '12 2LT Convertible Join Date: Mar 2012
Location: Belmont, California
Posts: 1,701
|
Instructions for ZL1 front end installation
Are there any detailed instructions anywhere?
Edit (7/6/17) - See post #13 further down. I created instructions since I could not find the complete detail I was looking for.
__________________
Mods: GM Locking Gas Cap, RS License Plate Frame, SS Brembos, ZL1 FrontEnd, 14/15 Convertible Top
 Last edited by intensifi; 07-17-2017 at 11:21 PM. Reason: Added my own instructions |

|

|
|
06-07-2017, 12:03 AM
|
#2 |
  
Drives: early 2011 Camaro convertible Join Date: Jul 2014
Location: House Springs, Mo
Posts: 2,002
|
try this super chevy article http://www.superchevy.com/how-to/pai...let-camaro-ss/
__________________
 Early 2011 LT Convertible, ZL1 bumper, hood, side skirts, belly pan and wheels, Truecarbon ECF hood extractor, K&N CAI, Elite catch can, Big Worm Bow Tie emblems, Jacfab bracket, Vitesse TC, BMR strut brace, BMR tunnel brace, NPP exhaust |
|
|
|
|
06-07-2017, 08:14 AM
|
#3 |
|
#TeamBeckyD
Drives: 2017 HBM 2SS Convertible A8 Join Date: Aug 2008
Location: Apopka, FL
Posts: 10,496
|
MY OEM ZL1 appearance conversion links below
Build thread http://www.camaro5.com/forums/showthread.php?t=392689 Individual links ZL1 bumper install http://www.camaro5.com/forums/showthread.php?t=228300 ZL1 Spoiler install http://www.camaro5.com/forums/showthread.php?t=232775 ZL1 Springs http://www.camaro5.com/forums/showthread.php?t=242039 Black 10-spokes installed http://www.camaro5.com/forums/showth...281782&page=10 ZL1 Side Skirts & Rear Diffuser http://www.camaro5.com/forums/showthread.php?t=307236 ZL1 hood http://www.camaro5.com/forums/showthread.php?t=366228
__________________
 #TeamBeckyD #TeamBeckyD**FIFTY HBM 2SS VERT** |
|
|
|
|
06-07-2017, 08:46 AM
|
#4 | |
|
Drives: '12 2LT Convertible Join Date: Mar 2012
Location: Belmont, California
Posts: 1,701
|
Quote:

__________________
Mods: GM Locking Gas Cap, RS License Plate Frame, SS Brembos, ZL1 FrontEnd, 14/15 Convertible Top
|
|
|
|
|
|
06-07-2017, 08:47 AM
|
#5 | |
|
Drives: '12 2LT Convertible Join Date: Mar 2012
Location: Belmont, California
Posts: 1,701
|
Quote:
__________________
Mods: GM Locking Gas Cap, RS License Plate Frame, SS Brembos, ZL1 FrontEnd, 14/15 Convertible Top
|
|
|
|
|
|
06-07-2017, 12:10 PM
|
#6 | |
|
#TeamBeckyD
Drives: 2017 HBM 2SS Convertible A8 Join Date: Aug 2008
Location: Apopka, FL
Posts: 10,496
|
Quote:
__________________
#TeamBeckyD**FIFTY HBM 2SS VERT** |
|
|
|
|
|
06-07-2017, 07:25 PM
|
#7 | |
|
Drives: '12 2LT Convertible Join Date: Mar 2012
Location: Belmont, California
Posts: 1,701
|
Quote:
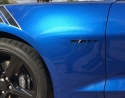
That's how I removed the old front end. Jacked up the front and pulled the wheels. Next task is to sort all the screws and fasteners that came with the front end kit from gen5diy to determine where they go. Same for the wiring harness. It has two connectors for the car end. I just need to figure out where they all go. Nothing looks hard. I just need to to determine what fasteners to use for which component and if there is a preferred or easier order of assembly. I also need to decide if I should obtain the ZL1 front wheel liners and the brake cooling ducts. I also noticed two pieces that mount underneath the front end and provide a small "air dam" for each tire/wheel. The look to be about 1.5" tall and about 8 inches wide. I'm guessing at speed they serve some useful purpose. Wondering if I should buy those as well.
__________________
Mods: GM Locking Gas Cap, RS License Plate Frame, SS Brembos, ZL1 FrontEnd, 14/15 Convertible Top
|
|
|
|
|
|
06-07-2017, 08:05 PM
|
#8 |
|
#TeamBeckyD
Drives: 2017 HBM 2SS Convertible A8 Join Date: Aug 2008
Location: Apopka, FL
Posts: 10,496
|
Definitely do the wheel liners brake ducts are not important but the liners are our V6 ones do not fit exact
Sent from my iPhone using Tapatalk
__________________
#TeamBeckyD**FIFTY HBM 2SS VERT** |
|
|
|
|
07-02-2017, 11:37 PM
|
#9 |
|
Drives: '12 2LT Convertible Join Date: Mar 2012
Location: Belmont, California
Posts: 1,701
|
Front end install is complete
Looks like I'll be adding: 1) ZL1 license plate bracket Previous one does not fit the new lower grill 2) L&R air diffusers on the underside I believe they are functional at speed and warn of low obstacles 3) L&R wheels liners and brake ducts Old ones do not attach properly and why not cool my brakes. 4) L&R wheel wheel front edge trim (I believe there is an official name for this item) I was torn on this until I saw how the bumper and lower splitter/grill come together. The junction needs to be covered.
__________________
Mods: GM Locking Gas Cap, RS License Plate Frame, SS Brembos, ZL1 FrontEnd, 14/15 Convertible Top
|
|
|
|
|
07-03-2017, 08:26 AM
|
#10 | |

|
Quote:
Post some photos....
__________________
 |
|
|
|
|
|
07-03-2017, 11:30 PM
|
#11 |

Drives: 2010 2SS/RS L99 IBM silver stipes Join Date: Dec 2015
Location: K.C. Kansas
Posts: 1,329
|

__________________
2010 Imperial Blue w/ Silver stripes 2SS/RS L99
Mods = Not enough.... |
|
|
|
|
07-06-2017, 12:41 PM
|
#12 | |
|
Drives: '12 2LT Convertible Join Date: Mar 2012
Location: Belmont, California
Posts: 1,701
|
Quote:
I went on vacation so I would not be tempted to drive it while the new paint cures a bit more.
__________________
Mods: GM Locking Gas Cap, RS License Plate Frame, SS Brembos, ZL1 FrontEnd, 14/15 Convertible Top
|
|
|
|
|
|
07-06-2017, 02:26 PM
|
#13 |
|
Drives: '12 2LT Convertible Join Date: Mar 2012
Location: Belmont, California
Posts: 1,701
|
Instructions for ZL1 front end installation
Since I couldn't find a concise set of instructions, I'll post some below.
Read through before attempting install! Assumes you bought from Gen5DIY or have equivalent parts and fasteners. Tools required: - Large soft blanket to protect freshly painted bumper - 7mm socket - 10mm socket (with short and long extensions) - Torx T20 - Philips head screw driver - Flat head screwdriver - Drill and drill bits - Clippers with cutting edges at tip. - Helper to assist in removing old bumper and installing new bumper. One person needed for each side to insure alignment and avoid paint scratches. 0) Have your new bumper painted. 1) With old bumper still installed - There are two plastic liners at the top of the old bumper located under the leading edge of the hood when closed. These need to be installed into the new bumper. Use a flat blade screw driver to remove the large two piece plastic rivets in the plastic liners. Save these rivets for the new hood. There will be additional smaller plastic rivets (10). Carefully drill out the center of these old rivets and remove them. Set the two plastic liners aside for later reinstallation. DO NOT INSTALL THEM IN THE NEW BUMPER AT THIS TIME. YOU RUN THE RISK OF CRACKING THE NEW PAINT IF YOU PUT FORCE ON THE BUMPER WHILE IT IS NOT ATTACHED TO THE CAR AND SUPPORTED. 2) Remove your old bumper. There is a two video thread in the Camaro5 DIY section on how to install a new grill. Use the first video as instructions to remove the old bumper. NOTE: I highly recommend you drive the front wheels up on a couple of 2"x6"x18" blocks of wood, engage the parking brake, block the rear wheels, jack up the front end from the center with a floor jack, install jack stands on the front L&R side jack points, lower the center front floor jack just enough to engage the jack stands and then remove your front wheels. With the old bumper removed... 3) Disconnect the wiring harness from the side yellow marker lights by turning the harness slowly. Remove the yellow side marker lights by carefully compressing the clip in the back and then pushing the back out. Next, carefully pull the lights backward to remove them from the old bumper. 4) Disconnect the wiring harness from the daytime running lights (DRLs) by carefully turning the end of the harness to remove the bulbs. Note location of mounting clips near end of the harness. Pull mounting clips off of old bumper. You will reattach the mounting clips into the new bumper/absorber at the same locations. 5) Disconnect harness from plastic support clip on passenger side of bumper. 6) Remove harness plastic support clip that was mounted on old bumper and install it into new bumper component in same location. 7) Remove wiring harness from old absorber. Save harness for later reuse. 8) Remove DRL bulb mounts from retainers built into old bumper. Use small flat blade screw driver or some other mechanism. This was actually the toughest part of the whole install for me as you have to compress a three sided clip for each of the three holes to remove each bulb mount. I was tempted to just buy new ones. Since my old bumper was damaged, I just cut both sections out of old bumper with a drywall saw to allow me to take each up to my work bench and get them out there. You are now done with the old bumper. 9) On the car install a new ZL1 air dam (black plastic component directing air up into radiator) or cut the ends off your SS or LT air dam. I recommend just buying the ZL1 part. It is NOT included in Gen5DIY's kit. It cost something like $40 from Maureen at Rodgers. New piece looks way better than one with cut off ends. It also has proper alignment for ZL1 brake ducts if you decide to use them. You can install the brake ducts later but this is your only chance to replace the air dam without later having to pull the entire bumper off again. 10) Attach the support to the new bumper. On a large soft blanket to protect the newly painted bumper, tilt the bumper back to have the front end pointing up. Insert 4 of the nuts into the square holes on the bumper near the center leading edge. The correct holes are easy to determine by observing where the bolt holes are on the support. Attach the support to the new bumper with the 4 - 7mm bolts. 11) Attach the lower grill/splitter to the bumper. Insert the remaining nuts into the leading edge square holes of the bumper. Note there is a leading row and trailing row of square holes. Only use the leading edge row of square holes. The rear row will remain empty. Carefully slide the lower grill/splitter into the bumper making sure to lineup all the clip-in fasteners before pushing in for the final mount. Use the Philips screws to attach the lower grill/splitter to the bumper. Note: Gen5DIY lists these as bolts but they are Philips head screws. You will have extra screws when you are done. Note: If you purchased the lower edge metal protectors, use them and their screws instead of the ones provided by Gen5DIY. 12) Tip the bumper back to vertical on the large soft blanket and rest it on the support and lower/grill. Install the upper grill. Follow instructions in the second DIY video of thread mentioned earlier. 13) Verify upper and lower grill fasteners are completely through bumper and locked into place. Inspect each fastener. 14) Install silver metal retaining clips into inside trailing edges of now joined lower grill/splitter & bumper. The mount points are near where the wheel wells will be. On each side, one of the slide in fasteners from the lower grill/splitter will now be through the bumper leaving a square for the clip to slide into. Snap each into place. 15) Install each fog light into lower holes on each side of the bumper. Fog lights will snap into place. Orient lights so screws are on top before trying to snap them in. I don't recall if the lights were universal or L&R. Check the mounting clips on bumper and fog lights for verification. 16) Install DRL bulb mounts into bumper. Writing on front edge of bulb mount should be on the bottom. Carefully snap into place. Install DRL retainers (circular black pieces) on back of DRL bulb mounts. 17) Carefully install L & R light covers into bumper from the front. Verify fog light adjustment screws are accessible from front of bumper. 18) Install absorber into bumper. 19) Install wiring harness into absorber. Insert Gen5DIY harness first then thicker factory harness last as it clips into the absorber. Center via center harness mount removed from old bumper. Attach signal connector of old harness and new harness together. Old harness plugs into new harness. New harness will plug into car signal connection later. 20) Mount now joined harness connector onto plastic connector mount moved from old bumper/absorber. The attachment point is the old harness to new harness junction. 21) Carefully install yellow side marker lights into bumper WITHOUT attaching harness. 22) Attach appropriate wiring harness connections to yellow side marker lights. Note you may need to gently pull the harness to have sufficient harness length. 23) Attach new harness to fog lights. Be careful to check connector orientation before pushing it into each light. 24) Attach old harness/bulbs into DRL bulb mounts. 25) Attach harness end clips into same locations on new bumper (step 4 above). 26) With a helper carefully lift and guide assembled bumper onto car. Watch for pin alignment as well as yellow side marker light alignment. Start pins into holes and verify side yellow marker alignment. DO NOT PRESS all the way in yet. Verify alignment with absorber on main fixed metal bumper and air dam underneath. Once all are aligned, press new bumper all the way in. 27) Install two 10 mm bolts into top of bumper in engine bay. 28) Install two 10 mm bolts into underside of bumper. Assuming the pins are in the holes, the yellow side markers are aligned, and the 4 10mm bolts are threaded properly into their holes, you now have a properly aligned bumper! 29) Attach new harness signal connector to car body harness signal connector. 30) Push relay (cube) and power connectors up into front edge of engine bay on far side of radiator fans. You want the wires to come up near the front edge of the fuse box. 31) Attach relay (cube) to left side of fuse box with a zip tie. There is a protruding piece of plastic on the fuse box with a hole in the center. This is the mount point for the relay. 32) Open fuse box and remove nut from 12V power terminal in front. DO NOT GROUND yourself while doing this! If you are uncertain how to properly interact with car electrical systems, disconnect the battery before attempting this step! Attach power connector for new harness over bolt. Re-attach nut and tighten. Close Fuse Box. 33) Finish attaching bumper with 10mm, 7mm bolts and Torx screws (wheel well liners). Reverse procedure in bumper removal video referenced above. Make sure to insert plastic trim pieces removed in beginning before re-installing two piece plastic rivets in engine bay. 34) Re-attach wheels and torque lug nuts to proper value. Lower car back to floor level. 35) Start car and turn on lights to verify light operation. Note DRLs may not come on due to ambient light conditions. Yellow side markers verify the old harness is connected. Fog lights verify the new harness is connected. 36) Attach plastic trim piece rivets into top edge of bumper in engine bay. The rivets need to be "started" before pushing them into the 10 mounting holes. Squish them slightly by hand. Then push each of them through the holes. Hold each rivet top down while pulling the pin all the way up. When secure (you will hear clicks), clip the remaining pin length off. Be careful of sharp edges where the excess pin length was cut off. Enjoy!
__________________
Mods: GM Locking Gas Cap, RS License Plate Frame, SS Brembos, ZL1 FrontEnd, 14/15 Convertible Top
Last edited by intensifi; 07-08-2017 at 01:23 PM. |
|
|
|
|
11-27-2023, 01:31 PM
|
#14 |
 
Drives: 2010 2SS/RS ABM#200 ZL1 conversion Join Date: Jul 2021
Location: Milan Indiana
Posts: 56
|
2010 conversion
|
|
|
|
|
|
|
|
 |
| Thread Tools | |
|
|


