You are browsing camaro5 

|
 05-24-2012, 08:57 AM
|
#267 |
       
|
im just gona add this link in here. Its another write up. He modified his existing absorber http://camaro5.com/forums/showthread.php?t=225095
__________________
 |

|

|
|
05-24-2012, 10:13 AM
|
#268 | |

Drives: 2014 Z/28 #82+#192, 18ZLE 66Nova Join Date: Oct 2008
Location: By the lake in AZ
Posts: 15,719
|
Quote:
|
|
|
|
|
|
05-24-2012, 01:08 PM
|
#269 | |
|
[COTW 5/12/14]

Drives: 2012 CRT NF Cammed 2SS/RS For Sale Join Date: Oct 2011
Location: NOLA
Posts: 6,115
|
Quote:
I planned on using my OEM absorber, and having to drill a couple holes
__________________
 |
|
|
|
|
|
05-24-2012, 01:22 PM
|
#270 | |
 Drives: 2010 2SS/RS Join Date: Sep 2011
Location: Mn
Posts: 481
|
Quote:
You still need the z28 brackets requardless of the year |
|
|
|
|
|
05-24-2012, 01:25 PM
|
#271 |
|
Drives: 2014 Z/28 #82+#192, 18ZLE 66Nova Join Date: Oct 2008
Location: By the lake in AZ
Posts: 15,719
|
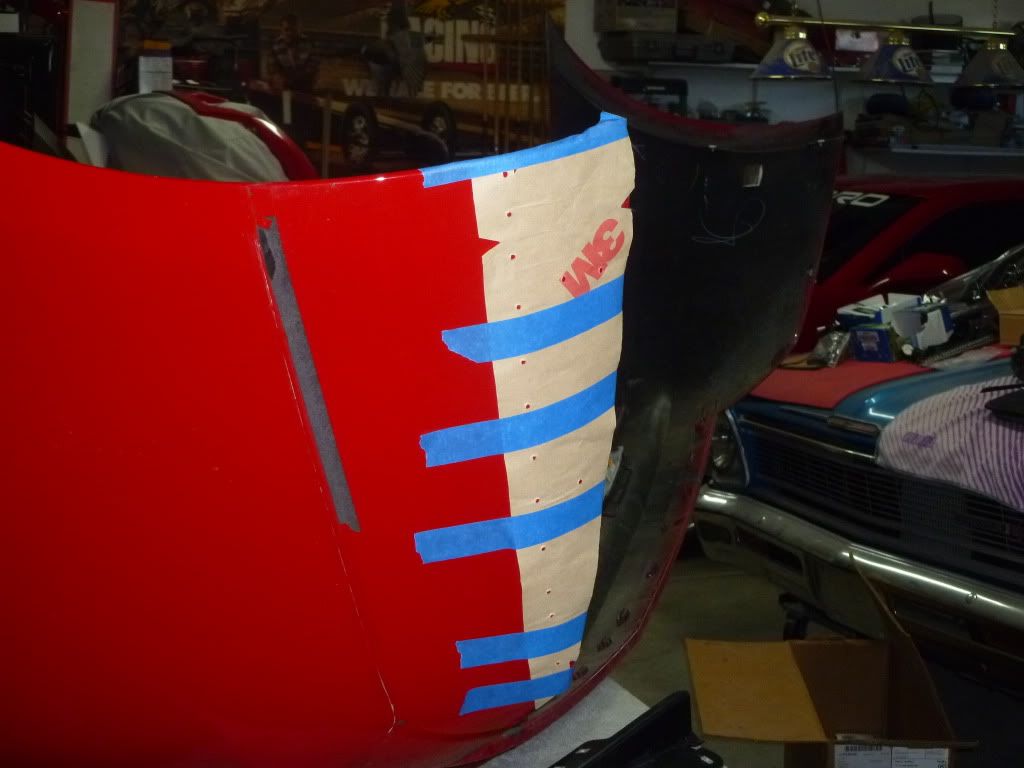
With the new absorber comes new brackets that get riveted to it, the brackets move the holes back 1/2" and down 1 1/2" so the diffuser mounts to them. see pic.
In the pic you can see the new diffuser and the old on on top. |
|
|
|
|
05-24-2012, 02:05 PM
|
#272 |
     
|
Ofer how hard is the install with the correct absorber? Want to do this right and easy
Sent from my SPH-D710 using Tapatalk 2
__________________
My Build Thread
http://camaro5.com/forums/showthread...=1#post5036900 Maureen@Rodgers Chevrolet...The best prices and customer service period!!(734)676-9600 Gen5Diy.com.....http://www.gen5diy.com/ Wretched Motorsports..www.wretchedms.com/ Pedders USA...http://www.peddersusa.com/ |
|
|
|
|
05-24-2012, 02:10 PM
|
#273 |
|
[COTW 5/12/14]
Drives: 2012 CRT NF Cammed 2SS/RS For Sale Join Date: Oct 2011
Location: NOLA
Posts: 6,115
|
Thanks ray and ofer I appreciate it
__________________
|
|
|
|
|
05-25-2012, 07:24 PM
|
#274 |
Drives: 2010 Camaro Join Date: Aug 2009
Location: Quahog, Rhode Island
Posts: 1,171
|
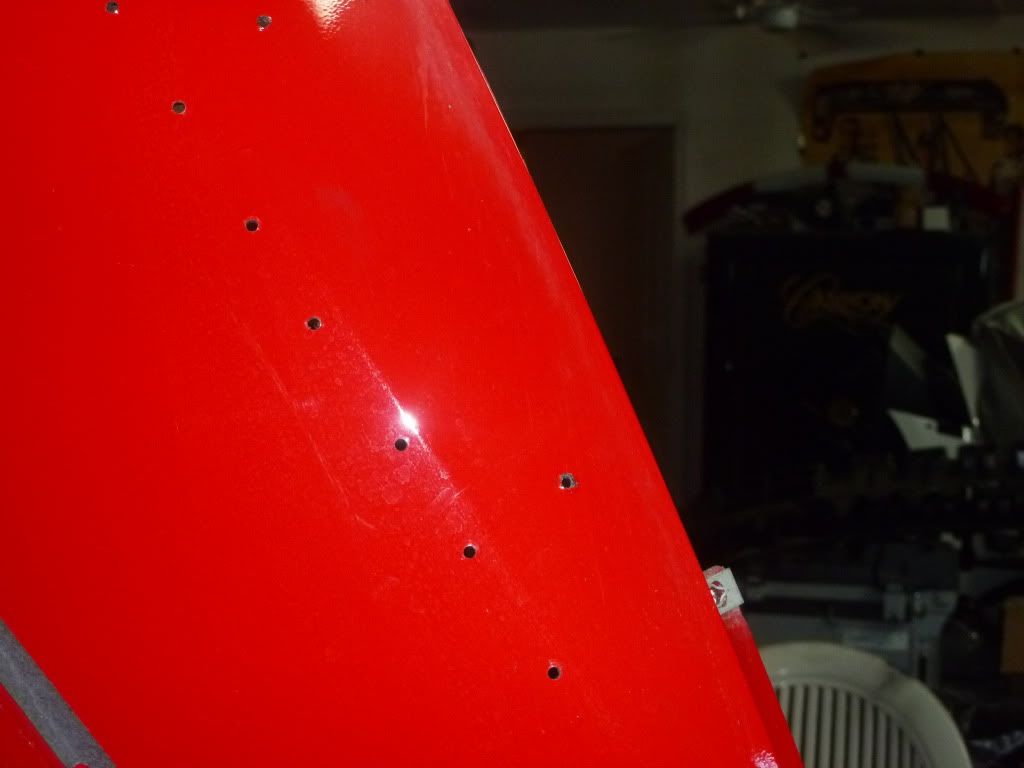
Not to jack your thread Ofer, and I hope you don't mind me putting in my 3 cents... but I just finished installing the rear diffuser.
I used my '10 absorber, yes, you are correct that the locating tabs on each of the extension tabs are at different angles, but the end result is they are even across the bottom of the absorber. I just cut the locating tabs & drilled for a 2nd rivit. Each tab is marked "Outboard L", "Inboard L", "Inboard R", and "Outboard R" I didn't have a template, that would have made it easier, but the cuts seem to run just about 1/4" above the lower body line. Some careful measuring and a steady hand with a dremel with a cut-off wheel worked well for me. The extra hole in the picture is from a prior splash guard install.  A view of the back of the fascia... And the outside... Hope this helps, and  Ofer for starting this thread! Ofer for starting this thread!
__________________
 |
|
|
|
|
05-25-2012, 07:32 PM
|
#275 | |
|
[COTW 5/12/14]
Drives: 2012 CRT NF Cammed 2SS/RS For Sale Join Date: Oct 2011
Location: NOLA
Posts: 6,115
|
Quote:
__________________
|
|
|
|
|
|
05-25-2012, 07:40 PM
|
#276 |
|
Drives: 2014 Z/28 #82+#192, 18ZLE 66Nova Join Date: Oct 2008
Location: By the lake in AZ
Posts: 15,719
|
Looks good, there is always more than one way to skin a cat.
|
|
|
|
|
05-25-2012, 07:43 PM
|
#277 | |
|
Drives: 2010 Camaro Join Date: Aug 2009
Location: Quahog, Rhode Island
Posts: 1,171
|
Quote:

__________________
|
|
|
|
|
|
06-08-2012, 08:43 PM
|
#278 |

Drives: LS3S/C Join Date: Aug 2008
Location: CALI
Posts: 1,344
|
HELP
 how do you remove the old diffuser? and do you need extra bolts for the zl1 diffuser thanks how do you remove the old diffuser? and do you need extra bolts for the zl1 diffuser thanks
__________________
MODS whipple 2.9L s/c, ADM race scoop, 600 rwhp 550 wrtq, .
|
|
|
|
|
06-08-2012, 11:48 PM
|
#279 | ||

|
Quote:
http://camaro5.com/forums/showthread.php?t=225095
__________________
Build Thread:http://www.camaro5.com/forums/showthread.php?t=196385
 Quote:
|
||
|
|
|
|
06-10-2012, 09:31 PM
|
#280 | |
|
Drives: LS3S/C Join Date: Aug 2008
Location: CALI
Posts: 1,344
|
Quote:
__________________
MODS whipple 2.9L s/c, ADM race scoop, 600 rwhp 550 wrtq, .
|
|
|
|
|
|
|
|
|
 |
|
|
 Similar Threads
|
||||
| Thread | Thread Starter | Forum | Replies | Last Post |
| SS bumper cover installed on my 2LT/RS | 01pewterz28 | Cosmetics and Lighting Modification Discussions | 60 | 01-15-2015 03:57 PM |
| Light burned hole in rear bumper | HopeRidesAlone | Camaro Issues / Problems | Warranty Discussions | TSB and Recalls | 1 | 12-03-2013 08:09 PM |
| List ZL1 Option Codes | OldJedi | Camaro ZL1 Forum - ZL1 Specific Topics | 103 | 11-30-2011 07:25 AM |
| Great Motortrend Article - GMs Reuss: Camaro ZL1 Wait is Worth it, | IOMZL1 | Camaro ZL1 Forum - ZL1 Specific Topics | 21 | 10-10-2011 02:32 AM |
| Dent forming in Rear Bumper | ambientweather | Camaro Convertible Forum | 3 | 08-01-2011 06:44 PM |