You are browsing camaro5 

|
 06-19-2013, 12:02 PM
|
#1 |
 
|
Cliff's 2012 2LT RS Inferno Tiger Camaro Build
I was brought up loving all things GM and hating all things Ford. My dislike for Ford has lessened over the years but my love for GM and especially Chevy has not. Of the 11+ vehicles currently in my immediate and surrounding family - all are GM and, to the best of my knowledge, no other brand has ever been in the family. As soon as the 5th gen Camaro came out I knew that it was the car for me. I purchased this baby in July of 2012 with my first pay-stub after graduating from engineering school. I stumbled onto Camaro5 while looking up modifications and have never left. With the first year having the car coming to a close and now that I have a few modifications of my own installed, I figured it was time to start my build thread.
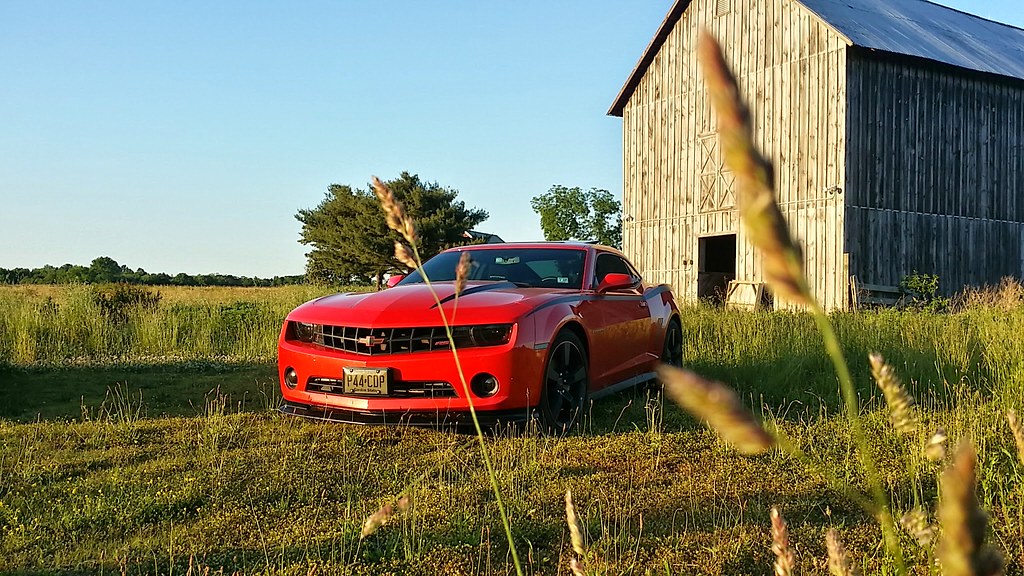 My installed/planned modifications are listed below. I will also include detailed contact information and specs for any body shops, parts, or websites used in the modification process. I hope you enjoy and please contact me with any questions! - Cliff Car Shows Silver Diner July 4th Breakfast Car Show - 2013 Cherry Hill, NJ Silver Diner Labor Day Car Show - 2013 Cherry Hill, NJ 3rd Annual Cinnaminson Girls Softball Car Show with SJCC - 2014, NJ PhotoShoots Ocean City South Jersey Photo Shoot with Samp4nda Install Guide In addition to my own install guides I will include other install guides that I find useful. DefenderWorx Locking Fuel Door Big Worm Graphix Side Spears Big Worm Graphix Hood Spears Big Worm Graphix Gill Inserts Rider Graphix Trunk Blackout Front Bumper Removal Maintenance Transmission and Differential Fluid Change Learning Experiences Rear Ended Curb Rash Waxing over Vinyl Decals Custom Painted Engine Cover Painted Fuse Box Cover Modifications INTERIOR Cover King Seat Covers ProClips USA custom cell phone holder EXTERIOR Powder Coated Rims DefenderWorx Locking Fuel Door Big Worm Graphix Side Spears Big Worm Graphix Hood Spears Big Worm Graphix Gill Inserts Big Worm Graphix Smoked Light Kit Big Worm Graphix Trunk Blackout Rider Graphix Trunk Blackout (Replaced with Big Worm Graphix Trunk Blackout after rear end collision) Phastek Bowtie Vinyl Blackout Kit (Replaced with Painted Bowties) Rider Graphix Wheel Pinstripe Accent Kit Rear Window Tint 20% Side Window Tint 35% Black/Smoke Tuf Shield Combo Front Plate Cover Tuf Shield Smoke Rear Plate Cover RiverCity Creations Painted Bowties ACS T2 Front Splitte ZL1 Rocker Panels ZL1 Rear Molded Splash Guards Custom Front Splash Guards Oracle LED Backup Lights PERFORMANCE Cold Air Inductions CAI System VMax Ported Throttle Body SOLO Performance Mach-X LFX Cat-Back Exhaust SOLO Performance HFCs Apex Performance Air Scoop Elite Engineering Catch Can Engine Bay Air Brushed Hoodliner Custom Painted Engine Cover Painted Fuse Box Cover Apex Water Bottle Relocation Kit Suspension/Brakes Full ZL1 Brake Kit (Front and Rear) - Purchased waiting to install Goodridge Stainless Steal Rear Brake Lines - Purchased waiting to install Strut Tower Brace Planned Modifications Interior Ambient Lighting Kit Sill Plates Exterior lighting kit Engine Bay Roto-Fab Radiator Cover lighting kit Performance 3.91 Gears Nytrex triple threat wet nitrous system Suspension Trailing Arms Tie Rods Coilovers - Installed with problems ============================ Most Recent Photo ============================  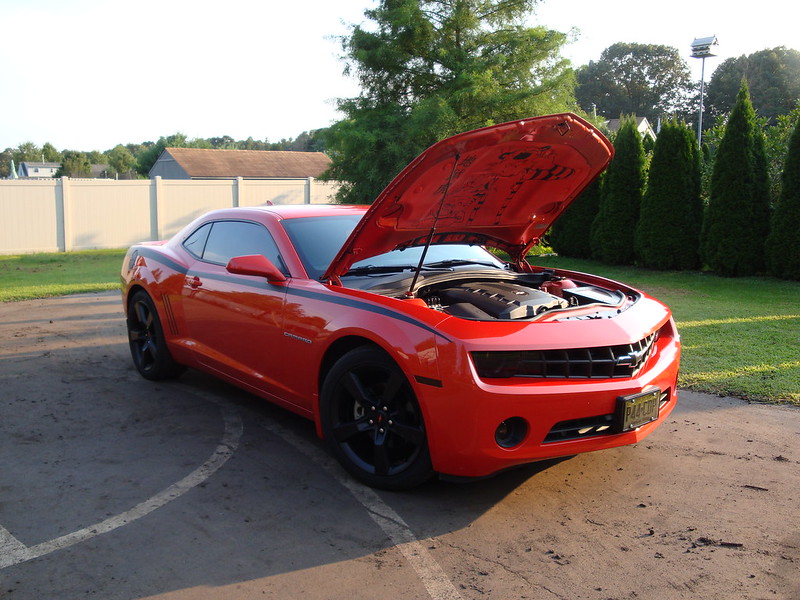 =============================== Pre-Mod =============================== 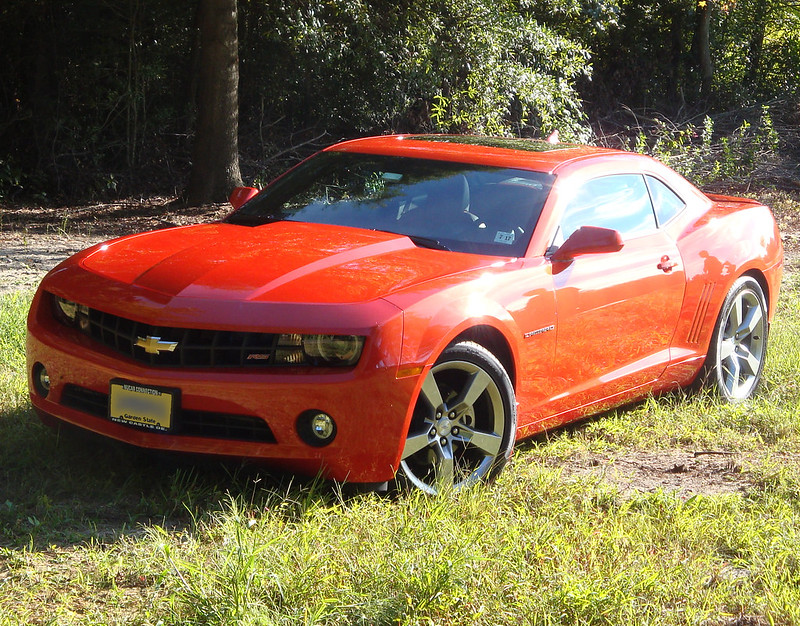  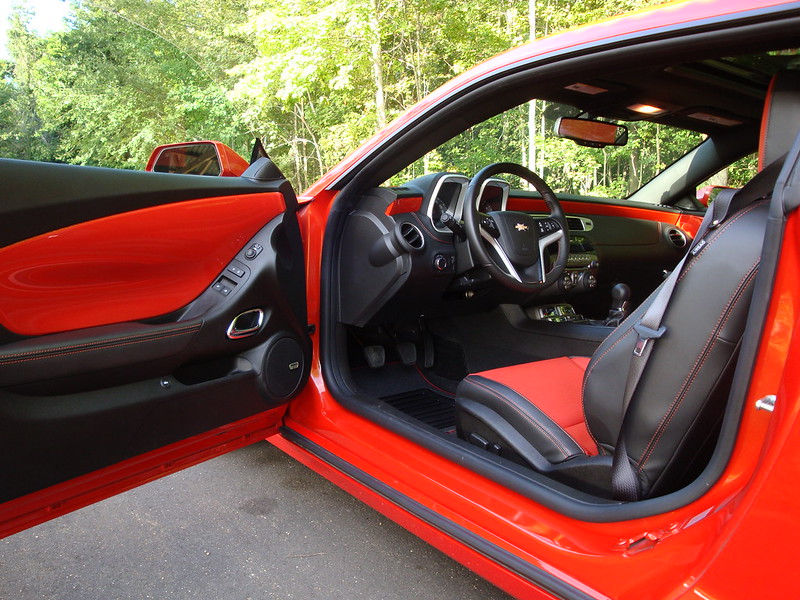
Last edited by cliffdog89; 04-25-2016 at 01:44 PM. |

|

|
|
06-19-2013, 12:13 PM
|
#2 |
  Drives: 2012 Summit White 1Ls Join Date: Jan 2012
Location: Diamond Bar, Cali
Posts: 898
|
Sweet ride! She looks so clean, your interior came out great too I love the matching stiching! And you got the manuel trans, even better!

|
|
|
|
|
06-19-2013, 12:20 PM
|
#3 |
|
|
Mod 1: CoverKing Seat Covers
Purchased: Carid.com
Price: $149.99 + $30.00 ("Camaro" Stitched Headrest Cover) Recomendation: I would recommend these covers if you want to protect your seats. The "Camaro" stitching across the headrest also looks great from the outside and adds to the look of the car. These are very comfortable and easy to clean. I purchased seat covers after discovering a small tear in the passenger side leather. This was somewhat of a bitter sweet modification as I love the stock orange accented leather but I wanted to protect the seats from any future damage. Starting to take the Camaro to shops for upgrades, I am much more comfortable with mechanics and gear heads moving my car with these seat covers installed. I am also no longer grimacing when friends come along for rides  Installation: The installation is a little tricky - the instructions are not over helpful as they are generic. The bottom portion of the cover fits snugly on over the seat with the edges tucked into the plastic trim. Two straps extend under the seat from the front of the cover to the back. These straps are extremely difficult to tighten and I had to use a heavy gauge wire to pull the draw strings taunt. I ended up only doing one of the two straps on the passenger side as it was too difficult to fish the wire through the under-seat motors. The back cover fits snugly with a portion being slipped between the backrest and seat. This is portion is Velcroed to the rear portion of the the backrest cover. The headrest installation is intuitive. Issues: One issue I noticed is that when the backrest is lowered for someone to enter the rear seat of the vehicle the covers shift a little. This shifting is minimal with proper installation an can easily be corrected in a few seconds. Also, there are a couple straps hanging from the rear of the backrest cover that I could not figure out where to attach to. These are just pushed under the seat (I never sit in the back so I don't mind lol). Also, there is a flap that extends from the back of the backrest down to the floor (not a tight fit); however, this keep feet from being put on your rear seats. 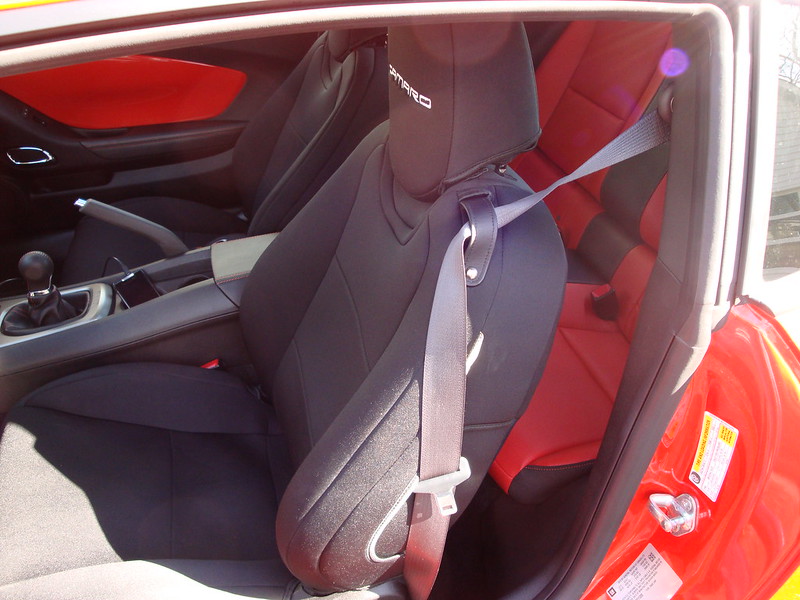
|
|
|
|
|
06-19-2013, 12:22 PM
|
#4 |
|
|
Mod 2: Powder Coat Stock Rims and Fix Curb Rash
Body Shop: Kwicksilver Wheel Repair
Location: 13 New Brooklyn Road Edison, NJ 08817 Contact: jiskander@kwicksilverusa.com Price: $175/wheel (including curb rash repair to one rim) - Included unmounting wheels from car, removing tires, removing TPM sensors, remounting TPM sensors, remounting tires, remounting wheels to vehicle. Recomendation: I would highly recommend this repair shop. I emailed John with photo's of my curb rash and a request to powder coat my rims. He called me back later that evening and was extremely helpful through the whole process in setting up an appointment. I arrived at his shop at 8:30AM with my vehicle - by 1:30 I was leaving with beautiful powder coated rims. He stepped me through the whole process and showed me each stage of the application. After having the car for 1 week I had my first (hopefully my last) experience with curb rash. My previous/other vehicle ('89 Caprice) has large walled tires which don't mind a curb now and then but the Camaro was a whole different animal. Needless to say I found that out the hard way. After a significant amount of researching and getting various prices from repair + powder coating I opted with John at KwickSilver due to some good reviews he had received.  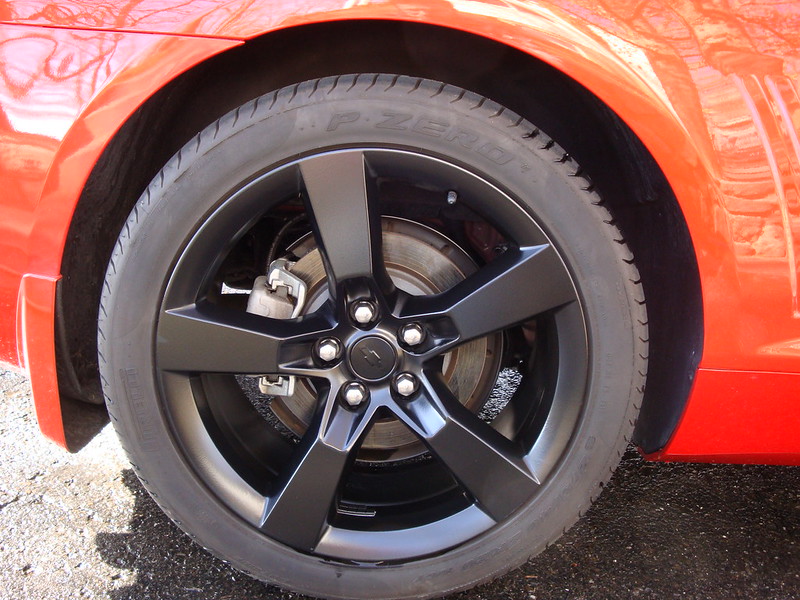 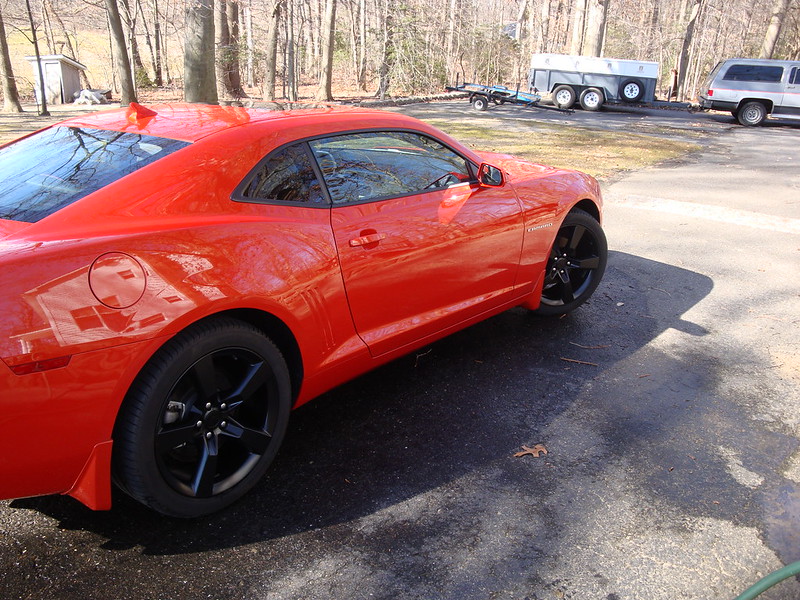
|
|
|
|
|
06-19-2013, 12:25 PM
|
#5 |
|
|
Mod 3: Cold Air Inductions Cold Air Intake System
Purchased: www.coldairinductions.com
Price: $399.99 + $17.00 S&H Recomendation: I would recommend purchasing this CAI system. Great Customer Service. After much deliberation I decided to go with the Cold Air Inductions CAI system. Unlike many of the other companies that make cold air intake systems for every vehicle on the road - Cold Air Inductions focuses on the GM family of vehicles with a few exceptions (such as challenger intake systems). I was also considering the Roto-Fab CAI system and the Injen CAI system. Injen received solid reviews for the 2010-11 V6 camaro's but I could not find any systems installed in the updated '12 LFX engine. Roto-Fab was also high on my list but was on the expensive side and did not include a fully enclosed air box like the Cold Air Inductions system. Installation: The Installation took under a half hour. It was fairly straightforward except for the airbox which took a little shimmying to get it in place; However, once it was in place it fit like a glove!  The lid was a little problematic getting the half turn screws locked in and required a little re-adjustment of the box but as you can see in the photos it fit perfectly once aligned properly The lid was a little problematic getting the half turn screws locked in and required a little re-adjustment of the box but as you can see in the photos it fit perfectly once aligned properly  Performance Gains: I have not taken my car to a Dyno but even without the numbers I can feel and hear the additional power. Shifting from 1st to 2nd (Only Manual Camaro's for this guy) and giving the car a little throttle, an immediately noticeable deep roar is present. These deeper tones only increase as the RPM's climb. The car is also much more responsive to the gas then before. The nice bass tones (as much as a V6 can put out anyways lol) continue up through all the gears, although they are not as noticeable in 6th. According to CAI, the system provides an average 17 RWHP gain on my car. As far as fuel economy, I seem to have increased about 1 MPG over my previous driving; however, I feel that I am pushing the car harder now because of how awesome it sounds  so I am probably not realizing the full gains added by the system. so I am probably not realizing the full gains added by the system. CAUTION: CAI recommends that you check the filter periodically to ensure that it has not become loose on the system. DO THIS! After about two weeks of driving with the CAI system I started noticing diminished throttle response and a lack of the deep tones I had become accustom too. The engine was also idling hard. Sure enough, after popping the hood, I saw that the filter had worked its way off and was sitting in the air box  I reattached it and made doubly sure that everything was extremely tight. It has been a week since reattaching the filter and I have not had any problems; however, I now carry a screwdriver in my glovebox just in case  UPDATE: This has been installed for several months and has not come loose again. 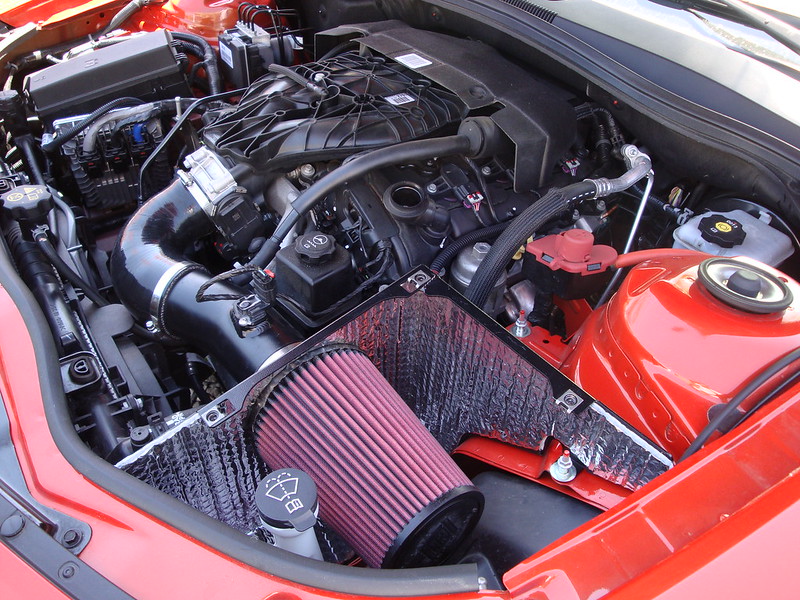   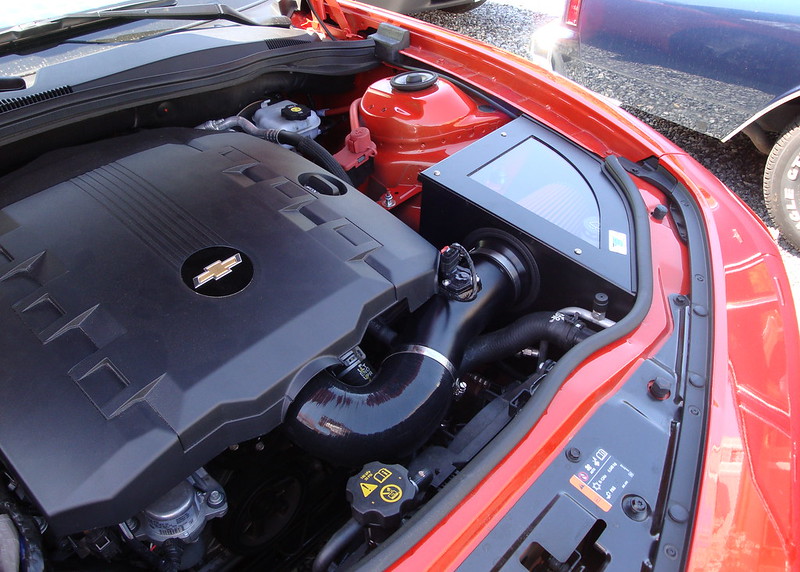
Last edited by cliffdog89; 02-12-2014 at 11:05 AM. |
|
|
|
|
06-19-2013, 07:45 PM
|
#6 |
|
|
Mod 4: VMax Ported Throttle Body
Purchased: www.revxtreme.com
Price: $150.00 + $200.00 Core Charge + $15.00 S&H The core charge is the approximate value of a new (non-ported) throttle body from GM. Upon returning the stock core from your vehicle the charge will be refunded. I chose to keep my original core pending any need for replacement down the road. In the shipping box they encouraged that the stock core should be returned within seven days to ensure the refund. Shipping took a few weeks but Tracy at RX performance stayed in contact and responded to my emails quickly and promptly. While the gains reported for the VMax throttle body vary from 2-12HP (the lower end seems more likely) I decided to make the purchase due to all the positive reviews on Camaro5. The installation took about fifteen minutes. Upon starting the car it seems to rev a little higher than usual although it settles down after a few seconds. As reported the "dead" spot is reduced. this is most noticeable cruising in 6th gear. I am able to shift into 6th at lower rpm's without feeling like the engine is starved for power. Ported Throttle Body  Stock Throttle Body 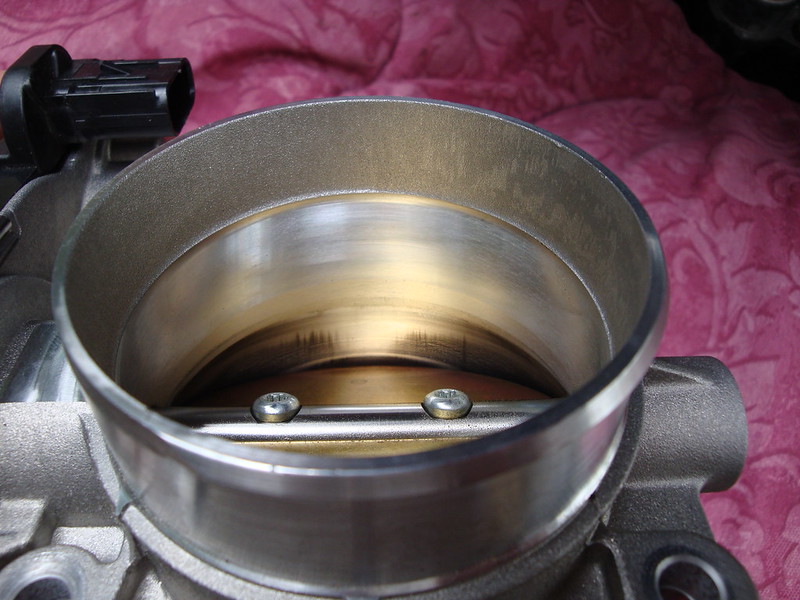 Ported Throttle Body Installed 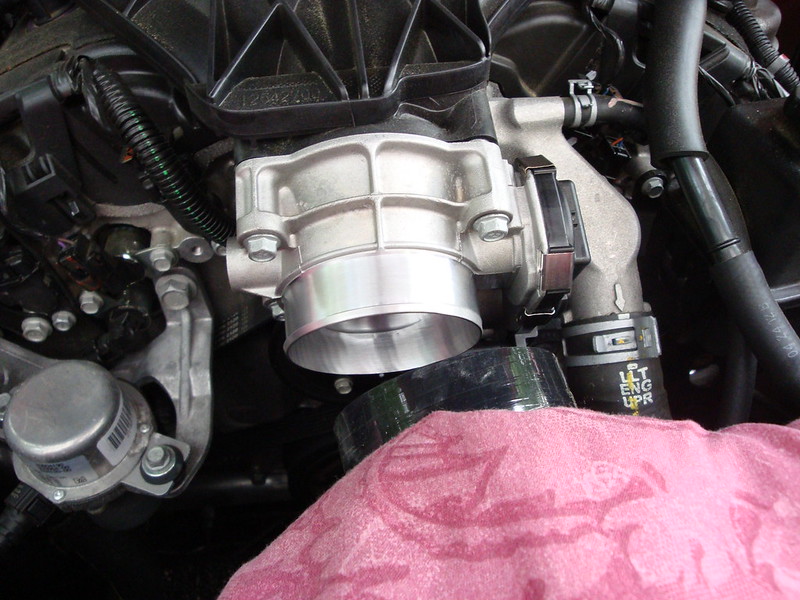
Last edited by cliffdog89; 06-20-2013 at 06:42 AM. |
|
|
|
|
06-19-2013, 08:15 PM
|
#7 |
|
|
Mod 5: Window Tinting
Purchased: www.dynamictint.com
Location: 1972 N Black Horse Pike Williamstown, NJ 08094 Phone: (856) 566-8468 Price: $500.00 included installation and lifetime accidental damage coverage. Front window (clear) 3M Elite Crystalline Side windows 35% and rear window 20% 3M Ultimate Color Stable (A cheaper grade tint could have been installed on the rear and side windows for $170.00) After looking around for a good window tinting shop in South Jersey I found Dynamic Tint on a Camaro5 forum. I dropped the car off and it was finished four hours later. I couldn't be more happy with the results. It is important to go to a shop that is used to working with the camaro's automatically lowering windows. The did a great job and used a heat gun to ensure the bottom portion of the window did not peel upon opening while the rest of the window was curing. While installing the tint is partially for appearance - it was also for protection of the interior as I do not have a garage to store the car and it is usually in direct sunlight. Due to this I had the crystalline installed on the windshield to block heat and UV rays. The higher grade tint I had installed is guaranteed by 3M not to lose color, crack, or bubble for life. Due to the nearly constant sun exposure I went with this more stable option. Now most people want to know - will I get pulled over? I do live in NJ where any and all window tinting on side windows and the windshield is illegal. However, after having the tint installed for about a month I have not been pulled over. KNOCK ON WOOD 
__________________
 Last edited by cliffdog89; 06-20-2013 at 10:36 AM. |
|
|
|
|
06-20-2013, 06:28 AM
|
#8 |
|
|
Mod 6: DefenderWorx Matte Black Locking Fuel Door
Purchased: Ebay
Cost $100.00 To continue with the matte black theme I had started with the powder coated rims, I purchased the DefenderWorx locking fuel door. The install was a little tricky and much more involved than I expected due to me wanting it perfect. Removing the old locking mechanism was fairly difficult. The instructions indicated that the mechanism should just pull out after releasing it; however, it required a great deal of work to shimmy it out without damaging the unit. (I got the impression from the instructions that the design might have changed slightly from the '10 & '11 models but I am not sure.) The instructions said to use a set of tin snips to cut back part of the hinge to allow the locking portion of the new door to fit (See second photo). I used a hacksaw which worked just as well. The only disadvantage of using the hacksaw was that the hinge wanted to sway with the cutting mostion  In the first photo you will see the metal bracket that slides over the old locking mechanism (notice the old push pin is cut off at the base and pushed inside the mechanism). Two of these metal brackets were included - one slightly higher than the other. The shorter of the two was not tall enough and I was unable to latch the door using it. The taller of the two was too tall. With this bracket installed, I was able to pull the door open about a centimeter with it locked  This would not do. I used a vice to straighten and re-bend the bracket to a height slightly lower. I ground off the excess and and after a few fitting sessions got the perfect height! This is why the bracket looks a little beat up in the photo. This would not do. I used a vice to straighten and re-bend the bracket to a height slightly lower. I ground off the excess and and after a few fitting sessions got the perfect height! This is why the bracket looks a little beat up in the photo.As you can see in the first photo, the old locking mechanism is used to hold the metal bracket. Two pieces of double back tape are included with the fuel door to secure the mechanism back in place. These are completely inadequate. With the two pieces installed I was easily able to force the door open, pulling the whole mechanism out in the process. To rectify this problem, I purchased outdoor grade Loctite double back tape. I cut a generous piece and forced it into the gap. This has held up beautifully.  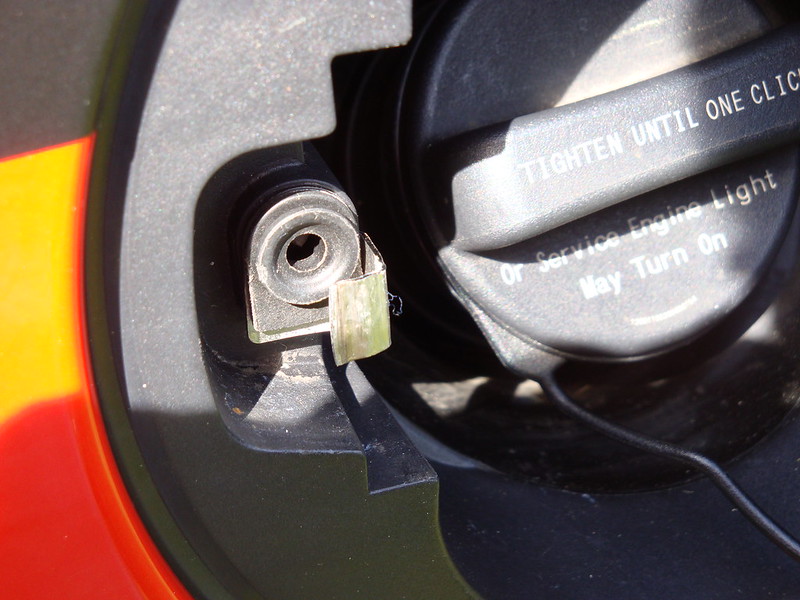 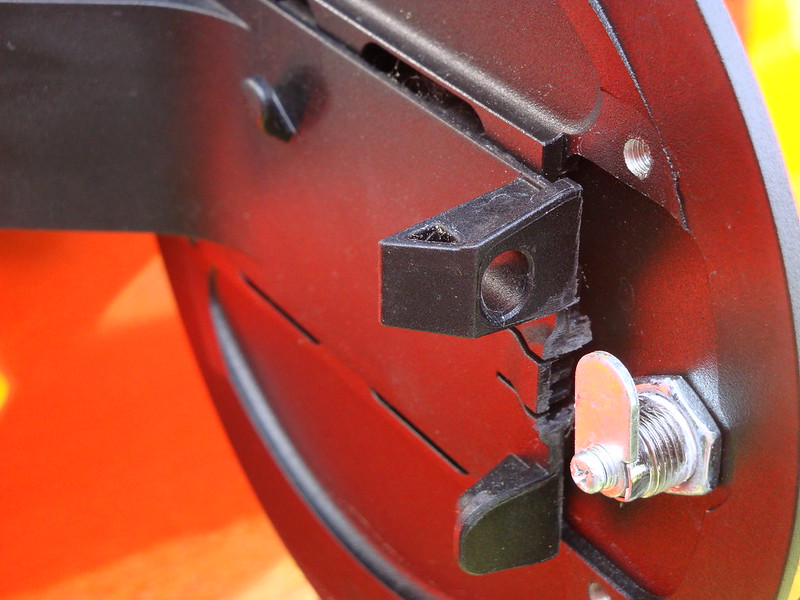 
__________________
Last edited by cliffdog89; 06-24-2013 at 09:09 AM. |
|
|
|
|
06-22-2013, 06:47 PM
|
#9 |
 
Drives: 2012 45TH 2LT RS Join Date: Jul 2012
Location: Michigan
Posts: 271
|
Great job on your mods! Your write ups were well done, I enjoyed reading each one!
__________________
 |
|
|
|
|
06-24-2013, 09:15 AM
|
#10 | |
|
|
Quote:
__________________
|
|
|
|
|
|
06-24-2013, 11:50 AM
|
#11 |
|
|
Mod 7: Side Spears, Hood Spears, & Gill Inserts
Purchased: www.bigwormgraphix.net
(If you search for their site you may find a second url: www.bigwormmotorsports.com This is the WRONG site) Contact: bigworm90@gmail.com Matte Black Side Spears $169.95 Matte Black Hood Spears $40.00 (Only $40 because added to Side Spears ordered Regularly $50.00) Matte Black Gill Inserts (style #2) $29.95 Ordering from Big Worm Graphix was a pleasure. After ordering and installing the stripe kits on my car I have had a few follow up questions all have been responded to promptly. They use Hexis vinyl which I found superior to the vinyl which I received from both Phastek and Rider Graphix. I would recommend Big Worm Graphix to anyone.  Earlier this year found me on work travel for two months. Needless to say, in between the training sessions, I found myself with too much time on my hands so I started looking up striping options for my car. I was looking for something unique. I did not want to have the same stripes that 90% of Camaros have. I also was considering painting versus vinyl; however, for the price differential, I opted to go with vinyl. Vinyl also gave me the flexibility to easily modify my stripes down the road should or the ability remove the stripes altogether. After changing my mind several times on the stripes I decided with the matte black side/hood spears combo from Big Worm Graphix. Installation Prep The stripes sat for about five months as I waited for the warmer summer weather to arrive. I finally slotted out a day for the install and my grandfather and I started the process. This was the first time either of us had installed vinyl decals and the process went surprisingly smooth. To prep the car I used rubbing alcohol to remove the wax from the application areas. After an initial rub down, I sprayed the areas with water to see if it was still bubbling or running off smoothly. It was still bubbling (indicating wax was still present) and I rubbed everything down again, this time much for vigorously. I started the installation off easy and installed the hood spears first. One nice thing about working with the Hexis vinyl is that it only requires water during the application process rather than the soap mixture required by Phastek and Rider Graphix. Hood Spear Installation I sprayed the surface and the sticky side of the vinyl with plenty of water and then lined it up on the car, leaving excess hanging over the front and rear of the hood. Making sure plenty of water is applied is key as this allows the vinyl to be picked up and re-applied easily. After lining up the vinyl, I used the supplied squeegee to remove as much of the excess water as possible. I then used a blow dryer to gently go over the entire surface of the decal. A blow dryer is preferable to a heat gun as a heat gun can melt the decals if you are not careful. After leaving the decal sit for about thirty minutes I peeled off the front backing and re-squeegeed the decal. I then tucked the excess under the rear and front of the hood. This I held in place for about a minute which was sufficient for the decal to stay in place.  Side Spear Installation After installing the hood spears, we moved onto the side spears. This was the most daunting challenge of the install. To begin, we taped the spears in place on the passenger side of the vehicle with masking type until a satisfactory alignment was achieved. We choose to do the passenger side of the vehicle first because the fuel door dictated the exact placement of the spears. We then matched the height on the driver side. Moving from the rear quarter panels to the door it is important to make sure the spear sits above the door handle indentation or you will have difficulty molding the stripe to the curvature. After taping the stripes to both sides, masking tape was placed just above the stripes to serve as a guide once the stripes were taken down. The same process of spraying, adjusting, squeegeeing, blow-drying, and re-squeegeeing used for the hood spears was repeated for each section. After the final step, I used the blow-dryer to push the decal around the edges of the fuel door for a nice finished look. The spear section on the front fenders continues over the gap between the fenders and the front fascia. I just to use a box cutter to slice the decal AFTER it was installed. I then used the blow dryer and pushed the edges into the gap. I chose to do this to prevent the decal from lifting over time. 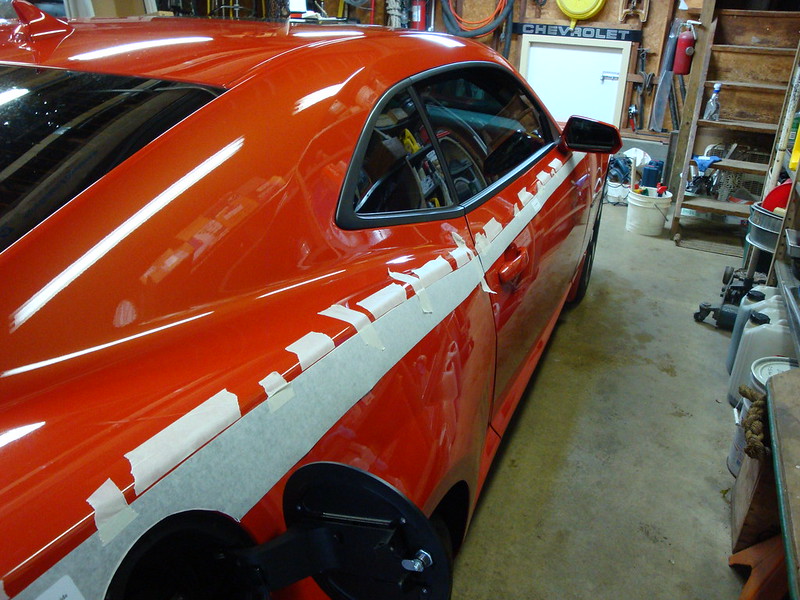 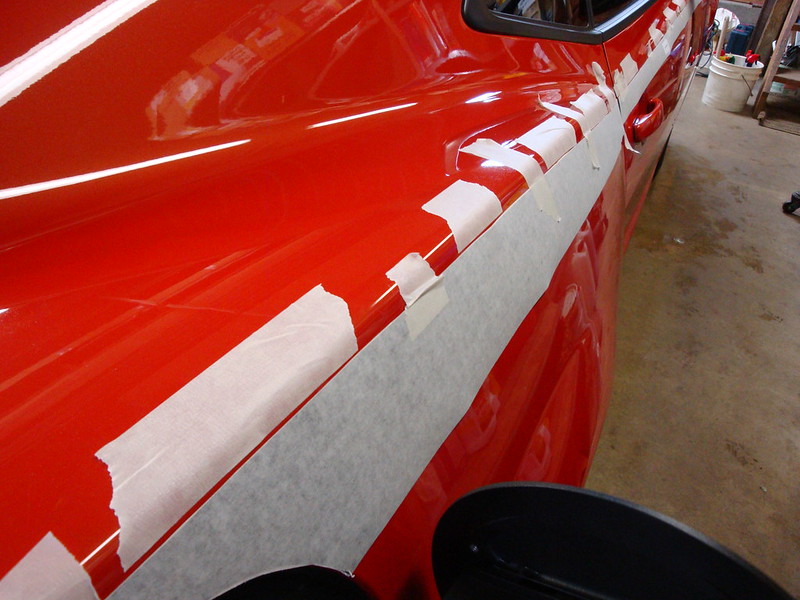 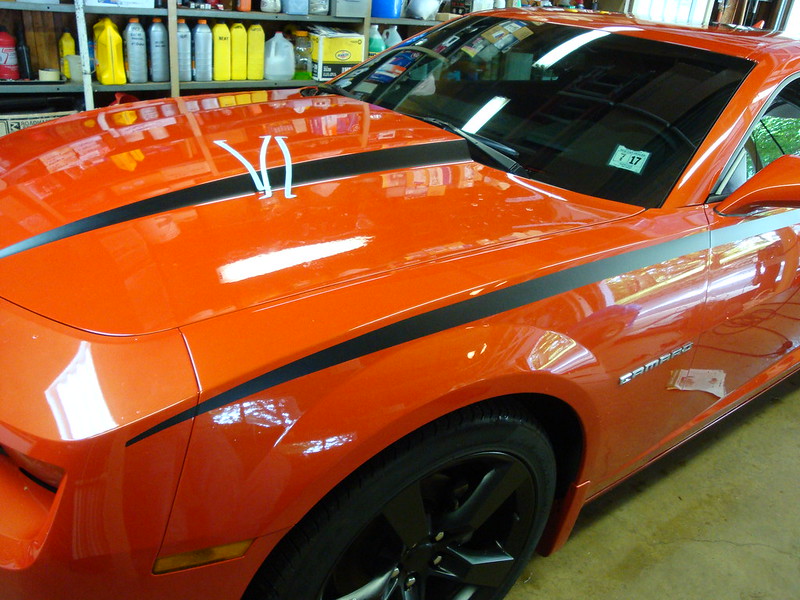 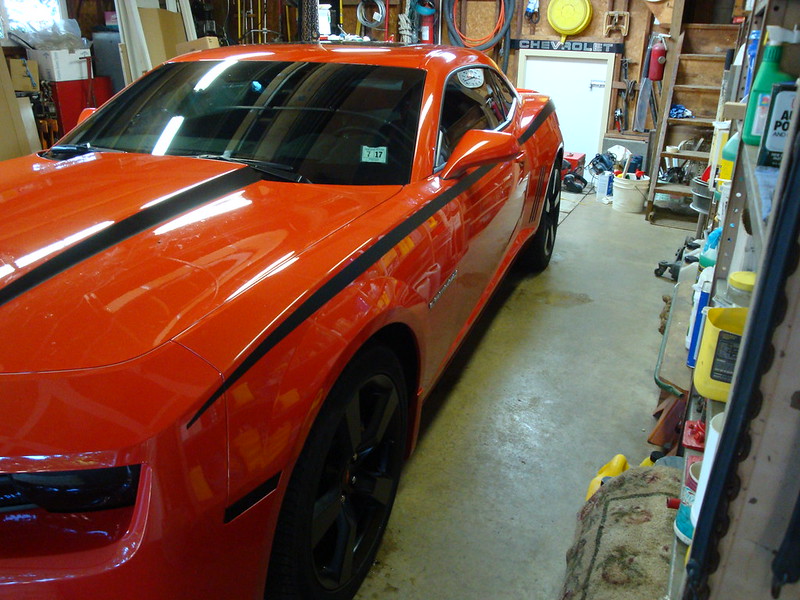 Gill Insert Installation While one would think this would be the simplest of the install, they proved to be the most troublesome because of the exact fit required. To ease the process, I cut the backing paper as close to the decals as possible. I found that even with cutting the paper back, it was preferable to remove the front backing paper as soon as the decal was applied. This allowed me to make sure the decal was applied correctly. With much frustration and reapplication, the decals were successfully installed and look great! I was on the fence with these inserts but could not be happier with the results. They are not obnoxiously present but add a nice subtle feel, not looking like decals unless closely inspected. I do not know if this was a mistake or intentional but Big Worm Graphix included a second set of gill inserts at no cost. This is very nice because it would be extremely easy to stretch out the vinyl during the application process. The only issue I have noticed is that small air pockets are present in the corners of some of the inserts. These are not apparent and I am not sure what to do differently during the application to prevent this from happening. 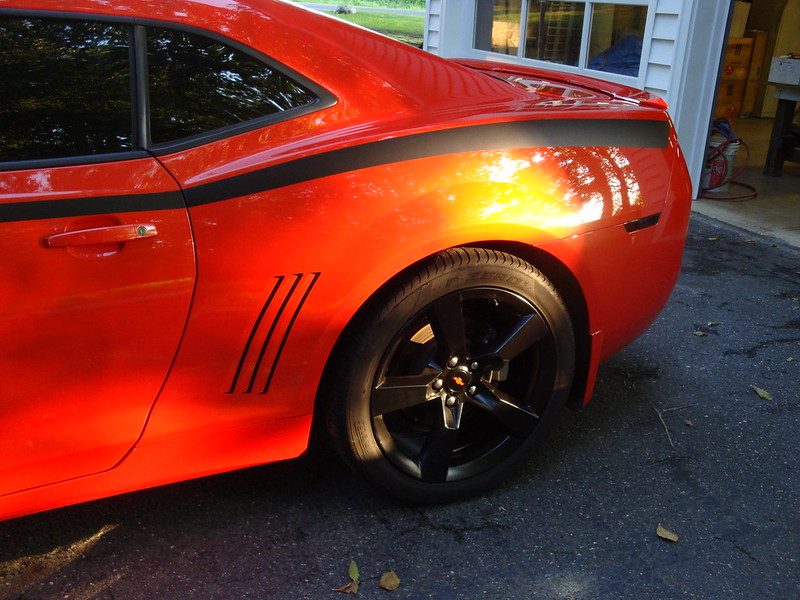 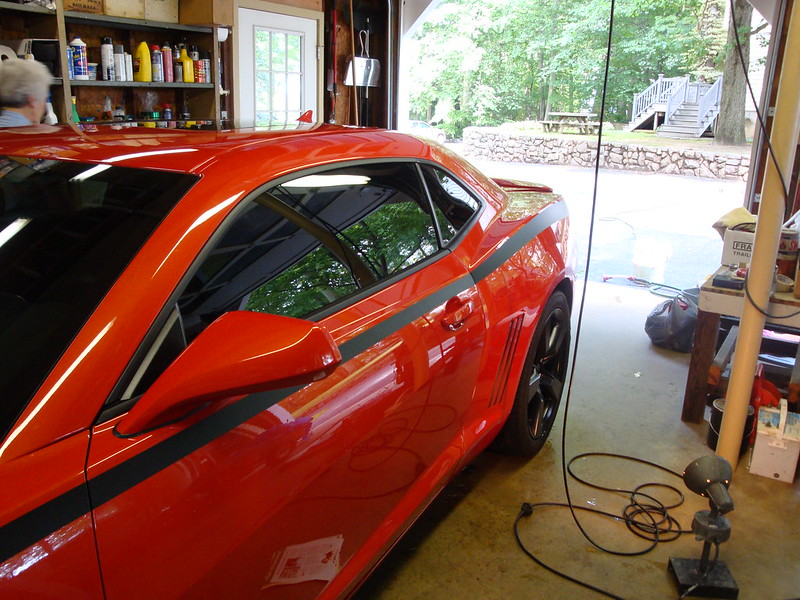 Post Installation After installing the decals, which took about four hours, I left the car in the garage for the recommended 72 hours. All decals were still in place. I will update this down the road with how well they have held up. Care After installing the decals I contacted Big Worm Graphics asking if the decals could be waxed. Their response is below: You have to be careful with what type of wax you use. We have been using Maguires Ultimate Quik Detailer for several years with no negative long term effects. It is a spray wax instead of a paste wax, the paste waxes will leave a hazy residue on vinyl & trim. I searched around a little further and found the following on the Rider Graphix FAQ page Can I wax over the decals? Most Liquid Detailing sprays and waxes are fine to use on decals. We have asked Sal Zaino to comment on this further, you can visit his website at www.zainostore.com Zaino Show Car Polish works great on all vinyl decals. It is non-abrasive, leaves no white residue or wax buildup and actually makes the decals last longer. It's UV40 protectant will keep the decals from shrinking, fading and drying out. Plus it will make the decals look like they have a clear coat over them. Try it on all the decals you'll love it. You can use Z-2, Z-5, Z-6 or Z-8 NOTE: For Flat Black or Matte Decals. Try a test spot on the Flat Black decals and see if you like the look.It will make the decals have a slight gloss to them. It boils down to a matter of personal preference. After two coats of Z-2 and one coat of Z-6 the car and decals are looking amazing! It has been a week since the wax was applied and one day since Z-6 shine enhancer was applied. The decals are still looking great
__________________
Last edited by cliffdog89; 07-05-2013 at 06:36 AM. Reason: Update on Zaino Products used to Wax Decals |
|
|
|
|
06-24-2013, 11:58 AM
|
#12 |
|
|
Car Detailing Guide
While searching around online I found this detailed guide for car detailing which includes product recommendations and reviews. I have found it extremely helpful in detailing my car
http://paintcarendetailing.com
__________________
|
|
|
|
|
06-28-2013, 04:37 PM
|
#13 |
|
Account Suspended
Drives: 1991 Z28, 2015 SS & 2017 SS Join Date: Aug 2009
Location: Fort Worth, Tx
Posts: 800
|
Great job on the install, thanks for posting!
|
|
|
|
|
07-04-2013, 06:26 PM
|
#14 |
|
|
Silver Diner July 4th Breakfast Car Show - Cherry Hill NJ
So today, for what turned into a beautiful Fourth of July
, I went with the South Jersey Camaro Club (SJCC) to the Silver Diner Breakfast Car Show in Cherry Hill NJ. We all enjoyed an awesome breakfast and milkshakes while our cars were judged along with about two hundred other vehicles. There were approximately twelve 5th gen Camaros (ten of which were from SJCC), three 1st gen camaro's (including a beautifully restored ''69 Z/28  ) and one 2nd gen '80 Z/28. This was my first time entering my car into a judged competition and I shockingly placed ) and one 2nd gen '80 Z/28. This was my first time entering my car into a judged competition and I shockingly placed  I placed "Best of Class" along with five other cars in the 2000 and up modified category (One of the other five vehicles was also a 5th gen Camaro I placed "Best of Class" along with five other cars in the 2000 and up modified category (One of the other five vehicles was also a 5th gen Camaro  ). I have posted some photo's of the SJCC cars along with my own below. Enjoy ). I have posted some photo's of the SJCC cars along with my own below. Enjoy   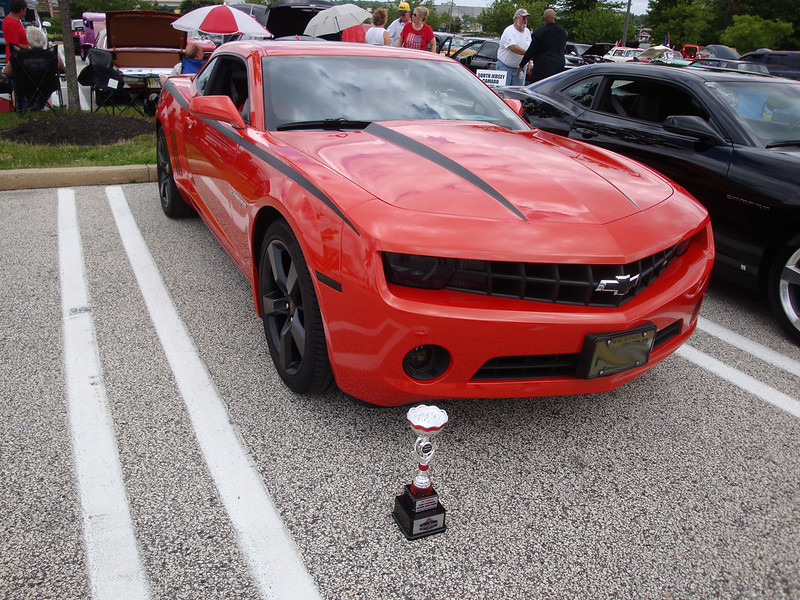   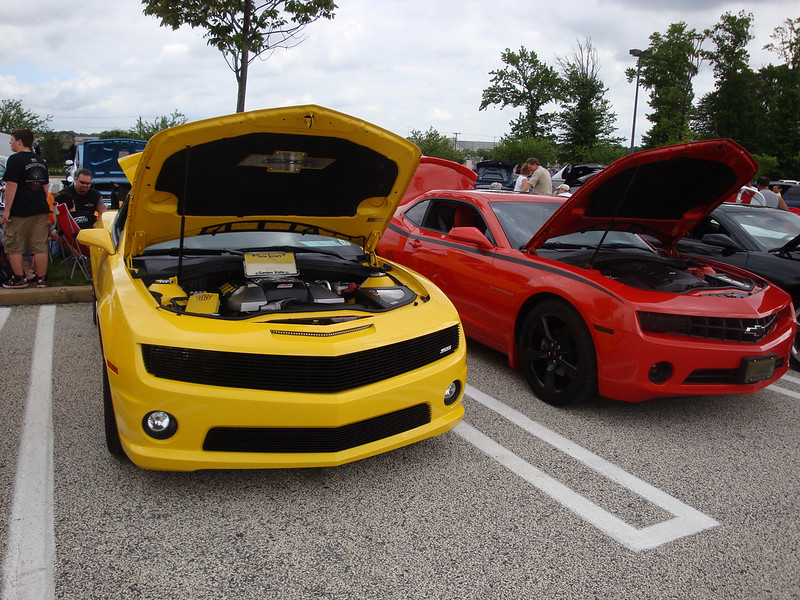 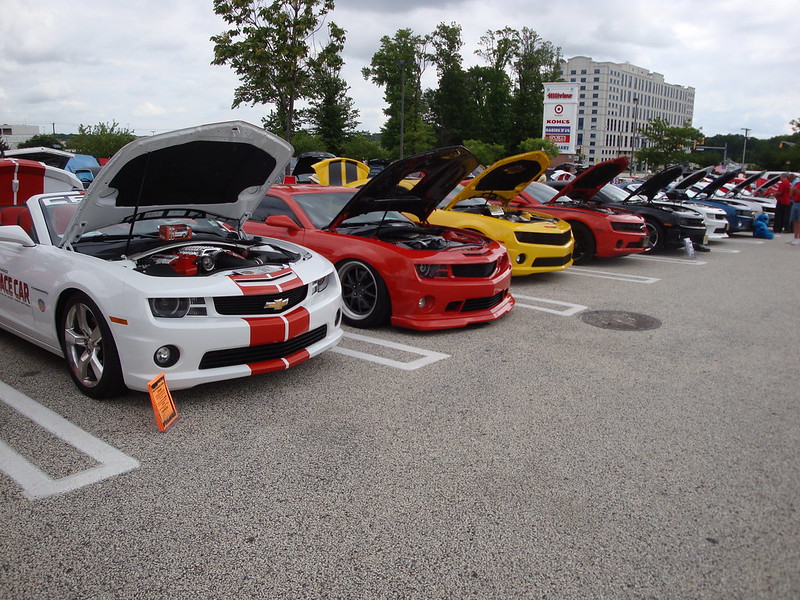 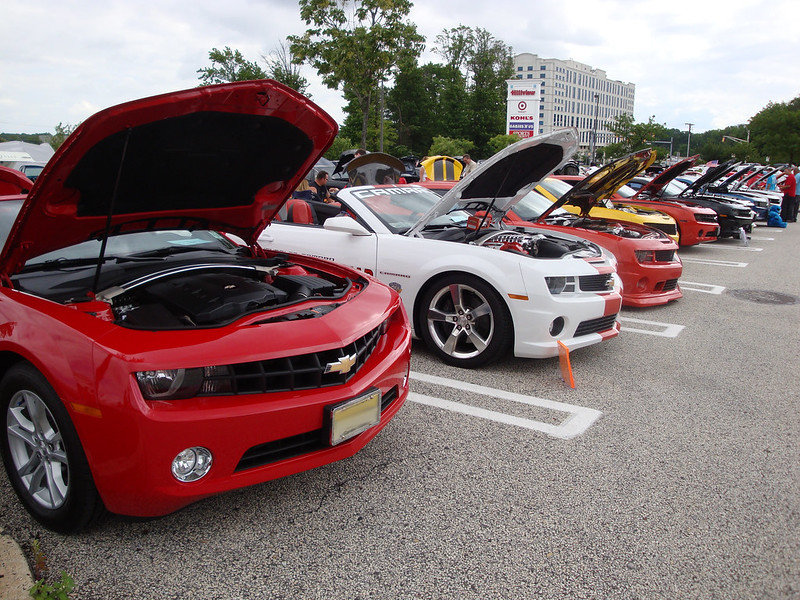 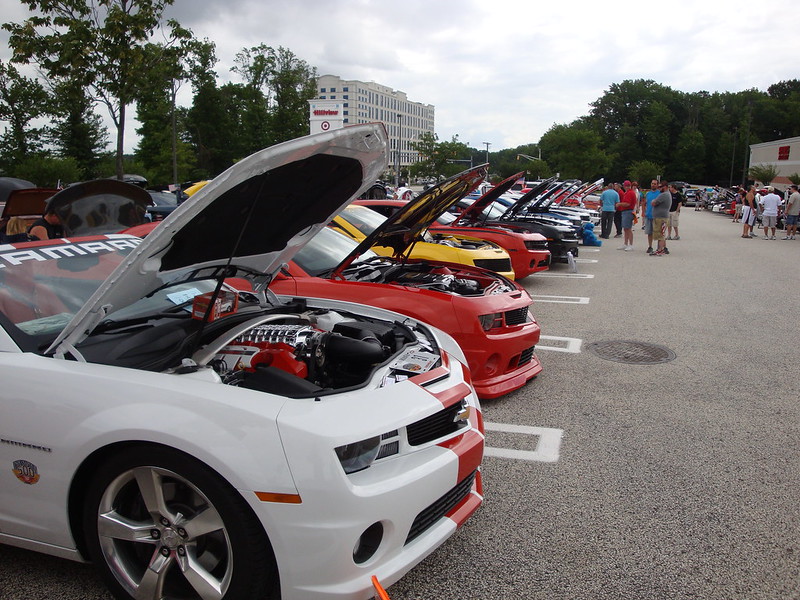   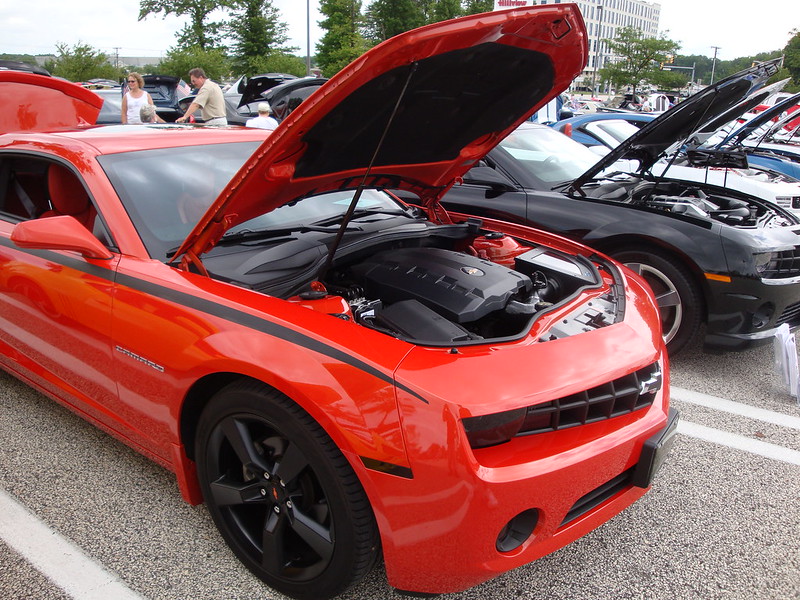 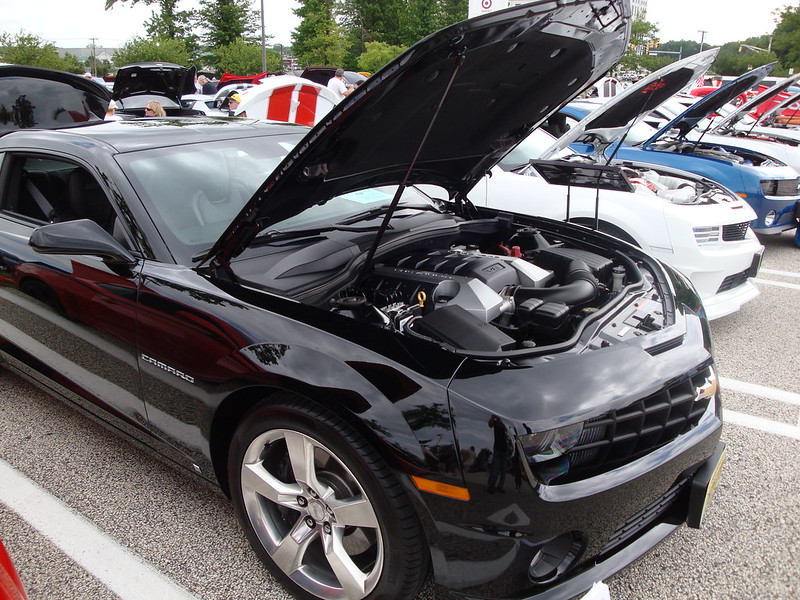 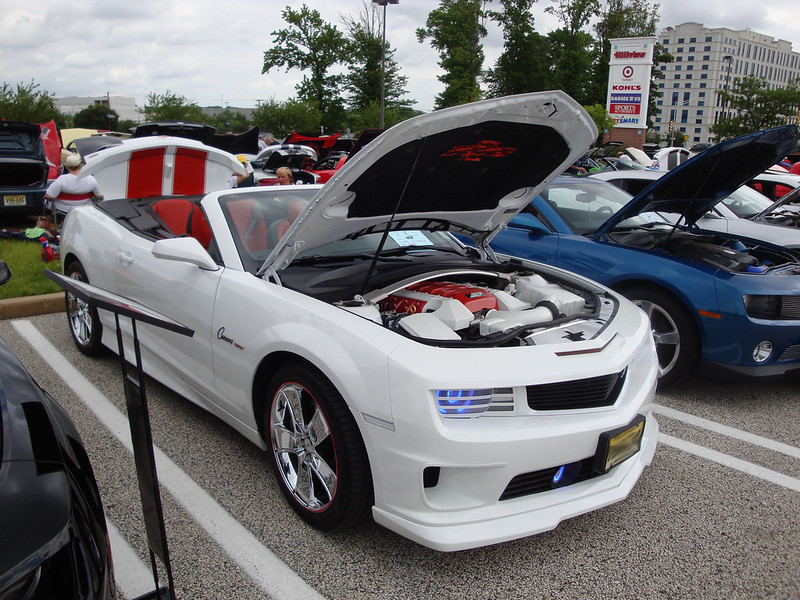 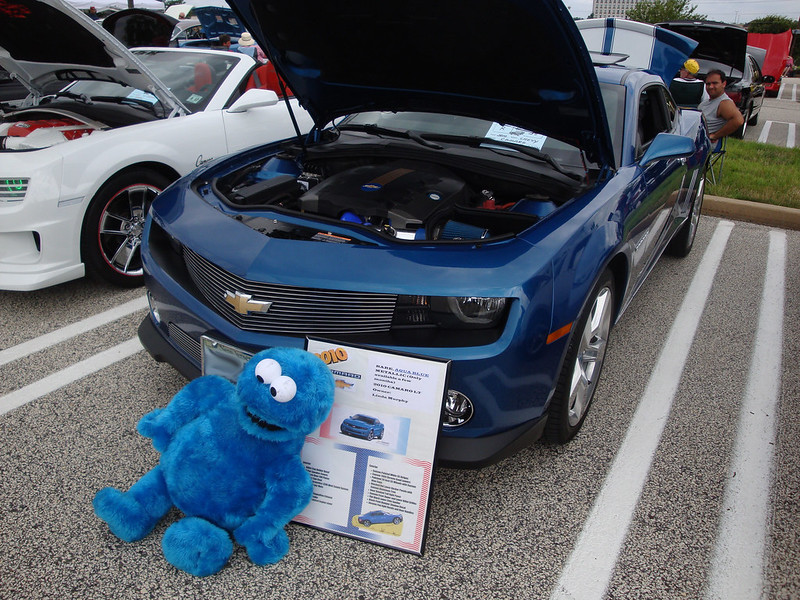 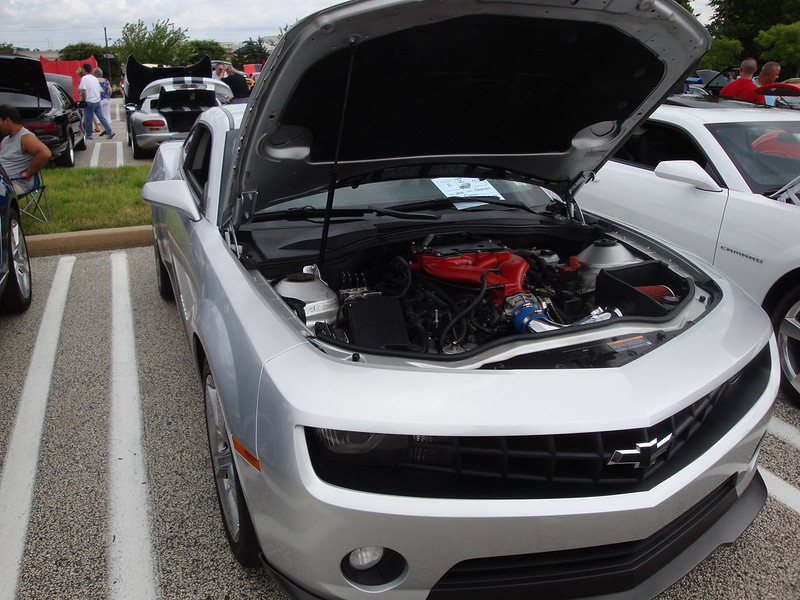   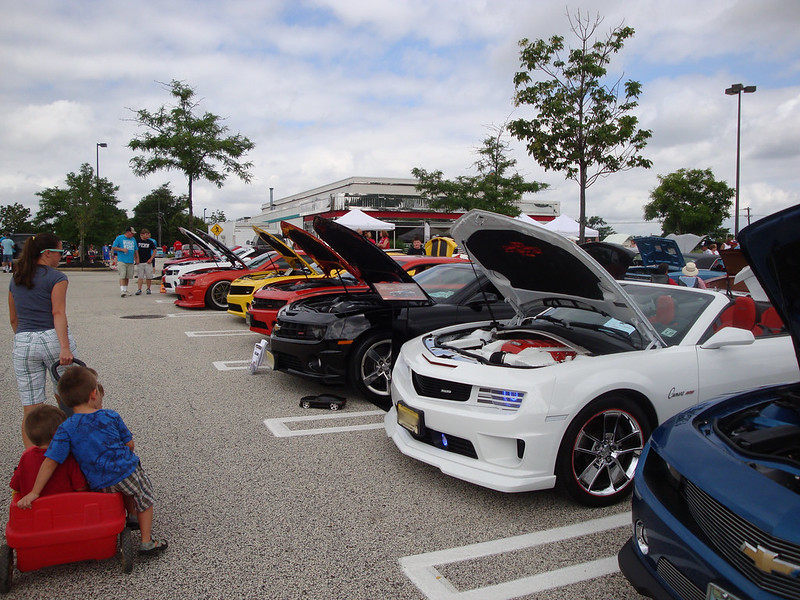 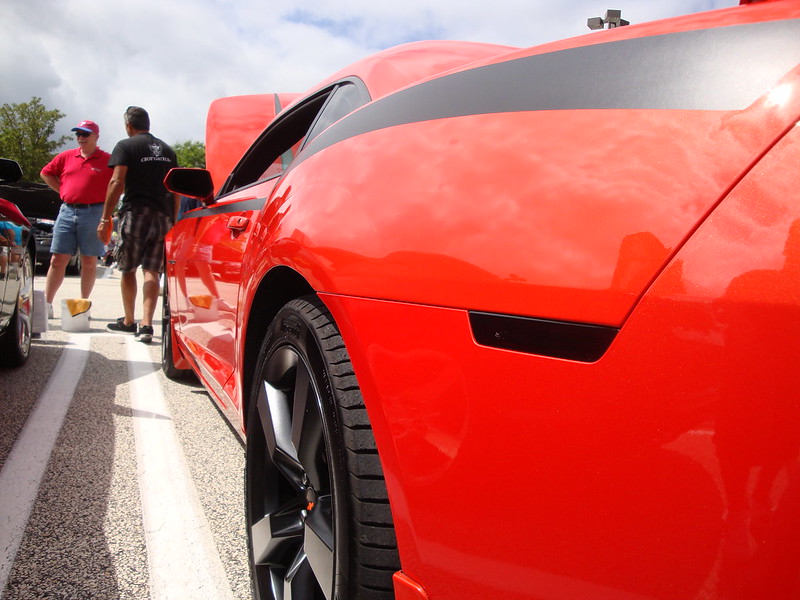 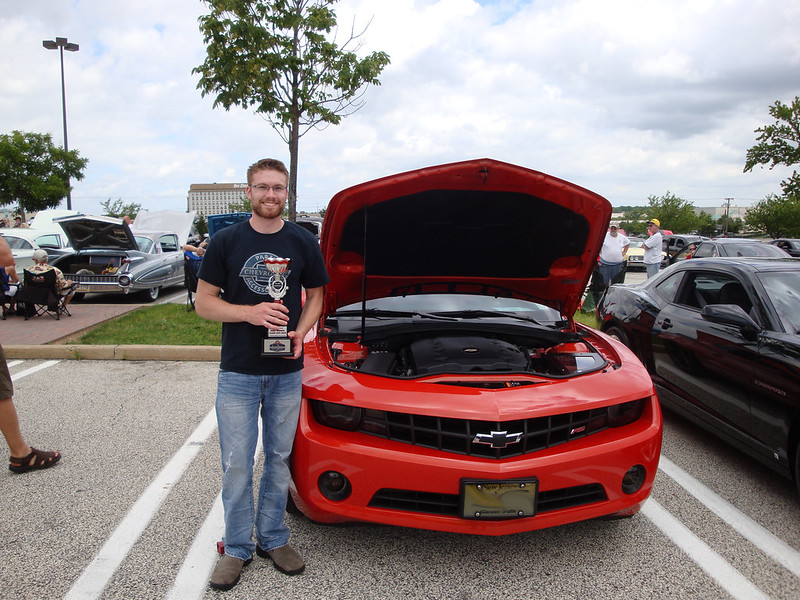
__________________
|
|
|
|
|
|
|
|
 |
|
|


