You are browsing camaro5 
|
|
 12-11-2013, 01:32 PM
|
#1 |
 
Drives: 2010 Camaro rs/ss Join Date: Jun 2010
Location: toronto
Posts: 111
|
Request for kooks header install video and/or advice
Just wondering level of difficulty for kooks headers DIY install. Videos would be appreciated. A few shops asking 500 dollars Canadian.
Thanks. |

|

|
|
12-11-2013, 01:41 PM
|
#2 | |
 
Drives: 2011 Camaro SS L99 Join Date: Jan 2012
Location: Perry, GA
Posts: 553
|
Try this:
|
|
|
|
|
|
12-11-2013, 01:45 PM
|
#3 |
 Drives: 2010 RS/SS Join Date: Dec 2010
Location: Mooresville, NC
Posts: 959
|
It's really as simple as removing the old and installing the new - there are no fitment issues or tricky situations. If you want to help yourself out, spray some PB blaster on the exhaust bolts (manifold outlets on back) and o2 sensors a day or so before you do it to make your job easier!
|
|
|
|
|
12-11-2013, 01:53 PM
|
#4 |

|
Did mine in a day and half...just make sure you jack the car high enough to get the old ones out. AND also remember how to route the dipstick tube, I thought that was the hardest part of the whole installation.
__________________
1969 SS: SS/DA 427 CI/Auto
2011 SS-2 LS3 M6 MODS: P1X ProCharger, Squash dual fuel pumps, ID fuel injectors, Cam: Pat G designed/EPS Ground (228/234 .629/.629 114 LSA +4 advance), Lethal Racing ported throttle-body and intake manifold, Kooks 1 7/8 Long Tube Headers, Dynomax Bullet Cat-Back System, Skip Shift Eliminator  |
|
|
|
|
12-11-2013, 02:04 PM
|
#5 |
|
2010 2SS/RS M6

Drives: 2010 2SS/RS M6 Join Date: Jun 2010
Location: Auckland, NZ
Posts: 1,482
|
I just installed mine two weeks ago. Did the whole thing almost by myself (needed a little help threading the new ones into place). It really is a straight-forward job:
Remove engine cover Remove stock air intake box (not required, but very helpful) Remove spark plugs & wires (wires just pull off, plugs are 5/8") I completely removed the plug wires, although you only have to disconnect them from the plugs. Remove oil dipstick (one bolt, then pull. Keep in mind where it came out from because you'll have to feed it back into place). Jack the front of the car up and put on jack-stands. Disconnect O2 sensor electrical plugs (4 total sensors, two on each side. Upper plug is along the firewall, lower one is near the transmission underneath) No need to remove the O2 sensors from the headers/cats until AFTER you remove the headers. Undo the 6 bolts along the top of the headers (leave one of the middle ones for last, otherwise the headers will "swing" once you loosen the last bolt). Be careful here if you want to use the factory gaskets. Slowly lower the headers down through the bottom of the engine compartment. At this point you just need to transfer the O2 sensors to the new headers/cats, then reverse the process. Granted, you will notice I didn't mention disconnecting the existing cat-back system. When I installed mine, I was replacing the full system and had already removed the cat-back. I would imagine you would need to unbolt the cat-back before removing the 6 bolts that hold the header in place. The engine compartment is very tight where you'll be using a ratchet to remove the plugs and header bolts. This part was VERY tedious and resulted in multiple scrapes, bruises, and swear words. Removing the stock airbox created a bit more room to work with on the driver's side. I recommend doing that side first so you can see what you're doing on the first attempt, then apply to the passenger side. The passenger side has a couple of fuel lines that will cause you a ton of grief (at least they did for me), but they are flexible and you can push them out of the way a little. Only other bit of advice if you're doing it yourself: get a stepladder. Once you jack the front of the car up, it can be difficult working with the header bolts with the car in the air. You need to remove the O2 sensors before undoing the header bolts, which requires you to crawl under the car, so you'll either need to jack the car up and let it down a couple of times or just get a small step ladder and only worry about jacking it up once.
__________________
2/7/2014: 419 hp, 419 tq
Cosmetic: ZL1 front w/mailslot, painted stripes, powdercoated SS rims, tow hook, and full chrome delete Suspension: Pfadt subframe bushings, Pfadt rear UCA bushings, Z28 Upper control arms, Spohn trailing arms with BMR trailing arm & differential bushings, ZL1 Toe Rods and springs, Prothane radius arm inserts & steering rack bushing, Pfadt Sport front sway, FE4 conversion w/ DS rear sway, Pfadt strut brace Drivetrain: RMCR tune, CAI intake, Kooks headers, hi-flo cats & exhaust, VMAX TB, ZL1 fuel pump, LSR Tri-Ax shifter Bumblebee Racecar Build |
|
|
|
|
12-11-2013, 02:08 PM
|
#6 |
|
Drives: 2010 Camaro rs/ss Join Date: Jun 2010
Location: toronto
Posts: 111
|
Thank you!
|
|
|
|
|
12-11-2013, 02:19 PM
|
#7 | |
|
MURICA!

Drives: 2014 2SS 1LE Join Date: Sep 2013
Location: RGV, Texas
Posts: 459
|
Quote:
__________________
Pro Amore Patriae
God gave three gifts to man; dogs, women, and the LS motor. 2014 Camaro 2SS 6MT RS 1LE Black on Black AFE Intake, Stainless Power Headers + HFC, BadlanzHPE Electric Cutouts. 315/275 Nittos, Wheels. Debadged, Cosmetic Mods, Sound System, More  |
|
|
|
|
|
12-11-2013, 02:24 PM
|
#8 |
|
2010 2SS/RS M6
Drives: 2010 2SS/RS M6 Join Date: Jun 2010
Location: Auckland, NZ
Posts: 1,482
|
The plug wires "loop" around the headers. The connect above the flanges, and then the plugs sit below the flanges.
Plugs come out because they stick out just a bit from the edge of the engine block/head and you run the risk of breaking them when the new exhaust headers are removed and put back into place. Here is a pic showing the relationship between the wires (red), the plugs (lower connection of the wires) and the headers: (picture does not include a lot of the other engine "clutter" that you'll be dealing with during the install process) 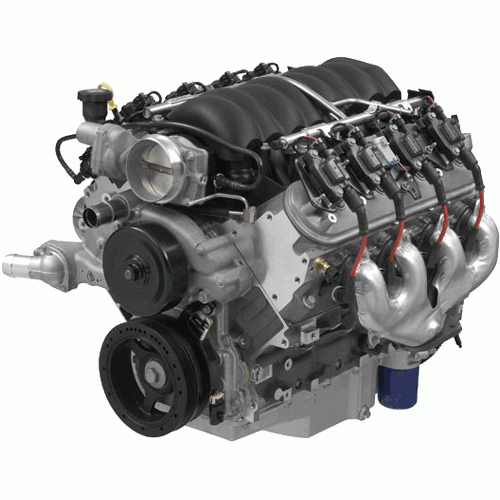
__________________
2/7/2014: 419 hp, 419 tq
Cosmetic: ZL1 front w/mailslot, painted stripes, powdercoated SS rims, tow hook, and full chrome delete Suspension: Pfadt subframe bushings, Pfadt rear UCA bushings, Z28 Upper control arms, Spohn trailing arms with BMR trailing arm & differential bushings, ZL1 Toe Rods and springs, Prothane radius arm inserts & steering rack bushing, Pfadt Sport front sway, FE4 conversion w/ DS rear sway, Pfadt strut brace Drivetrain: RMCR tune, CAI intake, Kooks headers, hi-flo cats & exhaust, VMAX TB, ZL1 fuel pump, LSR Tri-Ax shifter Bumblebee Racecar Build |
|
|
|
|
12-11-2013, 02:27 PM
|
#9 |
|
2010 2SS/RS M6
Drives: 2010 2SS/RS M6 Join Date: Jun 2010
Location: Auckland, NZ
Posts: 1,482
|
Also forgot to mention, removing the stock heat-shields makes getting to the plugs/wires/bolts 1000x easier. The heat shields are held in place by 4 small bolts (3 on the top, one at the bottom). Remove the lower heat shield bolt first.
__________________
2/7/2014: 419 hp, 419 tq
Cosmetic: ZL1 front w/mailslot, painted stripes, powdercoated SS rims, tow hook, and full chrome delete Suspension: Pfadt subframe bushings, Pfadt rear UCA bushings, Z28 Upper control arms, Spohn trailing arms with BMR trailing arm & differential bushings, ZL1 Toe Rods and springs, Prothane radius arm inserts & steering rack bushing, Pfadt Sport front sway, FE4 conversion w/ DS rear sway, Pfadt strut brace Drivetrain: RMCR tune, CAI intake, Kooks headers, hi-flo cats & exhaust, VMAX TB, ZL1 fuel pump, LSR Tri-Ax shifter Bumblebee Racecar Build |
|
|
|
|
12-11-2013, 02:28 PM
|
#10 |
|
MURICA!
Drives: 2014 2SS 1LE Join Date: Sep 2013
Location: RGV, Texas
Posts: 459
|
fantastic. good man
__________________
Pro Amore Patriae
God gave three gifts to man; dogs, women, and the LS motor. 2014 Camaro 2SS 6MT RS 1LE Black on Black AFE Intake, Stainless Power Headers + HFC, BadlanzHPE Electric Cutouts. 315/275 Nittos, Wheels. Debadged, Cosmetic Mods, Sound System, More |
|
|
|
|
12-11-2013, 02:57 PM
|
#11 |
|
Drives: 2010 Camaro rs/ss Join Date: Jun 2010
Location: toronto
Posts: 111
|
Dexman, you're a lifesaver!
|
|
|
|
|
12-11-2013, 02:57 PM
|
#12 |
|
Search Ninja

Drives: 2010 Black 2SS/RS A6 Join Date: Oct 2009
Location: Central Ark
Posts: 7,183
|
We have a very good DIY section. I know for a fact there's a DIY with LOTS of pics. Go in that section and hit the "search this forum" button, type in "header install". I believe nineball is the one who did it.
__________________
2010 Black 2SS/RS A6
Halltech CF 102 fed GPI modded intake manifold Bo (knows) White ported TB Kooks LT's/ Dynomax VT Pfadted (springs/sways) Dyno tuned by Rhino and GPI I once parallel parked a train. |
|
|
|
|
12-11-2013, 03:19 PM
|
#13 | |

|
Quote:
I wish I knew this a few weeks ago. Passenger side took way longer than it should but overall it's not a bad job. Just be careful on moving your exhaust system too much. That and the bracket at the center of the car, if touching something can lead to an annoying rattle. |
|
|
|
|
|
12-11-2013, 08:12 PM
|
#14 |

Drives: '11 2SS/RS A6 Join Date: Apr 2011
Location: New Orleans
Posts: 504
|
The O2 sensor wire plugs have a plastic retainer pin that secures the connector clip. Those are a PITA to remove mostly because it is difficult to get two hands on the plug (the front driver's side is the easiest). The center of the pin has to be squeezed slightly in order to remove it.
Also, both front sensors are held into the rear of the cylinder head with some sort of plastic clip. You actually have to remove/break that clip in order to fully access the plug. If you are able to remove that without breaking it, great. I couldn't so, when I re-assembled everything, I just used zip ties to secure the O2 plugs and wires out of the way. The rear sensor plugs are not that easy to get to either so, my advice is just patience. +1 for the PB Penetrating Catalyst to remove the O2 sensors. Spray, wait about 15 min, and they come out like butter!
__________________
Performance Mods:
Kooks 1-7/8 LTs; Calico coated w/HFCs, Solo Mach XL catback w/J-pipes, VMax TB, C.A.I. Intake, JRE Tune, RX Catch-Can |
|
|
|
|
|
|
|
 |
|
|


