You are browsing camaro5 

|
 01-08-2011, 10:06 PM
|
#1 |
 
Drives: 2012 Camaro 2SS Join Date: Sep 2010
Location: Aurora, Colorado
Posts: 222
|
Speaker Install
I had a fun day. I installed some new 6x9 speakers. I used the new 6x9 adapters from http://********.com/Chevrolet-GMC-Su...ers-clone.html
Remove the rocker panel. 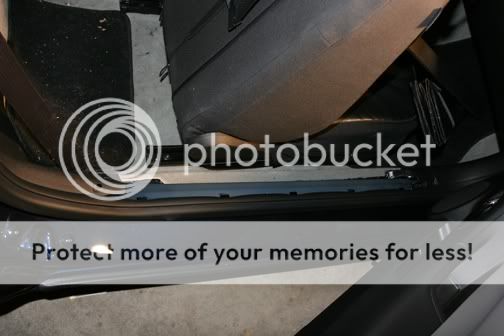 Remove the back seat. Start with the bottom part. You will need to pull up on the front part of the seat and then pull forward.  To remove the seatback you will fold the seat down and then look at the hinge you will see what I saw in the second photo. You will need two people to do this because it has to be done at the same time on both sides. Just push the silver piece back and lift the seatback up and out.  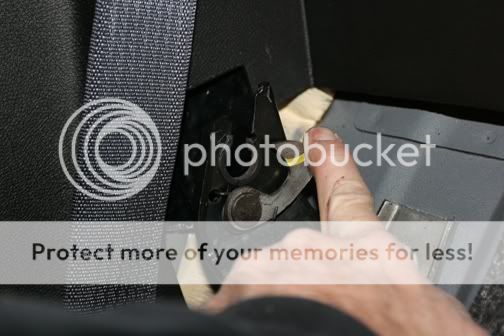 Now it is time to remove the lower interior trim piece. I started at the bottom front and worked my way to the back. 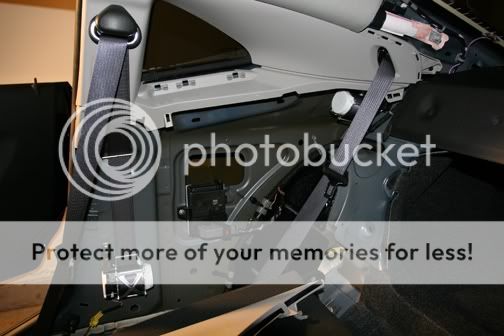 Next remove the back window trim. When you pull this off be careful their is a black clip that needs to be removed after you get this off. I think it is part of the airbag system.  Now remove side window trim. You will need a 7mm socket and T50 torx bit. There are two screws. One is hidden under the "Airbag" piece above the seatbelt for the front seat and the other is by the back window. You will need the T50 torx to remove the front seatbelt. After you have all of the screws removed just pull on the piece and it will pop out.  Now the real fun beggins. The rear speaker deck. There are four push tabs on the front part that need to be removed. Once you have them removed get under the speaker deck in the trunk and you will see four push pins that need to pushed up. 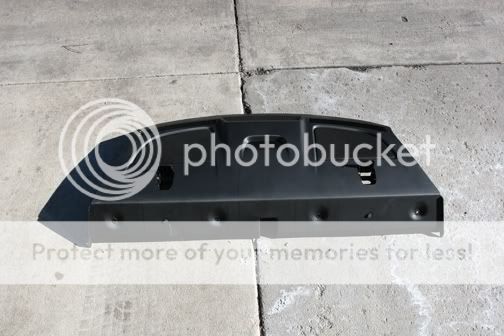 Here is the underside, You can see the four blue push pins. This is what is holding this piece in place. I worked my hand between the deck trim and the sheetmetal and pushed up on the deck trim and they came out. 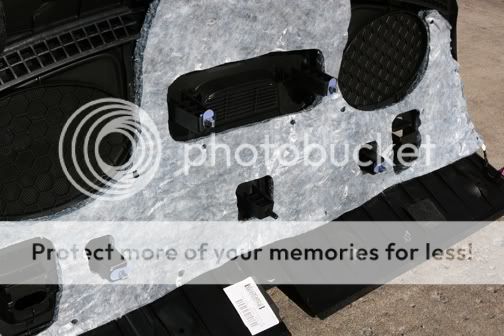 At this point the rear deck trim still did not want to come out. If you look at the photo (below). You can see three of the four tabs that hold this in place. I just had to pull hard to get this to come out.  Here is what it looked like after everything is out  You can see the factory speaker now. If you notice there is a big foam piece right next to each speaker. I'm not sure what this is for, but I think it helps to put pressure on the speaker deck. I would say do not remove this. 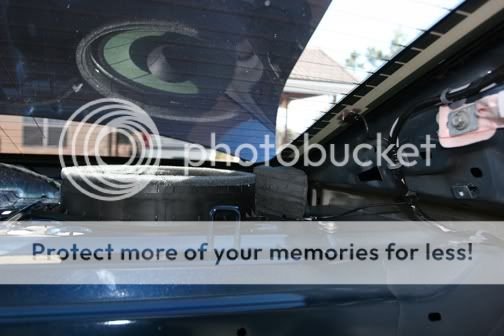 Installed Dynamat.  I installed the new speaker to the ******** adapter. New and old. 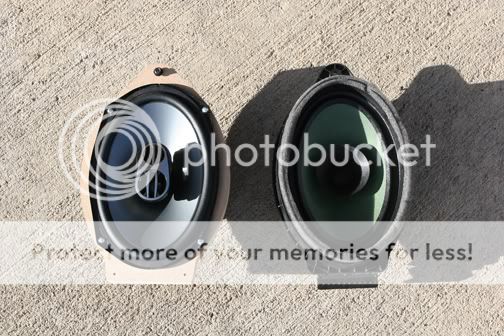 Here is the speaker installed.  Just put everything back in the reverse order and your done. It took a few hours to do this, but it was worth it. The sound system sounded so much better. Next step will be amps and sub. I hope this helps others who are thinking about doing this. I did shoot some video of this, so I will edit it and upload it later. |

|

|
|
01-08-2011, 10:33 PM
|
#2 |
|
Supercharged LSX

Drives: 2011 2SS/RS Black/Carbon Fiber Join Date: Dec 2010
Location: City of Angels
Posts: 6,741
|
Sweet thread!!!! looks like a lot of work. I hope it was worth it. Great job and thanks for sharing the pics.
__________________
 |
|
|
|
|
01-08-2011, 11:17 PM
|
#3 |
|
Drives: 2010 Camaro 2LT/RS Join Date: Sep 2010
Location: San Diego, CA
Posts: 213
|
How did you go about wiring them in? Do you have the BA or non-BA system?
__________________
 The only good Mustang is one who was prior enlisted. |
|
|
|
|
01-08-2011, 11:36 PM
|
#4 |
|
Drives: 2012 Camaro 2SS Join Date: Sep 2010
Location: Aurora, Colorado
Posts: 222
|
It is the non-BA system. I just cut the speaker plug off the wires and used the wire adapters that came with the new speakers.
|
|
|
|
|
01-08-2011, 11:55 PM
|
#5 |
|
Drives: 2010 Camaro 2LT/RS Join Date: Sep 2010
Location: San Diego, CA
Posts: 213
|
Thanks for the walk-through! I'm doing the same thing next weekend.
__________________
The only good Mustang is one who was prior enlisted. |
|
|
|
|
01-09-2011, 12:45 AM
|
#6 |
|
The wait is over!

Drives: 2010 Camaro, IOM, L99, Auto Join Date: Mar 2010
Location: Washington
Posts: 1,081
|
excellent write up, that really confirms that I dont want to do that job! I had been dreading it, now I know not to even try!
__________________
Ordered - 4/17/2010
Delivered - 5/29/2010 AlphaDamp CLD Mat - Get more Sound Deadening with less Sound Deadener |
|
|
|
|
01-09-2011, 01:42 AM
|
#7 |
 
Drives: 2011 Camaro Join Date: Sep 2010
Location: Tampa, Florida
Posts: 16
|
Ya....What the hell, seems like alot of work. Good write up though. Like the guy above, now I know why I dont want to mess with it. I hate dealing with all that interior pins and tabs. Seems like they didnt want us to mess around back there. Maybe I will wait for Best Buy to have one of their "Free Installation" with purchase deals. I will buy the speakers and laugh as I leave, lol.
|
|
|
|
|
01-09-2011, 02:43 AM
|
#8 |
|
THAT BOOST TURNS HEADS

|
WOW looks great..... thanks for all the info and walk threw
__________________
SoCal HT5 ENOUGH SAID
 |
|
|
|
|
01-09-2011, 10:20 AM
|
#9 |
|
Darth Martel

Drives: Black 1SS with 20% tinted windows Join Date: May 2009
Location: Bizzaroland
Posts: 1,496
|
Should post this in the DIY section or possibly a mod could move it there????
|
|
|
|
|
01-09-2011, 10:40 AM
|
#10 |
 
Drives: 2011 1lt/rs/sim Join Date: Sep 2010
Location: pa
Posts: 372
|
thats alot of work to change the 6x9s...hard to tell from the pics but would there be a way to hang the 6x9s?mount them from the trunk so if you have to change a speaker again you dont have to rip the whoe back end of your car apart again...maybe an adapter to hang them if possible..hint hint ********..
|
|
|
|
|
01-09-2011, 11:10 AM
|
#11 |
|
Drives: 2012 Camaro 2SS Join Date: Sep 2010
Location: Aurora, Colorado
Posts: 222
|
It seems like a lot of work the first time that you do it, if I had to do it again it would take about a quarter of the time. I had never done this before so I went slow and it took most of the day to do. The new adapters from www.********.com did not come with any instructions, but it looked easy enough to install.
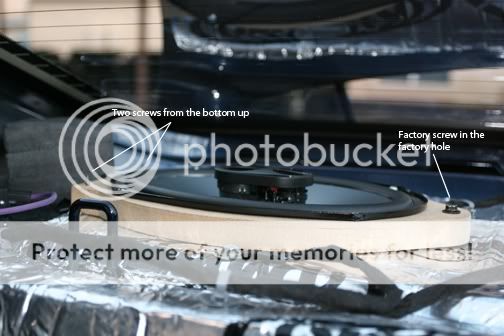 you could use this adapter from the bottom or the top because the screw holes for the adapter will go into the sheetmetal. If you use this adapter to mount underneath it is 3/4 of inch thick, so your speakers will hang lower and may get in the way of things. If you dont care I don't see why you couldnt. |
|
|
|
|
01-09-2011, 08:23 PM
|
#12 |
    
Drives: 11 IOM 2SS/RS M6 w/Hurst Join Date: Nov 2009
Location: Austin Texas
Posts: 1,269
|
This is a nice write up.
Couple of things: 1. Would you be willing to go back and edit your pics, specifically pointing out the clip locations and what not? You can use mspaint to do this. 2. Also did you mess any clips or break any fasteners when doing this? I ask these two questions only because this looks like a major pain and this photo right up is excellent. With the addition of the fastener points it would make it perfect. Cheers K |
|
|
|
|
01-09-2011, 09:22 PM
|
#13 |
|
Drives: 2012 Camaro 2SS Join Date: Sep 2010
Location: Aurora, Colorado
Posts: 222
|
I would like to edit the photos, but they don't show the all the places where the trim tabs are located. I did shoot some video of the install. It shows some of the trim and what your looking for. I will try to edit it this week.
I will be installing an Alpine MRP-F300 amp this weekend to power the new Alpine 609s. I will try to reshoot the trim photos to show the clip locations and screws. I did not break any clips or fasteners. I just worked slow and took my time pulling off the trim. |
|
|
|
|
01-09-2011, 11:25 PM
|
#14 |
|
|
Awesome, good write up!
I just want to replace my door speakers... How easy is the wiring to aftermarket speakers with a stock head unit? |
|
|
|
|
|
|
|
 |
|
|
 Similar Threads
|
||||
| Thread | Thread Starter | Forum | Replies | Last Post |
| DIY : Install headers on 2010 Camaro SS | Nine Ball | Camaro DIY & HOW-TO instructions & discussions | 70 | 06-25-2020 06:40 PM |
| My JL 12" and JL 250 amp install VIDEO AND PIX! | TAG UR IT | Audio, Video, Bluetooth, Navigation, Radar, Electronics Forum | 55 | 02-12-2011 01:03 AM |
| Please help with speaker install!! | camaro10rs | Audio, Video, Bluetooth, Navigation, Radar, Electronics Forum | 0 | 03-13-2010 12:32 AM |
| DIY : Install catback on 2010 Camaro SS | Nine Ball | Camaro DIY & HOW-TO instructions & discussions | 3 | 08-09-2009 04:36 PM |


