Camaro5 Chevy Camaro Forum / Camaro ZL1, SS and V6 Forums - Camaro5.com
 
TireRack
Go Back   Camaro5 Chevy Camaro Forum / Camaro ZL1, SS and V6 Forums - Camaro5.com > Technical Camaro Topics > Camaro DIY & HOW-TO instructions & discussions


Reply
 
Thread Tools
Old 01-14-2010, 03:45 PM   #29
SSE 4 2SS
Boosted Moderator
 
SSE 4 2SS's Avatar
 
Drives: Bone Stock LS3
Join Date: Sep 2009
Location: Marion Tx
Posts: 15,492
Send a message via AIM to SSE 4 2SS Send a message via Yahoo to SSE 4 2SS
Quote:
Originally Posted by TJ91 View Post
Ive found the dupliclor high heat paint to spray rough sometimes no matter how good your form is. I used the clear and it came out dusty too. I noticed the op had the rough surface i was talking about, did the wet sanding smooth it out completey?
btw nice job guys, the engine covers here all look unique and great!
There is no need to use high heat paint, but yes, wet sanding it with progressively finer paper will smooth it out. (I have seen lots of post where people were also worried about the paint cracking due to flexing of the cover. It is not a concern for me. I've never seen it happen on a properly sanded and painted cover. The paint is pretty flexible even when dry and the covers do not flex that much...) 1500 grit wet/dry paper should be the last grit used. As the op stated, sand as much as possible in one direction and preferrably in the direction you applied the paint coats. The final step I used is buffing it out with a foam buffer head on my drill. A dremel buffer is too small and often too fast, (burns the paint and leaves spider web marks) for anything other then down in the gaps and the oil filler hole. I actually used a headlight restoration buffer head. 3M makes a headlight restoration kit with a foam buffer that I used on my wifes car headlight. Works great... After the final wet sanding, there should be no shiny areas, you will still have a smokey look to the finish. Buff it out and you'll say dammmmmmnnnnnnnn... Use light pressure when buffing as you do not want to burn the paint, and try to keep the compound fairly wet, (add more compound as you need it, but use it sparingly... I put it on the buffer pad and lightly spread it around the piece to buff without spinning the buffer head. After it is on the areas I want to buff out, I then start the buffer spinning at around 1000 rpm and AGAIN< using light pressure, buff all applicable areas. Use caution on shoulders and ridges as these are the areas where it is easiest to burn through the paint. Buff a little and then allow it to dry to a haze, and then wipe it with a lint free cloth, I use micro-fiber towels, (more on this in a minute) and look at the results. you can always buff more, but you can't put the burned paint back on, so go slowly... it isn't hard... it just takes a little time.

If during the sanding or buffing stage, you rub through any painted areas, clean it real good and apply more paint. If you used clear coats, remember to apply the clear over the re-painted areas so the finish will blend. After all the work is finished, remove the tape. Use caution when removing the tape. Try to peel up an edge and then work it down the the strip of tape by sliding the pulled up portion along the part still taped down... you don't want to pull it off at a 90 degree angle... stay close to the work...This will cut the edge rather than trying to pull it up... Think of tearing paper with a straight edge as a guide rather than randomly tearing it up in the air...

Micro-fiber towels... I have these in various colors. Blue, general usage and can be washed with other items. Green, for oily work. I wash these in a bucket by themselves and lay them out to dry. Yellow... these are my paint work towels. My wife will wash them by themselves and they are never mixed with anything else. This way, I know they are not contaminated with sand, dirt, or any other kind of grit. When I am wiping a piece off, I use them two or three times max and then get a clean one... frustration comes from screwing up a project right as it is nearing completion. Call me anal... been there done that... I keep a laundry bag hanging in my shop for the various colors and when one is full, I take care of it...

I have about 50 of the yellow towels, and mixed amounts of the other colors...
__________________
If the car feels like it is on rails, you are probably driving too slow. -Ross Bentley

Horsepower is how fast you hit the wall.
Torque is how far you take the wall with you.

“If everything seems under control, you're just not going fast enough.” Mario Andretti

If you can turn, you ain't going fast enough...
SSE 4 2SS is offline   Reply With Quote
Old 01-14-2010, 04:22 PM   #30
SSRSLY
Lady Racer
 
SSRSLY's Avatar
 
Drives: 2012 GT500
Join Date: Oct 2009
Location: Spring TX
Posts: 503
Quote:
Originally Posted by TJ91 View Post
Ive found the dupliclor high heat paint to spray rough sometimes no matter how good your form is. I used the clear and it came out dusty too. I noticed the op had the rough surface i was talking about, did the wet sanding smooth it out completey?
btw nice job guys, the engine covers here all look unique and great!
How was the weather? Temperature and humidity play a HUGE role on the finish quality of a paint job.
__________________

2014 Ford F150 Tremor
2012 Shelby GT500
SSRSLY is offline   Reply With Quote
Old 01-15-2010, 04:44 PM   #31
Iwantone2
Voice Of The Voiceless
 
Iwantone2's Avatar
 
Drives: CGM 1SS RS
Join Date: Feb 2009
Location: OC Cali
Posts: 9,617
You guy's are beasts!!!
__________________
Iwantone2 is offline   Reply With Quote
Old 01-16-2010, 05:44 PM   #32
corvette_dad
 
corvette_dad's Avatar
 
Drives: 2010 2ss/rs red/grey stripes
Join Date: Sep 2009
Location: fayetteville, tn
Posts: 29
i agree it's all about the prep work, they all look really good. keep up the insperation.
corvette_dad is offline   Reply With Quote
Old 01-18-2010, 03:46 PM   #33
SWHCPA
Snow White can be naughty
 
SWHCPA's Avatar
 
Drives: '10 Camaro/'67 Mustang
Join Date: Oct 2008
Location: Dallas
Posts: 724
Send a message via AIM to SWHCPA Send a message via Yahoo to SWHCPA Send a message via Skype™ to SWHCPA
Quote:
Originally Posted by SSE 4 2SS View Post
Here is the cover I customized based on views of a few other covers and some inspiration from Camaro5...

I used dupli-color regular paint. After prepping it (cutting out the top with a dremel, and filing it smooth, cleaning and taping and sanding) I painted base coats and then wet sanded it with 800 grit and then heavier color coats and then sanded it again. I then sanded it with 1500 grit wet-dry, and then sprayed it with clear coat. I sanded that with 1500 wet and then applied another coat of clear. I wet sanded that and then buffed the whole thing out with ultra fine buffing compound. It actually has a very deep color appearance...After all else was done, I got some # 8 stainless cap washers and screws and fitted them in the holes running down the center on each side...I used some screen material from Home Depot, gutter screen used to keep leaves out of the gutters, and cut it to fit and then used JB weld to install them...
OK - how much $$$ and beer do I need to throw at you to get you to do this for my V-6 cover? That is absolutely righteous. Superior job~!!!
__________________
SWHCPA is offline   Reply With Quote
Old 01-19-2010, 10:51 AM   #34
Trailbreaker77
 
Trailbreaker77's Avatar
 
Drives: 2010 Transformers Edition
Join Date: Nov 2009
Location: Maryland
Posts: 678
Ok, which color matches the rally yellow of my car. I am all over this.
__________________
Trailbreaker77 is offline   Reply With Quote
Old 01-19-2010, 01:51 PM   #35
sixty9fordkiller
Donkey Dick Cam Camaro
 
sixty9fordkiller's Avatar
 
Drives: 2010 2SS/RS LS3 M6
Join Date: Oct 2009
Location: Los Angeles, CA
Posts: 1,998
Quote:
Originally Posted by camaro104 View Post
Mine came out cool.....
looks hot. i like!
__________________

Bone Stock
sixty9fordkiller is offline   Reply With Quote
Old 01-19-2010, 06:08 PM   #36
RoqDoc
 
Drives: 2010 Camaro 2SS/RS #2934
Join Date: Dec 2009
Location: Fort Worth, TX
Posts: 1
This is what I did early last June. Opted for the black lettering versus the silver. But, both look outstanding.
Attached Images
 
RoqDoc is offline   Reply With Quote
Old 01-19-2010, 10:16 PM   #37
strobi
MJ STROH
 
Drives: 2010 Camaro 2LTRS
Join Date: Aug 2009
Location: Buffalo, WY
Posts: 185
I had the body shop at my Chevy dealer paint mine (engine cover) and the 4 trim rings on my LS steel wheels I'll be using with snow tires. Painted same color as my car (cyber gray)...total cost $208 took them 2 hours..... no muss no fuss!
strobi is offline   Reply With Quote
Old 01-19-2010, 10:36 PM   #38
wer2foxs
 
wer2foxs's Avatar
 
Drives: 2010 VR SS
Join Date: Sep 2009
Location: Indianapolis, IN
Posts: 722
Quote:
Originally Posted by Trailbreaker77 View Post
Ok, which color matches the rally yellow of my car. I am all over this.
I ordered the Rally Yellow from Dupli color. Find the color code in the trunk on a name plate and go to the dupli color website and order it. Here is my creation. Post # 63
http://www.camaro5.com/forums/showth...t=58701&page=3
wer2foxs is offline   Reply With Quote
Old 01-20-2010, 05:43 AM   #39
Trailbreaker77
 
Trailbreaker77's Avatar
 
Drives: 2010 Transformers Edition
Join Date: Nov 2009
Location: Maryland
Posts: 678
Quote:
Originally Posted by wer2foxs View Post
I ordered the Rally Yellow from Dupli color. Find the color code in the trunk on a name plate and go to the dupli color website and order it. Here is my creation. Post # 63
http://www.camaro5.com/forums/showth...t=58701&page=3
Thanks for the help and your cover looks great!
__________________
Trailbreaker77 is offline   Reply With Quote
Old 01-20-2010, 06:29 AM   #40
Bonemaro

 
Drives: 2010 RJT 1SS M6
Join Date: Jul 2009
Location: Ann Arbor, Mi.
Posts: 1,692
Send a message via AIM to Bonemaro
well i know what i'm doing this spring. Great job guys!
Bonemaro is offline   Reply With Quote
Old 03-06-2012, 05:11 AM   #41
GrimmyBlaze
 
Drives: Camaro RS package, Black Decepticon
Join Date: Jun 2011
Location: Pullman
Posts: 43
Project?

Hey guys how are you doing?
So I want to work on a project for my friend's camaro engine cover.. :

I want to put this hood on
http://www.phastekperformance.com/20...od-400111x.htm

And so I want the engine to have the "dark knight" batman sign
with it just lighting up on the center of the hood.

how complicated would that be? if there is anybody that can do such a thing , my friend is more than ready to pay up $$ lol

Anybody got any thoughts/feedback?
GrimmyBlaze is offline   Reply With Quote
Old 03-06-2012, 08:13 AM   #42
CINDER02
<3
 
CINDER02's Avatar
 
Drives: '11 Camaro
Join Date: Nov 2010
Location: Plano Texas
Posts: 265
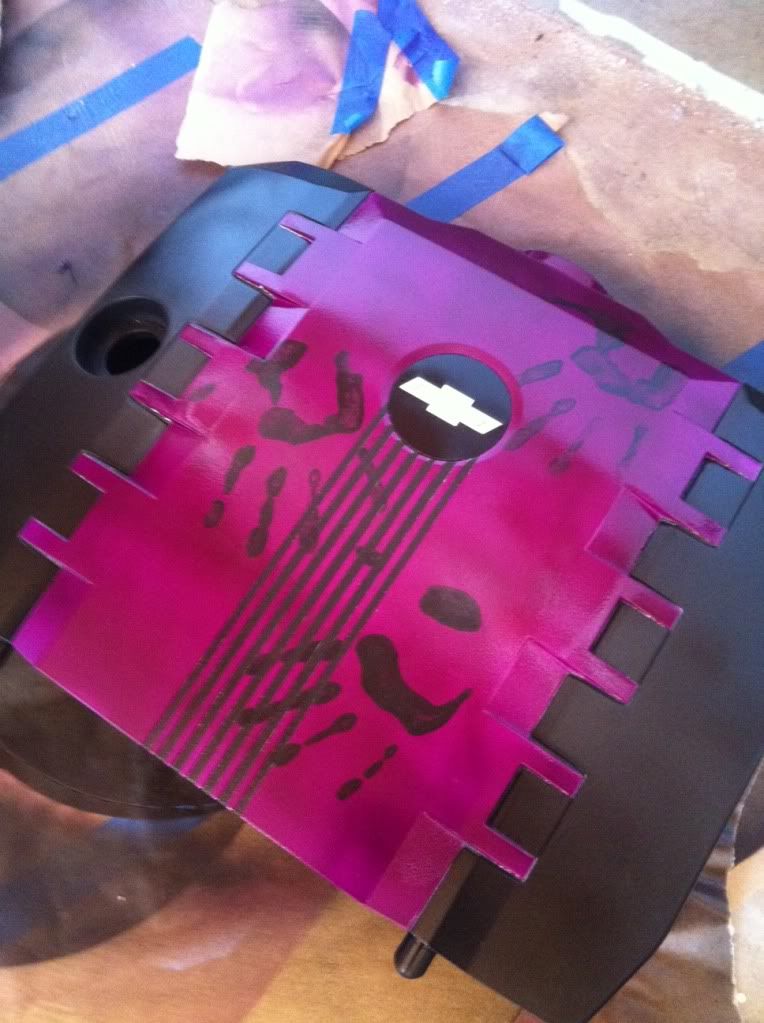
Here is mine, I am not very artistic, but I love how it came out with a little flare

CINDER02 is offline   Reply With Quote
 
Reply


Posting Rules
You may not post new threads
You may not post replies
You may not post attachments
You may not edit your posts

BB code is On
Smilies are On
[IMG] code is On
HTML code is Off

Forum Jump

Similar Threads
Thread Thread Starter Forum Replies Last Post
Camaro Z28 (HP Edition) FACTS: radz28 Camaro ZL1 Forum - ZL1 Specific Topics 44 01-29-2011 10:05 PM
AirAid Cold Air Intake anyone? FLYNNZL1 Camaro V8 LS3 / L99 Engine, Exhaust, and Bolt-Ons 12 01-01-2010 09:05 PM
My custom painted engine cover brooks35 Cosmetics and Lighting Modification Discussions 10 09-22-2009 06:33 PM
Engine cover MOD d69chris Cosmetics and Lighting Modification Discussions 33 09-16-2009 10:02 AM
DIY painting your engine cover RoyalKev Camaro DIY & HOW-TO instructions & discussions 8 08-15-2009 01:12 PM


All times are GMT -5. The time now is 05:19 PM.


Powered by vBulletin® Version 3.8.9 Beta 4
Copyright ©2000 - 2024, vBulletin Solutions, Inc.