You are browsing camaro5 

|
 02-07-2013, 10:11 PM
|
#1849 |
         
Drives: 2009 ZR1 Join Date: May 2010
Location: KCMO
Posts: 3,205
|
In order to move the pcm and fuse box, do you just extend all the wiring or do you shorten it? Or can you tuck it away?
|

|

|
|
02-09-2013, 10:58 AM
|
#1850 |
|
ace5.org

|
Joe sent me here.....and
 AWESOME work!! AWESOME work!!Keep it up!
__________________
Stock...For Now.
|
|
|
|
|
02-10-2013, 12:11 AM
|
#1851 | ||
|
Drives: G5.R Join Date: Sep 2010
Location: SoCal
Posts: 2,377
|
Quote:
Let me know if I can help in any way. Quote:
Time for a quick update. I got a new battery charger for my SLR, So now I can stop using my Iphone to take pics, LOL I have a lot of catching up to do on my posting but I've been working on getting the sub finished. Here are a few pictures of the spindles. These first two pics I had posted earlier but I am re-posting them to show how far these spindles have come. The one on the right had gotten sand blasted but still needed some additional grinding of the seams. Once I had them completely sanded. I polished them to a mirror finish. (reference the one on the left) Next thing I did was to tape off the areas where bolts are going through. I didn't want to add paint to those areas and deal with the paint getting jacked up when I'd tighten the bolts. I sanded blasted them again to create paint adherence. (reference the one on the right) By the way, I bought a sand blaster today. I got tired of going to my powder coater to get things done. I did a bunch of bolts that I am sending out to get cad plating. They came out really clean. Next came a light coat of etching primer And finally ......... the finished product in a cast aluminum finish. ************************************************ Next week will be exciting as I should be getting parts that will help G5R shed another 50 lbs! By the way, I'm going to create another post in the cosmetic section to check interest but I'm having a bunch of ZL1 parts replicated in carbon and would like to see who else would be interest in the same pieces. I am picking up a bunch of parts from my dealer next week to take off molds. Let me know if there's an interest and in what parts. |
||
|
|
|
|
02-10-2013, 07:02 AM
|
#1852 | |
|
ACE5 (Atlanta Group)

Drives: "Black Ice" Join Date: Sep 2010
Location: Suwanee, GA
Posts: 1,702
|
Quote:
__________________
Custom Two-Tone Paint, Whipple, Pedders, NightOwl RGB Halos & Other Lighting
[COTW 5/2/11] 2011 Two-Tone White/Black SS/RS Convertible See our Atlanta Social Group or home page: ACE5.org |
|
|
|
|
|
02-10-2013, 11:13 AM
|
#1853 | |
|
Drives: G5.R Join Date: Sep 2010
Location: SoCal
Posts: 2,377
|
Quote:
Joe, pictures really don't do them justice. They impressed me on how nice they came out! G5R is the name I coined the project. It stands for Gen 5 and the R for "race". My vision is to create something GM could perhaps had done as a concept. Hence my choice for the BBS for my street setup. GM used it on Leno's Camaro and something similar on the Dusk edition. I'm having emblems made for the exterior and interior with the G5R logo. There are several places I'm thinking such as the grill, hood sides, trunk, calipers or wheel centers (one or the other), door sill, pedals (one character on each pedal), dash. I'm going to be selective as I don't want to over do it, but these are some of the areas I'm considering. ************************************************* On the carbon parts, I'm looking to do:
For those who might be interested in these parts for your car, I create a post in the "Cosmetic" section to check interest. Here is the link: http://www.camaro5.com/forums/showthread.php?t=276241 I'm going to be keeping a tally and will decide if I want to have more made. Please go on that thread and let me know what parts you might have an interest replicated in carbon. ************************************************** ****** The reason I'm also doing the 1LE front splitter in carbon is because I have mixed emotions as to whether I should use the ZL1 front fascia. I thinks it's is the prettiest front end for these car, but I'm not sure it will go with my GM concept theme. My theme is more of an SS carbon edition, so I wasn't planning on using the ZL1 hood. So the ZL1 front facia might look out of place  . .I was planning to keep the stock hood as I really like the inner skeleton structure. It looks really mechanical. I was planning on welding in the 50 plus little holes it has to clean it up and repaint it again. At PRI, I came across a Siebon hood designed for racing. Most carbon hoods are only carbon on the outside and glass on the bottom. They end up weighing more than our factory aluminum hoods. This one is carbon on the inside and out! It's also much lighter than the factory hood which helps my goal of losing 400 lbs. It's also an exact replica of the stock hood with the inner skeleton structure I like, plus they eliminated all the little holes I wanted to weld in. So I immediate fell in love with it  , LOL , LOLThe other thing was the quality of the weave, most carbon hoods have distortions and leave something to be desired. This looked like something GM would had produced! It as close to perfect as you can get! All of this is reflected in the price as most hoods are between $1,000 to $1,200, this hood is $3,200. it should be here next thursday or Friday  I am still planning on giving it the "Nathan" twist. I'm cutting out the sections that are meant to hold the under hood insulation panel. This will make it more symmetrical. I'm filling the cavities with some type of material. Stay tuned for more to come. I'm painting it flat clear to give it a matted look. I'm also toying with the idea of putting tint in the clear to create some sort of design. Kinda like the Ring Brothers did last year on their 2013 Mustang. Once I'm done, I might call it the "G5R Carbon Edition", LOL ************************************************** ***** By the way Joe, it's funny you mention the trunk as I'm starting at that next week, you'll see, LOL I keep remembering your post about cleaning the clutter in the trunk, etc, LOL. I guess you saw it coming . |
|
|
|
|
|
02-10-2013, 11:37 AM
|
#1854 |
|
Drives: 2009 ZR1 Join Date: May 2010
Location: KCMO
Posts: 3,205
|
I want to put the PCM and fuse box in the cabin filter but I wonder if it would be easier with the engine out...
I can use the space they take up for something better like pleasing aesthetics. ETA I just looked at stangkllr's pics and it appears he just tucked the wiring under the fuse box and built a custom box around it all and it was done with the engine in place. |
|
|
|
|
02-10-2013, 08:47 PM
|
#1855 |
|
ACE5 (Atlanta Group)
Drives: "Black Ice" Join Date: Sep 2010
Location: Suwanee, GA
Posts: 1,702
|
Thanks Nathan for the explanations. Makes a lot more sense conceptually now. I was curious to know if you have plans yet for the inner fenders, especially the front ones, as you have made a lot of openness up front, where you'll see the inner fenders from the engine bay. I could see these on your car in carbon fiber also.
__________________
Custom Two-Tone Paint, Whipple, Pedders, NightOwl RGB Halos & Other Lighting
[COTW 5/2/11] 2011 Two-Tone White/Black SS/RS Convertible See our Atlanta Social Group or home page: ACE5.org |
|
|
|
|
02-11-2013, 07:46 AM
|
#1856 |
|
Airborne Pathfinder

Drives: Camaro ZL575 Join Date: Nov 2009
Location: San Benito, TX
Posts: 1,139
|
Nathan
After reading this thread I am trying to start a few little projects (battery wiring/evac/PCM relocation with your help and little more insight to how you do them. 1. what are my needed items to do the polishing you show throughout this thread? 2. where did you get the items to do the radiator hose? Also, I can't seem to find anything on you doing the lower radiator hose, so if you could provide me that I would appreciate. I am building up the courage to start some of the wiring so if these go well I will jump on those. And yes, I will post numerous pictures of the transformations, especially if it turns out as nice as yours. Mike
__________________
2010 Camaro Indy 500 Pace car, LS3-ZL575
Other cars are- 95 BMW 325 sedan- AA exhaust, AA CAI, AA Strut bar, AA chip, M3 rotors and calipers, racing clutch, oversized injectors, upgraded M3 interior- Audi A4 SLine, with black out optics |
|
|
|
|
02-13-2013, 08:50 PM
|
#1857 |
 Drives: cars Join Date: May 2011
Location: Oversneeze
Posts: 4,544
|
So when I did the TB someone asked if I ever weighed parts before/after. When the wife went to work I stole her food scale (if anyone rats me out heads will roll) and used it to check my PS bracket I've been working on. 918 vs 904 grams. So although ugly casting flash isn't very heavy.
I'll be doing a 2-tone similar to your spindles, mostly because I'm too lazy to screw with the 2 recessed areas. So the ribs and flat surfaces will be polished and the recessed spots a metallic silver. I'm also going to try a bare metal clear by eastwood over all of it. It will be a test to see if it yellows over my deployment. When I get back I'll decide if I want to do it to other parts or go with a sealant. Masking and paint should happen tomorrow. 918 vs. 904, a 1.53% reduction if my math is correct   Here it is before paint.  People ask why so much sanding is necessary. The flatter the base the better the mirror-like shine. Polishing sand castings really makes you appreciate billet parts. If only I could borrow Nathans credit card.  
|
|
|
|
|
02-13-2013, 09:54 PM
|
#1858 | ||||
|
Drives: G5.R Join Date: Sep 2010
Location: SoCal
Posts: 2,377
|
Quote:
Quote:
Hence the reason I have decided for the moment to just clean up the area and paint it. Once I get the car running and all the bugs worked out, I will take it to a pro shop to create faux bay paneling. Quote:
. 1. On the polishing, I'm going to ask Synner if he can jump in as he is more versed than I on what to used for a home project. I have a really good friend who owns a pro polishing shop and whenever I need to do anything, I just go over and use his equipment. 2. I am glad you are looking to replicate the radiator hose. I can't believe nobody has done it yet as it looks so much better than the factory rubber hose. I wont be using mine as I'm relocating the radiator filler cap onto the tube. This is the piece I'm using. I would send you mine had I not promised it to somebody else. Here is the link to where you can get the tubing. TUBING Make sure you get 1.25" OD. It comes raw, so you will need to sand it down with 200 grit SP to make it smooth. You can then give it whatever finish you decide on, polish, paint, anodize, powder coat, brushed, etc. I brushed mine with red scotch brite. You can pick them up at any local automotive paint store. On the clamps, I used constant tension clamps which are pretty pricey at $18 a piece form http://www.bmrs.net/ You can use Gates clamps which are really nice and only $4.99 each. Here is the LINK I posted way back when on the first page a video on them. On the couplers I will need to dig through my receipts file to find who I purchased them from. I'm having second thoughts about going through that folder as I may have a heart attack, LOL On the lower radiator hose, I still haven't made one. I put that whole project on hold as I'm tucking the radiator under the core support and will need to take measurements once I install it. You can get couplers with different degree bends to make up the lower hose and use a straight aluminum tubing for the filler. Remember the tube needs to have a radius on each end to keep it from leaking. If you can't find the right length, you will need to shorten it and have it re-welded. That should cost you no more than $20. For your upper radiator hose, you will also need to weld a AN fitting for your oil cooler. Let me know if you'd like me to get you the size fitting you'll need. I am now doing something different as I'm going to use an after market cooler. Mike if you'd asked me if I'd be rebuilding my engine when I first started this thread, I'd say you're........ CRAZY!!!. So as far as building your courage, take it one step at a time and build from each. And yes, make sure to post a lot of pics as each member help encourage another member. Nathan Quick Update: Got some of the ZL1 parts I'm going to recreate in carbon today. Also recieved the 3.91 gears and ZL1 lower control arms and end links. Those lower control arms are definitely not up to G5R standard. They are going to need some work, LOL. 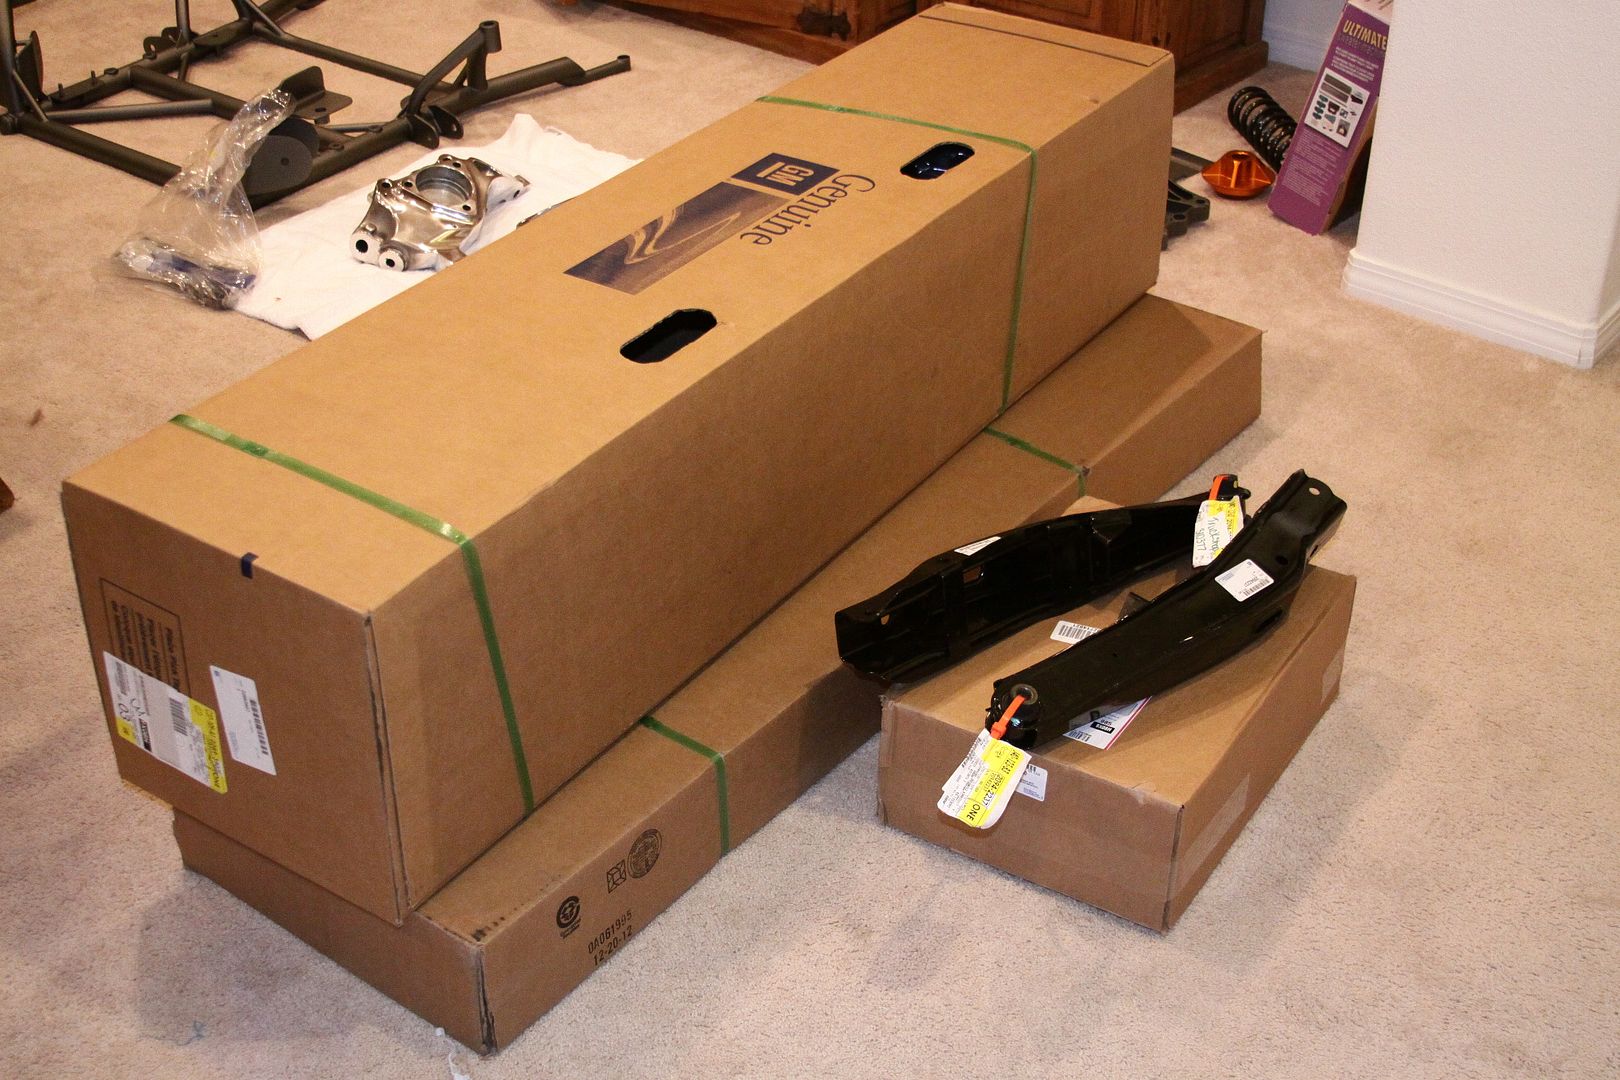 Edit: Quote:
Dang Synner, you posted just as I was posting. I was going to ask you to post some of your polishing tips to help Mike out. By the way, I really like your idea of doing the bracket 2-toned. Last edited by Moreno1; 02-13-2013 at 10:22 PM. |
||||
|
|
|
|
02-14-2013, 08:49 AM
|
#1859 |
Drives: 2010 Summit White Camaro SS/RS Join Date: Dec 2010
Location: Toledo Ohio
Posts: 388
|
Sorry for the dumb question, but I need a new EVAP line ( the one next to the fuel line on the passenger side of the engine ) Do you suggest I make it myself or buy one? This is what mine looks like now..
   And could someone please provide me with a link to the correct line? Thanks! |
|
|
|
|
02-14-2013, 09:50 AM
|
#1860 | |

Drives: 2010 Camaro, 2006 Z06 Join Date: Feb 2009
Location: SLC, UT
Posts: 3,370
|
Quote:
|
|
|
|
|
|
02-14-2013, 09:53 AM
|
#1861 | |
|
Drives: cars Join Date: May 2011
Location: Oversneeze
Posts: 4,544
|
Quote:
http://www.caswellplating.com/buffs/images/Buffbook.pdf The biggest thing is smoothing/sanding. I have cartridge rolls, dremel bits, palm sander, die grinder for the big stuff. I usually go 80-120-220 then start polishing. I don't like using sisal wheels on aluminum because it rounds corners and can create scratches. I primarily use sprial sewn and loose wheels with black and brown compounds respectively. Then finish up with mothers or some other liquid polish. If you get a ton of compound stuck in areas use acetone to remove it. The shine/reflection comes from getting all the surface molecules level and the reflection aiming in the same direction. If you were to just start polishing the surface would be wavey and uneven and give you mediocre results. Its the difference between saying its polished and show polished. This is probably the best kit to start out with. You need an electric drill that has a fairly fast rpm rating. http://www.caswellplating.com/buffin...ffing-kit.html If you don't have a drill that would work then get a buffing machine from harbor freight (cheaper than a decent drill) and this kit. Never use the harbor freight wheels or compounds, they suck. http://www.caswellplating.com/buffin...ffing-kit.html Assorted mini felt bobs for the hard to reach areas. http://www.caswellplating.com/buffin...lt-bobs-1.html I got the cartridges from eastwood but this will give you an idea. I have drum and tapered for hard to reach areas http://www.caswellplating.com/buffin...dge-rolls.html This is the kind of stuff that I use the die grinder and cartridge rolls to remove:  If you're willing to put in the time and have no life or a wife you're trying to avoid you can end up with something like this. It's an investment to start out but I think its worth it. Paying someone to do a single part is enough to buy all the supplies to do everything you'd want to do on a whole car or two. 
|
|
|
|
|
|
02-14-2013, 10:28 AM
|
#1862 |
|
Drives: pleather and Chiclets Join Date: Mar 2012
Location: a line somwhere
Posts: 4,206
|
that tb looks amazing. i have to ask if that was left just polished like that how long is that going to hold up?
|
|
|
|
|
|
|
|
 |
|
|
 Similar Threads
|
||||
| Thread | Thread Starter | Forum | Replies | Last Post |
| Roto-Fab | Engine Covers - S/C | Fuse Relay Cover | Radiator Cover | Billet Oil Cap+ | AutoAgenda | Exterior Parts & Accessories | 14 | 02-06-2013 08:43 PM |
| New Texas Speed & Performance Engine Machining Center! | Trevor @ Texas Speed | Camaro V8 LS3 / L99 Engine, Exhaust, and Bolt-Ons | 18 | 01-16-2013 03:46 PM |
| Hawk Performance Brake Pads part HB247Z.575 $85.00 | Rogan | USA - Florida | 2 | 10-07-2011 12:10 PM |
| Acronyms? | KEEP RT | Camaro V8 LS3 / L99 Engine, Exhaust, and Bolt-Ons | 20 | 03-11-2011 08:57 PM |
| Great Read and Info on Oil Weight | Banshee | Mechanical Maintenance: Break-in / Oil & Fluids / Servicing | 1 | 11-23-2009 09:03 PM |


