You are browsing camaro5 

|
 04-06-2020, 08:12 AM
|
#99 |
 
Drives: 2010 Camaro SS/RS Twin Turbo LSX454 Join Date: Aug 2018
Location: Detroit, MI
Posts: 143
|
Now those are SWEET! Where did you get them?
|

|

|
|
04-07-2020, 06:37 AM
|
#100 | |
       
|
Quote:
 For the switches i ordered the line lock one was to replace the cheaper rocker master switch with no led light on it that my line lock kit came with. Figured this one since I was ordering the other 3 I need now, will be a nice upgrade over the cheap plain rocker master switch the Hurst kit came with. For the POW POW one, that will be a master switch and safety switch for the main power feed to the launch controller ( clutch tamer slipper/ stov-004) & (also for the Ctap). The launch control switch is a momentary switch and the 2step is a latching switch ( always left on at the track or when in use) that when momentary is pushed will arm both the stove & ctap. Basically the set up will allow the powpow switch to power feed on or off as a kill switch if the system momentary is armed ( wont do anything if momentary is not armed) . The momentary switch once pushed will trigger power to the 2 step switch & also 2 relays that will keep the power on to the stov and ctap until the stov MPH setting signals a pulse sending current to trigger the relays that will just kill the stove and the ctap. Once the stov triggers the shut off, the devices can not be armed again at all until you push the momentary switch again. Took a lot of reading an figuring out but I finally figured it out. To figure it out I did some on the bench testing and all worked great. Hopefully the stov controller will do exactly what i am hoping it will do so all goes to plan. Bench testing worked perfect so I moved onto actually installing everything now in the car. I am going to order 2 small custom indicator lights for the launch control and 2step so i can quickly see them when on and when off by putting them in a more line of site without looking down etc. My original plan was to put the switches ( 3 of them) in that small dash trim panel to the left of the steering wheel but decided it was going to be too much work and I'd need to make a custom new dash trim there if i went with my original switch location I had planned. So I put the switches down in my custom cup holder cover and will just add 2 custom indicator lights ( mini green lights for all systems a go!) in that small dash trim area instead since I know I can fit 2 small indicators in there without to much trouble.
__________________
Car mods: never enough!
 Last edited by Jayjellyfish212; 04-07-2020 at 07:20 AM. |
|
|
|
|
|
04-07-2020, 07:31 AM
|
#101 |
|
|
Here is the spot I finally settled on for the switches for the launching stuff. Seemed to be the most convenient location without creating more custom work to do. Turned out great. The pow pow is 19mm and the L/C & 2step ones are 22mm. Ill just need 2 indicator lights up on the dash or piller so I dont have to look down and will allow me to know when they are on or off since we are looking for a indicator that the stuff was shut off at a select MPH...
__________________
Car mods: never enough!
|
|
|
|
|
04-09-2020, 06:51 PM
|
#102 |
|
|
All done and almost ready to test it out. Just gotta hook my laptop on the car and set the pulse wire on from the ECM to the Stov controller and should be set. I was able to wire it all up so the launch pedal tamer controller stuff and the ctap and 2step all get triggered off completely once the set MPH is reached. I’ll start at 10MPH and see if that is enough time and mph for everything to do it’s job and shut off before I shift to second gear.
__________________
Car mods: never enough!
Last edited by Jayjellyfish212; 04-09-2020 at 07:07 PM. |
|
|
|
|
04-09-2020, 06:53 PM
|
#103 |
|
|
__________________
Car mods: never enough!
|
|
|
|
|
04-09-2020, 06:58 PM
|
#104 |
|
|
The launch button and 2step button switchs get triggered off once the car hits the selected mph
__________________
Car mods: never enough!
|
|
|
|
|
04-09-2020, 07:06 PM
|
#105 |
|
|
These 2 little blue lights are just temporary indicators for now. One is for the pedal tamer and the other is for the 2step! I'm gonna put lower brightness and green colored ones in instead but I'll put them in the pillar so they are up higher and look factory . Searching for some custom ones that will read “SEND IT!! “ when lit up.
__________________
Car mods: never enough!
Last edited by Jayjellyfish212; 04-10-2020 at 01:07 PM. |
|
|
|
|
04-12-2020, 10:59 PM
|
#106 |
|
|
Ended up finalizing everything and getting the tuning stuff done today! I was able to test everything out and it all worked out great 👍. I made 5 test on the car to see if the stov controller would shut off everything as I wired it for and it worked perfectly. Everything on each 5 tests shut off at 17mph with the controller. All first gear only systems including the 2step off at 17mph and can not trigger back on unless I push the launch control momentary button again which certainly when making passes I wont be doing. This has been a fun project and Im looking forward to trying it out at the track soon.

__________________
Car mods: never enough!
|
|
|
|
|
04-15-2020, 11:13 AM
|
#107 | ||
|
Drives: 2010 Camaro SS/RS Twin Turbo LSX454 Join Date: Aug 2018
Location: Detroit, MI
Posts: 143
|
Quote:
That's some pretty advanced wiring. I hadn't thought to include a momentary switch. The way you have it it safer than what I'm running. I've got a simple power on/off switch for everything so technically if I forget to turn it off after the run I'll go back into launch mode when picking up my time slip. LOL [QUOTE=Jayjellyfish212;10763680]All done and almost ready to test it out. Just gotta hook my laptop on the car and set the pulse wire on from the ECM to the Stov controller and should be set. I was able to wire it all up so the launch pedal tamer controller stuff and the ctap and 2step all get triggered off completely once the set MPH is reached. Ill start at 10MPH and see if that is enough time and mph for everything to do its job and shut off before I shift to second gear. I've got mine set at 10mph as well. I'll need some real seat time to know if that's appropriate but cool to see that's where you started as well. Quote:
Sorry I haven't been in this thread for a while. If you had a chance to see my other thread you'll see I've been a little busy with something far less fun.... 
|
||
|
|
|
|
04-15-2020, 06:55 PM
|
#108 | |
|
|
[QUOTE=NXTLEVL;10767612]That's some pretty advanced wiring. I hadn't thought to include a momentary switch. The way you have it it safer than what I'm running. I've got a simple power on/off switch for everything so technically if I forget to turn it off after the run I'll go back into launch mode when picking up my time slip. LOL
Quote:
Shoot me a PM and I can give you some info on how to wire the stov controller to trigger on by a momentary switch , then latch on via relays and then get triggered off at your selected mph. Wasn’t to bad to figure out but required some bench testing before I ran the wiring in the actual car once I was certain it would all function as planned. You can have it shut off all first gear only devices. You can also have it afterwards kick on a nitrous controller as well during your run. I may give a soft shot a try with a controller later on . Currently getting ready to do a big cam upgrade in mine here soon so the nitrous stuff will have to come later time. Just so you know my 2step and launch tamer control stuff is separate from my line lock. I didn’t want to have the line lock with those gadgets. Easier for me to just keep separate and use line lock in wet box and then switch over to the other goodies afterwards.
__________________
Car mods: never enough!
|
|
|
|
|
|
08-23-2020, 10:44 PM
|
#109 |
 
Drives: 2010 1SS LS3 Join Date: Aug 2019
Location: Waxahachie, TX
Posts: 276
|
Any updates? I am thinking about getting this same setup going if I can’t get my left foot to release slower. My line lock is ran off a relay module with the cruise cancel button I built, so it free’s up room for other electronics/switches.
__________________
2010 CGM 1SS
408/4L80E/ZL1 ESS G4 |
|
|
|
|
08-24-2020, 11:02 AM
|
#110 | |
 Drives: Chevy Astro Join Date: Jun 2020
Location: PNW
Posts: 25
|
Quote:
Here's the shape of hydraulic pressure release curves you get with the MAP/Magnus style systems, which rely on simple single stage hydraulic restriction to control clutch engagement rate (all tests done with pressure sensor located in hyd TOB bleed hose)... 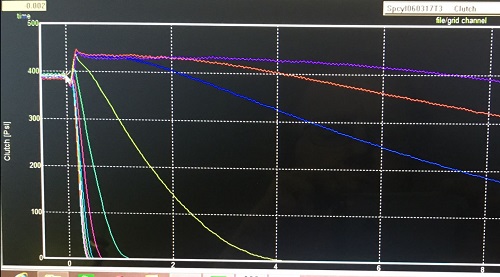 Notice how long they take to reach the sweet spot with any meaningful amount of restriction, or how quickly they blow thru the sweet spot without any meaningful amount of restriction. Not much resolution in the middle. Ideally you want TOB pressure to drop to the sweet spot zone instantly, but then stay in that sweet spot zone for about 0.7 sec which gives the car some time to accelerate before the clutch locks up. Here's the stepped release curves you get with the ClutchTamer (yellow trace) and 2-stage Hitmaster unit (blue trace) ... 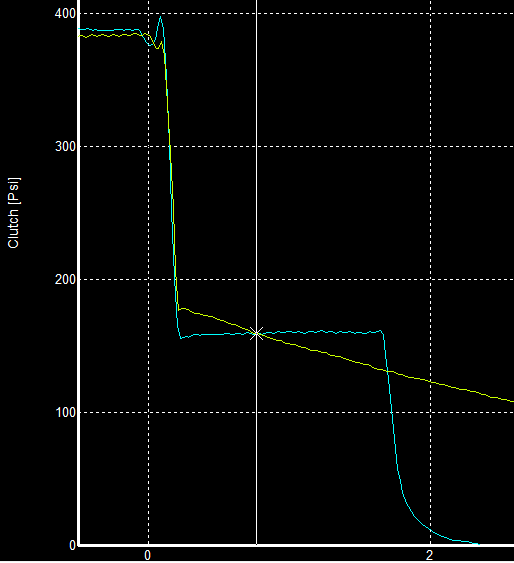 No matter how skilled you are, there's no human way possible to produce these shapes of curves with your foot. The ClutchTamer and Hitmaster units can do it consistently, good enough to bring home Wallys at national events. Grant Last edited by sr530; 08-24-2020 at 11:35 AM. |
|
|
|
|
|
09-01-2020, 07:44 PM
|
#111 |
|
Drives: 2010 1SS LS3 Join Date: Aug 2019
Location: Waxahachie, TX
Posts: 276
|
Kits are too expensive. Gonna build my own.
__________________
2010 CGM 1SS
408/4L80E/ZL1 ESS G4 |
|
|
|
|
09-02-2020, 12:17 PM
|
#112 |
|
Drives: Chevy Astro Join Date: Jun 2020
Location: PNW
Posts: 25
|
I don't know what style device you plan to diy, but I built my first version of the ClutchTamer years ago for about $20 using hardware store materials...
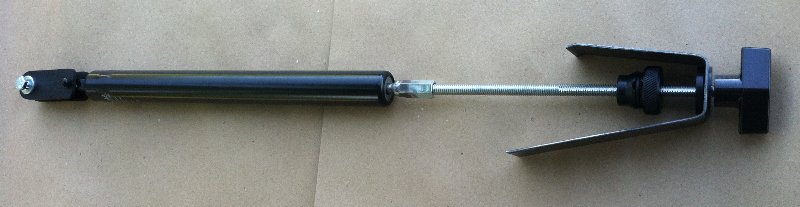 The Hillbilly Slipper is amazingly effective, but the cylinder itself is about 13" overall and it's internal spring is stiff enough to add about 25lbs of effort using 3.25" of it's stroke. Here's a link to more info... DIY Hillbilly Clutch Slipper Install Here's a simple diy ClutchMasters/Tilton style one-way simple restriction valve that you can build with a spring, nitrous jet, and some hardware store fittings. The nitrous jet is seated against the inlet with a spring, the inlet fitting is chamfered slightly so the jet can seat against it. ...when the fluid travels from the master cylinder, the jet get's blown off it's seat and fluid bypasses the orifice. ...when the fluid travels from the slave to the master, the spring and fluid seat the jet against the inlet fitting, which forces return fluid to travel through the orifice. 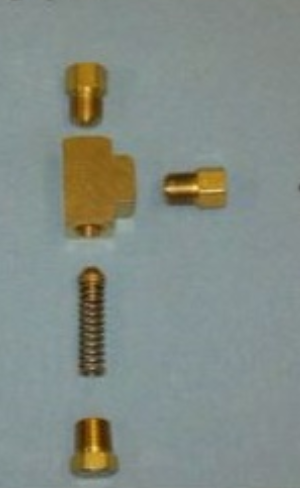 Combine it with a solenoid bypass, you will have what's basically a MAP/Magnus style system without the dial adjustment. If you want the dial style adjustment, just substitute the above diy valve with a Parker F200S Flow Control Valve. Resolution isn't great at the amount of restriction you will need, but it's the same valve used by MAP/Magnus...  If you want a diy version of my Hitmaster valve, i'm not going to help you with that as it is currently "patent pending"  Grant |
|
|
|
|
|
|
|
 |
|
|


