You are browsing camaro5 
|
|
 04-17-2018, 12:52 PM
|
#1 |
 
Drives: Yellow 2014 2SS Convertible Join Date: Oct 2016
Location: Pittsburgh, PA
Posts: 121
|
Added new speakers, amps, and sub to my 2014 2SS
So I just finished upgrading my sound system in my 2014 2SS convertible. I haven't worked much on cars before and expected to be able to find a lot more information online during the planning process. In the end there was a lot of fiddling around, trial and error, and hoping for the best. So I thought I would outline some of the things I did and experienced to help others going through this same process.
My Components
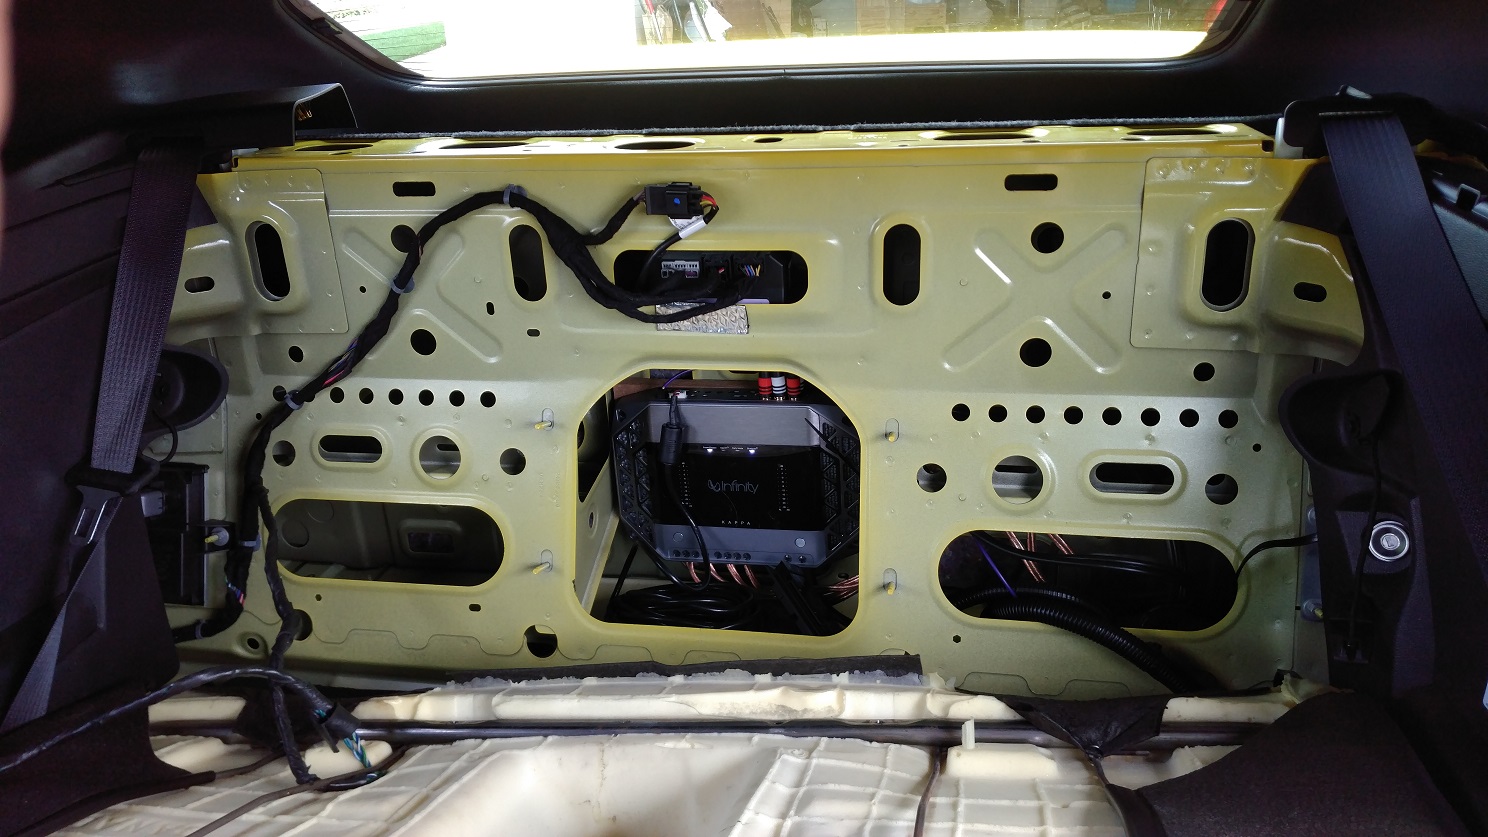
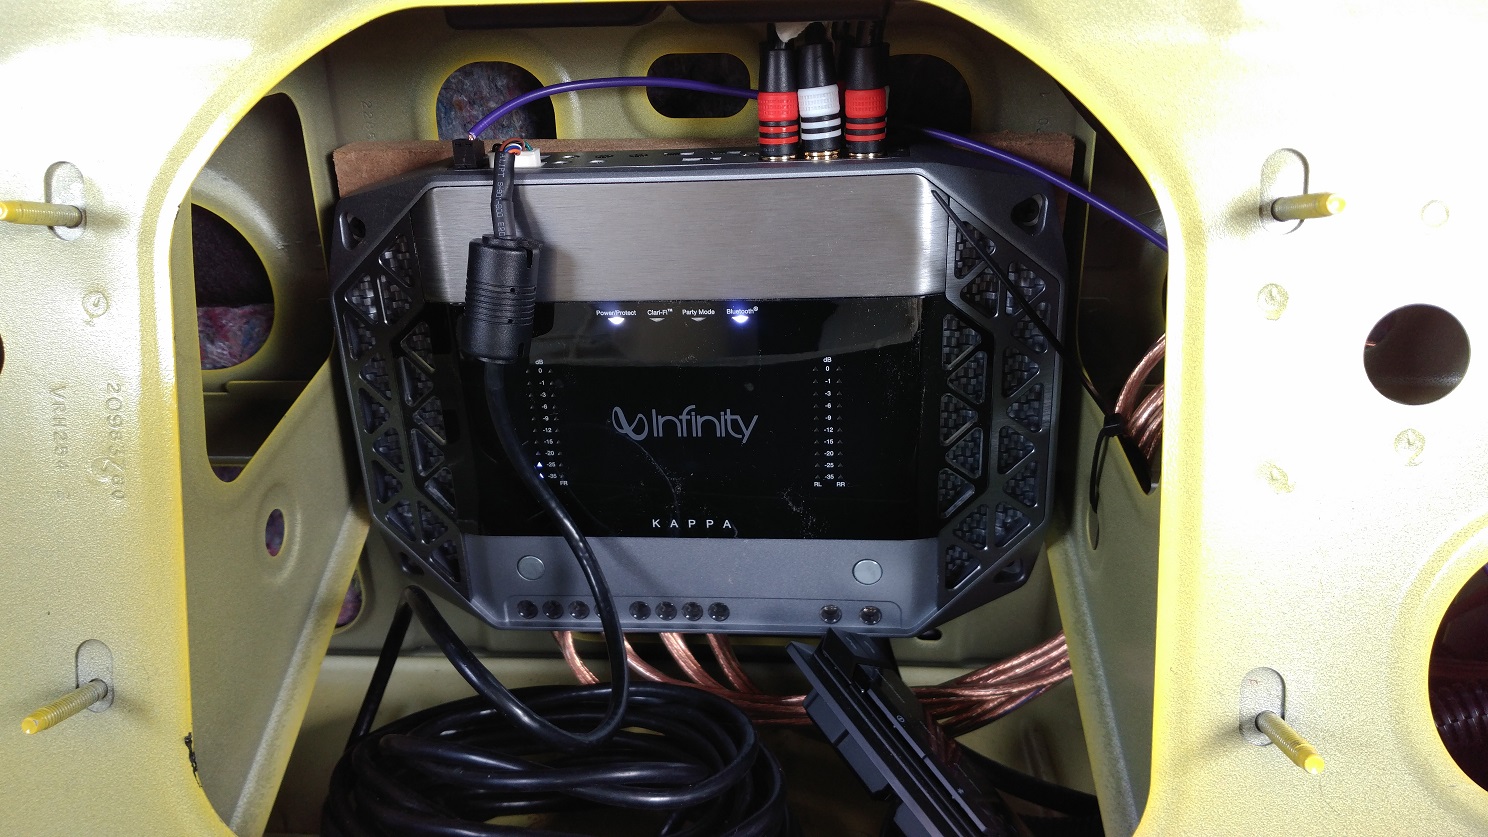
Soundproofing So I need to say this first: I will never upgrade a stereo without soundproofing again. This is the first time I've upgraded my stereo and did any kind of soundproofing with it, and the difference is night and day. Roadnoise is a fraction of what it was, midbass and bass are both deeper and fuller, and best of all my sub sounds 1/5 as loud from outside the car as it would have without the soundproofing. I purchased two 36 sq ft boxes of 80 mm Noico from Ebay and it cost me a total of some $130, which really wasn't bad. I thought about the custom cut pieces for sale from other places, but the pricing was insane, and now that I see what it's like to apply the stuff I'm glad I went this route. I had more control over where I placed it and how. I picked up a 3" wide 1/2" rubber roller from Amazon. I paid a few extra bucks and got a steel frame J-roller, which I'm really glad about as it helped in the corners and tight spaces (AKA: most of the car). Besides that I had my trusty utility knight. That was all you need for installation. The toughest part was getting the carpeting and trim off. The soundproofing was just cutting a piece of approximately the right size, dry fitting it, ripping off the backing, pushing it down, and rolling over it if possible. Then rinse and repeat. From what I can tell there is little difference if you apply one giant sheet or a bunch of smaller pieces, as long as you get proper coverage, but I'm no expert. I read varying views on coverage. In my experience (and I did some practical testing since I was working a couple hours each night then driving around) putting a few pieces on anything that might vibrate virtually eliminated the vibrations, but only cut road noise a little. Covering exterior body panels completely when possible really cut the road noise and gave the music that richer sound. In the end I did the trunk top, trunk sides, and partway down the battery hole. I was surprised how much this helped road noise. Then I did the doors, first up inside the door (against the outer sheet of metal), then across the interior-facing metal. This also made a difference in midbass as I'm guessing it acted like a ported box for the woofer. I plan to do the floorpan when I pull the seats out to change the seat covers; I'm thinking that will do a ton for the remaining roadnoise. Remember to pull down your back seat during this process. There is a very thick foam sheet that appears to be soundproofing between your back seat and your trunk. Removing this doubled the volume of my trunk sub. Now this last comment could be all psychological, but I never thought about it before hand and temperatures have been pretty consistent around here for the last month. The car seems to heat up and retain heat substantially faster since I did the soundproofing, and I don't notice the slight draft I used to. So I'm thinking the Noico acted as insulation as well. I'm guessing this also means it will stay cooler in the summer when the air is on. Though it does make me wonder what will happen when the car sits in the sun on a midsummer's day. Front Speakers For the fronts I decided on a set of Morel 602 components. Install was far more painful than I expected. First off, the old tweeters popped right out of the housing, but I could find no way to reliably attach the new tweeters. Luckily the housing frame fit nicely around the new tweeter inner body ring, and the outer ring fit snuggly against the frame. So I took some of my 80mm Noico soundproofing materials and attached two layers to the back of the housing. This put pressure on the back of the new tweeter when the housing was screwed shut holding it in place in the frame. Plan on taking the door off to be hell. You'll need a trim tool to avoid damage. Also, to access the screw behind the door handle you pop ONLY the back panel off. I was trying to take off the trim around the entire recess because I had no clear instructions and ended up damaging my door. After two hours of trying to get to that damned screw (btw, it's a torx, along with the phillips and hex screws you already took off on the door; argh!) and finally popping the door panel off, I found that there were some 7 or 8 wires that needed disconnected, and Chevy was kind enough to give you 3-5 inches of slack. Plan on having a second person to hold the panel, a portable light to shine into the space between the panel and door, and to scratch your hands and arms all up and down reaching into an area they don't fit. Also, each connector detaches a little different. Best I can advise is take your time, use needlenose pliers, and start with the drivers door; that way the second door will seem easy by comparison. I think whoever designed the woofer housing needs fired (or at least punched). The woofer is literally built into the frame, and the frame is held on the door by one single screw. You can buy replacement frames from Amazon, but they also attach using one single screw. I didn't realize any of this until my door panel was off and car undrivable, and didn't want to wait two days for an adapter to ship. So I grabbed some 1/2" plywood and cut my own adapters to attach to the inside of the door. Then drilled holes through the door and attached the woofer to my adapter. Soundproofing material between each layer, of course, to reduce vibration. One other note. If you plan to use the existing wires, expect to have almost no slack to work with. You'll be reaching into the woofer opening just to strip the damned things, and I have no idea where the full channel wire is at. Best I could do is tie the factory woofer wire into my crossover, and from there into my speakers. When I got the new amps in I did get a full signal, so it doesn't look like there is a built in crossover. Rear Speakers I went back and forth for months about whether to include rear speakers. Some comments suggested I skip them as they would confuse the front soundstage, unless I got a signal processor that allowed me to do differential rear fill and get the timings matched up. On the other hand, I wanted my rear passengers to get a decent experience as well, and too much treble was absorbed from the front speakers by the front seats. In the end I decided on a set of Infinity Kappa Perfects, and turned them down at the amp. They actually provide a nice addition to the Morels, filling in some brightness and giving the sound a fuller fill. In addition, now my passengers are happy.  The rears were pretty easy to replace. Just pop the trim off and remove/install with screws. Speaker wires were still way too short and way too thin. My wire strippers cut the one wire twice because they are barely 18 gauge (if that!). I would definitely recommend finding some adapter kit that you can just plug into the factory connector and just wire your speaker from that. They make adapters for these speakers so you can install something larger than 3.5". However, I prefered to keep most of my sound in the front and was just using the back to help provide some lost frequencies for the passengers, so using the backs as fill worked just fine with the factory size for me. One very important note here. The amps I looked at all provided a rear channel passthrough to send to your sub amp. So turn your rear speakers down by using the gain control on the amp. If you instead try to just fade the sound to the front in the head unit, you'll lose your sub signal. Subwoofer So I decided to just pickup the stealth box from ******** and figured it'd be a nice and simple install. Nope. My Sundown SA-10 would not fit into the box. On the two opposite sides where the speaker plugs were (12 o'clock and 6 o'clock) I needed an extra 1/4" of clearance. Then at 3 and 9 o'clock I needed a little less than that for the frame pylons. In the end I had to take a jigsaw to the box in four locations. I finally got the sub in, but couldn't get many of the screws to hold as I made a mistake on my measurements and cut too much. So I had to grab a 1x8 I had laying around, cut up a 0.75"x1"x3" piece, and screw that to the inside of the box, so that I could use 3" screws to attach the subwoofer down to that support piece. It wasn't pretty, but it worked. I was a little disappointed in all the extra work required after buying a 'turnkey' box. Unless your heart is set on a particular sub (and I have to admit, the Sundown is mega-sweet), make sure you take note of the opening size. The box fit nicely into the driver's side of the trunk and really doesn't take up much space, though it's not easy at all to get in and out. It also gets in the way of lifting the carpet to access the battery and spare tire space, which hadn't occured to me. So you may have some additional work required there cutting up the carpet, or you can just deal with not being able to take the carpet out. FARK I purchased the FARK unit from ******** and it went pretty well. The factory amp is on the driver's side of the trunk. You need to remove the side carpeting, which is held in place by a couple of snap clips. A trim tool made short work of them. I tried pliers and a screwdriver when that was all I had; I broke a couple clips. I'd recommend a cheap trim tool; you can get some 3D printed plastic ones on Amazon for less than $10. The factory amp is screwed in place. It's not worth trying to slither back into there to disconnect the wires. Just unscrew the amp and pull it where you can see and access it. Even then the wires are short, and it will not be easy to work with. I've been told all three connectors should just unclip and pull right out. Two of mine worked that way; the last I destroyed on it's way out. Luckily it was the one I didn't need. My experience with the GM electrical connectors in general has been pretty bad; I destroyed 3 total in this project. Once everything was free the FARK plugged in and worked immediately. No complatints. The only difficulty was trying to find somewhere good to shove it so I could get the sub in. Running wires around the sub, especially under it, made pushing the sub box back very difficult. In the end I brought the wires over the back. Amps Here is where I hit the most difficulty. I ended up with two Zapco amps: a ST-X 4 P and a ST-1000XMII. Both were about 12" x 6.5" x 2". Originally I planned a box along the passenger side of the trunk, but it just got too big once I chose these larger amps. So I installed the amps up against the back wall of the trunk side-by-side, and there was a perfect amount of space for them. However, as the trunk floor carpet is a thin layer, I had a ton of bumps from wires running under it, and corners of it were constantly lifted by wires coming up around the sides. Meanwhile the whole thing looked horrible with wires running everywhere. I spent hours trying to do cable management and just couldn't make it work. I've come to the conclusion that it's possible to mount amps against the back of the trunk, but you need to work out some kind of cable channel. In my case I had 4x 4-AWG wires for power, plus 10x 12-AWG sets of speaker wires, plus 3 sets of RCA cables...it was just too much. Meanwhile, I had spent the whole time thinking about losing those 4-6" of trunk space. And let's not forget the convertible top that would be sitting on the top fins of the amps when down, so you really need an amp enclosure to keep the fins clear, which also means fans and thus more cables. During the process of removing the factory sub so it would no longer play (and so I didn't have the extra weight in the car), I found a 7" deep 'enclosure' between the back seats and the trunk. It's essentially a sheetmetal box with many holes. I couldn't believe that I could find no one else who tried using this for anything other than a sub enclosure before (which I would strongly recommend against, btw). I thought for sure that there was something I wasn't aware of and it wouldn't work for an amp, but it did. So I had to trade in my ST-X 4 P for an Infinity Kappa 4, which I love. The Kappa fit perfectly in the old sub opening and cleaned up a ton of my wire problems. There is plenty of room to fit 10 amps back there...if Chevy had actually left an opening to get to all that space. They didn't, and so my sub amp I just mounted to the side of my sub box. Not super pretty, but also not terrible...most of the wiring was from the cabin amp. The power lines come straight back from the battery, through the existing wire channel, through a hole in the sheet metal between the trunk and this enclosure. And the speaker wires are run through another hole in that sheet metal right behind the sub box. So the speaker wires are invisible and the power wires are clumped in the existing power wire channel creating only one little bump running the length of the trunk. Not only did this solution hide one amp away, but I have plenty of room there for a sound processor, or even another small amp in case I want to add a second sub to the trunk without trying to find something that can supply 1000w x 2 (which would not be easy). Sound Processor? So my biggest regret is that I couldn't afford to add a sound processor yet, but that's definitely my next purchase. The head unit does not seem to put out a flat response curve, though I'm really not sure on that. I'm pretty sure it's adjusting it as you turn the volume up; I noticed system sounded better when I set my gains with 25 as the max volume instead of 45, even though my oscilliscope showed no clipping at the HU even at max. Sirius and MP3s through the HU sound very harsh, almost painful at loud volumes. I thought it was the HU itself doing it, but my amp allows me to connect directly to it using bluetooth, so I tried that. Same frickin' thing! So I started playing with the graphic equalizer on my phone (blindly, since I'm far from an expert). I eventually found that by cutting the 1k - 4k bands (bottoming out on the 2k), I was able to get rid of the harshness and listen to my music without pain (yay!). I then bumped up the 8k and 16k bands and it adds some brightness back in. Still, I find myself varying the bass wildly (really really wildly) when listening to MP3s, so I think it's either something with the format or just the original recordings; in any case I don't think the bass issue is with the HU. I don't know why this harshness occurs and now suspect that I either made a bad decision in speakers, or it just has something to do with the interior of the car. But I experienced this across two different amps, both with the back speakers on and off. In any case, a DSP would let me handle at least this part in the system itself, which I think is an absolute must. I'd still like to figure out what's going on with the bass and if there's any way for me to handle that automatically before moving forward though. Since the Kappa allows me to stream bluetooth directly to it. I've been doing that with my phone, with my custom EQ settings (I use Poweramp), and it sounds substantially better. If I could get my head unit to sound as good as my phone streaming via bluetooth, I'd be a happy camper (sad, I know)! I hate having to reach down and try to fiddle with my phone every time I need to adjust the volume, skip a song, etc., but I shudder to think what my experience with this new system would be like without Poweramp! Mistakes So what would I do differently? Well, obviously, I wouldn't play musical chairs with the amps. I wish I had just hidden them away from the start so I didn't need to keep running wires, doing cable management, and worst of all, building two different amp boxes that I never used! I would probably replace the head unit. Last I looked (which I guess was a while ago) GPS Nav HUs were in the $1200+ range. I looked after my install and found that you can get a decent one now for $600. The factory HU may or may not mess with the response curve, but has no equalizer to speak of. Meanwhile, MP3 support is wacky, there is no folder sorting, FLAC support is non-existent, and despite what is advertised I can't get a WMA-lossless to play. And with MP3s the bass response is insanely inconsistent (my 18db bass boost knob doesn't make a dent in it half the time). I'm probably going to end up adding a JL Fix-86 at some point here. Of course, that's just masking the quality issues (with the HU?), and doesn't address the other issues. Meanwhile, the Fix plus the FARK is well over $400 anyway, so a new HU would have been under $200 for a nice clean signal and better functionality...oops. That's assuming I wouldn't get the same harshness with a new HU, though I expect it would have a nice built-in equalizer either way. I've heard that's more work than all the speakers combined, though. I also would have planned on finding or building some adapters for the front woofers. I made mine at 10pm, exausted after hours of working on my system, frustrated because my car was in pieces and I needed it done, and with no natural light to work in. They were far from perfect and will probably need replaced at some point. Questions? So I've learned far more than I ever wanted to about working with the audio components and interior areas of this car during this process. So if anyone else is going through this, and has a question, please let me know. I'd love to save someone else some of the pain I went through. |

|

|
|
04-17-2018, 04:50 PM
|
#2 |
|
ILSQ

Drives: '13 2SS/RS Join Date: Feb 2017
Location: Flatlands
Posts: 322
|
Nice write up! Do you have pics of your trunk? There are HU’s that can be found for around $300(taking a chance w/no warranty), but the PAC kits are also $300. Dayton Audio is coming out with a much anticipated DSP, and miniDSP would be another budget option. I hope you feel that tour hard work was definitely worth the sound upgrade!
__________________
Way too many mods to list, and just getting started...
|
|
|
|
|
04-17-2018, 08:27 PM
|
#3 |
   Drives: 2011 2SS/RS Join Date: Feb 2016
Location: Jacksonville FL
Posts: 1,190
|
Very good details. Great parts hcoice too. Post up some photos!
__________________
2011 Camaro SS 2SS/RS A6
MRR M017 1le Replica Wheels Vararam Ram Air Intake Speed Engineering Longtube Headers w/ Magnaflow HF Cats Bo White PnP Stage 2 TB GPI SS2 VVT Cam w Cometic thin gaskets 10.69 compression Xpipe w/ Res Delete and NPP Exhaust Tuned By Anonymous Calibrations Gen5DIY Mylink Conversion W/ Backup Cam Morel 3 way custom speakers, Infinity 860w Subwoofers in trunk baffle Helix P6 6ch amp w/ 8ch DSP and P1 Sub amp |
|
|
|
|
04-23-2018, 11:58 AM
|
#4 |
|
Drives: Yellow 2014 2SS Convertible Join Date: Oct 2016
Location: Pittsburgh, PA
Posts: 121
|
Sorry for the delay; it took me a little while to get around to pulling my back seat back down. Here are a few pics:
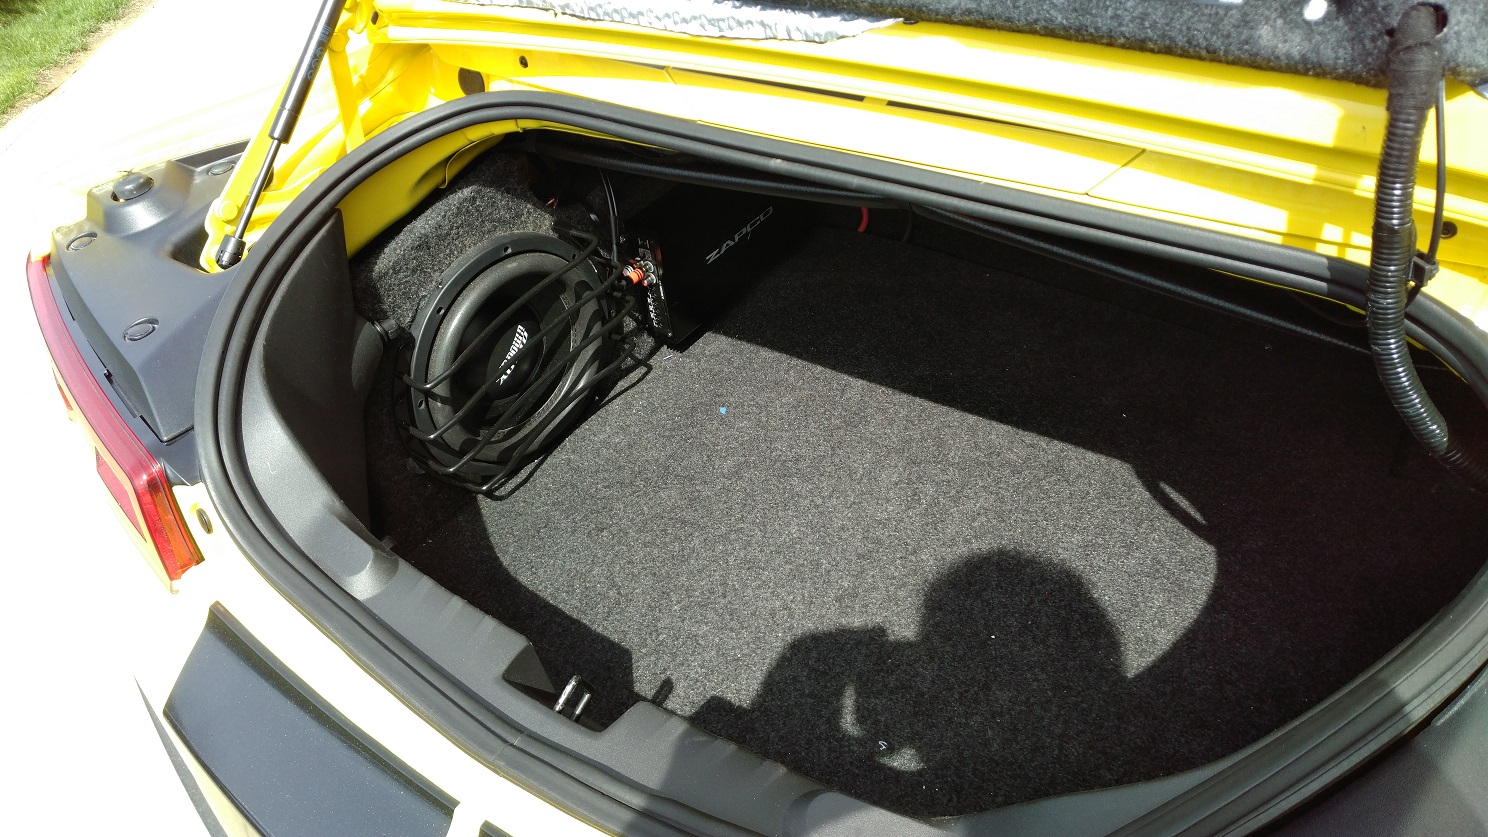 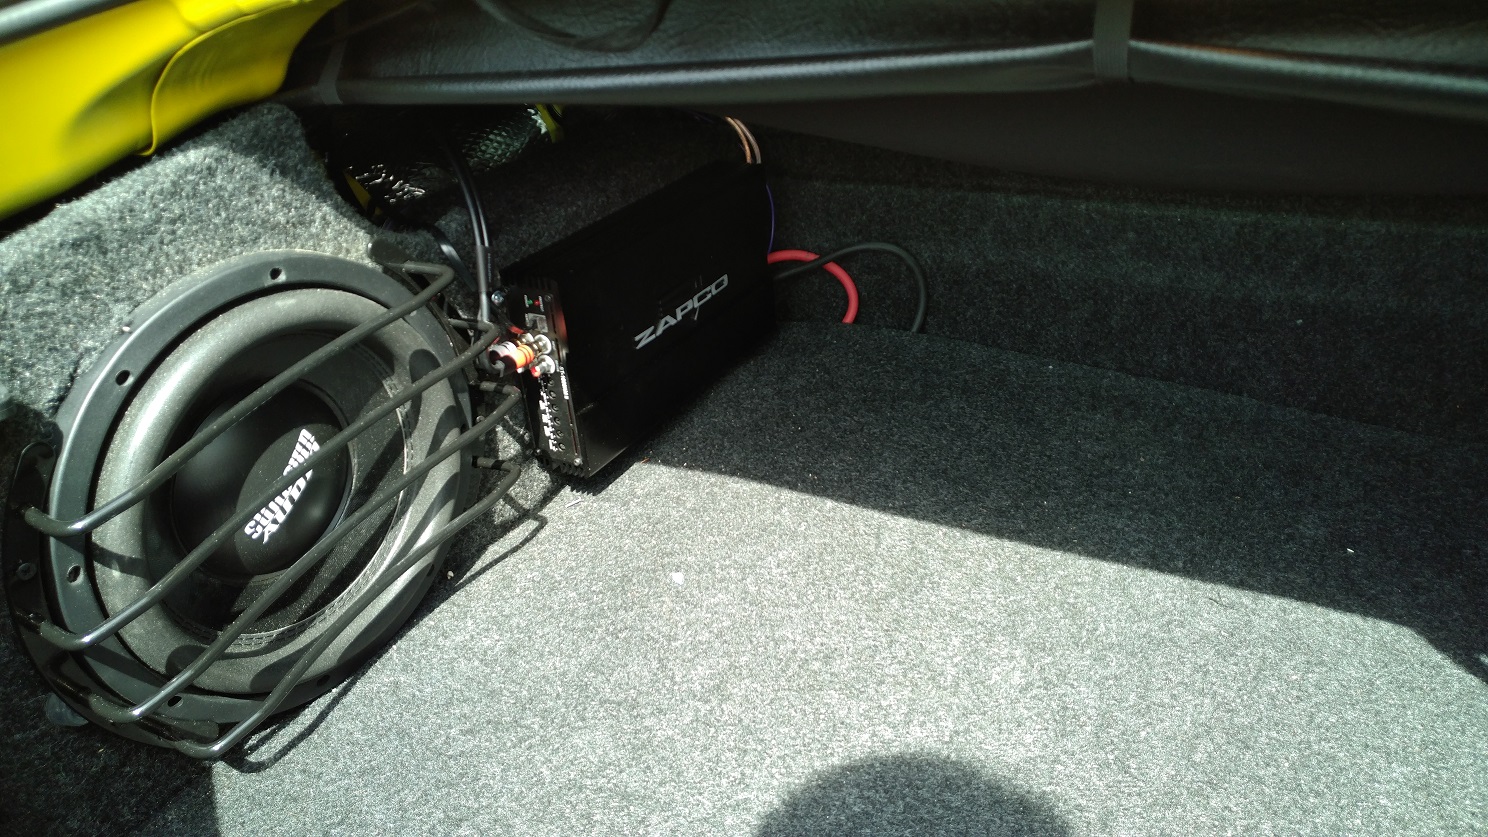   Yes, definitely worth it. But man, what a pain! |
|
|
|
|
04-24-2018, 01:15 PM
|
#5 |
 
Drives: 2011 VR SS Vert Join Date: Aug 2015
Location: Minneapolis
Posts: 372
|
I believe there is a thread somewhere where someone posted the plans for building a sub box that would mount in the old sub location. What are your thoughts on that?
|
|
|
|
|
04-24-2018, 01:20 PM
|
#6 | |
|
Drives: Yellow 2014 2SS Convertible Join Date: Oct 2016
Location: Pittsburgh, PA
Posts: 121
|
Quote:
I've seen a few suggestions of just mounting a free-air sub, or trying to use foam to seal that space, and that seems like a bad idea for a few reasons, especially with the convertible motor sitting in there. |
|
|
|
|
|
04-25-2018, 05:48 AM
|
#7 |
 
Drives: 2011 Inferno Orange Camaro 2SS/RS Join Date: Nov 2011
Location: Pittsburgh, PA
Posts: 1,368
|
You should have asked, You know I did all that and I have all the proper tools so that nothing would have been broken. There is a local place by me that makes high quality adapters for both the doors and the rear deck. The have a website as well. When I did my door speakers I ordered from them only to find out they are literally 3 blocks away from me lol.
Now you just need to add a bunch of cameras that you can monitor at any time from your phone. 
|
|
|
|
|
|
|
|
 |
|
|


