You are browsing camaro5 
|
|
 08-31-2018, 05:07 PM
|
#43 |
Drives: 2018 2SS M6 Redline Join Date: Oct 2014
Location: United States
Posts: 431
|
What did you do to the first one? Any interest in selling it lol?
__________________
 |

|

|
|
08-31-2018, 06:35 PM
|
#44 | |
|
Account Suspended
Drives: 2010 Camaro 1SS LS3 Join Date: Jan 2015
Location: Riverside, CA
Posts: 4,018
|
Quote:
Yeah, you don't want it... its fairly hacked up. The shipping would be more expensive than what this would sell for at this point lol. The cuts on this new one went well, however. Nice, clean cuts with the dremel... sandpaper (some 120, then some 1000) and here we are. The good thing about the unfortunate waste of the other one, if there's a positive here, is that I was able to use it as a template for the cuts. After careful observation, the lines on this new unit already had the outline for the dremel, right on the crease... Here are pics, so far so good! |
|
|
|
|
|
09-12-2018, 10:29 PM
|
#45 |
    
Drives: 2011 2SS Join Date: Mar 2015
Location: Arlington, Texas
Posts: 1,333
|
I installed the zl1 style diffuser today and it really doesnt fit great. There were a lot of modifications that had to be made for it to even fit so Im sure it could be a mistake if mine that caused it to not fit but even if someone gave me another one for free, I wouldnt even try to install it. Its on the car now and it looks decent from a few feet away but once you get close the huge gaps and stuff become obvious. Hopefully it works out better for you OP
__________________
2011 SS L99
LSA Supercharger, BTR Stage 3 PDS Cam, Yank 3200SS, Weapon X Stage 2 intake, LSA Heads, Flex Fuel, Ported throttle body, Speed Engineering Headers, NOWEEDS, ZL1 fuel pump, DSX AUX Pump, ID-1050X injectors, 3 pipe to NPP mufflers, 3.91 gears  |
|
|
|
|
09-13-2018, 06:53 PM
|
#46 |
|
Account Suspended
Drives: 2010 Camaro 1SS LS3 Join Date: Jan 2015
Location: Riverside, CA
Posts: 4,018
|
SynergyGreenSS, I haven't installed it yet... was planning on it this weekend.
Did you notice it doesn't have any clips on the topside? (of course you did) I don't want to rush this. I want to take some time to remove the rear bumper, carefully remove the NPP diffuser, and then attempt the install... this in case I need to reinstall the NPP for whatever reason. I was thinking some 3m double sided tape for the topside, and screws, bolts, or rivets for the underside (depending on clearance). I'd love to see pics if you can accommodate... wondering what areas don't look right. Thanks for the feedback. |
|
|
|
|
09-13-2018, 07:32 PM
|
#47 | |
|
Drives: 2011 2SS Join Date: Mar 2015
Location: Arlington, Texas
Posts: 1,333
|
Quote:
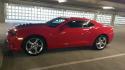
Yeah I really dont know why they didnt put clips on the top but they did on the sides. I used 3m double sided tape on the top but it doesnt want to stick very well because the bumper has more of a curve than the plastic diffuser, so the diffuser wants to pull away from the bumper. I ended up using one self tapping screw towards the outside of the very top of the diffuser (which I hate to do) in order to hold it on but Im not sure how strong that will hold on. I used all 6 of the stock mounting points on the underside and that seems pretty strong. Ill take some pictures for you soon but basically the diffuser looks like it was made from a mold, and the mold may have shrunk or something. So the diffuser has like easily a half inch gap on each side, and on the far left, the diffuser is sticking out about three quarters of an inch or so from the bumper. I know that last part doesnt make a ton of sense but once you see the picture youll see what I mean
__________________
2011 SS L99
LSA Supercharger, BTR Stage 3 PDS Cam, Yank 3200SS, Weapon X Stage 2 intake, LSA Heads, Flex Fuel, Ported throttle body, Speed Engineering Headers, NOWEEDS, ZL1 fuel pump, DSX AUX Pump, ID-1050X injectors, 3 pipe to NPP mufflers, 3.91 gears |
|
|
|
|
|
09-14-2018, 07:36 PM
|
#48 |
|
Drives: 2011 2SS Join Date: Mar 2015
Location: Arlington, Texas
Posts: 1,333
|
Heres the pics of what I was talking about. It honestly doesnt look horrible from a few feet away. I put black tape on each side so the gaps arent as obvious as they would be if they were green.
  
__________________
2011 SS L99
LSA Supercharger, BTR Stage 3 PDS Cam, Yank 3200SS, Weapon X Stage 2 intake, LSA Heads, Flex Fuel, Ported throttle body, Speed Engineering Headers, NOWEEDS, ZL1 fuel pump, DSX AUX Pump, ID-1050X injectors, 3 pipe to NPP mufflers, 3.91 gears |
|
|
|
|
09-14-2018, 08:10 PM
|
#49 |
|
Account Suspended
Drives: 2010 Camaro 1SS LS3 Join Date: Jan 2015
Location: Riverside, CA
Posts: 4,018
|
SynergyGreenSS thanks for the pics! I wonder if we first need to secure it at the top edge, then if the bottom side needs new bolts/rivets/screws etc., we accommodate.
I'm going to give it a go and will post up some pics on how it turns out. Thanks again, your feedback is very helpful. |
|
|
|
|
09-14-2018, 08:35 PM
|
#50 |
|
Drives: 2011 2SS Join Date: Mar 2015
Location: Arlington, Texas
Posts: 1,333
|
I used all the stock mounting locations on the bottom so hopefully that helps hold it on. Keep us posted on how it goes for you
__________________
2011 SS L99
LSA Supercharger, BTR Stage 3 PDS Cam, Yank 3200SS, Weapon X Stage 2 intake, LSA Heads, Flex Fuel, Ported throttle body, Speed Engineering Headers, NOWEEDS, ZL1 fuel pump, DSX AUX Pump, ID-1050X injectors, 3 pipe to NPP mufflers, 3.91 gears |
|
|
|
|
09-15-2018, 12:03 PM
|
#51 |
|
Account Suspended
Drives: 2010 Camaro 1SS LS3 Join Date: Jan 2015
Location: Riverside, CA
Posts: 4,018
|
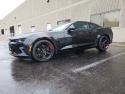
So before I post up pictures, I will say that I tried installing it a bit differently than you SGSS. I did not depend on the underside stock mounts to align the diffuser. I did not want to see the same gap on the topside so I aligned the edge from the top, and worked my way downward.
I also used self tapping screws to hold the topside in place before screwing in the bottom and the bottom sides with new holes. This gave it a better look, but as you will see, there's still the small gap on the sides. It doesn't seem to be as pronounced as yours, but they're there. Also, the cuts I made were a bit off, and you can still see a bit of that from the right angle if you crouch down to inspect it... hard to tell really, unless you're really up close. I know now how the cut needs to be so that it is perfectly hidden by the 3dCarbon slats... in the future, I may get another one to replace this one since they are fairly cheap. All in all, I am quite satisfied. Some lessons learned but it will hold up well for a good while, and it really does look good I think. I'll say that it didn't fall off going over 120 either (in Mexico)...  4 stars out of 5 - one less due to fitment being a bit off. The cuts are on me... Pics to follow. |
|
|
|
|
09-15-2018, 12:19 PM
|
#52 |
|
Account Suspended
Drives: 2010 Camaro 1SS LS3 Join Date: Jan 2015
Location: Riverside, CA
Posts: 4,018
|
Here's how we should cut the sides (yellow line)... This so that you can flatly lay those small sides to the bottom of the bumper, then secure with bolts or screws.
Last edited by Spec; 09-15-2018 at 01:13 PM. |
|
|
|
|
09-15-2018, 01:04 PM
|
#53 |
|
Account Suspended
Drives: 2010 Camaro 1SS LS3 Join Date: Jan 2015
Location: Riverside, CA
Posts: 4,018
|
1st Set of pics. Let me know your thoughts... much appreciated.
|
|
|
|
|
09-15-2018, 03:54 PM
|
#54 |
Drives: 2014 Red Hot LS3 Join Date: Oct 2014
Location: SF Bay Area, CA
Posts: 4,266
|
I like it a lot.

|
|
|
|
|
09-16-2018, 09:57 AM
|
#55 |
|
Account Suspended
Drives: 2010 Camaro 1SS LS3 Join Date: Jan 2015
Location: Riverside, CA
Posts: 4,018
|
Cheers brother... you know what? A black matte or carbon fiber pinstripe vinyl across where the screws are will finish it off nicely I think.

|
|
|
|
|
09-16-2018, 12:03 PM
|
#56 | |
|
Drives: 2014 Red Hot LS3 Join Date: Oct 2014
Location: SF Bay Area, CA
Posts: 4,266
|
Quote:
|
|
|
|
|
|
|
|
|
 |
|
|


