You are browsing camaro5 

|
 08-18-2012, 09:39 PM
|
#1 |
|
Oldbie that nobody knows

|
DIY - Paint your interior ABL Trim Panels (THE RIGHT WAY!!!)
THIS THREAD DOES NOT APPLY TO LS TRIM PANELS OR CLOTH TRIM PANELS! THIS THREAD APPLIES ONLY TO THOSE WHO OWN A 2LT/2SS AND WANT TO CHANGE THE COLOR OF THEIR ABL TRIM PANELS!!!
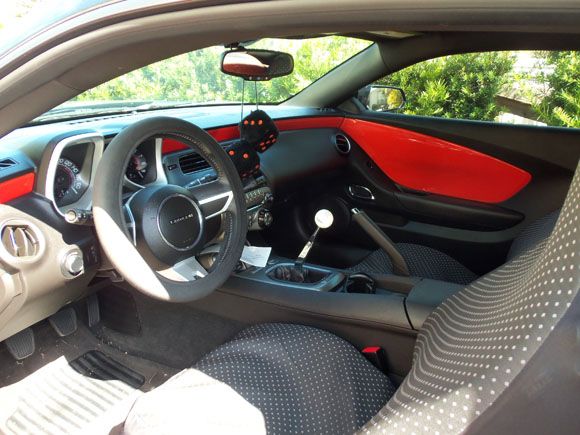
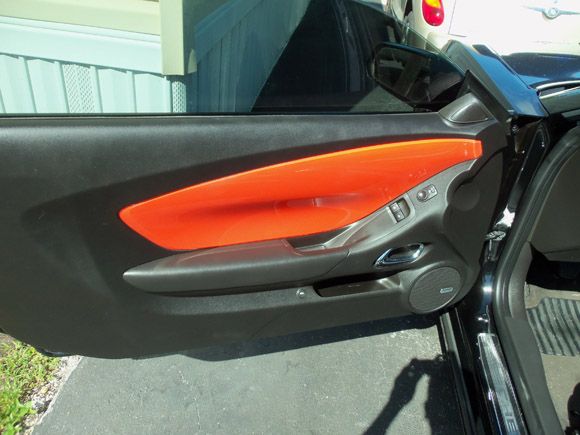
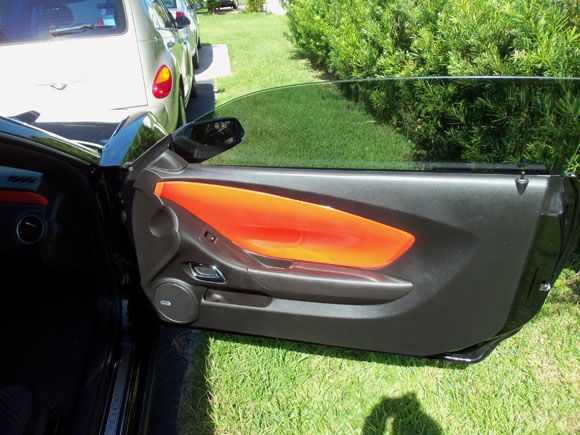
My car is a 1SS and one of the first mods I did was to get silver interior trim panels straight out of a 2SS. I did just that, but after a year or so, my car's theme began to evolve to Black & Hugger Orange, so for a couple months now I've been wanting to do my interior trim panels in Hugger Orange. The conflict I had was, most people who painted the ABL panels tended to just paint right over the front of them and mask off a small strip of the plastic at the top so the ABL could still shine through. Well, this is the wrong way to do it! If you look at the back of your trim panels, you'll notice the back of it is painted in a flat color, whether that be Neutral (the beige one), silver (stock), Synergy Green, IOM, Scorch Yellow, or whatever. The reason it looks glossy is because you're looking at the color through a thick layer of transparent acrylic plastic that is glossy and smooth at the surface. Ergo, the correct way to paint the ABL trim panels a different color is to strip the paint off the back resulting in a transparent part, masking off what needs to be masked off to maintain the factory paint lines (which is easy), and then to shoot your preferred color. The finished product will have a factory appearance with the layer of transparent plastic still intact, meaning the ambient lighting can shine through completely as it is supposed to. FUNFACT: The best part about painting them this way is not only to maintain that factory look, but it is also very foolproof. Since you're looking at the color through a thick layer of plastic, it hides virtually any imperfections you make during the stripping and paint process. For example, my finished product in this tutorial has a couple of fisheyes and the areas that were stripped have some light sanding marks from the steel wool, but you can't see them from the front, which is all you'll see when you install the part! So you can jump into this project knowing that you're most likely going to get perfect results. Anyway, ONTO THE DIY! PROTIP:Start with the left dash trim piece, since it is the least expensive to replace (around $40.00 for the most expensive finish, which is Synergy Green) if you make a critical error, which is difficult to do with this DIY. Here are the supplies you'll need to strip it: 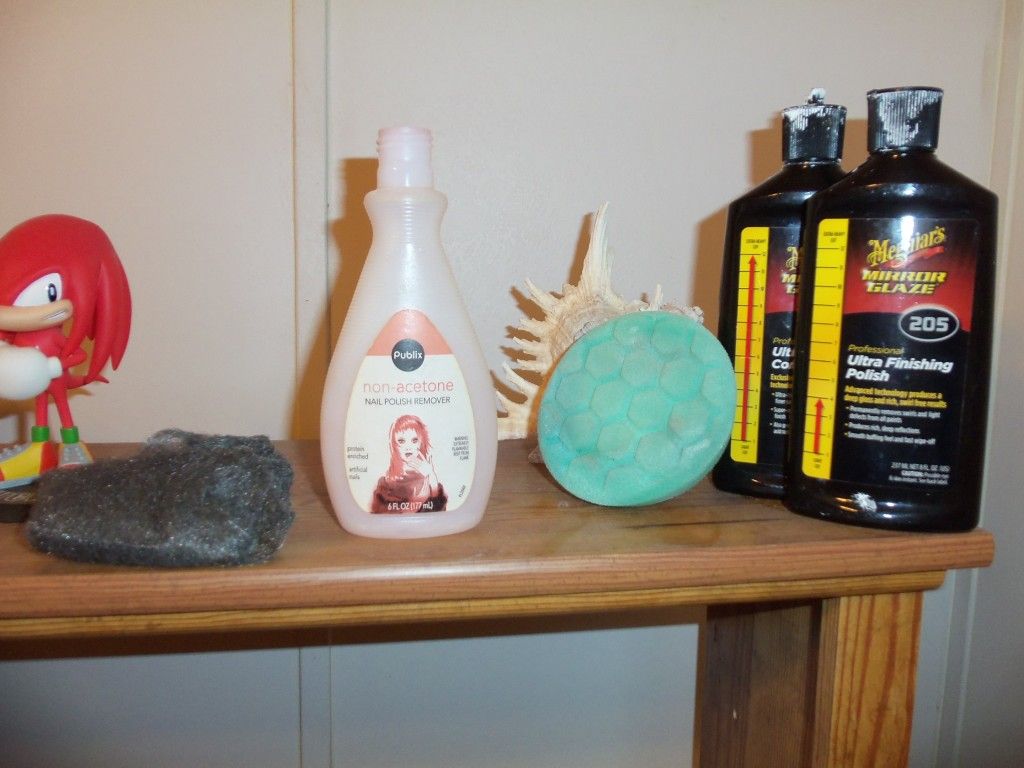 (Don't mind Knuckles - I'm Gen Y, so I played Sonic and loved it, lol.) From left to right: • #0000 Steel Wool (finest grade) • Krud Kutter Grafitti Remover (use nothing else! I know the original version of this DIY stated to use non-acetone nail polish remover, but I discovered even that is too strong for the plastic! The plastic these pieces are made out of is Polycarbonate, aka Lexan. This stuff is very sensitive! Nothing else is safe on these plastics other than Grafitti Remover! If you're very apprehensive about taking a chemical to the plastic, I'd highly advise removing it through sanding which will take a lot longer, but you'll at least have peace of mind you're not damaging the plastic.) • A medium to heavy cut polishing pad or applicator - you'll be doing it by hand for the dash trim panels, then by machine for the door ones. • A heavy cut compound, and then a finishing polish Before the dash pieces can be stripped, you're going to have to remove the plastic strip that contains the mounting tabs on the back of them. They're applied to the trim piece by moulding tape - you know the drill for this. Heat gun or blow dryer and fishing string or dental floss. Just be careful not to break the strip. After the mounting tab strip is removed, remove all the leftover adhesive residue with goo gone or whatever. Now for stripping the paint: Lightly soak the steel wool in the grafitti kutter and scrub the back of your trim piece (this DIY assumes you know how to remove the trim panels). Use moderate pressure: too light, you'll take forever to start removing the paint, too heavy and you risk compromising the texture. *And yes, the back of the ABL trim panels have a slight texture to them - you'll notice this on the silver ones the most if you look at them from the front in certain lighting. The reason the texture is there is probably to help paint adhere better. Removing a bit of the texture is okay, but try to be careful - this is why you're using fine grade steel wool. Just a quick warning, the outer ends of the dash trim pieces are very difficult to get all the paint off of in the tight crevices and corners, so pay particular attention to those. You might have to resort to sandpaper at some spots. PROTIP:It is absolutely INTEGRAL that you remove ALL of the paint, because if you don't, then it's going to still be under the new coat of paint, and seeing as how you are staring through the plastic at the underside of the paint once the part is installed... what do you think you'll see? That's right, the old paint. So you must remove ALL of it. Once all the paint is stripped, the part will be a bit hazy on the backside. (It goes without saying to keep your hands away from the front smooth glossy side throughout this whole process.) This is where the compound comes in. Meguiar's M105 Ultra Cut Compound is a good one. Apply a bit to the pad and a bead to the surface you just stripped and use heavy pressure and polish the textured surface. Keep doing so until you've restored satisfactory clarity, and then follow up with a finishing polish to restore full clarity. If you want absolute perfection, wet sand with a high grit sandpaper before polishing. You'll know it's okay when if from an inch away from the surface, your finger looks kinda blurred but then if you place your finger against the textured surface firmly, you can see it through perfect transparency. Your freshly stripped surface should look similar to this (note the texture): 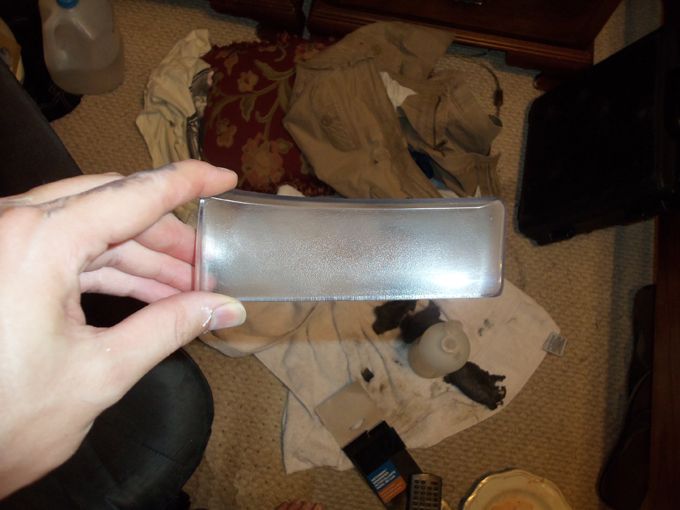 As you can see, there are some light sanding marks in spots from the steel wool - this is okay. Once the paint is laid on, you won't see these anymore through the thick layer of plastic. Masking: I didn't take a photo of the masked part, but it's pretty open and shut. Just try to remember which parts were painted silver on the part before you stripped it and mask to that effect. It should be relatively easy. Painting: How you paint depends on what color you're using. You can use an aerosol rattle can and still get factory-like results. I used Dupli-color Engine Enamel in Chevy Orange (same thing as Hugger Orange, or previously known as Carrousel Red). Listen to the instructions on the can when painting and you'll be fine. Paint adheres pretty well to this plastic as well, so the only prep you need is to THOROUGHLY clean the part, including isopropyl alcohol or else you'll get fisheyes - not that they'll be seen once the part is installed, but perfection is nice if it's achievable, right or wrong?  Note about paints: Solid colors will give you more breathing room for imperfections since they won't show the reflections, peaks, and valleys of the textured surface nearly as much as a metallic will. So if you happened to sand away too much of the texture or if you have a lot of sanding scratches from the steel wool that even the compound couldn't fully remove, then a solid color will hide pretty much all of them once it's sprayed on. Not to say a metallic color is a no-no, it's just there's a remote possibility your imperfections might be visible. Here's my finished product after two light coats and a heavy coat: 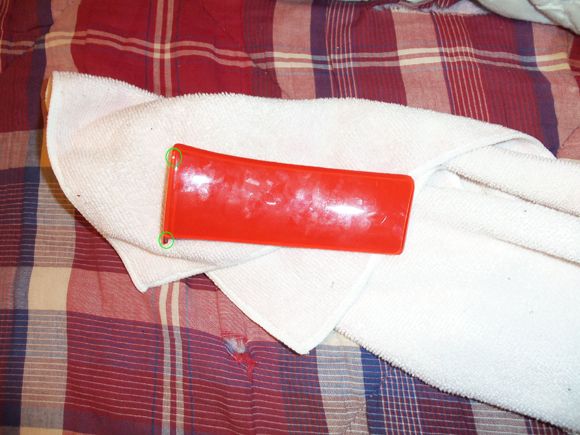 I circled in green spots that I wasn't able to remove the paint on - see how they show? They're so small that I don't really mind them, and the one on the bottom won't be visible when the car door is closed. It's a good example of how important it is to remove ALL the paint. (Forgive the fingerprints, please. LOL) 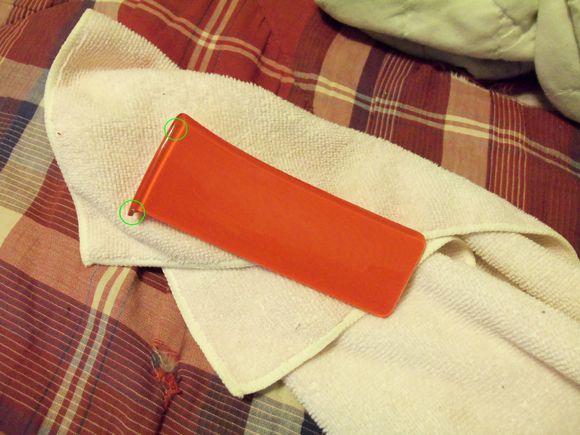 Another pic of the finished product in different lighting. Looks factory! Remove the masking tape after the part is dry to handle. You might have to very lightly sand the masked off edges to smooth them out a bit - 3000 grit followed by a quick rub with polish should be fine, but don't do that until the part is completely dry. (A day or two.) Up next is the hardest part: reinstalling the dash pieces. It's virtually impossible to put the tab strip back onto the back of them in just the right position so you have a seamless mount into the dash. The best thing to do is to apply 7/8" 3M molding tape to the back of your newly painted trim, install JUST the plastic tab strip into the dash, and then very carefully push the trim piece into the strip so that the molding tape sticks to just the right spot to ensure a factory fit. If you mess it up, you have to remove the tape and do it allover again, which might risk pulling the paint right off with the molding tape. Needless to say, it's very advisable you get it right the on the first try. The door panel trim parts are actually the easiest to do out of the entire DIY. First of all, they are an easy paint strip job since they have no nooks and crannies that will be difficult to get paint off of (or at least none that show on the installed product), and most importantly, you remount them with screws instead of tape that needs to be placed in just the right spot. Anyway, hope this helps! Happy painting and enjoy your newly painted ABL door panels - DONE THE RIGHT WAY! 
Last edited by nUcLeArEnVoY; 09-05-2012 at 11:39 AM. |

|

|
|
08-18-2012, 09:59 PM
|
#2 |
|
it's mind bottling..

Drives: SGM Join Date: Apr 2011
Location: miami floirda.
Posts: 5,393
|
Nice
__________________
 |
|
|
|
|
08-18-2012, 10:46 PM
|
#3 |
    
Drives: 2010 RJT 2SS/RS Join Date: May 2012
Location: Staten Island, NY
Posts: 1,354
|
I was gunna do it slightly different then you did, but since I have everything you used I'll try your way 1st
Great write up by the way
|
|
|
|
|
08-19-2012, 09:23 AM
|
#4 |

Drives: 2014 Z/28 #82+#192, 18ZLE 66Nova Join Date: Oct 2008
Location: By the lake in AZ
Posts: 15,719
|
  way to go. way to go.
|
|
|
|
|
08-19-2012, 07:49 PM
|
#5 |
|
Drives: 2010 RJT 2SS/RS Join Date: May 2012
Location: Staten Island, NY
Posts: 1,354
|
I advise against using cotton balls or a soft brissel brush, I used them on the smaller piece and I used the steel wool on the longer piece
The smaller piece came out a lot cloudier then the longer trim, don't know if it was what I used or my technic but that's just my experience hope this helps someone |
|
|
|
|
08-19-2012, 08:17 PM
|
#6 |
|
Oldbie that nobody knows
|
Probably not aggressive enough. No matter what you do, it's gonna look like crap after the initial stripping. I just did my longer passenger side piece today - the clarity begins to come out when you polish it. I had a right bitch of a time stripping the paint on the nooks and crannies of the outer end, man. My hands are killing me and I was worried I might have sanded away too of the texture in that area with the steel wool, but lo and behold, for some reason once the paint is laid on it magically looks perfect.
What color are you painting yours, BTW? RJT? I'd be interested to know how a metallic turned out. Post pics! |
|
|
|
|
08-19-2012, 08:21 PM
|
#7 | |
  
Drives: 2011 RJT Camaro LT2 RS auto shift Join Date: Dec 2011
Location: Washington state
Posts: 1,861
|
Quote:
__________________
 Caddy Caddy |
|
|
|
|
|
08-19-2012, 08:37 PM
|
#8 |
|
Drives: 2010 RJT 2SS/RS Join Date: May 2012
Location: Staten Island, NY
Posts: 1,354
|
Yes I'm doing it RJT
I also jus finished sanding both off, Gunna polish them off 1st thing in the AM since I got the day off, just don't know if I'm Gunna tape off the front or leave it and compound out the overspray but either way I'll be posting pics 
|
|
|
|
|
08-21-2012, 06:18 AM
|
#9 |
|
Oldbie that nobody knows
|
Mike, how are your trim panels going? Mine are complete, and I must say, they change the look of the interior big time! It feels like the car is new again. They look factory! I'll take pics later on, but I would love to know if my DIY helped other people.
Stripping the door panel pieces was SO easy in comparison to the dash pieces. If you let the NPR just pool in the nooks and crannies and crevices for around 45 seconds, it wrinkles up and strips the paint so quick, but you gotta get it off no later and when you're polishing it, make sure to polish it good. The main difficulty with the door panels is that there's a lot more surface for you to forget about stripping the old paint completely. Twice I had to steel wool down spots of the new color to strip away some residual old silver paint I forgot to originally strip and then resprayed the areas. The good thing is, since you're looking at the underside of the paint you're spraying, you can spot correct and it still looks seamless. Still, it goes to show how important it is to remove ALL the old paint. Last edited by nUcLeArEnVoY; 08-21-2012 at 07:39 AM. |
|
|
|
|
08-21-2012, 10:45 AM
|
#10 |
|
Drives: 2010 RJT 2SS/RS Join Date: May 2012
Location: Staten Island, NY
Posts: 1,354
|
Well I have them striped and ready to be painted but I'm also going to be painting my a/c trim and just Gunna do it all at once so hopefully I can have it painted late today
Can't wait to see your door panels, post pics |
|
|
|
|
08-21-2012, 10:52 AM
|
#11 |
 
Drives: Yellow Camaro 2LT RS Join Date: Jun 2012
Location: Brooklyn, NY
Posts: 169
|
Awesome thread I'm deff going to do this
|
|
|
|
|
08-21-2012, 04:44 PM
|
#12 |
|
Oldbie that nobody knows
|
Check it out, guys:
   And the only flaw out of the whole process: 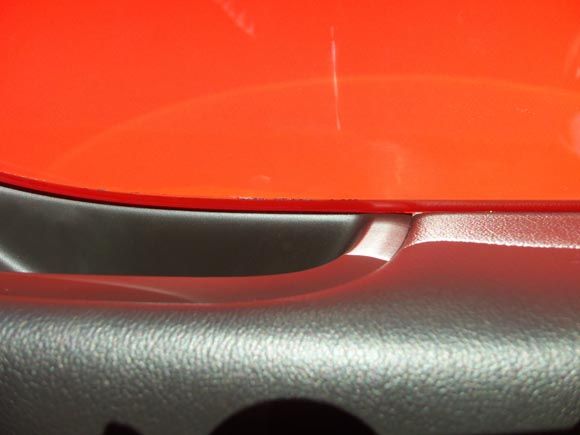 See the little bits of gray on the bottom? I dunno what they are, because it's not old paint. Not gonna lose sleep over it! Looks great, and is finally done! |
|
|
|
|
08-21-2012, 05:06 PM
|
#13 |
|
Drives: 2010 RJT 2SS/RS Join Date: May 2012
Location: Staten Island, NY
Posts: 1,354
|
Did you take the insert off the door panel to do it?
It looks amazing by the way, I gotta hold off a while on the paint for mine :( |
|
|
|
|
08-21-2012, 05:37 PM
|
#14 |

|
Looks fantastic!
__________________
 2013 Hot Wheels 2SS 2013 Hot Wheels 2SS |
|
|
|
|
|
|
|
 |
|
|


