You are browsing camaro5 

|
 02-16-2012, 07:19 PM
|
#43 | |
 
Drives: 2020 Satin Steel 2SS Coupe Join Date: Jan 2011
Location: Springfield, Missouri
Posts: 640
|
Quote:
__________________
2020 Satin Steel 2SS Coupe
|
|

|

|
|
02-16-2012, 08:56 PM
|
#44 | |
 
Drives: 2010 Camaro 2SS Join Date: May 2011
Location: Gardner,Ks
Posts: 490
|
Quote:
__________________
Whipple,custom cam,CAI,Kooks,Pedders and PFADT 626RWHP 549TQ ..
 |
|
|
|
|
|
02-16-2012, 09:02 PM
|
#45 | |
|
CamaroFans.com

|
Quote:
__________________
 |
|
|
|
|
|
02-19-2012, 02:16 PM
|
#46 |
|
Drives: 2020 Satin Steel 2SS Coupe Join Date: Jan 2011
Location: Springfield, Missouri
Posts: 640
|
Sorry I forgot to take pictures, but this what I used to get mine out:
All of this is from Lowe's Hardware Department 6" Full Threaded Bolt - Thread Size 3/8-16 (buy 2 in case the threads get chewed up.) Grade 8 Nuts - 3/8-16 (buy 4 or 5) Grade 8 Washers - 3/8 (buy enough to be able to push the bushing out. Around 10 should be good.) 1 7/8" Hole Saw - (like in PQ's video. I got one made for metal so the teeth dug in to keep it from turning. Just left a few minor scratches) 9/16 Wrench and 9/16 Socket or Ratcheting Wrench to turn/hold the bolt/nut. 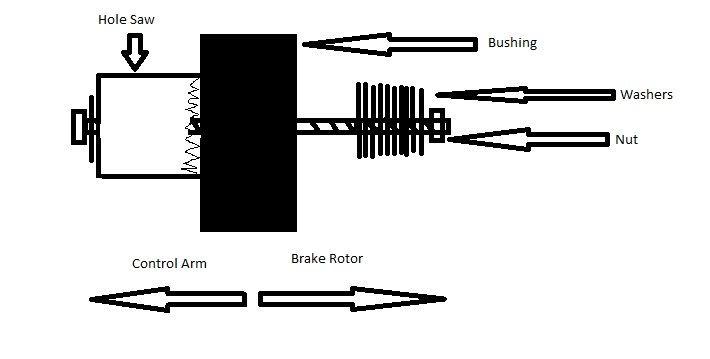
__________________
2020 Satin Steel 2SS Coupe
Last edited by njdad61; 02-20-2012 at 12:48 PM. |
|
|
|
|
02-20-2012, 09:14 AM
|
#47 | |
         
Drives: Race Car Join Date: Sep 2009
Location: Seffner, FL
Posts: 6,226
|
Quote:

|
|
|
|
|
|
02-20-2012, 01:57 PM
|
#48 | |
 
Drives: a M6 LT1 ordered From Becky!!! Join Date: Jan 2010
Location: NJ
Posts: 7,520
 |
Quote:
__________________
"Democracy Dies in Darkness" |
|
|
|
|
|
02-20-2012, 02:28 PM
|
#49 |
|
Drives: 2010 Camaro 2SS Join Date: May 2011
Location: Gardner,Ks
Posts: 490
|
I used a a three prong puller from autozone which you can convert to a two prong. Was pretty easy after I went and got that.
__________________
Whipple,custom cam,CAI,Kooks,Pedders and PFADT 626RWHP 549TQ ..
|
|
|
|
|
02-20-2012, 07:27 PM
|
#50 | |
|
Drives: 2020 Satin Steel 2SS Coupe Join Date: Jan 2011
Location: Springfield, Missouri
Posts: 640
|
Quote:

__________________
2020 Satin Steel 2SS Coupe
|
|
|
|
|
|
02-20-2012, 07:46 PM
|
#51 | |
|
Drives: 2010 Camaro 2SS Join Date: May 2011
Location: Gardner,Ks
Posts: 490
|
That is funny you say that, my son looked at me and said why don't you use the impact thingy. I said because this tool is cheap,and made in china
 Glad I made one smart decision for once. Quote:
__________________
Whipple,custom cam,CAI,Kooks,Pedders and PFADT 626RWHP 549TQ ..
|
|
|
|
|
|
03-04-2012, 02:50 AM
|
#52 |
|
Drives: 2011 2ss/rs Join Date: Nov 2011
Location: Canada
Posts: 1,431
|
Why so many washers needed? Would a 2" hole saw work? And how deep is the bushings? Haven't looked under the car yet and trying to get all parts in order while I'm at work. Got some 3/8 ready rod cut at 6", 8", 10", 12", lengths with 3 different siZe pipe nipples, handful of washers/nuts. Only thing I can't get here is a 1 7/8 hole saw.
|
|
|
|
|
03-04-2012, 04:39 PM
|
#53 |
|
RIP JoePa

Drives: 2010 2SS/RS & 2001 Audi S4 Join Date: Apr 2010
Location: Central PA
Posts: 644
|
I did it with a 2" hole saw and it worked fine. I just got home from the shop doing these and subframe bushings.
__________________
 |
|
|
|
|
03-04-2012, 04:57 PM
|
#54 |
|
Drives: 2011 2ss/rs Join Date: Nov 2011
Location: Canada
Posts: 1,431
|
How did you do the subframe bushings? Were they easy? Use a puller setup too?
|
|
|
|
|
03-04-2012, 06:14 PM
|
#55 | |
|
RIP JoePa
Drives: 2010 2SS/RS & 2001 Audi S4 Join Date: Apr 2010
Location: Central PA
Posts: 644
|
Quote:
__________________
|
|
|
|
|
|
03-04-2012, 06:23 PM
|
#56 | |
|
Drives: 2020 Satin Steel 2SS Coupe Join Date: Jan 2011
Location: Springfield, Missouri
Posts: 640
|
Quote:
__________________
2020 Satin Steel 2SS Coupe
|
|
|
|
|
|
|
|
|
 |
|
|
 Similar Threads
|
||||
| Thread | Thread Starter | Forum | Replies | Last Post |
| Pfadt Trailing Arm Install Help | Agent WD-40 | Suspension / Brakes / Chassis | 13 | 07-12-2011 05:23 PM |
| PFADT Rear Control Arm and Trailing Arm Alignment | NVMYSS | Suspension / Brakes / Chassis | 6 | 05-20-2011 11:16 AM |
| LMPerformance, Spohn Camaro 2010 Tubular Rear Trailing Arms w/ Polyurethane Bushing | LMPerformance | V8 Bolt-Ons & Tunes | 3 | 10-19-2009 03:33 PM |
| 98 camaro z28 torque arm removal | boxmonkeyracing | 4th Generation Camaros | 5 | 06-13-2008 08:02 PM |


 .....
..... 