You are browsing camaro5 
|
|
 10-18-2016, 10:20 AM
|
#897 |
|
'It's an experiment'

Drives: [COTW 2/09/15] '11 GPI LSA SC Z/LE Join Date: May 2014
Location: Dallas TX
Posts: 8,694
|
Had to order stock swaybar mounts as I got rid of my originals when I did the BMR upgrade.
JusticePete noted they are the strongest available. Here are those part numbers: 92195494 sway bar brackets front (GM Calls these Stabilizer brackets) 92227775 sway bar brackets rear Waiting on my order from RDP (trueTrac and LWP)... Learning patience all over again ;o) -Don
__________________
747 RWHP 794 RWTQ
"Horsepower sells cars, torque wins races." - Enzo Ferrari See My Build: http://www.camaro5.com/forums/showthread.php?t=385577 |

|

|
|
10-19-2016, 12:42 PM
|
#898 | |
   Drives: too many to say! Join Date: Nov 2010
Location: S.E. Michigan
Posts: 1,013
|
Quote:
|
|
|
|
|
|
10-19-2016, 04:01 PM
|
#899 |
|
'It's an experiment'
Drives: [COTW 2/09/15] '11 GPI LSA SC Z/LE Join Date: May 2014
Location: Dallas TX
Posts: 8,694
|
From the bottom looking up. The red clip is pointing to the front of the car. That red clip is what pushes the guide from the diffuser up so it hooks in place..
-Don
__________________
747 RWHP 794 RWTQ
"Horsepower sells cars, torque wins races." - Enzo Ferrari See My Build: http://www.camaro5.com/forums/showthread.php?t=385577 Last edited by hammdo; 10-19-2016 at 05:22 PM. |
|
|
|
|
10-19-2016, 11:03 PM
|
#900 |
|
'It's an experiment'
Drives: [COTW 2/09/15] '11 GPI LSA SC Z/LE Join Date: May 2014
Location: Dallas TX
Posts: 8,694
|
Just a quick note. Here are the 'factory' sway bar mounts:
.jpg) The bigger one's (92227775) are the rear mounts. I'll be putting on the rear sway tomorrow -- since everything except the wheels are off. Since I'm waiting on the diff parts, I'll do the oil change and brake flush -- with Castrol SRF! That should be fun to do as I have 2 liters and the Motive Black Label and GM adapter! -Don
__________________
747 RWHP 794 RWTQ
"Horsepower sells cars, torque wins races." - Enzo Ferrari See My Build: http://www.camaro5.com/forums/showthread.php?t=385577 Last edited by hammdo; 12-24-2016 at 05:58 PM. |
|
|
|
|
10-19-2016, 11:07 PM
|
#901 |
|
Boosted Moderator

Drives: Bone Stock LS3 Join Date: Sep 2009
Location: Marion Tx
Posts: 15,491
  |
Yeah, Pete had me go back to the original ones as well... He demonstrated the difference... And as I had broken several mounting bolts... Haven't hurt one since...
__________________
If the car feels like it is on rails, you are probably driving too slow. -Ross Bentley
Horsepower is how fast you hit the wall. Torque is how far you take the wall with you. If everything seems under control, you're just not going fast enough. Mario Andretti If you can turn, you ain't going fast enough... |
|
|
|
|
10-19-2016, 11:22 PM
|
#902 |
|
'It's an experiment'
Drives: [COTW 2/09/15] '11 GPI LSA SC Z/LE Join Date: May 2014
Location: Dallas TX
Posts: 8,694
|
Yeah, we had a great discussion about how good some of the factory components are. I like JP's setup for the sway bars -- after racing @ NCM, I'll 'feel' better knowing the parts are up to the task -- not that I'm A.J. Foyt on the track ;o)
-Don
__________________
747 RWHP 794 RWTQ
"Horsepower sells cars, torque wins races." - Enzo Ferrari See My Build: http://www.camaro5.com/forums/showthread.php?t=385577 |
|
|
|
|
10-21-2016, 11:07 AM
|
#903 |
|
'It's an experiment'
Drives: [COTW 2/09/15] '11 GPI LSA SC Z/LE Join Date: May 2014
Location: Dallas TX
Posts: 8,694
|
Installed JusticePete's rear sway bar this morning using the stock mounts -- I had the 'shorter' bushings so I lubed them up and installed it -- very easy when the exhaust is not in the way ;o)
.jpg) Still waiting on the truTrac so next, I'll bleed the brakes with the Castrol SRF... Nice! -Don
__________________
747 RWHP 794 RWTQ
"Horsepower sells cars, torque wins races." - Enzo Ferrari See My Build: http://www.camaro5.com/forums/showthread.php?t=385577 Last edited by hammdo; 10-21-2016 at 04:11 PM. |
|
|
|
|
10-21-2016, 03:57 PM
|
#904 |
|
'It's an experiment'
Drives: [COTW 2/09/15] '11 GPI LSA SC Z/LE Join Date: May 2014
Location: Dallas TX
Posts: 8,694
|
Did a quick repair using JB Weld to put the plastic pieces back on the absorber. Quick and easy -- not worried about looks, just want to make sure it 'holds' -- use the quick set and was able to put all the pieces (that I found) back on:
.jpg) .jpg) Fixed all of the broken items... -Don
__________________
747 RWHP 794 RWTQ
"Horsepower sells cars, torque wins races." - Enzo Ferrari See My Build: http://www.camaro5.com/forums/showthread.php?t=385577 |
|
|
|
|
10-22-2016, 01:26 AM
|
#905 | |
|
Boosted Moderator
Drives: Bone Stock LS3 Join Date: Sep 2009
Location: Marion Tx
Posts: 15,491
|
Quote:
__________________
If the car feels like it is on rails, you are probably driving too slow. -Ross Bentley
Horsepower is how fast you hit the wall. Torque is how far you take the wall with you. If everything seems under control, you're just not going fast enough. Mario Andretti If you can turn, you ain't going fast enough... |
|
|
|
|
|
10-22-2016, 09:27 AM
|
#906 |
|
'It's an experiment'
Drives: [COTW 2/09/15] '11 GPI LSA SC Z/LE Join Date: May 2014
Location: Dallas TX
Posts: 8,694
|
Yep! Used JB Weld on my Sundowner seat for my Harley to fix the Lanyard. Saved me $300!
-Don
__________________
747 RWHP 794 RWTQ
"Horsepower sells cars, torque wins races." - Enzo Ferrari See My Build: http://www.camaro5.com/forums/showthread.php?t=385577 |
|
|
|
|
10-22-2016, 03:39 PM
|
#907 |
|
'It's an experiment'
Drives: [COTW 2/09/15] '11 GPI LSA SC Z/LE Join Date: May 2014
Location: Dallas TX
Posts: 8,694
|
Tech 2 ABS Brake Bleeding
Today, I used my Tech2 to open up the ABS to allow it to 'bleed' fully.
First, I want to show a hi-rez pic of the Motul 600 after 6 sessions and 2 years in use: 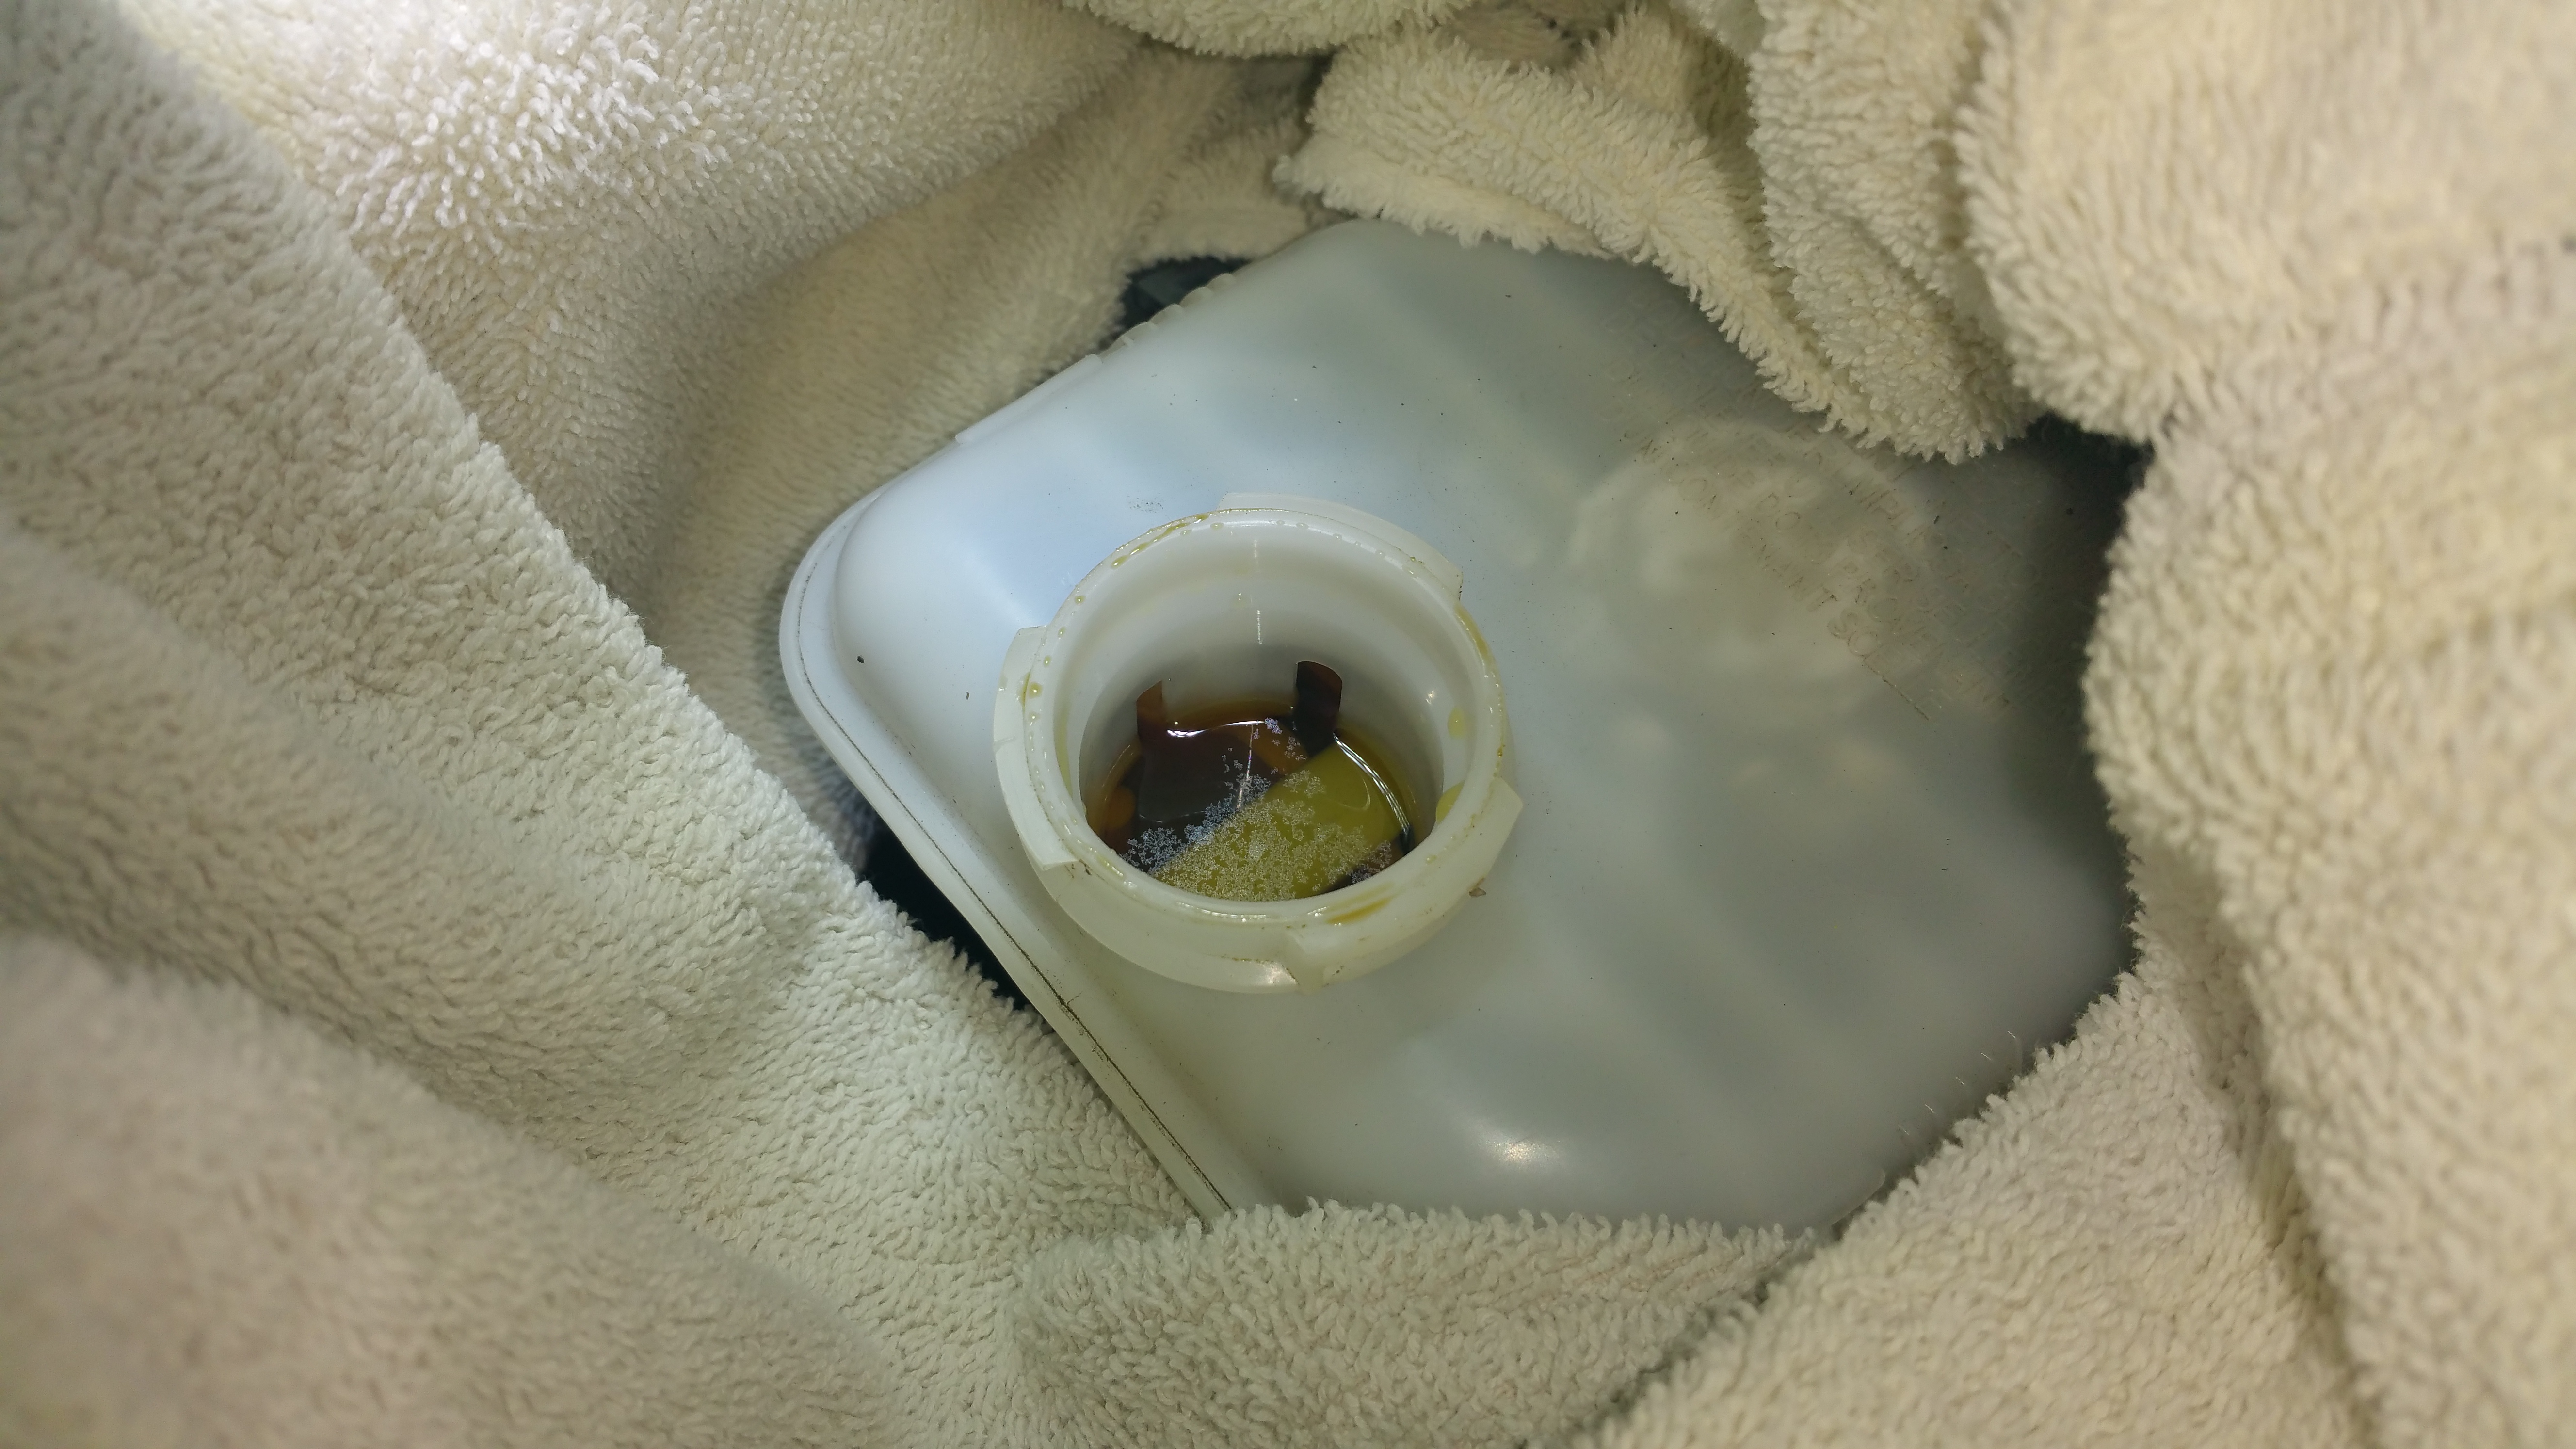 Yeah, U G L Y I use a one man bleeder to remove all the fluid in the master cylinder: .jpg) First fill of the Castrol SRF: .jpg) So, someone ask -- why the Castrol? Its wet boiling point (aged or with moisture). 590° Dry (not opened/new) 518° Wet (aged) Motul 600 is: 594° Dry 421° Wet Wet is what we 'should' be using -- note there is almost a 100° difference! THAT is huge, so, that is the big reason. Motul is about $18 a pint ($36 for a quart/liter), Castrol is $58 a liter (about $22 higher). I have 4 bleeder bottles from Motive and set them up for all 4 wheels so I didn't have to move the bottle when bleeding: .jpg) .jpg) Ready to bleed: .jpg) Bleeder setup: .jpg) Note I used a 'quick' disconnect so I could keep the 'dry' pump primed and was able to remove the master cylinder bleeder cap so I could refill. Here are the part numbers (got them from Amazon): .jpg) https://www.amazon.com/gp/product/B0...?ie=UTF8&psc=1 https://www.amazon.com/gp/product/B0...?ie=UTF8&psc=1 Used Apollo Pex Pinch Clamps from Lowes -- very easy to use (3/8"): https://www.lowes.com/pd/Apollo-10-P...ttings/3130479 And tool: https://www.lowes.com/pd/Apollo-3-8-...Wrench/3572372 Where I got the idea from: http://www.exitthefastlane.com/2013/...oir-brake.html Tech2 Bleeding complete: .jpg) .jpg) While stepping though the steps, you can hear the ABS solenoid cycling for each wheel specified in the Tech 2. Very easy! So, there it is! Basically bleed both caliper 'bleeder' screws during the section for each wheel until fluid was clear. NO BUBBLES during this cycle AND the ABS was bled -- how nice is that... -Don
__________________
747 RWHP 794 RWTQ
"Horsepower sells cars, torque wins races." - Enzo Ferrari See My Build: http://www.camaro5.com/forums/showthread.php?t=385577 Last edited by hammdo; 10-22-2016 at 04:28 PM. |
|
|
|
|
10-22-2016, 04:06 PM
|
#908 |
|
'It's an experiment'
Drives: [COTW 2/09/15] '11 GPI LSA SC Z/LE Join Date: May 2014
Location: Dallas TX
Posts: 8,694
|
These are the Tech 2 Steps I used to get to the ABS bled.
NOTE: USE THIS AT YOUR OWN RISK! First, we are going to use the ZETA platform, but not much is close for the Tech 2, so we'll choose something that will have the options, ( or as close as we can get to that, Caddy CTS Sigma Platform, which has similarities with the ZETA) so: Plug in my Tech 2 and using an external power source, I Chose Diagnostic->2011->Passenger Car->Cadillac->D->CTS->F2: Chassis->F0: Electronic Brake Control Module->F2: Special Functions->F1: Automated Bleed Procedure Follow the Prompts for each wheel. Prepare the pressure bleeder and cycle when instructed. Below are the basic steps in the manual: Perform a manual or pressure bleeding procedure. If the desired brake pedal height results are not achieved, perform the automated bleed procedure below. The procedure cycles the system valves and runs the pump in order to purge the air from the secondary circuits normally closed off during normal base brake operation and bleeding. The automated bleed procedure is recommended when air ingestion is suspected in the secondary circuits, or when the BPMV has been replaced. Automated Bleed Procedure Notice: The Auto Bleed Procedure may be terminated at any time during the process by pressing the EXIT button. No further Scan Tool prompts pertaining to the Auto Bleed procedure will be given. After exiting the bleed procedure, relieve bleed pressure and disconnect bleed equipment per manufacturers instructions. Failure to properly relieve pressure may result in spilled brake fluid causing damage to components and painted surfaces. 1. Raise the vehicle on a suitable support. 2. Remove all four tire and wheel assemblies. 3. Inspect the brake system for leaks and visual damage. Refer to Brake Fluid Loss or Symptoms - Hydraulic Brakes. Repair or replace as needed. 4. Inspect the battery state of charge. 5. Install a scan tool. 6. Turn ON the ignition, with the engine OFF. 7. With the scan tool, establish communications with the EBCM. Select Special Functions. Select Automated Bleed from the Special Functions menu. 8. Bleed the base brake system. 9. Follow the scan tool directions until the desired brake pedal height is achieved. 10. If the bleed procedure is aborted, a malfunction exists. Perform the following steps before resuming the bleed procedure: - If a DTC is detected, refer to Diagnostic Trouble Code (DTC) List and diagnose the appropriate DTC. - If the brake pedal feels spongy, perform the conventional brake bleed procedure again. 11. When the desired pedal height is achieved, press the brake pedal in order to inspect for firmness. 12. Remove the scan tool. 13. Install the tire and wheel assemblies. 14. Inspect the brake fluid level. 15. Road test the vehicle while inspecting that the pedal remains high and firm If no DTCs are present, this image is what you'll see: .jpg) . .After this, you can do 'normal' bleeding without having to bleed the EBCM again... -Don
__________________
747 RWHP 794 RWTQ
"Horsepower sells cars, torque wins races." - Enzo Ferrari See My Build: http://www.camaro5.com/forums/showthread.php?t=385577 Last edited by hammdo; 10-22-2016 at 11:11 PM. |
|
|
|
|
10-23-2016, 09:43 AM
|
#909 | ||
|
'It's an experiment'
Drives: [COTW 2/09/15] '11 GPI LSA SC Z/LE Join Date: May 2014
Location: Dallas TX
Posts: 8,694
|
Reviewing the latest Eaton docs on the truTrac, Synthetic GL5 is now on the recommended list!
PDF is here: http://www.eaton.com/ecm/idcplg?IdcS...me=PCT_1087652 Excerpt: Quote:
I've found this from AC/Delco (no limited slip additive): https://www.amazon.com/ACDelco-10-40...hetic+gear+oil will be looking @ Job Gibbs too: http://www.drivenracingoil.com/dro/l...etic-15965html Looking @ Lucas and AMSOIL too... I'll contact Eaton on Monday to find out what they suggest -- to see if they give me an answer... What would make sense is using the same gear oil the Z28 uses -- since they are both 'Helical' type units. Looking for the oil used in the Z28 now... UPDATE: Quote:
http://www.chevrolet.com/content/dam...PREP_Final.pdf -Don
__________________
747 RWHP 794 RWTQ
"Horsepower sells cars, torque wins races." - Enzo Ferrari See My Build: http://www.camaro5.com/forums/showthread.php?t=385577 Last edited by hammdo; 11-26-2016 at 09:58 AM. |
||
|
|
|
|
10-23-2016, 07:17 PM
|
#910 |
|
Drives: too many to say! Join Date: Nov 2010
Location: S.E. Michigan
Posts: 1,013
|
So, with the shut off connectors you don't have to dump the pressure out of the motive unit when you need to add fluid to the reservoir. ... right? The link you posted seems to say you should dump the pressure. ..am I reading that wrong?
|
|
|
|
|
|
|
|
 |
|
|


.jpg)
