You are browsing camaro5 

|
 05-12-2018, 12:12 AM
|
#2017 |
 
|
Thanks Don.
I've been googlin' my ass off tonight in an effort to begin to understand all the readings these gauges can display. Mah brain is starting to break. So many interconnected functions the readouts and motor performance depend on. So many readouts where the unit of measure isn't specified. For instance, I think, from my research, the MAF Frequency is displayed in Hz but for all I know it could be ms or KHz or... The writers of the manual take it for granted the unit of measure is known. And the MAF frreq ain't the only parameter their descriptions in the manual take that approach. If the ignition timing is being advanced for whatever reason does the knock retard reduce the degrees it was being advanced by the displayed number? Is the BOOST parameter, since, by the manual, measures Intake Vacuum, something I could/should be including in my scans? I could just add it I reckon and see if it appears to be reading anything but, I'm at the point where these readings are way far out of my depth of knowledge and aren't certain adding another parameter wouldn't just send me spiraling into information overload. Haven't been able to find anything definitive on what the FUEL TRIM CELL is actually reading. I pulled up both STFTs and LTFTs, thinking, from some of the reading I did manage to get through about fuel trims, that it would be the total fuel trims but when displaying STFT and LTFT, 0.0 and 2.3 respectively, readings on one gauge and the FUEL TRIM Cell, reading 14, on the other gauge, that appears to be incorrect thinking. Those readings were with the engine not running so may have been a pointless comparison. I'll leave the normal scan mode displaying those three the next time I go for a drive and see if my thinking is truly incorrect or not. At any rate, it's late and I think I'll go out and configure both gauges to scan that BOOST parameter, just to see if it will, have a smoke and cogitate on some of this. Probably won't do much cogitatin' though. Thanks again for your patience and help Don. |

|

|
|
05-12-2018, 08:52 PM
|
#2018 |
|
'It's an experiment'

Drives: [COTW 2/09/15] '11 GPI LSA SC Z/LE Join Date: May 2014
Location: Dallas TX
Posts: 8,694
|
Hendrix Offset Bushings Issue Resolved
As some of you may know, I'm having an issue with the Hendrix offset bushings -- they are 'sliding' on the diff:
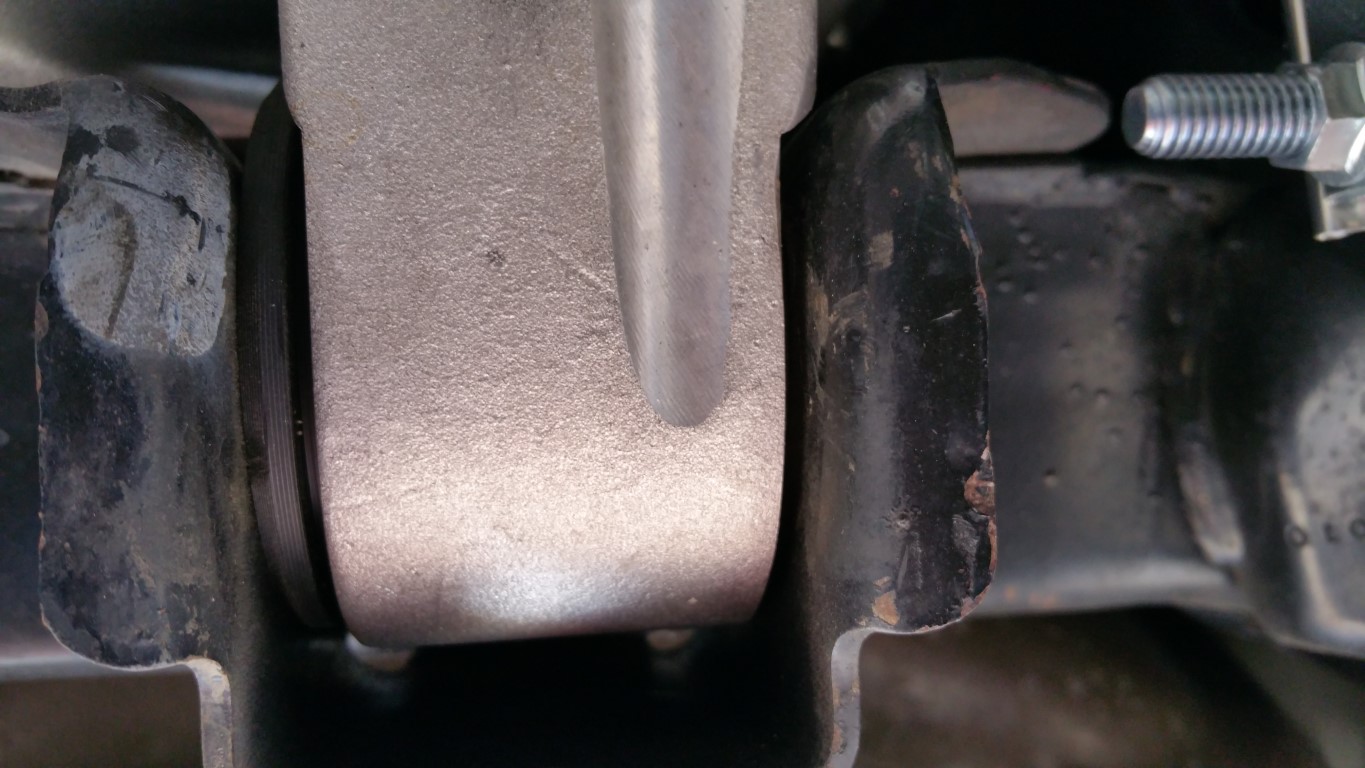 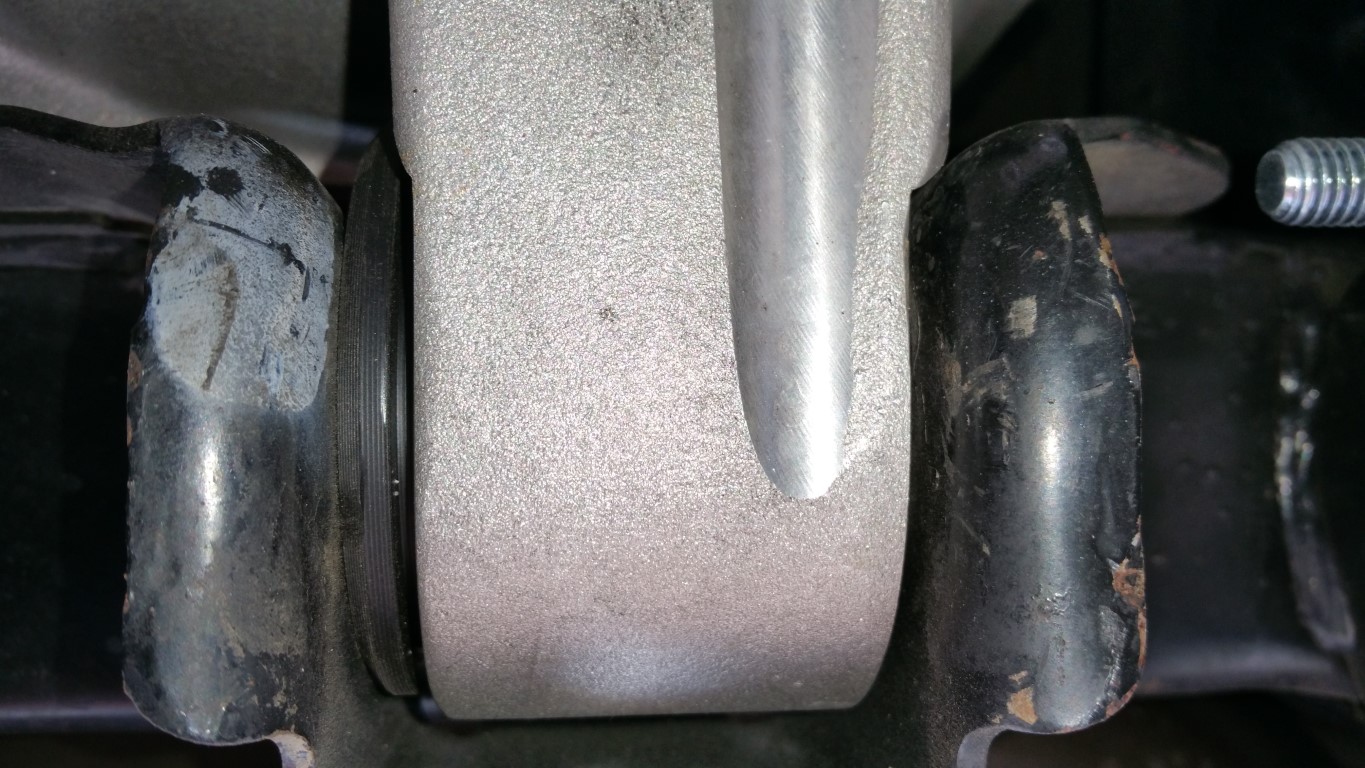 So I pushed them back in and the bushing slipped again. This time, I decided to create a shim to hold the diff from moving on the bushing. First, I used a delrin bushing I had from BMR to as a model to create my shim: 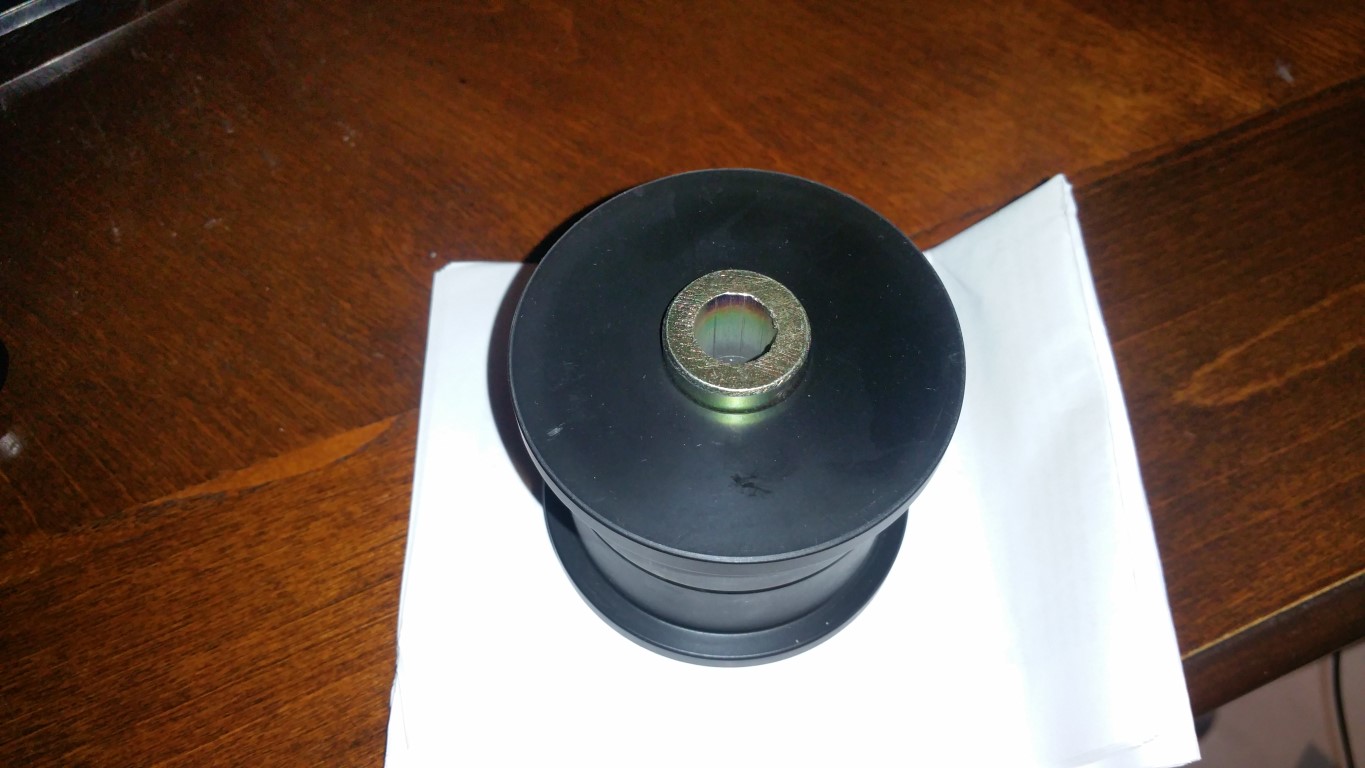 Sorry forgot to take a pic but basically I create a 3/4 moon shape so I could slide the shim in place, and rest on the 'bushing' in a circle. I cut a little over a 1/4 of the area to I had an opening to route the shim -- it basically tapped in and then rested on the bushing. So to continue, I slid the bushing back in place: 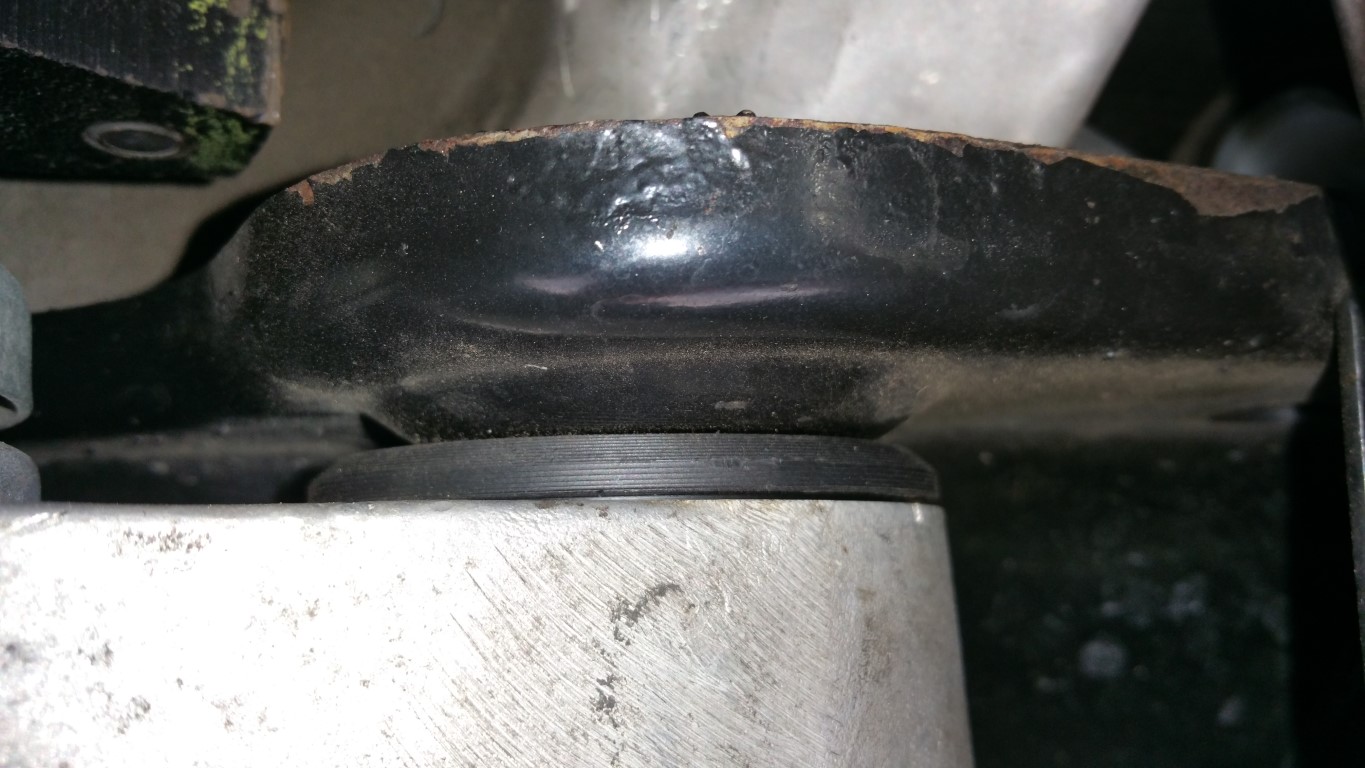 And using a 3/16" 6061 aluminum flat, I created my shim -- just had to clean up the LPW diff cover so I could slide it up. Once I had it formed, I then cut it and tapped it into place (this way, I know the shim would be tight as soon as I got on it): 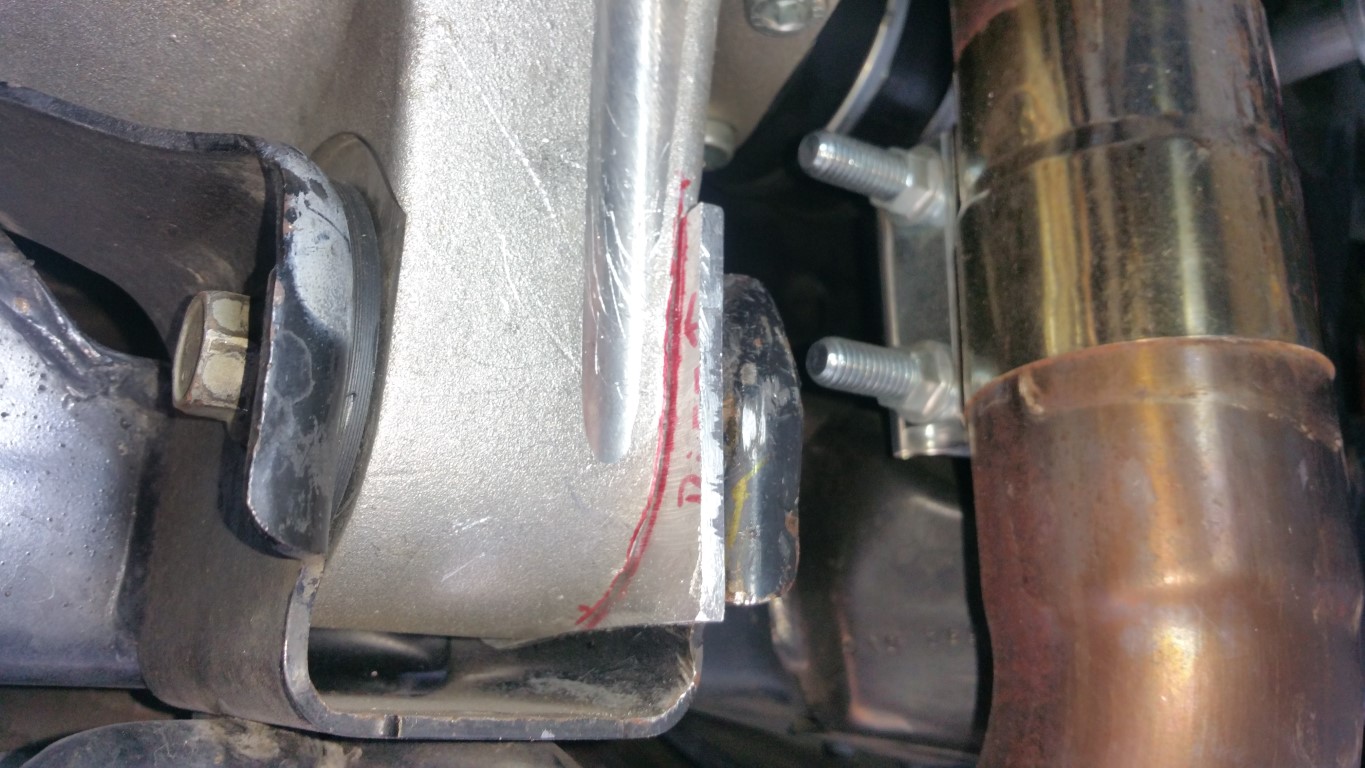 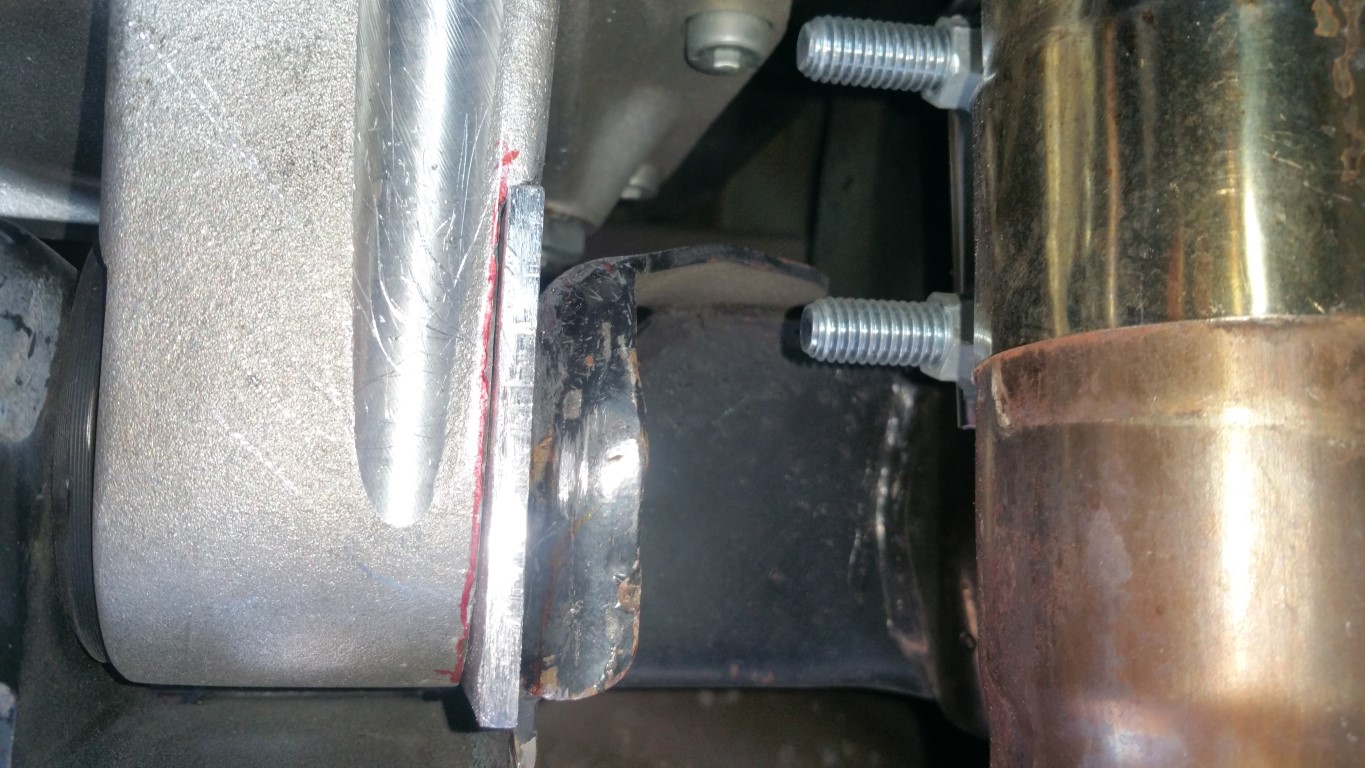 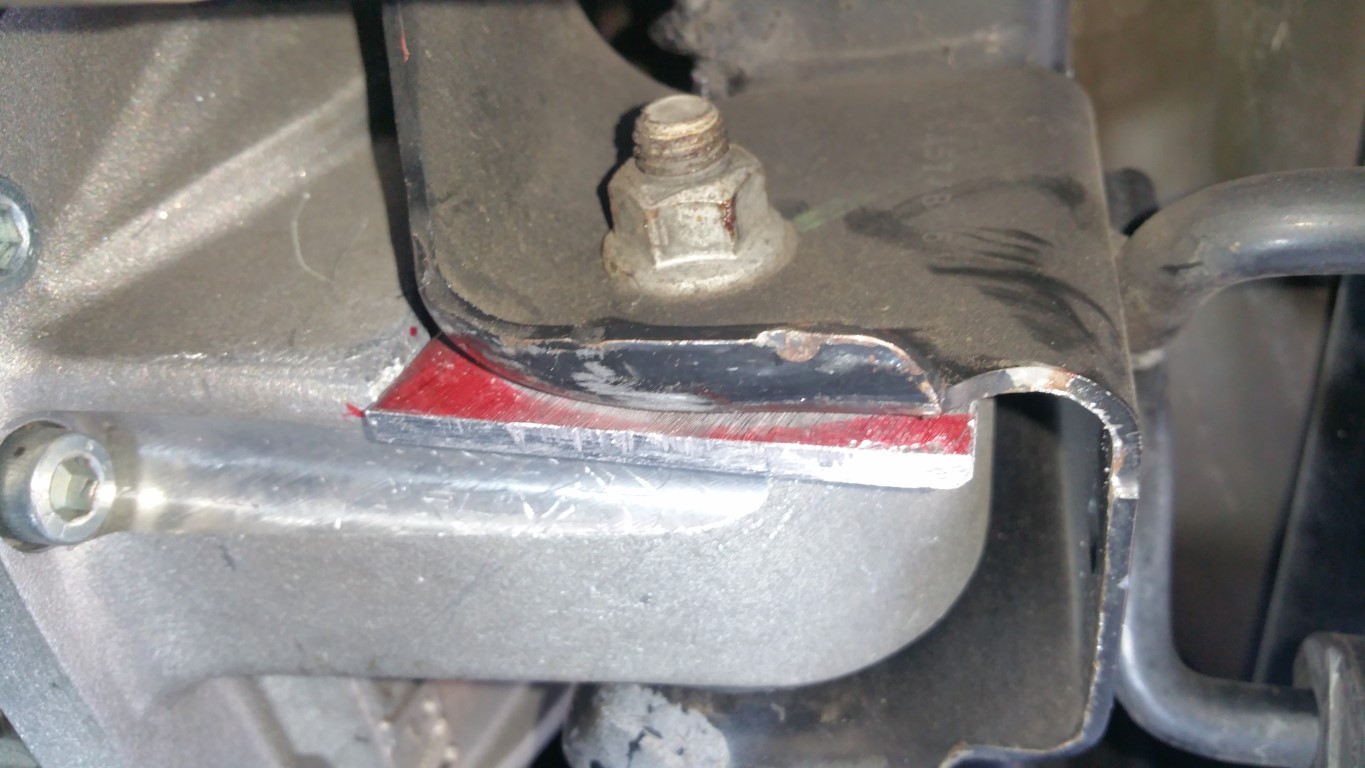 As you can see, the shim fills in the gap and will prevent the LPW from slipping on the bushing. Now to just 'hold' it up there, I used the same aluminum flat and create a 'cover' -- then riveted it in: 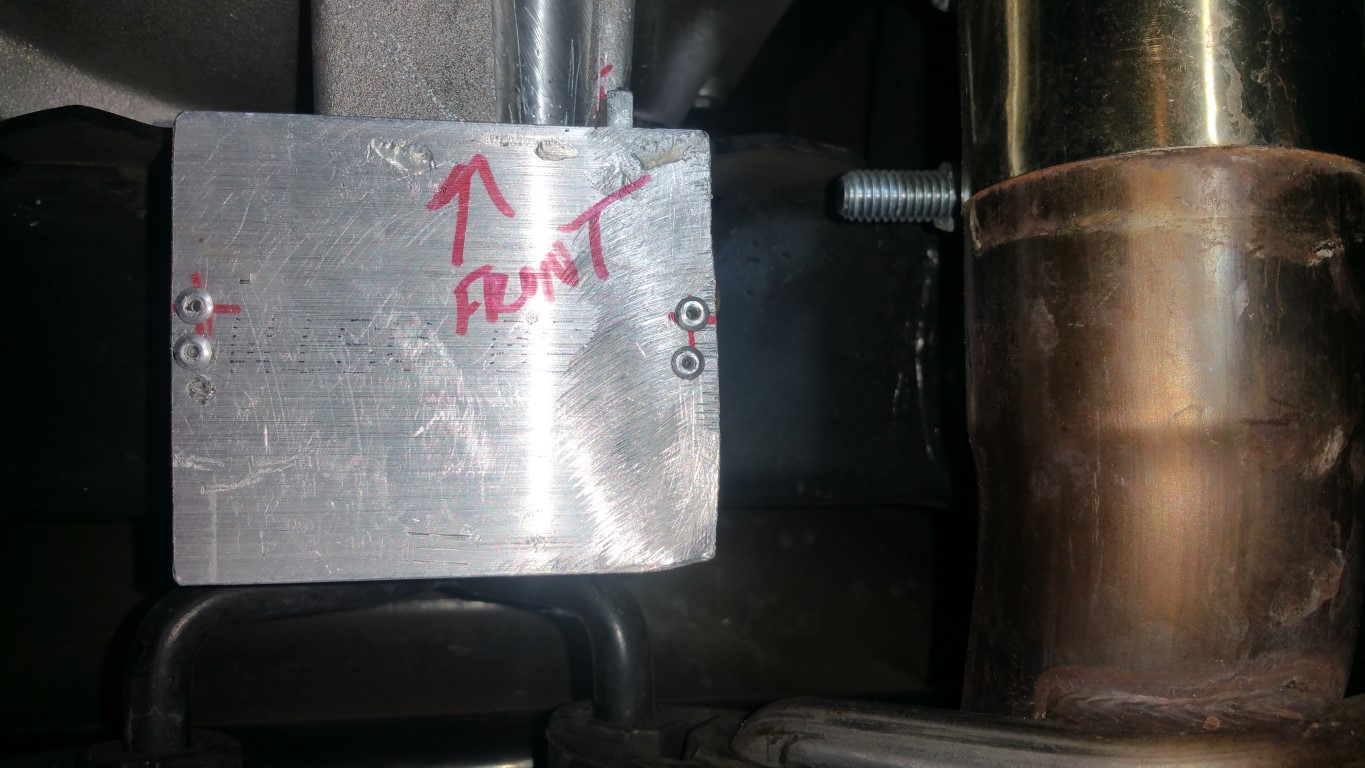 This cover has no load on it, its just to make sure the shim doesn't 'slip' down while racing. It was a TIGHT fit to get the shim up there (on purpose mind you) so I'm confident once I put some torque to it, the shim will be held in tighter. Thomas informed me he's never heard of this before, so I guess no-one has used his bushings for road racing with ~800 RWTQ. I can say for certain, I had no issues with the bushings 'before' the LSA forged install so if you have these and add more power, be on the lookout... Anyway, need to do a test drive and verify this took care of things... Ah racing... -Don
__________________
747 RWHP 794 RWTQ
"Horsepower sells cars, torque wins races." - Enzo Ferrari See My Build: http://www.camaro5.com/forums/showthread.php?t=385577 Last edited by hammdo; 04-03-2019 at 09:48 PM. |
|
|
|
|
05-13-2018, 06:35 AM
|
#2019 |
     
|
Creative fix there Don! Hopefully that doesn't increase the drive noise from the bushings too much.
__________________
2014 Camaro SS L99, Ashen Grey w/Black Leather - Build thread - http://www.camaro5.com/forums/showthread.php?t=491561
Mods - GPI 416 w/Custom Grind Cam, Ported Heads & Tuned by Ben, Mag Heartbeat, ZL1 Fuel Pump & DSX Aux Pump, NW 103 TB, FIC 1650's, Alky Meth, Circle D 3600 Triple Disc, RPM 5 CAI, Kooks Headers, Solo Cat Back, Viking Coil Overs & all the BMR Goodies in the rear, Zl1 3.23 Diff, DSS Axles, Gulfcoast Driveshaft, Hendrix Offset Diff Bushings, AFE Solid Subframe Bushings, 875HP/843TQ 5FDP |
|
|
|
|
05-13-2018, 10:23 AM
|
#2020 |
|
'It's an experiment'
Drives: [COTW 2/09/15] '11 GPI LSA SC Z/LE Join Date: May 2014
Location: Dallas TX
Posts: 8,694
|
It fixed it for sure and no more noise that I can tell but, the best solution would be to reverse the bushing and have the 'hat' side of the bushing on the driver's side -- then, all it would do is 'tighten' up the bushing instead of sliding.
That is probably what I'll do if I pull the diff down again... just reverse the housing bushing -- problem solved! I think that would be a great addition is to have instructions to that effect -- hat on driver's side to prevent sliding... If you notice, I use the LPW to hold the shim in place so it doesn't rock -- I filed a flat spot on the diff cover to make sure it was a very tight fit (light taping was all I needed to put the shim in place). As it stands, this works perfectly and I'll leave it as it is -- besides, I have a 'hat' on both sides now and I KNOW it won't move ;o) As a side note I 'almost' put a vortex generator on my shim cover just for the heck of it ;o) -- you know 'direct' airflow? -Don
__________________
747 RWHP 794 RWTQ
"Horsepower sells cars, torque wins races." - Enzo Ferrari See My Build: http://www.camaro5.com/forums/showthread.php?t=385577 |
|
|
|
|
05-13-2018, 03:50 PM
|
#2021 |
|
'It's an experiment'
Drives: [COTW 2/09/15] '11 GPI LSA SC Z/LE Join Date: May 2014
Location: Dallas TX
Posts: 8,694
|
Picked up a backup set of 1LE struts/shocks with only 3900 miles!
Tom was willing to ship and do goods and services via PayPal so we should be good! I have 24k on my current ones and I already have new shock hats — as well as new front struts.. never hurts to have spares! -Don
__________________
747 RWHP 794 RWTQ
"Horsepower sells cars, torque wins races." - Enzo Ferrari See My Build: http://www.camaro5.com/forums/showthread.php?t=385577 Last edited by hammdo; 05-13-2018 at 04:03 PM. |
|
|
|
|
05-15-2018, 06:44 PM
|
#2022 |
|
'It's an experiment'
Drives: [COTW 2/09/15] '11 GPI LSA SC Z/LE Join Date: May 2014
Location: Dallas TX
Posts: 8,694
|
Signed up for Eagles Canyon event May 26th. My instructor moved me up to the blue group so kinda excited about that!
So far, shim is working great and the oil leak appears solved! Already did most of the track prep. All that I need to do is charge GoPro batteries, road warrior plus, and change to track tires... Fun! Then a break for a bit before CFest! -Don
__________________
747 RWHP 794 RWTQ
"Horsepower sells cars, torque wins races." - Enzo Ferrari See My Build: http://www.camaro5.com/forums/showthread.php?t=385577 |
|
|
|
|
05-19-2018, 07:13 PM
|
#2023 |
|
'It's an experiment'
Drives: [COTW 2/09/15] '11 GPI LSA SC Z/LE Join Date: May 2014
Location: Dallas TX
Posts: 8,694
|
Started track prep today -- decide to inspect all dust cover's (caliper pistons) on the Brembos, Rotor Thickness, and pad thickness.
Have tools coming to validate but, did the left front the 'old school' way (Mic and cardboard to measure pads) and this is what I've found so far: 23k miles on rotors/pads, 6 Track days: Rotors are 34mm new (1.33 in) Min is 32mm (1.26 in) Pads are 9.85 mm new (.38 or 19/50 in). My left front so far is: 33.5 mm (rotor) and 7 mm pad (4.93 mm is the minimum) so, if the other front measures similar, these have quite a while to go before I have to replace (pads still have 2.07 mm and I've only used 2.85 mm so far)! When the pads get to about 5mm, I'll put new ones in just so they handle heat better. I'll get some pics tomorrow once the tools get here... -Don
__________________
747 RWHP 794 RWTQ
"Horsepower sells cars, torque wins races." - Enzo Ferrari See My Build: http://www.camaro5.com/forums/showthread.php?t=385577 |
|
|
|
|
05-20-2018, 05:08 PM
|
#2024 |
|
'It's an experiment'
Drives: [COTW 2/09/15] '11 GPI LSA SC Z/LE Join Date: May 2014
Location: Dallas TX
Posts: 8,694
|
Continuing with track prep, I also purchased these:
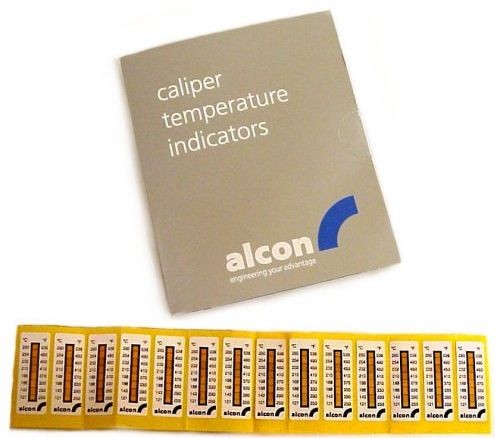 https://alconkits.com/tools-and-supp...-strips-detail they had them in stock (Amazon was unavailable). I'll put one on each caliper to get an idea of the temps -- i'll need to check those right after the session as to avoid 'heat soak' -- this will give me an idea of what my calipers (heat wise) are doing. Now, the other part is the measurements. These are the tools I'm using (all purchases from Amazon): 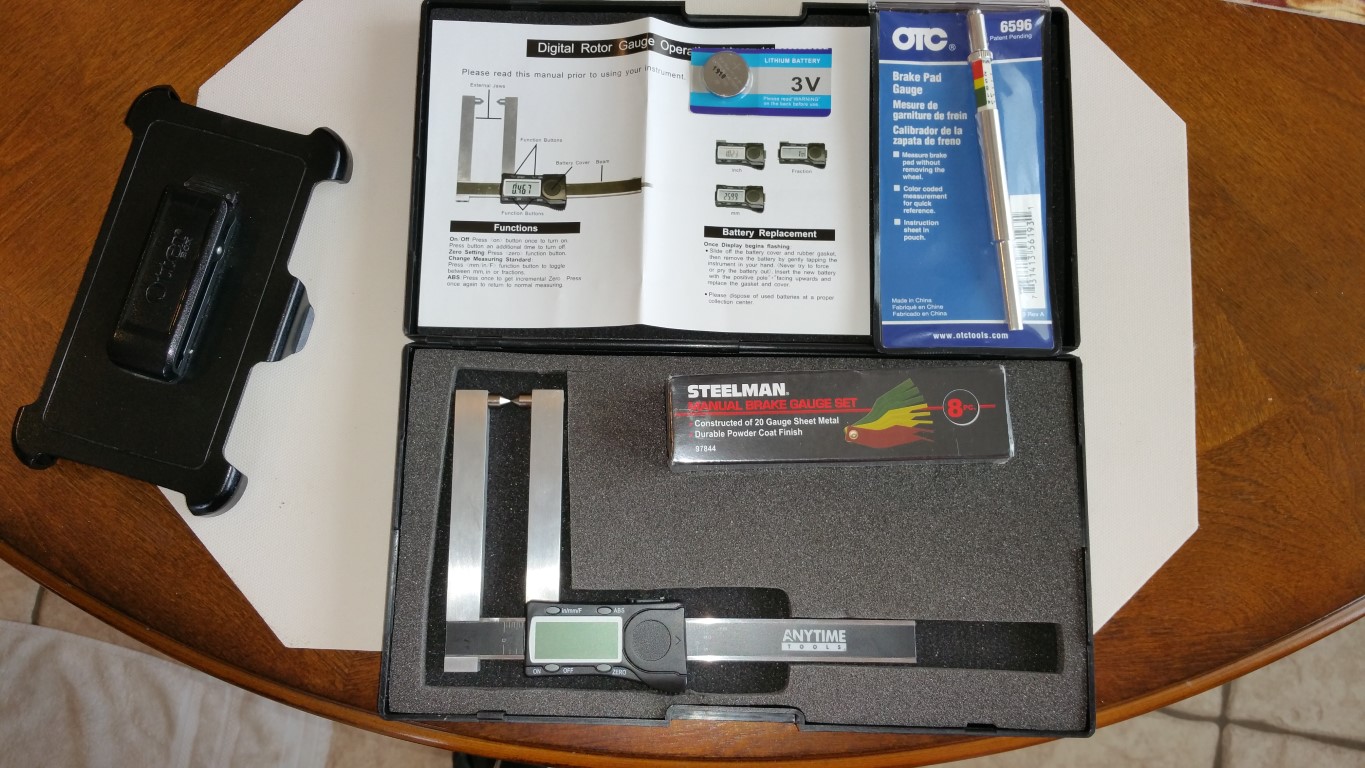 https://www.amazon.com/gp/product/B0...?ie=UTF8&psc=1 https://www.amazon.com/gp/product/B0...?ie=UTF8&psc=1 https://www.amazon.com/gp/product/B0...?ie=UTF8&psc=1 The mic is perfect for measuring the rotor. I do a check in 3 areas (top, middle, bottom) and then I rotate the rotor and check again: example: 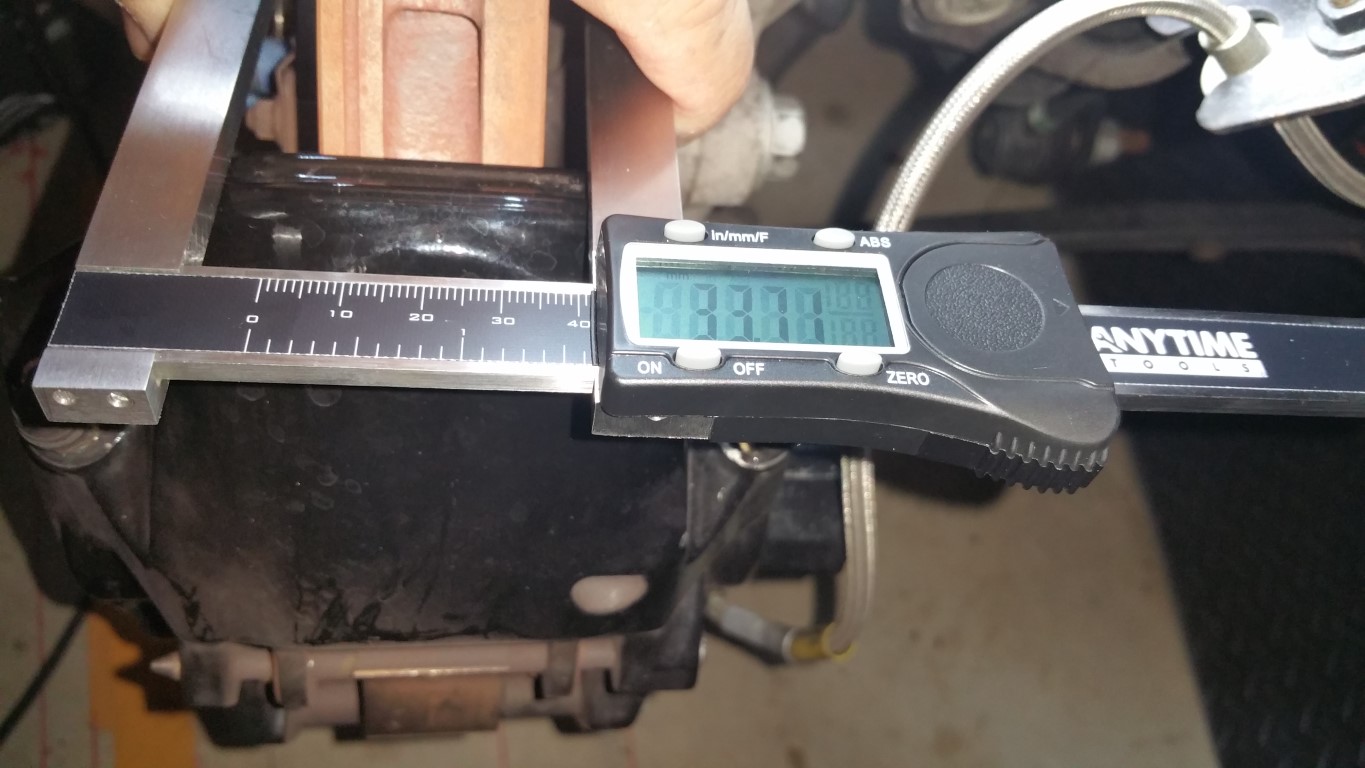 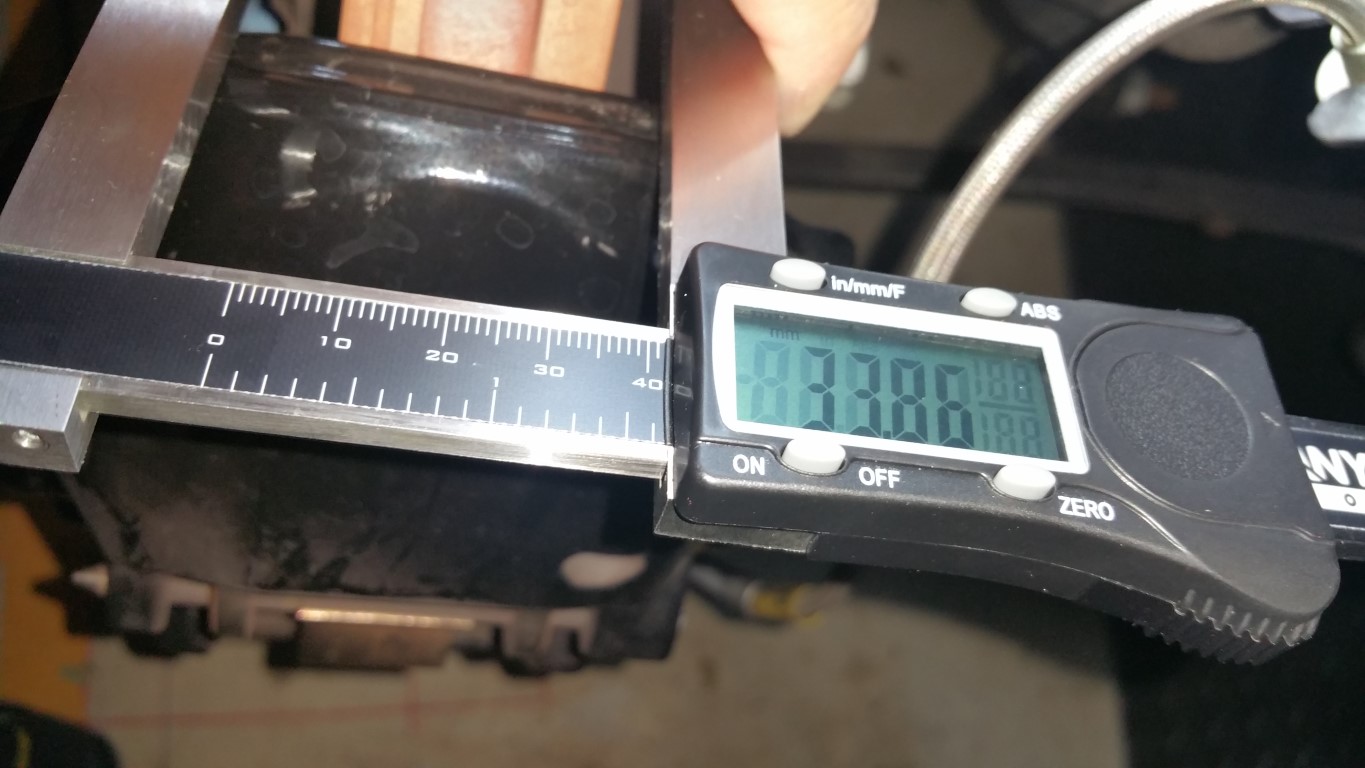 This is nice when I want to be a bit more accurate in measuring the pads: 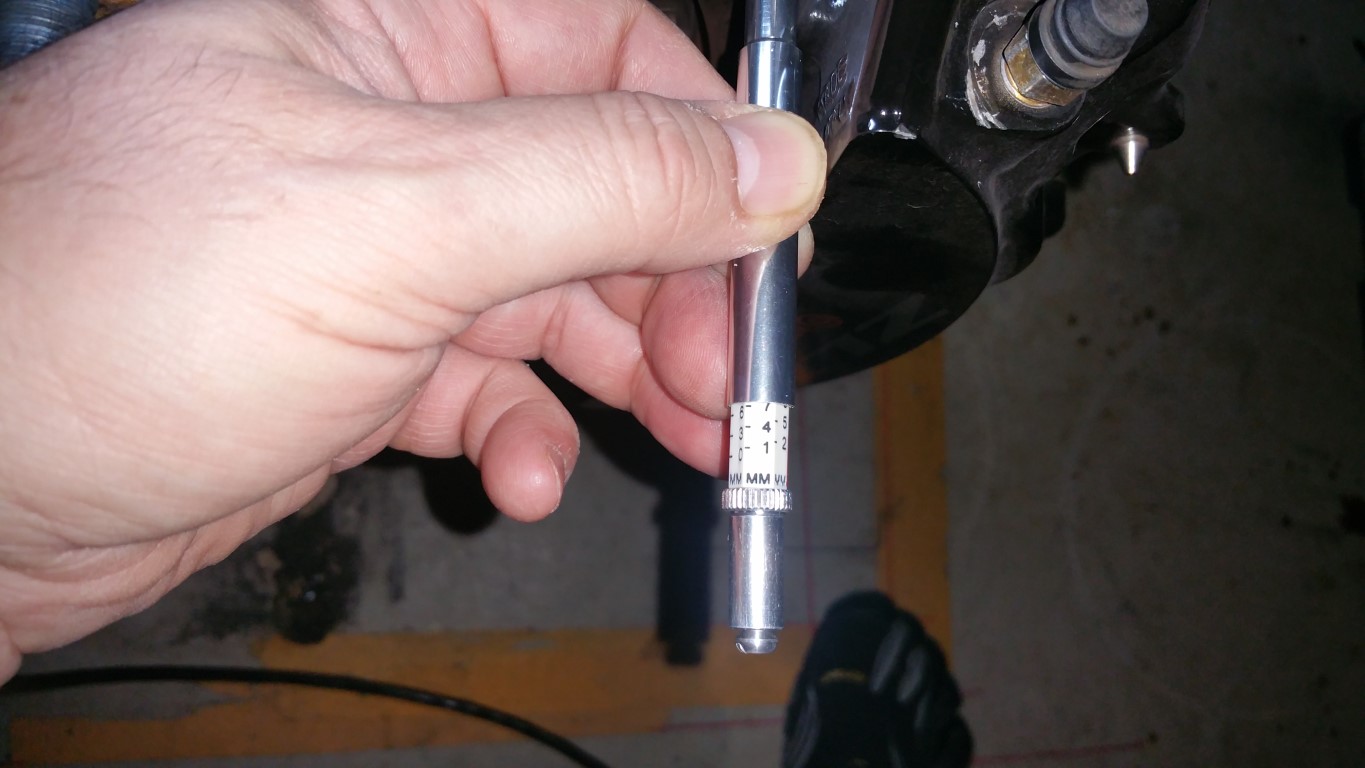 So, with that said, I take the lowest reading and that is my current state. Here are those measurements: Front Rotors: Max is 34mm Min is 32mm Rear Rotors: Max is 28mm, Min is 26mm Front Pads: Max is 9.85mm, 50% is 4.93mm (at that point I'll need to change so I don't overheat the brakes while racing) Rear Pads: Max is 9.50mm, 50% is 4.75mm Here are my current measurements: Left Front: Rotor: 33.71 Outer Pad: 7.00mm Inner Pad: 7.00mm Right Front: Rotor: 33.59 Outer Pad: 7.00mm Inner Pad: 6.50mm Left Rear: Rotor: 27.39mm Outer Pad: 6.00mm Inner Pad: 5.50mm Right Rear: Rotor: 27.38mm Outer Pad: 5.50mm Inner Pad: 5.50mm So, probably after this race, I'll need to install new pads so I can keep my 'safety' margin in place. As a side note, I swapped the wheels -- What I ran on the left I put on the right (LF is now RF) -- just to help on the wear. I mark the last location (Lefts) just to make sure I note the position. I'll consider at that point installing the Gen6 brake heat shields in the front and using the new 'non TTY' caliper bolts I picked up for ZZPerformance... So, once the caliper temp strips get here, I'll put those on and torque the wheels. Then all that will be left is RWP (Road Warrior Plus) and E85 (of course, charging the GoPro and Apex Pro)! Track prep and racing keep the car 'fresh' for me since most of the hard work is done (except the trans -- saving up for that!) -Don
__________________
747 RWHP 794 RWTQ
"Horsepower sells cars, torque wins races." - Enzo Ferrari See My Build: http://www.camaro5.com/forums/showthread.php?t=385577 Last edited by hammdo; 05-20-2018 at 06:56 PM. |
|
|
|
|
05-20-2018, 06:34 PM
|
#2025 |
|
Jan

Drives: 2010 Camaro 1LT Red Jewel tintcoat Join Date: May 2010
Location: Springfield, TN
Posts: 16,225
|
Those little temp things are cool!
__________________
 |
|
|
|
|
05-20-2018, 06:51 PM
|
#2026 |
|
'It's an experiment'
Drives: [COTW 2/09/15] '11 GPI LSA SC Z/LE Join Date: May 2014
Location: Dallas TX
Posts: 8,694
|
They are!
Not a new tech - used them in the past but, for a quick n dirty ck, just what the Dr. ordered. I have the laser but it can be impacted by surrounding areas. Thanks for cking in! -Don
__________________
747 RWHP 794 RWTQ
"Horsepower sells cars, torque wins races." - Enzo Ferrari See My Build: http://www.camaro5.com/forums/showthread.php?t=385577 |
|
|
|
|
05-20-2018, 08:37 PM
|
#2027 |
|
Jan
Drives: 2010 Camaro 1LT Red Jewel tintcoat Join Date: May 2010
Location: Springfield, TN
Posts: 16,225
|
I'll have to look into those. Might relieve some of my worry at NCM.
__________________
|
|
|
|
|
05-20-2018, 08:42 PM
|
#2028 | |
|
'It's an experiment'
Drives: [COTW 2/09/15] '11 GPI LSA SC Z/LE Join Date: May 2014
Location: Dallas TX
Posts: 8,694
|
Quote:
Also great to use on the diff too... -Don
__________________
747 RWHP 794 RWTQ
"Horsepower sells cars, torque wins races." - Enzo Ferrari See My Build: http://www.camaro5.com/forums/showthread.php?t=385577 |
|
|
|
|
|
05-21-2018, 02:29 PM
|
#2029 |
|
'It's an experiment'
Drives: [COTW 2/09/15] '11 GPI LSA SC Z/LE Join Date: May 2014
Location: Dallas TX
Posts: 8,694
|
Backup pair of shocks/struts came in — look like new!
Now I’m covered for quite a while! I expect no more than 50k out of my current set — depending on track abuse ;o). I’ll start gauging how they are at 40k and go from there... Also have my caliper rebuild kits. I’ll be rebuilding the front and rears after my next track day — vented pistons going in the front. Need new banjo washers and my red rubber grease from Castrol and rebuild time! Since I’m tracking more, good time to freshen up things... -Don
__________________
747 RWHP 794 RWTQ
"Horsepower sells cars, torque wins races." - Enzo Ferrari See My Build: http://www.camaro5.com/forums/showthread.php?t=385577 |
|
|
|
|
05-22-2018, 07:47 PM
|
#2030 |
|
'It's an experiment'
Drives: [COTW 2/09/15] '11 GPI LSA SC Z/LE Join Date: May 2014
Location: Dallas TX
Posts: 8,694
|
Ridge collars came in! Won’t have time to do those before race day but, will afterwards. Have a plan on how to do them ...we’ll see!
-Don
__________________
747 RWHP 794 RWTQ
"Horsepower sells cars, torque wins races." - Enzo Ferrari See My Build: http://www.camaro5.com/forums/showthread.php?t=385577 |
|
|
|
|
|
|
|
 |
|
|


