You are browsing camaro5 
|
|
 10-09-2009, 08:17 AM
|
#15 |
|
Dan

Drives: THE BEAST Join Date: Sep 2009
Location: ODESSA,TX
Posts: 336
|
There is a thread about what you asking about..........
|

|

|
|
10-09-2009, 02:26 PM
|
#16 |
   
Drives: 2010 Camaro SS/RS Join Date: Apr 2009
Location: Warrenton, Or.
Posts: 1,062
|
Detector Hook up
It's been done! A little more work, but would be cleaner. http://www.camaro5.com/forums/showthread.php?t=34844
__________________
Jayhawk500
2010 2SS/RS, Six speed, Rally Yellow w/ Black Painted Stripes, Boston Acoustic Stereo, Polished 20" wheels, Solo Mach X Catback Exhaust, Solo HF Cats, Halltech CAI, Full Dash & Door ABL, ABL Lit Homelink Buttons, HUD Installed, Ride Tunes, Full Electric Passenger Seat, Fbodfather signed, VIN # 4492, PAID OFF!!! 2010 Yellow 2SS/RS with black painted Stripes...$37,000.00; Ride Tones sound system and remote...$ 40.00; Seeing the kids faces (Young and Old) light up and almost wet their pants....Priceless!!! |
|
|
|
|
10-24-2009, 11:10 PM
|
#17 |
 
Drives: 2010 Camaro 2SS/RS L99 RJT Join Date: Sep 2009
Location: Knoxville
Posts: 211
|
Powerfreak,
I'm having a hard time getting the invisicord to work. When you say you used the connector end facing the floor is that the end on the mirror or the one on the roof? I can't get power to my V1 and it's getting frustrating. Thanks, Clutch |
|
|
|
|
10-24-2009, 11:15 PM
|
#18 |

Drives: Broken palmghetto test car Join Date: Oct 2009
Location: Balm, FL
Posts: 1,033
 |
My dad did this with his V1 in his 07 Tundra.. I'm not sure how exactly..
|
|
|
|
|
10-25-2009, 12:27 AM
|
#19 | |
|
13.453 @ 101.90
Drives: 2010 Camaro 2LT Rally Yellow Join Date: May 2009
Location: SE Pa.
Posts: 1,877
|
Quote:
|
|
|
|
|
|
10-25-2009, 09:04 AM
|
#20 | |
|
I.AM.

Drives: 2011 2SS/RS/A6 cammed-n-whippled Join Date: Oct 2008
Location: NY
Posts: 2,638
|
Quote:
it's the connector that's clipped onto the windshield. Plug into the bottom of that connector, the end that runs into the mirror.
__________________
NY5thgen.com
|
|
|
|
|
|
06-15-2013, 01:36 PM
|
#21 |
 
Drives: 2013 Camaro ZL-1, Victory Red Join Date: Nov 2009
Location: Fort Worth, TX
Posts: 378
|
Getting the cover back on is proving difficult. I think it's because the negative invisacord probe won't go all the way into the harness connector - see how the black/green invisacord probe doesn't sink in as far as the yellow/red one? - so it juts out a bit and prevents the cover from fitting properly. I'm tempted to cut the invisacord negative probe or maybe cut a bit of the cover to leave room for the protrusion.
Powerfreak's wiring description was on the money. Red is positive and black (it's hard to see the white stripe) is negative. This is unswitched power, which is fine with me. I verified it's 12V, red positive, with a multimeter then with the detector itself. I would recommend a 14" invisacord. Twelve isn't quite enough to mount the Valentine 1 to the right of the mirror and to the right of the dark area on the glass near the mirror. [IMG]  [/IMG] [/IMG]
|
|
|
|
|
06-15-2013, 02:46 PM
|
#22 |

Drives: 2013 Blue Ray 1LS M6 Join Date: Apr 2013
Location: Pittsburgh, PA
Posts: 1,227
|
Here are some pics of my setup.
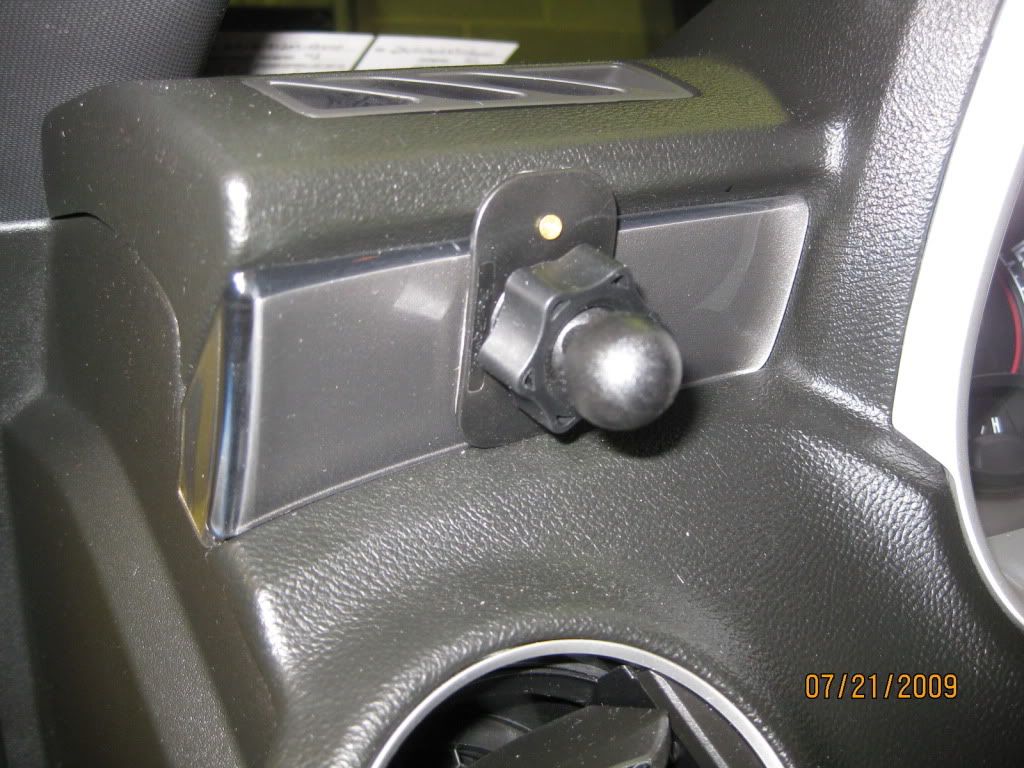
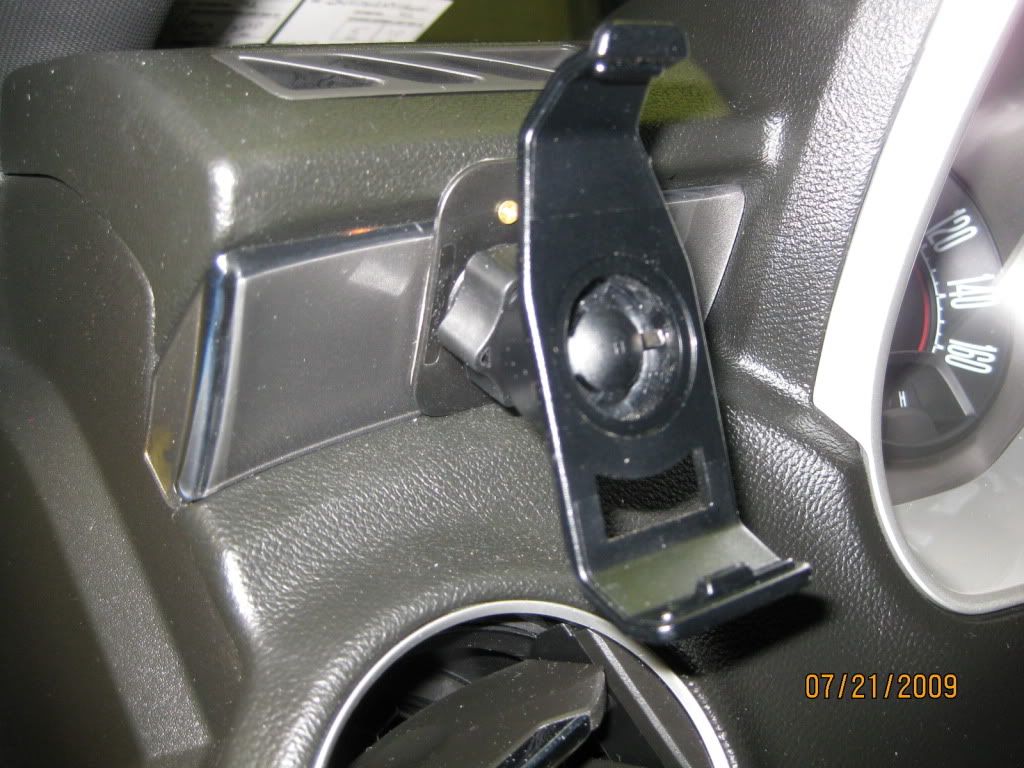
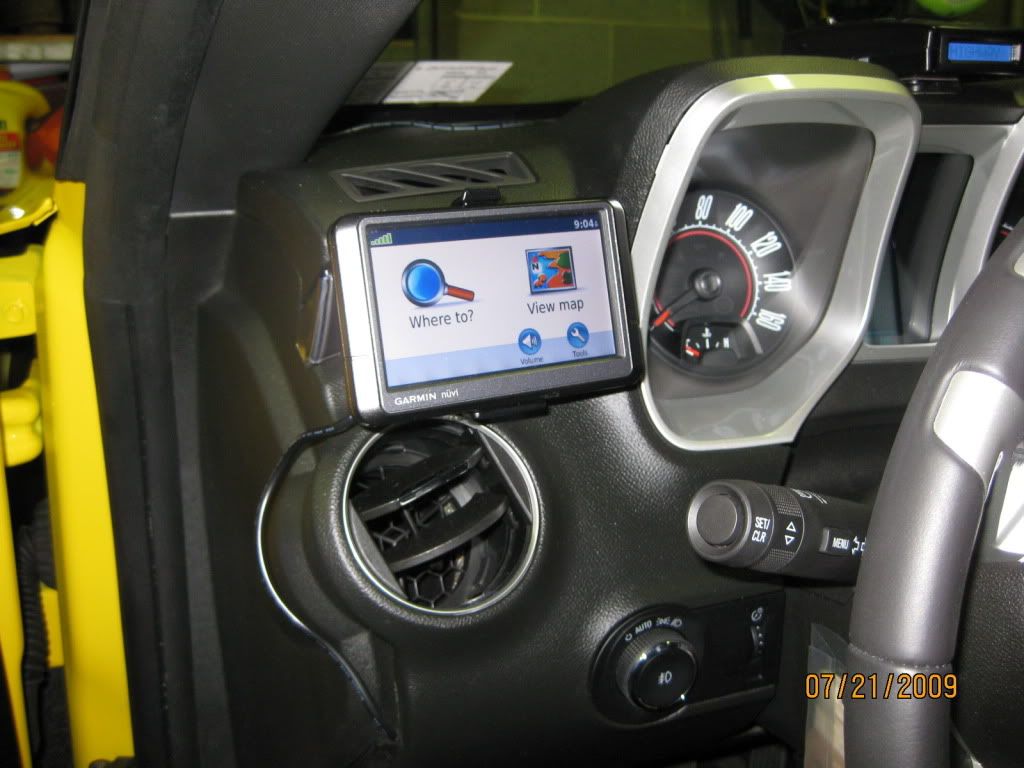
I used 3M VHB clear double sided mounting tape to hold the radar detector bracket to the windshield. I bought a 3' roll of it at the hardware for a few bucks. Holds like crazy. Here's a link to a larger roll online (for reference). http://www.amazon.com/3M-Heavy-Mount.../dp/B0016HGFXW I went to Radio Shack and got a power jack tip to fit my detector. Made a short, custom cable and wired it into the power for the airbag indicator light. At first I tried tapping into the "always hot" side of the dome light power, but for some reason it wasn't enough juice to run the detector, so I tapped into the other wire for the indicator light (soldered and heat shrink for a good connection) The Garmin GPS I mounted to the grey plastic trim on the dash. I bought a spare trim piece from the dealer parts department for $24 in case I ever want to put it back to stock. It required pressing the pin out of the mount to disassemble the suction cup mechanism. Then I cut the bottom of the mount straight across with my Dremel so that it rests on the black part of the dash to support the weight (see pic). Two 4-40 machine screws with washers and nuts hold it to the gray plastic. I wasn't concerned about cutting the GPS mount since all Garmin's use the same 17mm ball mount so it's easily replaceable. As shown in the pic, I carved a small notch in the gray trim piece, again using the Dremel, for the power cord. I did not want to modify the power cord that came with the GPS so I routed it, behind the gray trim piece, to the right side of the dash, and through the last trim clip hole. This way it is completely concealed except behind the GPS itself. This left me with a cigarette plug to plug in on the right end of the dash, where there is no power. If you remove the black plastic endpiece covers at either end of the dash you will see the vent ducts. Remove one bolt each, and they come right off, revealing a structural steel tube that runs from one side of the car to the other. I installed a fuse tap in the fuse block at the left end of the dash. I don't remember the number, but I chose one that turns on and off with the ignition, so that the GPS will follow suit. I ran the power wire from the fuse tap through the steel pipe to the passenger side of the dash. ***BE SURE TO USE TAPE OR SOMETHING TO COVER/SMOOTH THE ENDS OF THE PIPE SO IT WON'T RUB THROUGH THE WIRE.*** I then mounted/wired a 3-way cigarette outlet under the dash above the passenger footwell (near the A pillar). This gave me somewhere to plug in the GPS and also gives me 2 additional outlets if ever needed for anything. The install of both items is very clean and unobtrusive. The radar detector is barely noticeable behind the mirror, when viewed from the driver seat, and it's up high enough that you can hardly see it from the outside. It can see forward just under the black shade area of the windshield. It can see fairly well out of the rear window as well. The ideal location would have been below the mirror, but that was very in the way and blocked a lot of the windshield. This is a good alternative location in my book. The GPS is down out of the windshield as well, but still high enough to easily get a signal. Both are easily reachable without leaning forward at all. Installed both in an afternoon. The worst part was gaining access to the dome light wiring. I think there is another thread about how to get into that so I won't go into detail here. Hope this gives some people some ideas! 
__________________
Performance Mods
Elite Catch Can | CAI Intake with Scoop & Washer Bottle Relocation | MRT v2 Axle-Back Exhaust | MagnaFlow Resonated X-Pipe | Resonator Delete | Vmax Ported Throttle Body | GM Strut Tower Brace | JDP Tow Hook | Vitesse Throttle Controller Aesthetic Mods Chrome Peek-A-Boo Door Handles | Interior Accessories Kit | OEM RS HIDs w/ 6000k Bulbs & 5000k LED Fogs | Tail Light, Marker Light, & Turn Signal Tint | Tru-Sequence Sequential Turn Signals & Brake Lights | Silver Fade Gill Stripes | Carbon Fiber Bowties | Various Chrome/Painted/Carbon Fiber Items |
|
|
|
|
|
|
|
 |
| Thread Tools | |
|
|
 Similar Threads
|
||||
| Thread | Thread Starter | Forum | Replies | Last Post |
| Garmin nuvi > mounting & wiring for the Camaro | 67 GTO | Audio, Video, Bluetooth, Navigation, Radar, Electronics Forum | 25 | 11-05-2011 12:52 PM |
| Anyone have picts/info on the factory infotainment system wiring harness & plugs? | Matt'sSS | Audio, Video, Bluetooth, Navigation, Radar, Electronics Forum | 3 | 10-01-2009 12:48 AM |
| Radar Detector Hardwiring? - Tapping into 12V Accessory | Sloppy Joe | Audio, Video, Bluetooth, Navigation, Radar, Electronics Forum | 0 | 06-23-2009 02:18 PM |
| Hardwire Radar Detector? | mhennick | Audio, Video, Bluetooth, Navigation, Radar, Electronics Forum | 10 | 06-13-2009 10:27 PM |
| Radar detection systems? | DGordon | Audio, Video, Bluetooth, Navigation, Radar, Electronics Forum | 68 | 04-02-2009 09:05 PM |


